its March 2019 and forums still exist
** Redoing this original post - i used facebook links of the pictures and they died. im sorry
I own 3 240's and this is my daily driver , ive daily driven well over half a million miles or more in S chassis's since i got my permit. No savior honda civic, or weekend meets lol, all of it. I have only had some form of a S chassis as means for primary transportation no matter what, thats what I do, ride or die mothaflocka.
The other two S14's being 1j's the beams seemed like a great alternative choice, a couple months research and ordering parts the original swap was completed in 3 days 2 years ago and met my "experimental" budget at about 3000$, it probably costs a but more today or less depending on the market and options for swap parts . I like the iron block, timing belt, high compression dual vvti & 6 speed trans for the price. They are picky with fuel / intake / speed sensor and other quirky things although the Altezza link / ITbs or supercharger is a common options (auto motor is lower compression for turbo and boost )
Ka's are expensive now, I can't get over it. I hate looking at them and working on them, sure they spin the tires but really they are not a very fun motor to enjoy driving with, maybe I have just grown out of them. Sr20s are all crusty and expensive, etc, they can't handle accidents like overheating and also like the KA, timing chain which makes repair a pita, I hate removing front covers with a passion especially nissan stuff. I wanted AC and enough power to pass people on the highway. Then maintain good fuel mileage and have some good times on a back road or two headed out of state. Then drive to work every day all days of the year.. Thats what led me in this direction plus being a unique swap and documenting for the community is always a +1 similar to my original 1jz swapped S12 about a decade ago
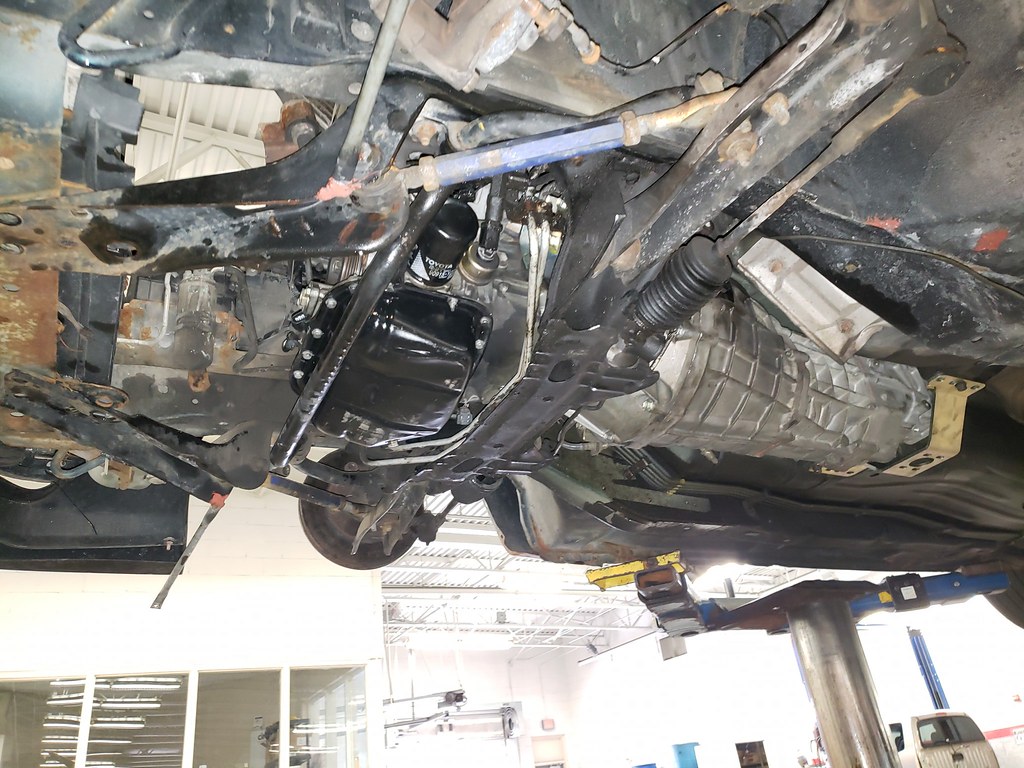
A/C works and power steering bolts up, the mounts are modified excessive mounts. The engine has a natural tilt i have removed so the shifter sits at a slight 5 degree angle. Barely noticeable, the shifter location fits well and the oil pan clears the stock swaybar. No subframe issues at all or hood issues. I did install a slim profile water neck on the back of the engine and cleaned up the bypass hose for optimal clearance to set the engine as far back as possible. Fuel is converted from single feed to the 240s return lines but flared to AN. Then aermotive 340 pump & Tomei regulator
The most complex part of the swap is modifying the headers to clear the column but thays common on most swaps anyways. Wiring is not complicated and I use Torque pro to scan codes and view more data. Stock ecu
The engine is so far back and the top end is incredible, it packs a nice healthy punch from 6 to 8k revs (vtak baby), it really shines on back roads and if your good with rev matching and cornering. Tons of extra control with the engine and the revs. The flywheel is an 11 lb toda flywheel , which is a dramatic loss over the original dual mass 32 lb'r. The intake is SO loud. The motor sounds awesome. Consider two resonators and a muffler to dampen the exhaust so you can hear that intake sing and keep the cops off your back
Flip a Ka's power band upside down and throw 50 horsepower at it and this is generally where your at with the beams on stock form. Although my intentions are just to drive from A to B I wasn't necessarily trying to have a 3rd 1jz swap car and did not want an NA sr20 given the nicer quality of the Toyota unit which is superior in my own opinion
Bottom line is this. Rather then complain or deal with stuff you don't like about the market these days, pave your own way and write down some notes for the next guy. If yall want these cars to stay around then finding lil 4 bangers that fit and run nice sometimes is better then a money pit that can't get you down the road 100k without just oil changes brakes and tires. Not all cars should be intended to be drift cars (coming from a well seasoned veteran) so consider restoring and dailying the car you like so you can enjoy it every day rather then keep it locked up in a garage to be sold because its so valuable. Some day there will be no more Ka's and Sr's that are affordable for the regular enthusiast.
anyways heres a quick brush from what i can remember before i forget. sorry if its not as Buildish as it was before. now all my photos are on flickr
i Paid 900$ for the beams swap - nobody wanted them early 2019 - i always be peepin them 4 cylinder JZ's hiding in the corner of the importer my whole car life, begging for a home
 52993357_10157000446584556_7360219690615963648_o
 by
david bellomo, on Flickr
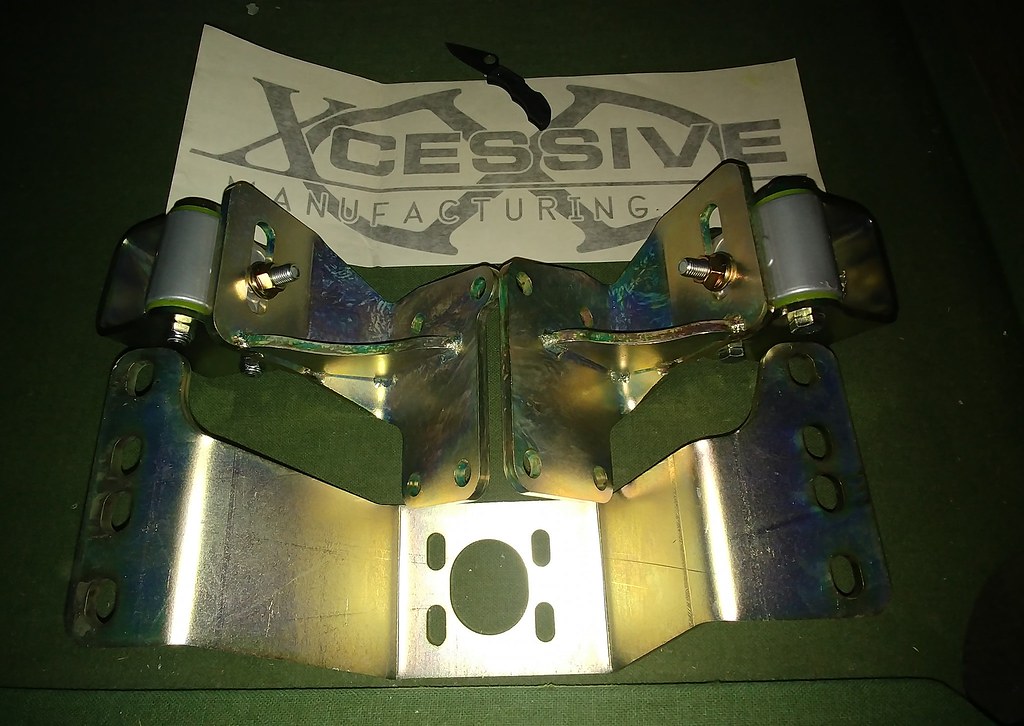
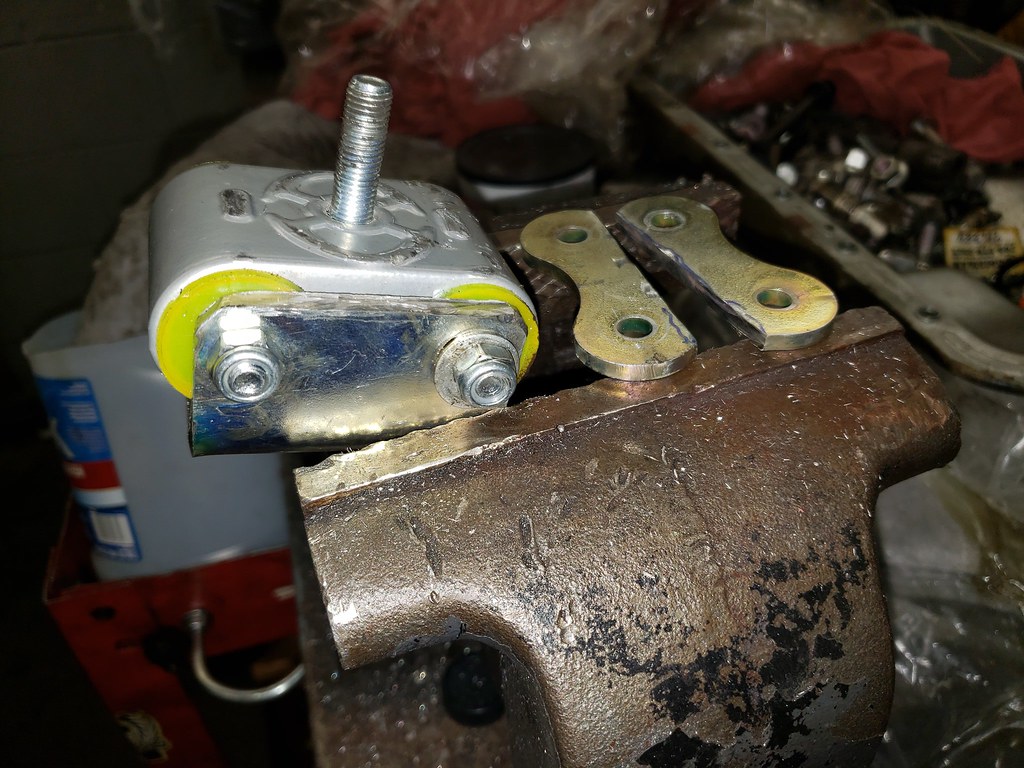
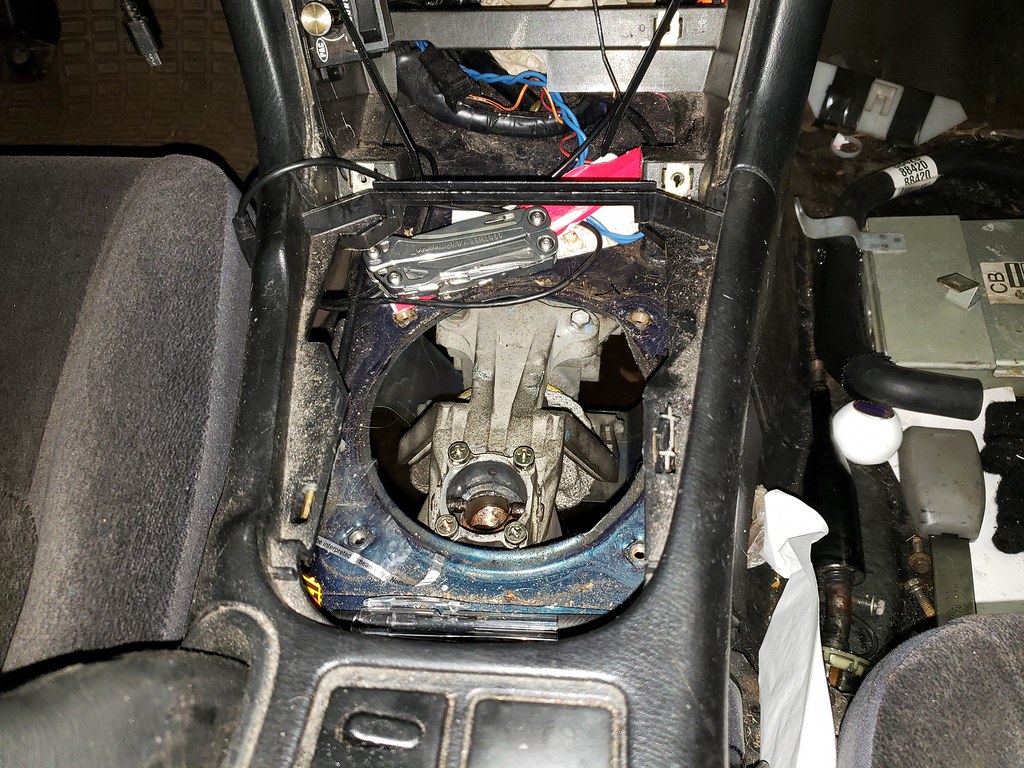
heres the excessive motor mounts, they did not fit , i had to modify the brackets and the mounts to actually even bolt the engine up. i provided information to xcessive and got a pat on the back. thanks guys
 46443416_10156767308719556_8208841057199194112_o
 by
david bellomo, on Flickr
 46458088_10156767308604556_8449863347561562112_o
 by
david bellomo, on Flickr
brackets slotted and dropped the drivers side down like an inch, the trans mount was a slotted 1jz trans bracket
 53050751_10157004602439556_31272442861191168_o
 by
david bellomo, on Flickr
ebay celica intake is a good start for the intake
 41033322_10156594654579556_497156955731656704_n
 by
david bellomo, on Flickr
 40818570_10156594654484556_7280373443969679360_o
 by
david bellomo, on Flickr
various tid bits about parts - ur welcome
battle garage is your friend , they are on ebay too
if your missing a brain box, gs300 is the same. EBayyyyy
 50491055_10156918835109556_195797637650186240_o
 by
david bellomo, on Flickr
 40406658_10156579485769556_4696233437491625984_o
 by
david bellomo, on Flickr
 41111500_10156594653984556_310321325690322944_o
 by
david bellomo, on Flickr
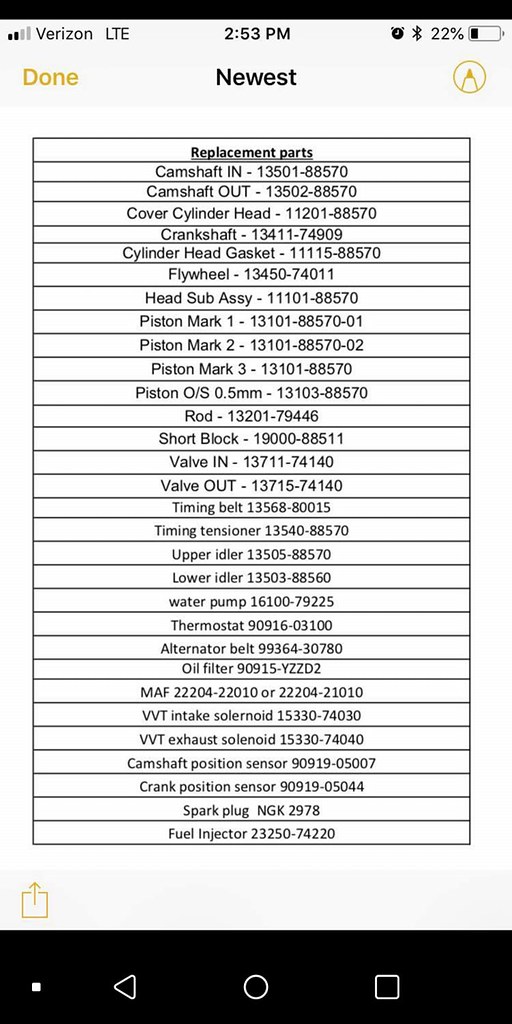
31126 BOOT, CLUTCH RELEASE FORK
31126-14010 1 $16.45
31204 FORK SUB-ASSY, CLUTCH RELEASE
31204-43010 1 $106.83
31210 COVER ASSY, CLUTCH
31210-22150 1 $183.55
31230 BEARING ASSY, CLUTCH RELEASE
31230-53010 1 $50.42
31232A CLIP, RELEASE BEARING HUB
31232-36030 TYPE A:イラストサンシヨウ 1 $2.17
31236B SUPPORT, RELEASE FORK
31236-14010 1 $24.91
31250 DISC ASSY, CLUTCH
31250-53012 1 $164.54
33311W BEARING (FOR INPUT SHAFT)
90363-12004 1 $40.72
90119-08026 *** STD. PART $0.71
16361A BELT, V(FOR FAN & ALTERNATOR)
99364-30780 1 $33.41
44310A BELT, V(FOR VANE PUMP)
Not applicable
88310A BELT, V (COOLER COMPRESSOR TO CRANKSHAFT PULLEY), NO.1
99364-31220 長さ=1220 1 $54.84
11115 GASKET, CYLINDER HEAD
11115-88570
some wire stuff and info
DOWNLOAD THIS!!!!!!!!!!!!!!!!!!!!!!!!!!!!!!!!!!
https://drive.google.com/file/d/1zhd...nGis8F1IS7FJyw
 40513321_10156579485529556_4807179404889292800_o
 by
david bellomo, on Flickr
 40417726_10156579486234556_8605977020700033024_o
 by
david bellomo, on Flickr
 40466568_10156579486354556_3794332318701715456_o
 by
david bellomo, on Flickr
https://www.dorikaze.net/showthread....y_OiyDkpcdanCM
E1, constant power, fused
E8, E10, E16, A6, switched power.
D26, tach, need tach adapter for accuracy/function
B3 and A28 will go to the oxygen sensor (will run without it) but let me know when you get to this. It’ll probably be the very last part of your swap.
All switched wires should be able to run off of your old coil power wire, but I’d recommend using a relay to avoid voltage drop
 49525724_10156876181684556_1057875179721457664_o
 by
david bellomo, on Flickr
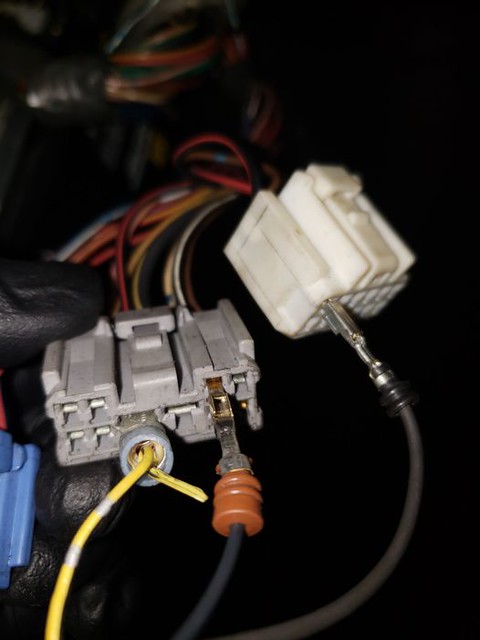
Maf on the right. Injectors and coils on the left. Ontop of powering the ECU and throttle body that's what was left. The maf power plug also has a alternator plug not pictured. It's on the second row down and the second to last pin from left to right . Needs 12 volts as well. *still needs revision to see if the injector and coils need direct power. This worked for me but I read otherwise the ECU powers them
i used a pickup 22r disk and have the part number (there are two part #'s but this one is IT, go to your local toyota and order. yay)
 45193706_10156725751629556_6147545896612528128_o
 by
david bellomo, on Flickr
 45221568_10156725751309556_5004779421270278144_o
 by
david bellomo, on Flickr
wix single feed fuel setup - this got me rolling for a year - i switched it up but to stay timeline correct ill still advise this is the cheapest way to get running, the beams asks for 62 psi and this wa s58 - it worked.
 50234180_10156907854189556_2898316692381761536_o
 by
david bellomo, on Flickr
UM YEA, they make a radiator for a beams swap, well it is for a hachi roku but who cares, its got to fit
 40461148_10156579486484556_3389560311370481664_o
 by
david bellomo, on Flickr
 50775365_10156918795769556_8956741347587391488_o
 by
david bellomo, on Flickr
yes , just slot the mounts and then bore out the bushings with a drill bit, i bent the top mounts to secure it in place

53287700_10157011151259556_610949167891611648_o by
david bellomo, on Flickr
i used the mishimoto hachi fans and included a mishi fan controller that threads into the radiator
 53701942_10157011151154556_4011723475663192064_o
 by
david bellomo, on Flickr
i had 3 days off at work and couple months research and parts ordering, this was the weekend where i tossed it all in and ended up making it happen despite discovering the engine mount issues which set me back a solid 6 hours
BYE KA - NEVER AGAIN
 53364393_10157004602759556_1316843917915717632_o
 by
david bellomo, on Flickr
yea thats a plastic roll cart
 52977657_10157004602644556_3016517293334069248_o
 by
david bellomo, on Flickr
that moment when you know its gonna work ( i had already pre wired and ran the engine on the stand)
 53501965_10157004601859556_4071379420353396736_o
 by
david bellomo, on Flickr
 53320720_10157004602074556_5695634041932349440_o
 by
david bellomo, on Flickr
w58 yoke should work on the J160 6 speed- shaftmasters online set me right
 53146083_10157011151429556_4117591348607975424_o
 by
david bellomo, on Flickr
 53150291_10157011151509556_2857591013617172480_o
 by
david bellomo, on Flickr
so i found this automatic beams altezza down pipe on europe ebay for 50$, shipping was 100$ but i really liked the dual pipes they were easy to weld and configure to get around the steering shaft. this seems to be a popular problem with the beams swap, ur gonna need a welder lol
 53077634_10157004604259556_5398663527592361984_o
 by
david bellomo, on Flickr
Maybe i worked @ a muffler shop in my previous life? just kidding but i was really happy with this exaust, dual resonaters highly reccomended to guys that like to hear the engine and not just the exhaust
 56786223_10157082161314556_2451049982271160320_o
 by
david bellomo, on Flickr
 56922716_10157082161344556_3831874924188794880_o
 by
david bellomo, on Flickr
yea it fits pretty well. i did get the motor further back a tiny bit after this pic.
 53018051_10157004601754556_5310702867953221632_o
 by
david bellomo, on Flickr
p0500 speed sensor code removal - convert your 3 wire signal to 2 wire, output to cluster, then cluster to ecu so ecu gets signal. p0500 effects the timing
 82159153_10157830064174556_5135727747150118912_o
 by
david bellomo, on Flickr
use any "dead" wires to your advantage, aka the original toyota engine harness on the beams to throw power to the engine bay
 82198406_10157830047094556_7906024611333013504_n
 by
david bellomo, on Flickr
tigg'd the a/c lines - wiring is quite simple. screw all that nonsense, run that bish through the triple pressure sensor and cycle the clutch off of that, the beams is eletric throttle so dont forget to power your a/c clutch signal to the power steering pin on the ecu to get some RPM bump, along with triggering your a/c fans if your using the same fan controller as me
 67299935_10157363872059556_1558577648135831552_o
 by
david bellomo, on Flickr
 67387195_10157363871999556_2297935484795486208_o
 by
david bellomo, on Flickr

67406698_10157363871954556_2586219071297028096_o by
david bellomo, on Flickr
AIR FLOW STRAIGHTENER critical, must straighten airflow. use HKS pod or get a straightener. i rivited this in my pipe. guess where i got it "honeycomb"
 54520879_10157035970394556_354534676813053952_o
 by
david bellomo, on Flickr
torque pro
Obd2 port install / using Torque App
- here are the pins you need off the ob2 port plug itself - pins -4, 7, 9 ,13 , 16
Pins off obd2 port to Ecu pins
-Pin 4 is ground ( I just used chassis ground )
-7 goes to pin E11 on the Ecu
-9 goes to pin D26 on Ecu
-13 goes to pin D24 on Ecu
-16 goes to pin E16 or E8 (B+)
Bought this obd2 scanner
https://www.amazon.com/gp/aw/d/B011NSX27A/ref=yo_ii_img...
Picked up one of these obd2 ports off eBay
https://www.amazon.com/gp/aw/d/B01KF0ZQVC/ref=yo_ii_img...
Then. I downloaded torque app
Note - need to change protocol for the beams Ecu to be recognized
Create a profile and scroll all the way to the bottom were it says "very advanced-elm327"
ATTENTION ATTENTION ATTENTION ATTENTION ATTENTION ATTENTION ATTENTION ATTENTION ATTENTION ATTENTION ATTENTION BELOW IS IMPORTANT
Type in - ATIB 96 \n ATIIA 13 \n ATSH8213F0 \n ATSP4 \n 0100 - exactly how it's typed and spaced then save the profile and your all set should link up to Ecu with no issues
 55698651_10157065726544556_7879858562464219136_o
 by
david bellomo, on Flickr
 55788320_10157065726579556_7285388136115339264_o
 by
david bellomo, on Flickr
startup video
https://www.youtube.com/watch?v=MEo90QxIOGk
checked fuel pressure
https://www.youtube.com/watch?v=KJZFCuVSqv0
YAY! happily ever after - close curtains.
 53778714_10157018299579556_1380397807420047360_o
 by
david bellomo, on Flickr
ok, now a year goes by. the beams swap i got was a bad egg. it was consuming a shit load of oil. eventually it started knocking and it threw a bearing on my 3 mile commute home,wow, gay. i have drifted for 10 years beating on cars and never thrown a bearing. i tossed this up as a neglected motor and decided to continue on and source a newer gen beams motor (g3)
i coasted down my street into the driveway where she died

 91505287_10158068222079556_4872631137362509824_o
 by
david bellomo, on Flickr
 91508609_10158068221544556_4753035019931353088_o
 by
david bellomo, on Flickr
of course i organized everything and collected all the parts for the future since i am a long term car enthusiast, i dont really give up and expect to need these parts later, i did trade that stupid block for a blow off valve. yea boi i got ALL major sensors in the trunk.
 91753567_10158068221894556_4848838392932204544_o
 by
david bellomo, on Flickr
my other bitches side to side
 91545440_10158068221749556_5709356136025554944_o
 by
david bellomo, on Flickr
got a new engine, blah blah, thanks market. now they cost 1400$
DO YOURSELF A MASSIVE FAVOR AND DITCH THE STOCK DUAL MASS FLYWHEEL, what a load of garbage, it was so looose and you could feel it driving, this toda 11 lb is freaking great!! the original wheel was 32 lbs
peep the slimline bypass, get it if you want to squeeze the engine back like i did, so you dont rub coolant lines on the firewall and give your self headaches later
 93770289_10158127522454556_88273672560705536_o
 by
david bellomo, on Flickr
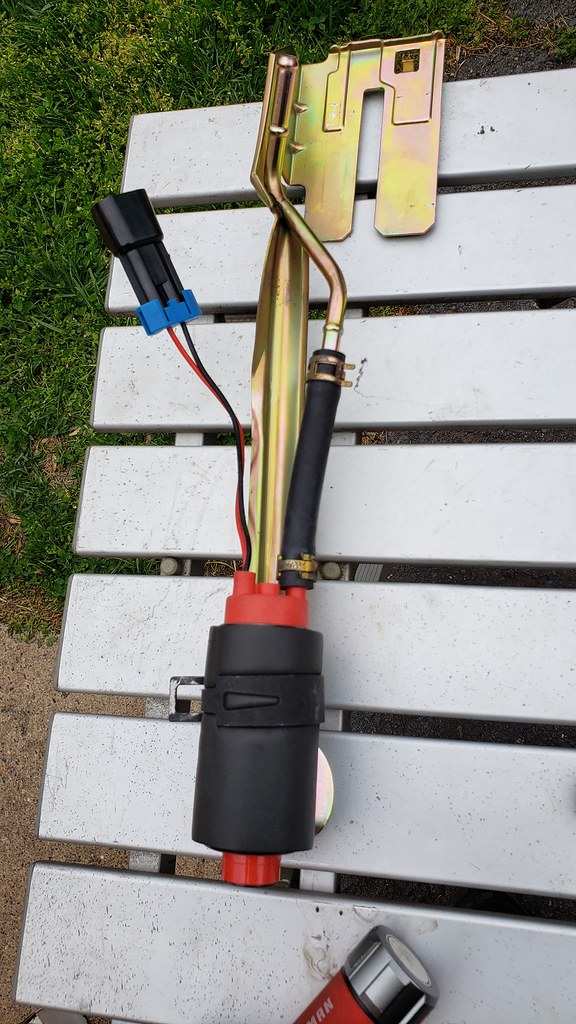
DO YOURSELF A FAVOR AND UPGRADE THE FUEL PUMP, the stock pump sucked!! this aeromnotive 340 made my shit feel way better, i was def running a bit low pressure for a year
 94073899_10158138921119556_5549292673522728960_o
 by
david bellomo, on Flickr
with the new engine at work and my car in the driveway i did some matrix shit and managed to get everything lined up. i bought a 37 degree flare tool (not 45 degree brake line) and flared the stock lines to AN, utilizing a tube nut this is a quality way to ditch all rubber hoses and is safe and secure.
i always remove the pan - engine right side up, and replace main seals and thermostat when putting any motor of mine in
i replace the timing belt but not the timing components or water pump.. its a toyota dude. im just a tech of 10+ years whatever dont listen. plus its a hella easy to work on later and check for other actual problems.
 92912212_10158101493224556_42579180491112448_o
 by
david bellomo, on Flickr
 92755407_10158101493139556_8017581658087620608_o
 by
david bellomo, on Flickr
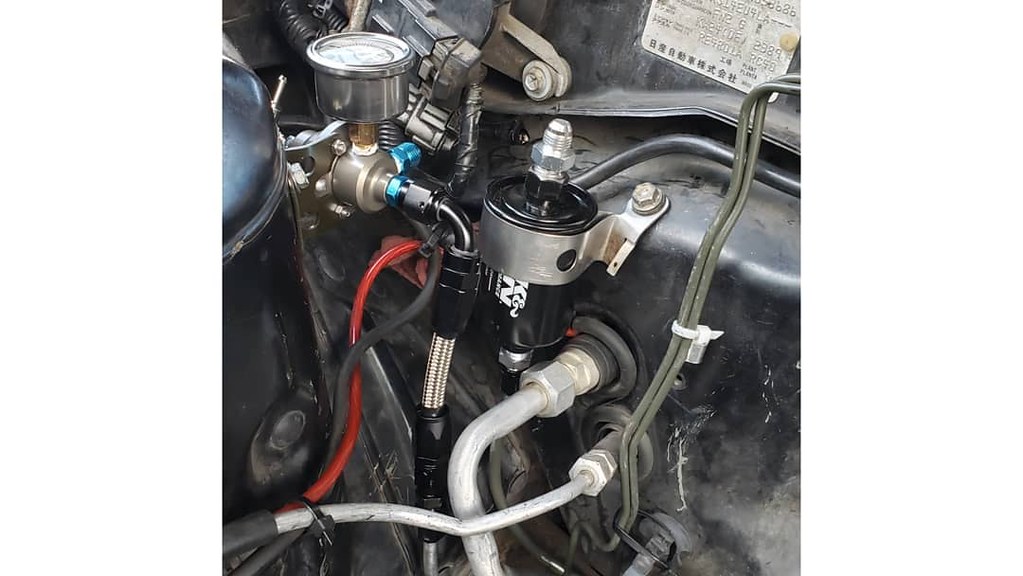
return style now, much better. i love how i got the K&N adapter and the stock lines 37 degreed flare. that filter is like 10 bucks to change later, GM power steering an adapters are what i used to convert the filter to AN
 92572794_10158101492994556_7437629269171240960_o
 by
david bellomo, on Flickr
new motor going in, i had to drive my 7.5 liter f250 for like 2 freagin weeks getting 1mpg

93473302_10158127522519556_8284326348671942656_o by
david bellomo, on Flickr
started a Facebook 240sx beams swap page find it for more info or others interested if u want
-David Bellomo