|
|||||||
| Home | Rules & Guidelines | Register | Member Rides | FAQ | Members List | Social Groups | Calendar | Mark Forums Read |
| Chat General Discussion About The Nissan 240SX and Nissan Z Cars |
 |
|
|
Thread Tools | Display Modes |
 11-17-2007, 01:19 PM
|
#1 |
|
Zilvia FREAK!
 
Join Date: Oct 2003
Location: Long Island, NY
Age: 40
Posts: 1,358
Trader Rating: (0)
  Feedback Score: 0 reviews
  |
bushings!
My subframe bushings were shot, and the collars weren't cutting it anymore, since I had the subframe down I decided to do the rear control arm bushings at the same time. This car sees some autox and eventually id like to try out an HPDE but it's no track car, so adjustable/solid arms was not what I was looking for. I went with nismo subframe bushings and energy suspension polyurethane control arm bushings.
Dropping the subframe, in hindsight I should have left the diff in and used that to drop it from, would have been easier but 2 jacks manage to do it.  The subframe is pretty light without the diff in there =]  Turns out the front 2 bushings were practically ripped in half   Unfortunately I do most of the work by myself so taking pictures while cutting out bushings was not my first thought, but basically: drilled out the rubber around the inner shell, didn't burn any rubber out, then you just cut the outer shell to relieve the tension and tap it out.  I had planned on powder coating everything, but in the end I was short on time, and really just wanted to drive the car so I said fuck it, the rust wasn't that bad on the subframe. The arms/uprights   You could always use a press right? Torrin 10-ton mini press $250 shipped from northern tool with extended warranty.  A 7/8" socket fits perfectly in the arms, so thats what I used to press them out, then just use a large socket to catch the bushing.   It's very important that you align everything properly when doing this, if you are not careful it's possible to shatter a socket under enough load(so I've read), it was easy to tell when something wasn't going to budge, so I just stopped and re centered the socket. Viola!   The A arms were impossible to press out, they have a collar that prevents you from pressing them straight on, so I had to burn/cut them out. The camber/toe arms were the easiest to do since its a straight shot through top to bottom. The uprights took careful positioning and some creative thinking. When installing the new bushings be sure to clean out the arms and use a bit of the supplied grease on the inside of the arm, the outside of the bushing, and the inside of the bushing, as well as the new sleeve that goes inside the bushing. Unfortunately that shit is like glue, so I didn't get a lot of pictures.     All done!   I ran out of battery so I don't have any of the subframe bushings/installation, but it's possible to press ALL of these bushings in using this press and some creativity. A larger (and more expensive) press would probably be easier to use. The best advice i can give when pressing the new bushings is patience and a flat head screw driver, squeezing these bushings into the arms was frustrating, the grease easily gets dirt on it, which you don't want, and the ends of the bushings are quite large and don't seem like they will want to fit. Before installing the subframe I bolted everything to it, installed the diff/axles, and torqued everything down. It seemed much easier to install it as one piece then doing everything under the car. I had a friend help guide the subframe into position under the car and it installed in about 10 minutes. Total time spent was probably ~15 hours of work as pressing the bushings out/in is time consuming. Driving impressions (after getting an alignment): the rear feels solid but not harsh, theres virtually no more noise from the rear (some from the aluminum driveshaft) and the bushings don't make any noise at all. Theres a bit more vibration, especially during decel, but nothing worth complaining about. There probably won't be any more autox this season as its getting quite cold in NY but im certain I will be happy with the results. On a side note, some of you may not know the Moog S14 front ball joints fit perfectly in the rear A arms, and I used the press for that as well. After pressing the subframe bushings, control arm bushings and ball joints, it's certainly seems worth the price for DIY'ers. |

|

|
| Sponsored Links |
|
11-17-2007, 02:41 PM
|
#4 |
|
Zilvia Junkie
 Join Date: Jul 2007
Location: Long Island, NY
Age: 40
Posts: 568
Trader Rating: (0)
  Feedback Score: 0 reviews
|
that press is awesome!!! i want one. i have the same exact bushing set for the entire rear for my s13 but i will be doing this in the spring. nice writeup. did you use like a sawzall to cut the metal sleeve out?
__________________
1993 KA24DE for sale with 180k..running when pulled.... need to get rid of ASAP...i'm moving |
|
|
|
|
11-17-2007, 03:13 PM
|
#5 | |
|
The Architect.
 
Join Date: May 2006
Location: Los Angeles, CA
Posts: 11,535
Trader Rating: (392)
Feedback Score: 392 reviews
|
That's awesome.
I should be doing this soon. Probably after I pick up another daily so I won't have to rush things. 
__________________
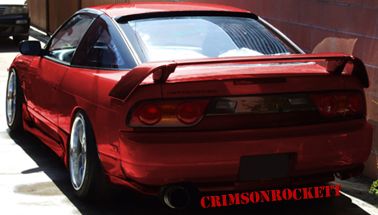 -Jspec- Instagram/CrimsonRockett Quote:
|
|
|
|
|
|
11-17-2007, 03:27 PM
|
#6 | |
|
Zilvia FREAK!
Join Date: Oct 2003
Location: Long Island, NY
Age: 40
Posts: 1,358
Trader Rating: (0)
Feedback Score: 0 reviews
|
Quote:
|
|
|
|
|
|
11-17-2007, 05:42 PM
|
#7 |
|
Post Whore!
 
|
did you reinstall the collar spacers after changing the subframe bushings?
i'm about to dive headfirst into this bushing game, seems like a bitch, but it will be worth it in the end.
__________________
|
|
|
|
|
11-17-2007, 06:01 PM
|
#9 | |
|
Zilvia FREAK!
Join Date: Oct 2003
Location: Long Island, NY
Age: 40
Posts: 1,358
Trader Rating: (0)
Feedback Score: 0 reviews
|
Quote:
|
|
|
|
|
|
11-18-2007, 10:09 AM
|
#12 |
|
Nissanaholic!
 
Join Date: Mar 2006
Location: Philadelphia suburbs
Age: 40
Posts: 2,347
Trader Rating: (7)
Feedback Score: 7 reviews
|
I am interested in hearing about how much of a difference these make...
I have replaced every single control arm or suspension piece on my car with pillow ball stuff, but nontheless, the spindle bushings and control arm bushings are still stock. My car is damn stiff, and I don't feel any compliance....I would like to know how much of a difference you guys feel due to the NEW BUSHINGS alone... PS I already have subframe collars....they are amazing of course
__________________
 Daily driven |
|
|
|
|
11-18-2007, 10:48 AM
|
#13 | |
|
Zilvia FREAK!
Join Date: Oct 2003
Location: Long Island, NY
Age: 40
Posts: 1,358
Trader Rating: (0)
Feedback Score: 0 reviews
|
Quote:
|
|
|
|
|
|
11-18-2007, 07:40 PM
|
#14 |
|
Join Date: Jan 2007
Location: Greensboro, nc.
Posts: 25
Trader Rating: (0)
Feedback Score: 0 reviews
|
Nice writeup! I am actually about to do this tuesday. I have my subframe out and some of the bushings out. I have already put in my subframe alluminum bushings. I cant wait to get this done and have the damn subframe back on the car
 I will deff be using your thread to help me out if needed thanks!! I will deff be using your thread to help me out if needed thanks!! |
|
|
|
|
11-19-2007, 10:19 AM
|
#15 |
|
Nissanaholic!
Join Date: Dec 2003
Location: In a place, near a river, over a lake
Age: 38
Posts: 2,415
Trader Rating: (22)
Feedback Score: 22 reviews
|
Nice!!!! Iknow what you mean about the aluminum drveshaft though... sure does make the rear end louder under decel.
__________________
Fu*king ginger bread man stole my wallet... SHIFTlock_slide to side d3m3rs0n: if i have a baby im naming it Brandons Fault Emerson |
|
|
|
|
11-19-2007, 10:35 AM
|
#17 |
|
Zilvia Junkie
Join Date: Jul 2006
Location: Nor VA
Age: 39
Posts: 500
Trader Rating: (0)
Feedback Score: 0 reviews
|
I did the nismo rear subframe bushings also.... pain in the ass but well worth it.... I wanted to avoid going solid on the bushings since a DD my s13... nismo ones workout perfect
|
|
|
|
|
11-19-2007, 02:21 PM
|
#18 | |
|
Zilvia Junkie
|
Quote:
 I only ended up using the bushings for the spindles in the rear, the subframe collars were a joke and i ended up going with aluminum. I only ended up using the bushings for the spindles in the rear, the subframe collars were a joke and i ended up going with aluminum. 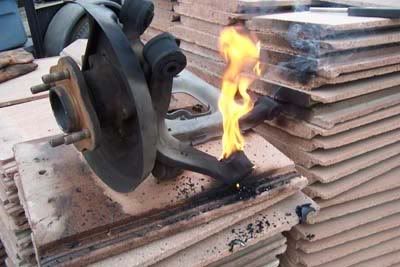 |
|
|
|
|
|
11-19-2007, 02:37 PM
|
#20 |
|
LAID OUT

Join Date: Mar 2004
Location: LAS VEGAS
Age: 43
Posts: 2,015
Trader Rating: (1)
Feedback Score: 1 reviews
|
Nice thread! And nice press that will definitely come in handy for future projects.
In december I'll be doing a similar project... Picking up a new used s13 subframe, going solid bushings, poly bushings on the uprights (already have brand new ball joints), multi link, z32 ebrake/hubs/calipers. Everything I've read is not making me look forward to getting the old bushings out... Shouldn't be too bad doing it at my fabricator's shop though.... Any other tips/advice? |
|
|
|
|
11-19-2007, 02:58 PM
|
#21 | |
|
Zilvia FREAK!
Join Date: Oct 2003
Location: Long Island, NY
Age: 40
Posts: 1,358
Trader Rating: (0)
Feedback Score: 0 reviews
|
Quote:
As long as you have patience and take your time pressing the new bushings in is easier then getting them out as it doesn't take as much force, you could use a vice to hold them in place with a large enough press, and just use a flat head to help coax the large bushing ends in. Patience, time, and a clean work area (for when the greased up bushings fall while trying to press them in). Good luck, and take some pics  |
|
|
|
|
|
11-19-2007, 03:34 PM
|
#23 |
|
Guild of Skullduggerous Intent

|
Nice job!
Have done it before on my first hatch and about to start doing it on my new (to me) S14. Only I'm starting with the front. Got the Master Bushing set from ES but it doesn't come with the all the bushings needed...  ... good thing I have accumulated random extra poly ones over the years. ... good thing I have accumulated random extra poly ones over the years. |
|
|
|
|
11-19-2007, 04:35 PM
|
#24 | |
|
Zilvia FREAK!
Join Date: Oct 2003
Location: Long Island, NY
Age: 40
Posts: 1,358
Trader Rating: (0)
Feedback Score: 0 reviews
|
Quote:
|
|
|
|
|
|
11-19-2007, 05:00 PM
|
#26 | |
|
Post Whore!
Join Date: Sep 2002
Location: Arden, NC
Age: 40
Posts: 4,460
Trader Rating: (1)
Feedback Score: 1 reviews
|
Quote:
__________________
My 240 vBgarage |
|
|
|
|
|
11-19-2007, 06:06 PM
|
#27 | |
|
Guild of Skullduggerous Intent
|
Quote:
edit: 7-18103G Energy Suspension Master Bushing Set - 1995 to 1998 |
|
|
|
|
|
11-19-2007, 07:08 PM
|
#29 | |||
|
Zilvia FREAK!
Join Date: Oct 2003
Location: Long Island, NY
Age: 40
Posts: 1,358
Trader Rating: (0)
Feedback Score: 0 reviews
|
Quote:
Quote:
Quote:
http://www.courtesyparts.com/energys...ion/240SX.html http://www.courtesyparts.com/Merchan..._Code=7-18106G |
|||
|
|
|
|
| Bookmarks |
| Thread Tools | |
| Display Modes | |
|
|


 Linear Mode

