|
|||||||
| Builds (and builds only) Got a build thread? It goes here, build threads anywhere else on the forum will be locked and never moved. |
 |
|
|
Thread Tools | Display Modes |
 10-11-2012, 07:00 PM
|
#1 |
|
Leaky Injector
|
Ca18det Uk S13 Money Pit
So I've been in the S-Body world for about 18 months now, been looking around on here for a little while so thought I'd post up my money pit S13
Bought it bog standard bar exhaust, nistune ecu running standard map and some cheapo gauges badly installed, one set itself on fire on the way back with it. I'll just copy and paste most of my stuff and try not to re-write it all, so if some of it doesn't quite follow dont panic! Current Spec list: T25 - 0.9 Bar NGK 7s Copper Spark Plugs - gapped to 0.9 300zx fuel filter New Oil Filter Oil Change with 10w40 s/s Magnetic sump plug D1 Catch Can with filter Gearbox Oil Change with 80w90 GL4 OEM NEW Gear Shift Bush Japspeed turbo back exhaust 3" with flexi's 4.5" exit Drilled and Grooved and vented 280 disks + New Pads Toyosport camber adjustment arms Toyosport Toe Arms Front and Rear Apex Gen1 Coilovers Walbrough Fuel Pump New Tank Straps New Brakelines to rear Replaced abs unit New Rear Droplinks Driftworks Braided Hoses F+R Pillar Pod 3 gauge Autogauge boost gauge/oil temp/oil pressure gauge + Needs sandwhich plates for oil Nistune ECU Re-upholstered Roof Lining/Glove Box Matt Black interior fixings - light/sunroof surround and clips/console/visors/Rear View Mirror Alpine CD/MP3/iPod Alpine Front Speakers Removed Rear Wiper Polybushed Subframe Painted subframe OEM front crank seal OEM half moon rocker gaskets Rota torques - 17x9j with 225/45/7 yokohama AD08 tyres Oil sandwhich plate with temp and pressure senders Front Mount intercooler + piping Toyosports Alloy Radiator 52mm Apex radiator hoses 5 ply Extended wheel studs m12 x 1.5 pitch, 25mm longer D1 race spec alloy wheel nuts m12 x 1.5 20mm slip spacers on all round Blitz shift knob Bronze rocker covers New windscreen with brand new OEM seals Driftworks Drift Button Dyed Carpet Overhauled fuel tank New centre console New dash New bootlid New Gates cambelt and tensioner - 135000 miles New Water pump - 135000 miles New aux belts - 135000 miles Stainless rocker,spark plug cover and sump bolts Arch Looms Tucked 2 New Coilpacks YOkohama Advan AD07 x 2 Bridgestone RFT 225x45x17 x1 Cone Filter Carbon Filter Delete OEM Thermostat and Housing So on with the mega monster build pics: How I bought her: 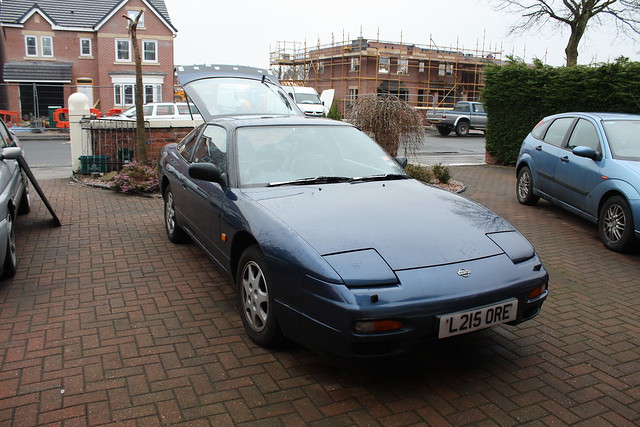 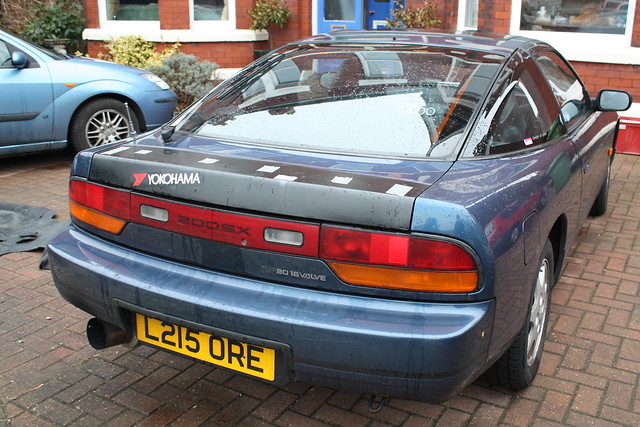 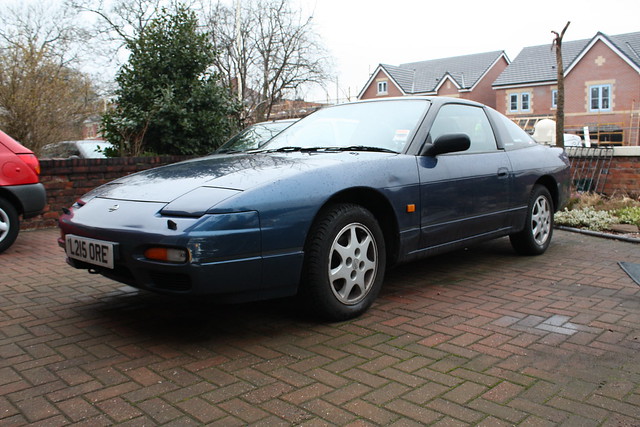 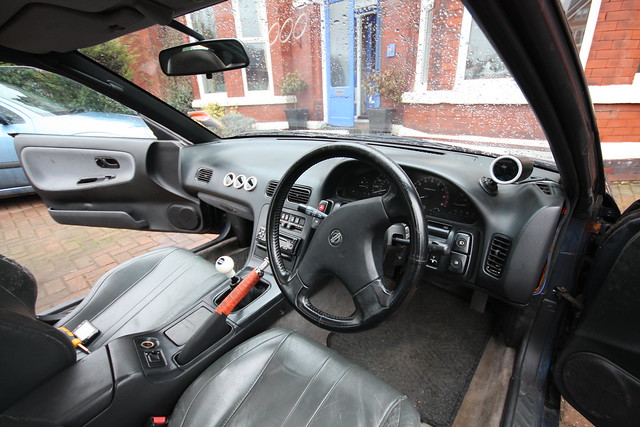 Soon looked like this to see what I'm dealing with: 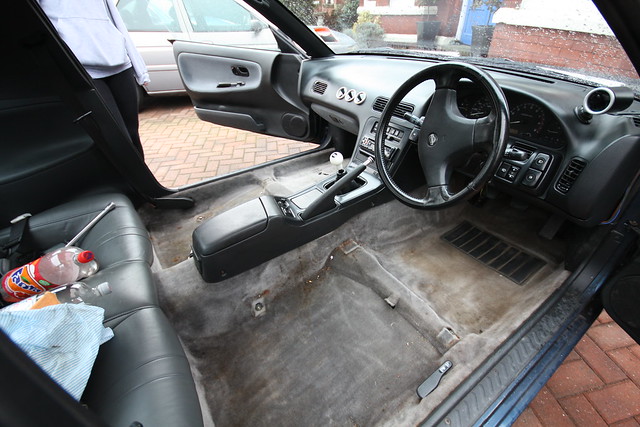 Then found this, job for tomorrow is sorting this lot out properly! 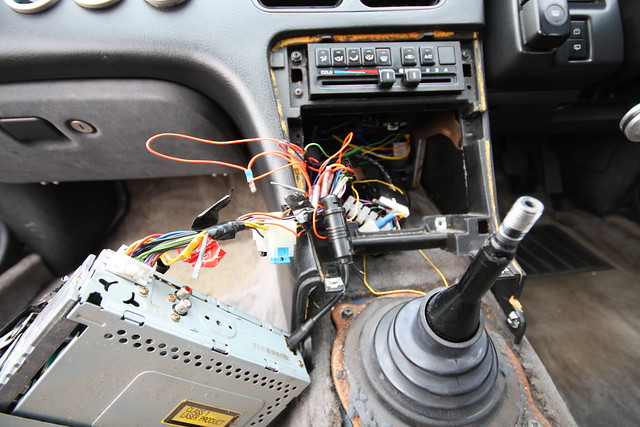 Melted water temp gauge, eek (dodge wiring to blame I imagine) 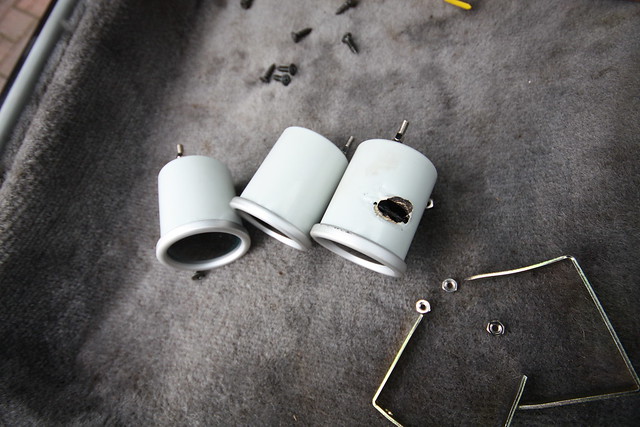 Finished up looking like this 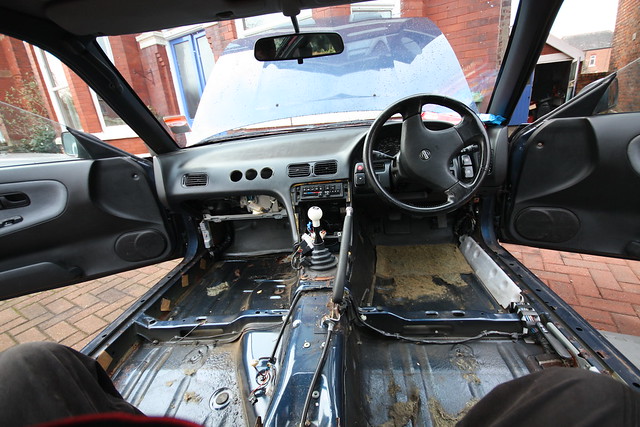 Overall I was pretty happy with it! Few bumps and scrapes, usual rust issues one biggy being the passenger footwell and front turrets from what I'd seen on first inspection. Wiring sorted out to this 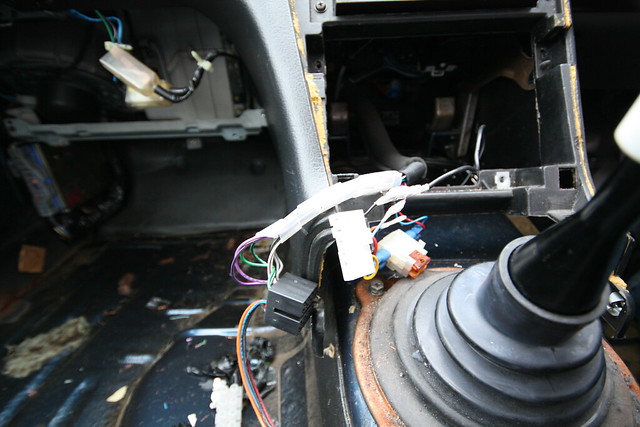 Much better! All chock block and bullet connectors gone, fully soldered and cable tidied. And it works! 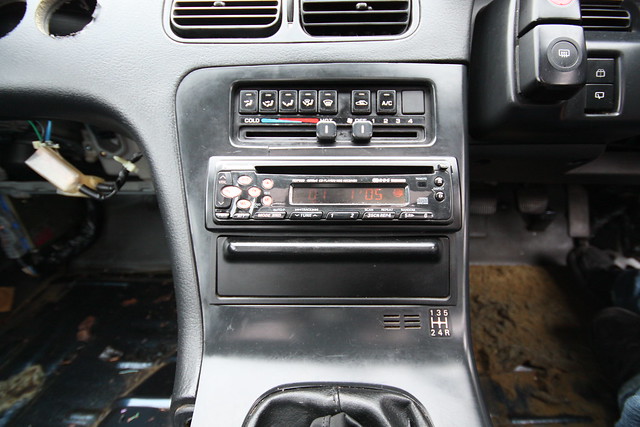 managed to wrap my dash/centre console and headlining in faux suede! looked amazing inside under artificial light, however in sunlight its very bluey rather than being black, so i imagine i'll rip it out and swap it to some real black material when pay day hits. Also given the light grey fixings a coat of some matt black for now to see how they'd come out and it looks pretty good, camera gives them an odd shine, but in real life they look spot on.   Started on the boot, has the usual holes from spoilers and a mega rust hole that had been bodge fixed, so out that came, as did the wiper motor and it got primered up. 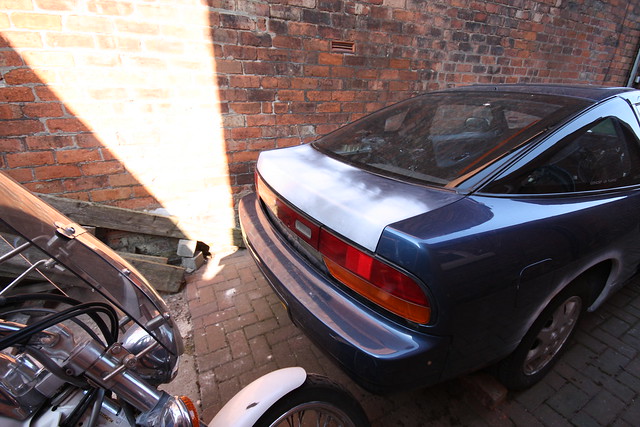 Then out came the rest of the interior, stripped it of everything and removed sound deadening to reveal some major rust holes. 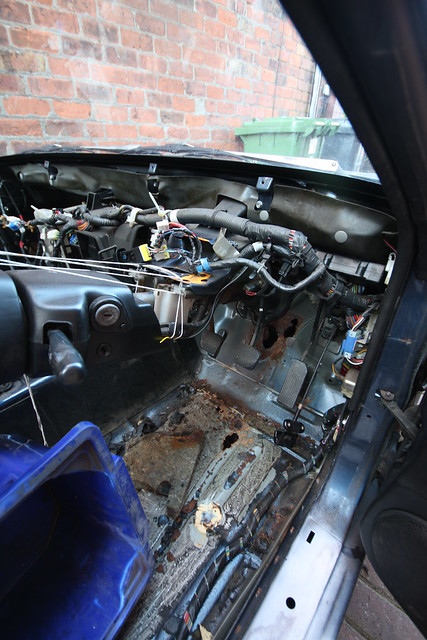 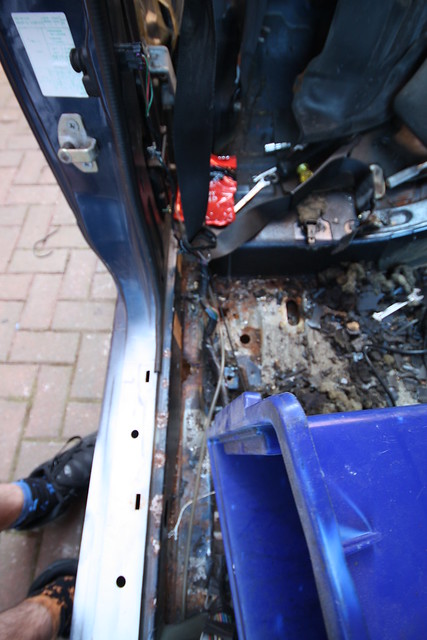 this one is worse than it looks ended up chopping a lot more of the floor pan out than i first wanted, but thought do it once, do it right! At this point it was do or scrap from my point of view. But after some deliberation out comes the grinder and mig welder. No pics of the finished action but shall get some soon enough. Then instead of moping over how rubbish the shell was, i thought id start on some interior bits that were uber rusty and weren't going back in the same! 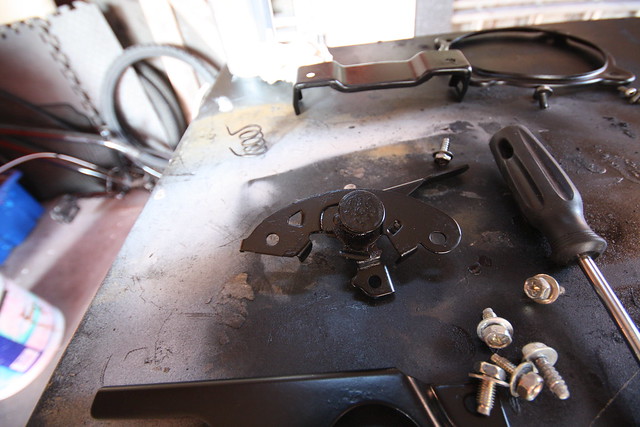  Had a peek inside the ECU, nistune board! This made me a very happy man and explains the fuel cut at peak boost, doubt it has the right map on it.  Since then all holes have been cut out and replaced with fresh metal, all primered and seam sealed. Also sured up the passenger side footwell with some bracing as i dont want it goign the same way as the drivers side. Carpet has been dyed black and everything is slowly being put back together. The faux suede on the dash has been whipped off as the finish was far to blue and the glue used hadnt taken properly, and im far too much of a perfectionist to let it stay as it was. In the process of relocating the extra gauges into a pillar pod. Exhaust was blowing, so ive had that off and adjusted to sort that, but now its fouling on the underside, so i have some flexi bits to put on this weekend. Rear droplinks have been replaced as the old ones were super knackered. Its had a sparkplug change to sort out the running, seems to have done the trick, filled up on coolant as it was a tad low. To do list is pretty big, but hoping to get the majority of it sorted this weekend to send it for an MOT next weekend. If its not ready looks like i'll be burning the midnight oils! More pics to come when i take a camera outside with me! Just cant wait to get her roadworthy! Also have purchased some paint to go on this when its passed as a bit of a treat...  Re-did front to rear brake lines, new ball joint in the front lower arms Sorted the turbo elbow gaskets as they where mullered   Exhaust paste around the turbo to japspeed downpipe   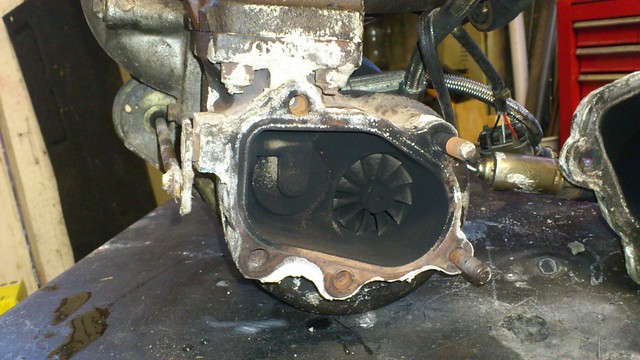 new brakes: 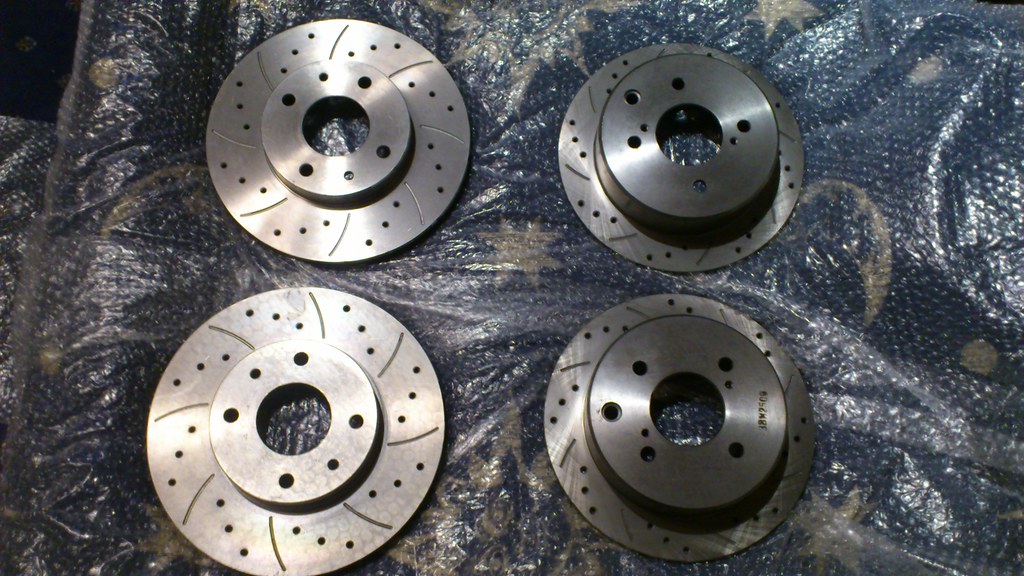 New Arms: 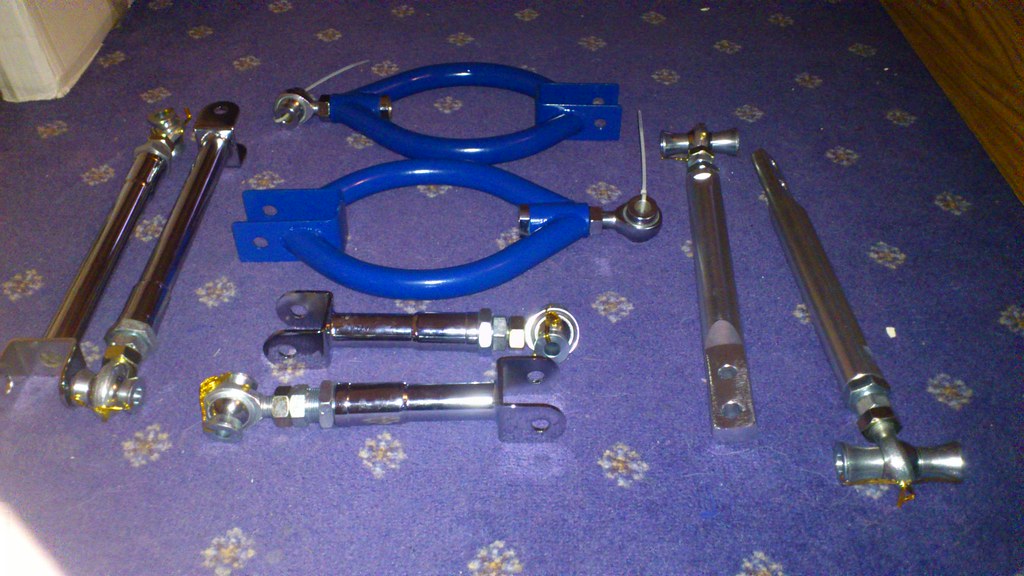 Not great quality but I got them at a price I couldn't really turn down, I also bought at this point some rose joint protectors as I don't want the rose joints to get rubbish in them. Silicon greased the joints up after sticking these on. Same as from Rally Design, I got 8 1/2" ones to do all the rose joints. And fitted:  No pics of the front, was spannering on my own and completely forgot till i got to this side! Didnt manage to do the camber arm on the drivers side as the subframe bolt rounded both sides and couldnt get in there with the grinder to get it off, So will change this side when I drop the subframe later in the year when the weathers better to do all the bushes and a good de-rust! All arms set to same as originals as I'm not lowering it just yet. Whilst underneath I spotted that my fuel tank straps where rotten, one all the way through the other close to being so. So went ahead and made myself some new ones! £12 for 2 strips of stainless steel 1m long by 30mm wide x 2mm thick and set to work.  Fitted these tonight, the one sat closest to the middle of the car was a right pain to get at with the subframe in the way. but a good half hour of spannering saw this off and another 20 mins to get the new one back on again. coilovers arrived, look in decent condition, cleaned up quite well as well Had a bit of a challenge to over come, as the drivers side rear original camber arm bolt that holes it to the subframe had rounded at both ends, so to get that off without dropping the whole subframe i ended up cutting through the camber arm, then grinding through the bolt in through the middle of the bolt/arm/bush. But with that finally off, the job was super simple as expected. Will need to get some subframe bushes at some point as I levered a bar in to check movement and there's quite a bit! So after fitment and a quick wash, not dropped it as much as I can, just enough to loose the inches of room untill i pick up a new set of wheels to fill out the space and sort the fitment out Before: After: [IMG]http://www.sxoc.com/vbb/attachment.php?attachmentid=76597&d=1328550921p/IMG] Also sorted out the sticky calliper, so now its braking straight and true, with the new discs and pads fully bedded in! Alignment will need to be sorted shortly, drives great up to 65mph, but after that I have a vibration/wobble that just gets worse cant seem to drive through it Subframe polybushes And a new bootlid as mines started to rust through again and i've lost the weather strip, so seemed cost effective to just buy the lot, hopefully in the post tomorrow Its a bit bright but wont stay that for long. Then pulled the whole rear end off the car, petrol tank and full subfram ready for a re-furb as the bushes were gone, might as well go all out. Looks fresh with a like of paint and lacquered to protect, also coated the filler inner with a bit of black to freshen it up a bit. Cleaned the rubber top and the pipe work too, will grab some snaps of that later. Will be cleaning up and replacing all the rubbers, will clean up well with a heat gun! Will also be putting an bike inner tube around the filler pipe for further protection in the future Diff finished Not sure on the gold, but it needed something to pick out the details and that's what i had to hand, looks better in the flesh, seems very bright on the photos. Also picked out the lettering with silver. I was going to polish it up but i don't have the time to do it all properly just now, but it will get done when i do. All the fresh stuff ready to get back together tomorrow! Finally looks like everyone else's!! All together again 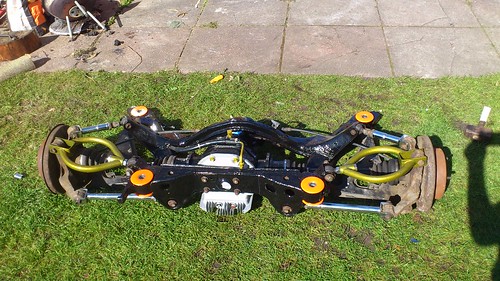 Everything our and ready to fit 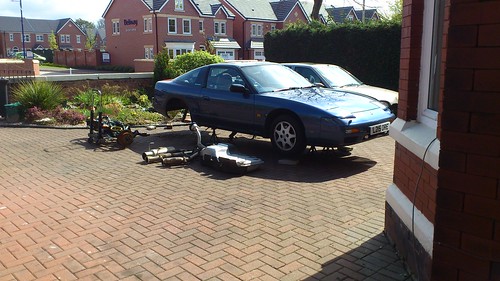 Finally on the floor, can just about see the fuel tank from that angle  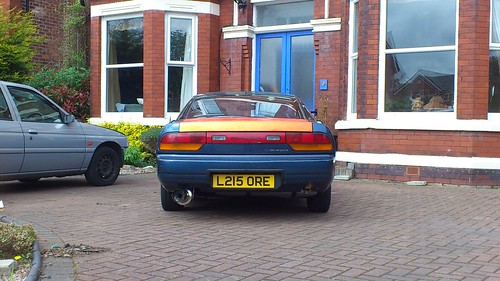 cleaned the interior, thought id show you guys the gauge holder and new dash I've put in with all the black trimmings. Looks super fresh, nice place to be, crappy phone pics in the sun, will whip out the real camera when I get some batteries! 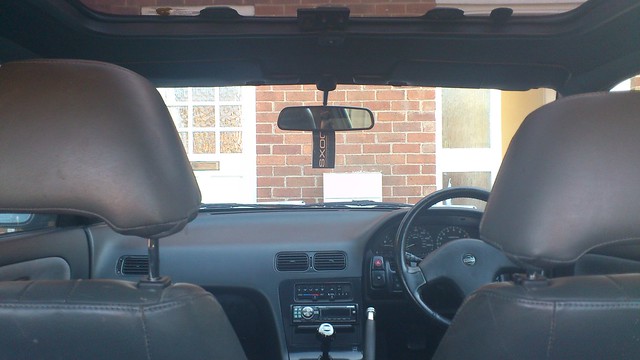 Black sunroof surround finishes it off nicely 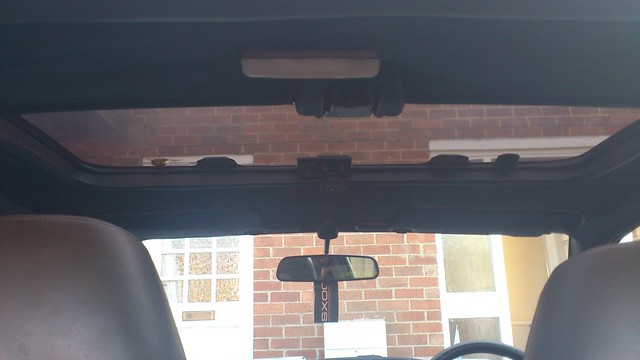 Gauges, not quite perfect unfortunately, so will be re-doing  I've also picked up some s14 interior lights to spray up mat black, so i can have a light in the front half of the car! Couldnt find the 180sx one, so s14 front will do! That's the end of part 1, got a lot lot more to go but can't add more just yet! |

|

|
| Sponsored Links |
|
11-03-2012, 12:07 PM
|
#2 |
|
Leaky Injector
|
So I've collected all the parts I need to hopefully sort a water leak out, do a cambelt change, sort an oil leak and swap the head gasket
Ordered a waterpump from camskill, turns out its one with a plastic impeller, so I ordered a Blueprint one from Apex (not in pic) cba sending the camskill one back so if anyone wants it for cheap PM me an offer. Also have 2 used coil packs to hopefully sort my running issues that arrived this week, cheers suprmek1 and another thanks to copey on here for giving me a drivers side window switch panel last week, works great! 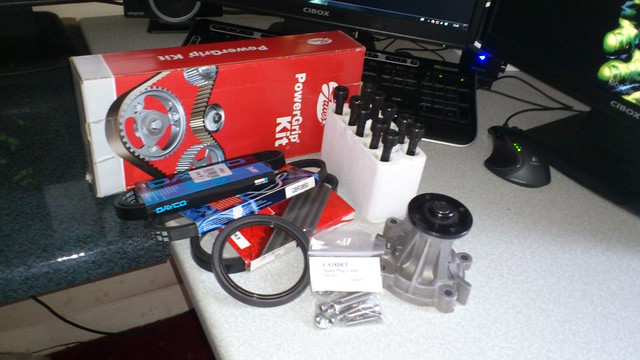 Replaced the rocker top screws with stainless allen bolts, much tighter fit, and has stopped the oil weep I had, also did the spark plug cover ones too. And swapped one of the wmic standard black pipes for an alu one I've had lying around for a while, just because current engine bay pics. Really need to spend some time cleaning this up as its a bit of a mess.. 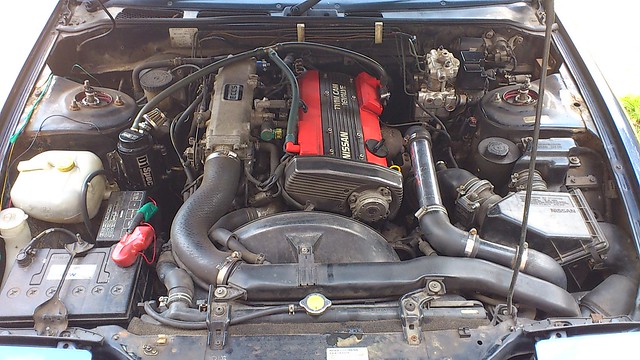 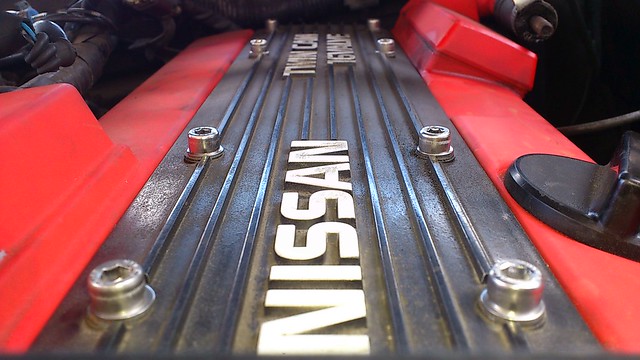 Over heated after 100 miles on a trip back to lincoln, luckily had some food and some John Deers to look at whilst I waited for it to cool off! Can't wait to get the time to sort all this out..  And finally its all close to being one colour, bye bye orange boot and crappy matt black patch work quilt rear quarters, hello badly matched Halfrauds crappy sapphire blue.. 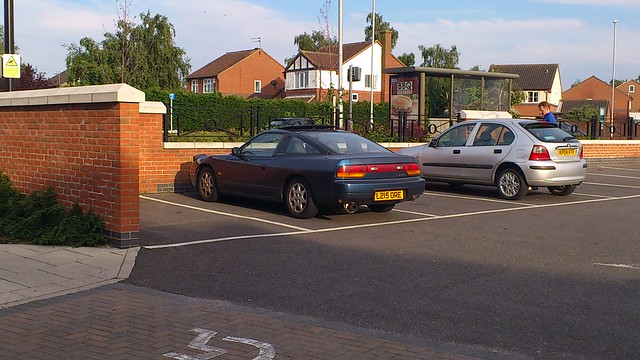 WHEELS!  So I've had a bit of time to sort my cambelt, water pump and other belts out. followed a tutorial from zilvia.net i think it was, farily straight forward, but did a few other bits and pieces on the way. first, removed bonnet and jacked up in the garage for ease of access to everything 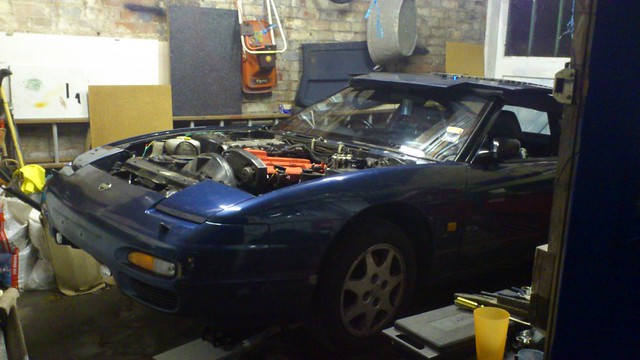 Ditched what was left of the coolant removed wings, bumper, and catch can. 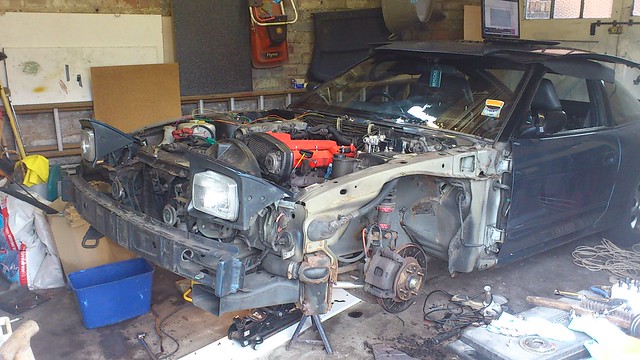 This lot came out of the catch can, any one tell me if that's pretty normal? Never emptied it before sort of light brown looking watery oily mixture 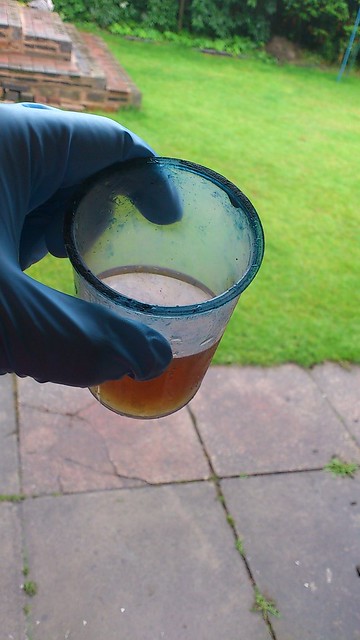 Radiator and viscous cowling out the way, along with all the piping i could remove for access too  Viscous off, all belts loosened ready for removal, as you can see, lots of oil residue everywhere thats collected road muck all over the place, crank oil seal leak is presumed! so all that will be cleaned up alter on 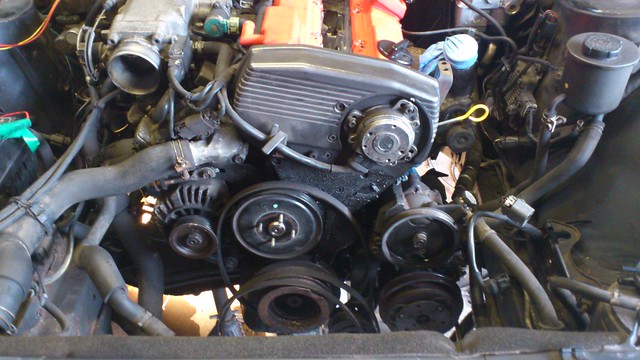 off with the CAS, looks in cood nick, all the splines are intact both on this and the cams, never noticed the CAS is a Mitsubishi item! This normal? 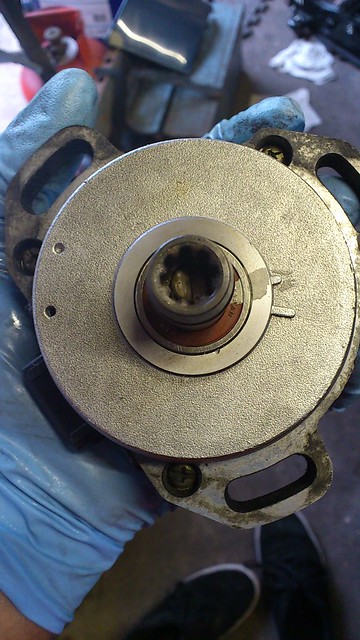 Underneath the cam cover, looks like someone has already done a cambelt replacement recently, but with all the oil that's been thrown around, and since i already have a new kit ready to go on, it's all getting replaced for peace of mind. 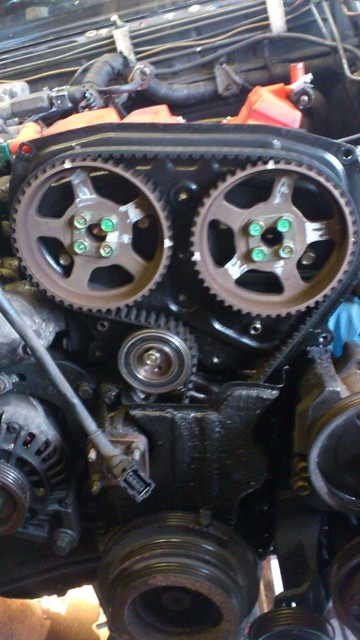 Off with the crank bolt, super easy with the strong bar, after putting it into 5th, and off with the crank pulley with a bearing puller, easy peasy  although the crank pulley does had a chunk missing, i presume this will be an issue with it making it out of balance, so i'll be on the hunt for a new one sharpish 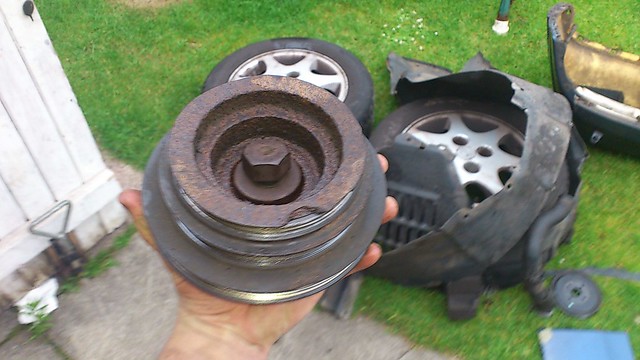 and finally off with the bottom cover, and BAM! Oil seal leak as suspected  So next was to pull that seal out and replace, so did this and cleaned up all the excess oil and pulled off the water pump, the gasket was half stuck to the block, so cleaned that off and made sure the mating surfaces where back to being uber clean, and popped the new water pump on  Much Better! On with the new cambelt after cleaning up the sprockets of any oily residue all the marks on the belt and block matched to motored on and popped it all back together again, after a bit of a clean. Cleaned the viscous too 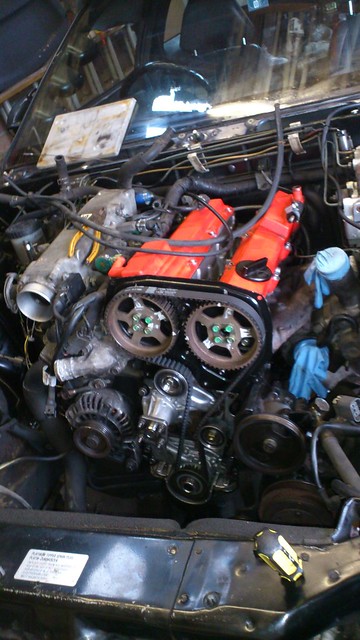 Whilst i was there, emptied out all the other easy bolt off bits and gave the bay a much needed clean up, as it looks like its never been done in its 18 year life! 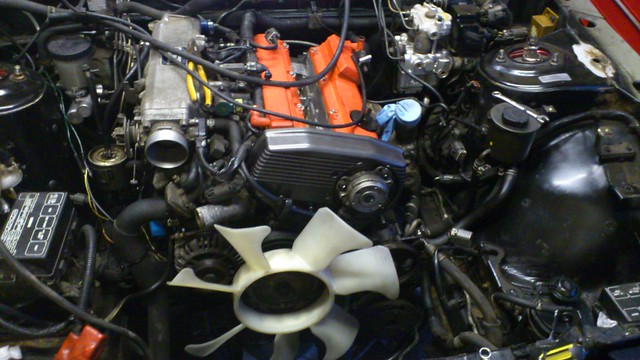 Looking a little better! Popped all the belts on, tightened them all up so that you can just twist them 90 degrees on their longest run by hand, locked all the tensioning bolts down popped the radiator and cowling back in 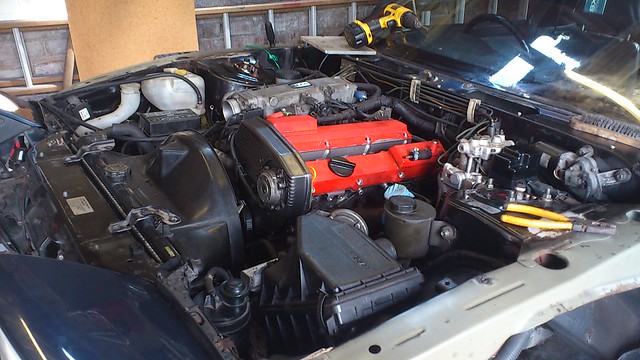 then all the pipe work and bolt off bits all put back into place after a good old clean up too 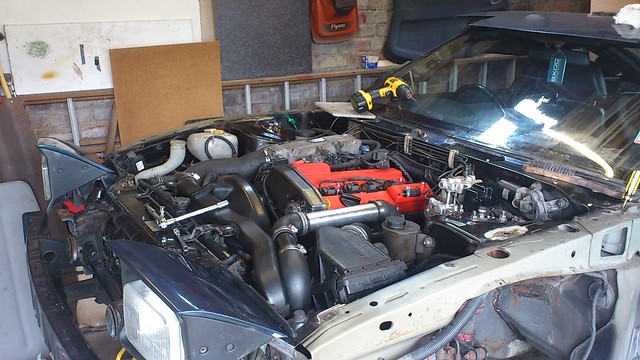 the reason for the wings coming off is to tuck the looms, so did this! 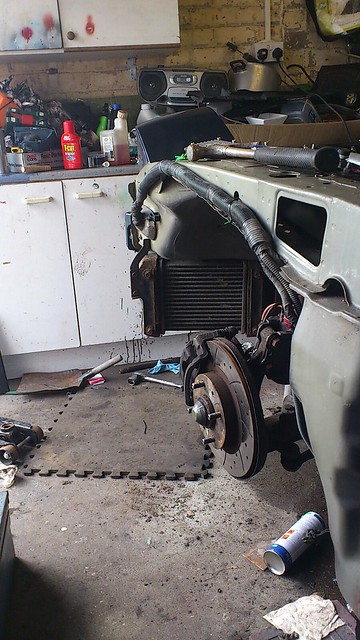 On both sides. Also re-routed the catch can pipes to run from one rocker cover to the other, and then to the catch can, much nicer looking set up with what i have to hand, another thing to redo in the future. Then re-fitted all the panels and dropped her back to the floor, quick test drive, and everything is fine again. Replaced the original cap with a spare i had lying around as it looks like that was the main reason for my over heating problems, with a cusco one on order from Japan, which actually arrived this morning. And drove it to Birmingham the next day without issues. The next day I drove down to see Remo to pick up my new wheels, and back to Southport to fit them, without any issues until i stopped at a services to re-fuel the car and myself. Fan belt noise going mental. So had a quick peak when it had cooled down, the belts had started to melt either through being too tight or not tight enough. Carried on regardless as I didn't have any tools with me and it was getting pretty darn late. By the time i got off the M6, something sounded like it had fallen off the front and clattered its way through the bay and off onto the road behind, so pulled in with the belts squealing, to realised that the tension bolt on the alternator had riggled it's way loose and dropped off!! Nightmare! So there I am on the hardshoulder of the M58 at gone midnight after a day of currently 400 miles, 6 matches of football and 6 hours driving, so I bite the bullet and just motor on slowly home with it squeeling away.. finally arriving home around 1am! Moral of the story, always carry tools! (i normally do, that's the only time i hadn't got them with me, not that it was much use after its fallen out anyway) Next morning, got to had a look and see what the damage is, belts seem to still be in great condition, but a little mucky from slippage. So tighten up and all is fine. However, mega oil spills underneath, quick inspection, looks like its the oil seal that i'd replaced leaking more than before, even after coating it in fresh oil before replacing it. SO! After all that, my bays back covered in oil, a new genuine seal is on order for Thursday for me to strip it down and do it all again! Lesson learnt, genuine seals from now on! fml! All part of the learning process i suppose, live and learn! After all that disappointment i decided to put on my newest purchase, Wheels! Now I've been waiting for this since the day i bought the car, and they look awesome, completely change the car. 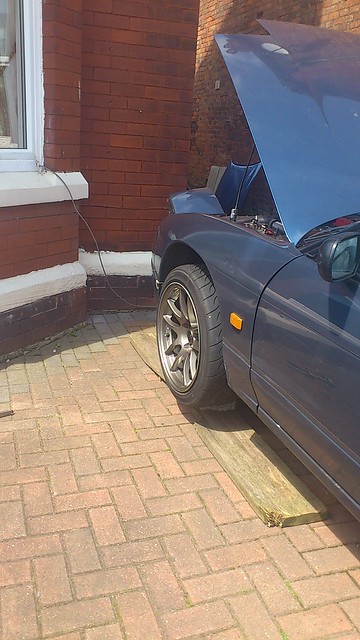 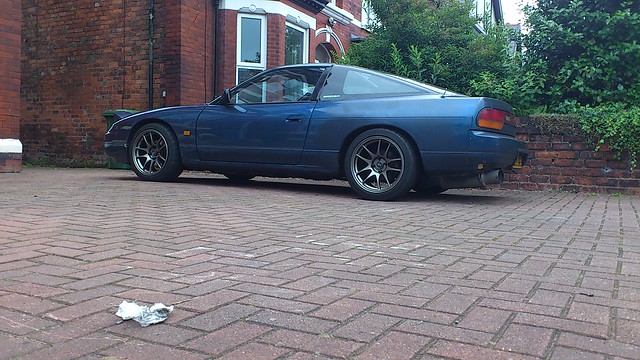 D1 Long wheel nuts, and nicely dropped, can't drop it any lower at the moment, as the coilovers catch the back of the rim without spacers, so i'll address that after all my other issues are sorted out. Gave it a quick wash, swapped out the tax disc holder for a simpler one 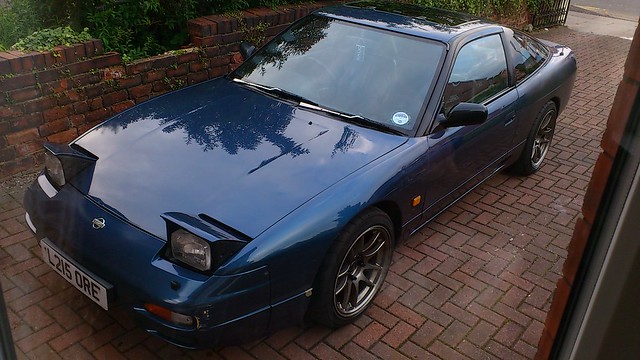 Next on the to do list, re-bush everything, as the rear lower arm inner bushes had died and are creaking more than an un-oiled bed and is annoying me quite a lot! Whilst waiting for the genuine seal to arrive at nissan, thought i'd get on with some other little bits, swapped a coilpack and cleaned up the springs inside the others, i have 3 where there are only springs, where the coloured gel appears to be yellow colour like so 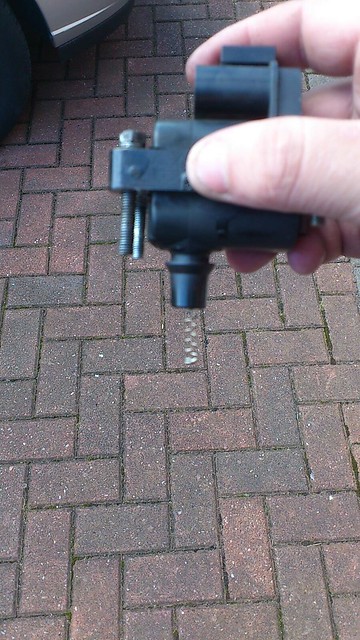 and one that i replaced with another with the spring and mental cylinder on the end. I extended all the springs and cleaned up all the contacts to give a better connection, which seems to have worked so far on a few drives out. New rad cap 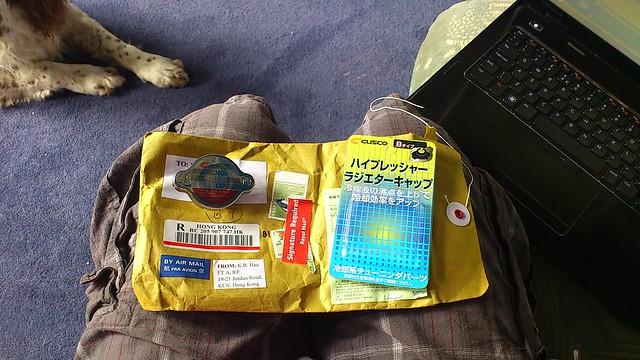 Sprayed up both my window wipers and my front nissan badge to black, as they where both worn and looking rather sorry for themselves, so quick fix was to primer them up, panther black them, and then lacquer, seem to have come out a treat. Also Relocated the number plate and gave the whole car a quick polish to try to bring the paintwork back to life 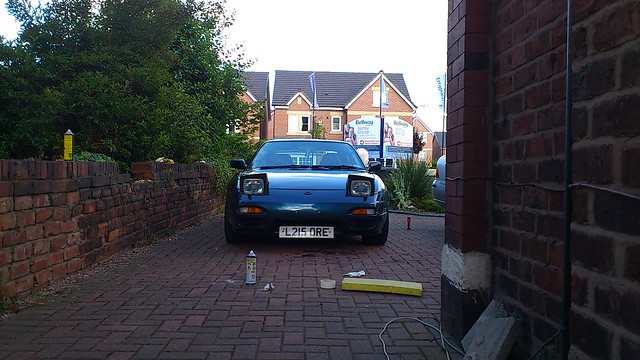 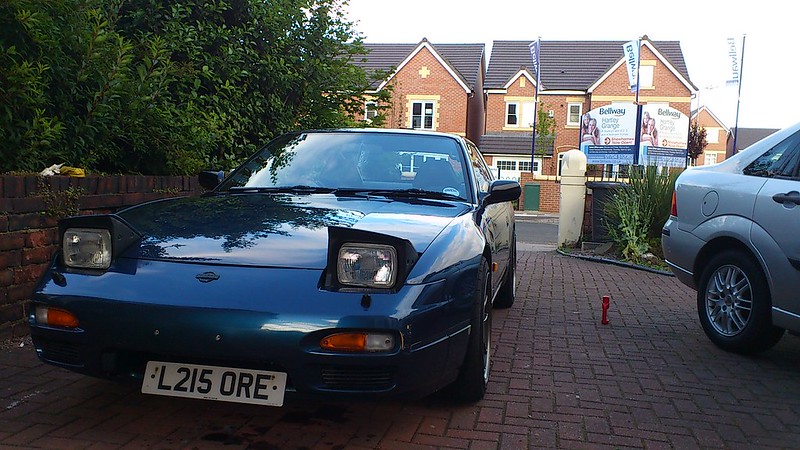 Decided i'd had enough of the pond that keeps appearing in the boot due to crappy sealing rear lights and cracked seals around the bootlid. So went round the boot seal with a tube of super glue fixing all the cracks/rips/tears and whipped off the rear lights  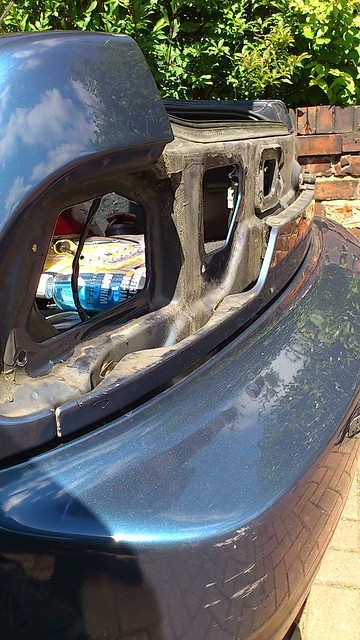  No pictures of them cleaned up, but the metal work looks in fantastic condition, just road grub really, cleaned up really nice. resealed with generous amounts of clear silicone bathroom sealer, little trick to chop a tall V in the end of the tube spout, then it leaves a nice point to ensure a full seal when going round! Learnt that from wheeler dealers Eddy! Had no rain as yet, so we'll see if that has fixed the problem, if not, its at least something else ticked off my list. So today, trip to nissan this morning to collect my genuine front crank oil seal to see if i can cure the horrendous leaking that's happened after installing the none genuine one last week. Since it was a cracking day outside, thought I'd work outdoors and make the most of it After having done it all last week, within half an hour it was back in the air with all the bits off that i needed to get at. 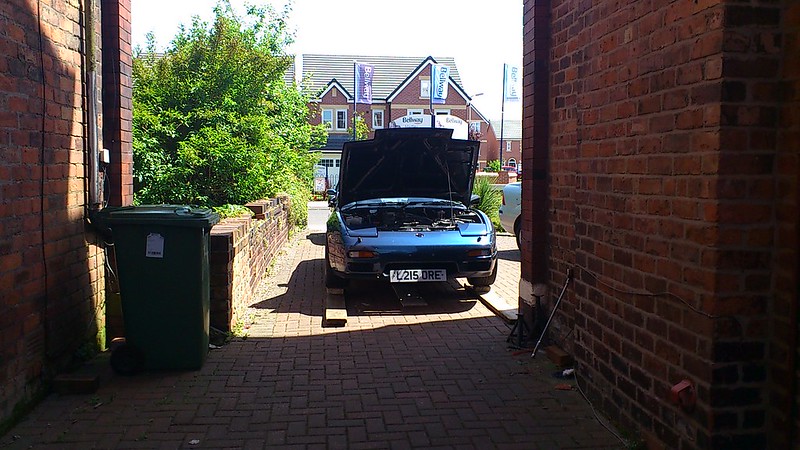 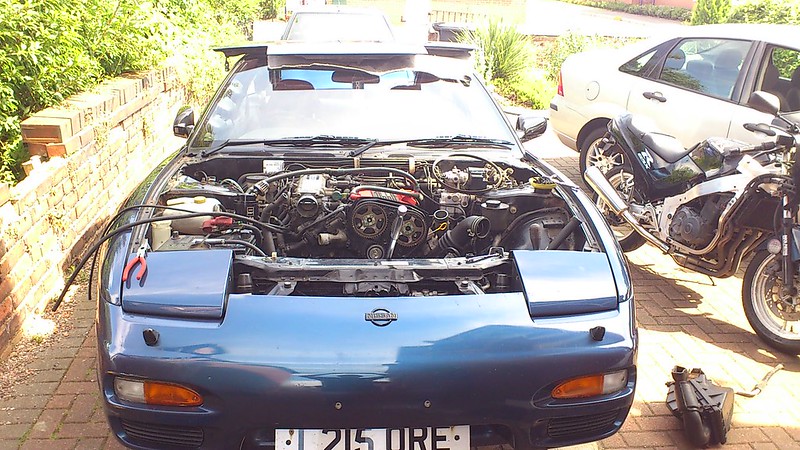 And as suspected, Oil practically pouring out the bottom  Cue, new seal 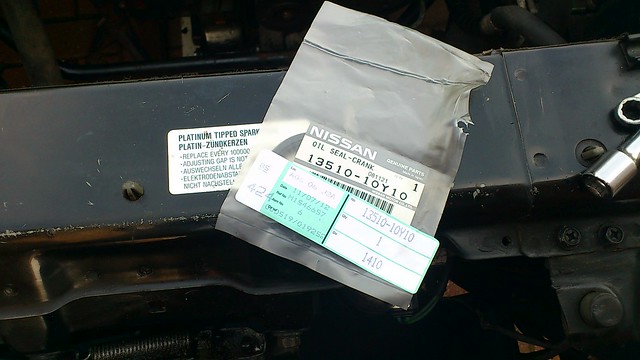 Ended up cable tying the belt to the cams so that i didnt have the job of completely reseating the cambelt, all in all took 3 hours from up in the air, few breaks, couple of friends over having a chat and throwing it all back together again, so time will tell if its sealed properly this time, hope so as I'm bored of that job! Whilst i was at it Ialso tightened up the bolts around the crank seal, as they weren't super tight, in order to hopefully stop any small leaks from there. I think engine will have to come out as i have a rear oil leak from somewhere as well, and for peace of mind i'll like to have it out top have a proper look at it and do them all at once. Also giving me the chance to sort out the engine bay properly, which would be nice! Cleaned off some of the oil underneath, but its absolutely caked and don't fancy getting it all over the path any more than it has already dropped. Well, new seal hasn't seated correctly despite being a genuine seal, which is a bit gutting  So in order to make sure that's not the only seal that's giving me issues I've borrowed an engine hoist and whipped the CA out for a nosey 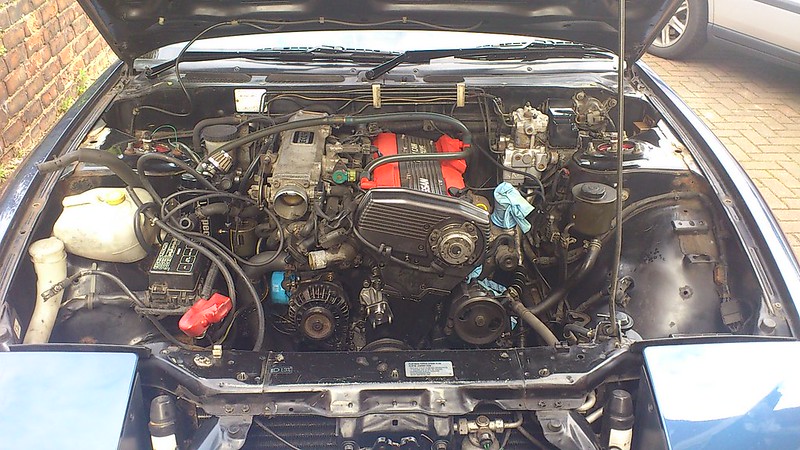 This is getting to be a familiar sight at the moment Everything tucked up to the sides, disconnected, labelled up and photographed ready to pull  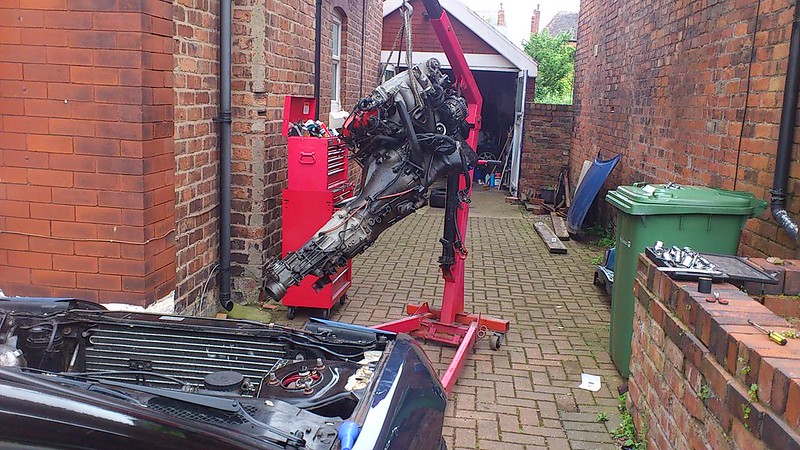 Finally out, utterly covered in oil, looks like half moons have been leaking down the back of the block and all over the bell housing. There's been a leak around the gear lever as the cover has split so its been spilling out around the that And as suspected the front crank seal hasn't sealed properly either, there must be a groove in the crank so I'll order a new one and not seat it as far into the block to avoid the groove. But I can now inspect that as its now in my garage! De-greased and jet-washed the engine whilst its out and will do the same to the bay tomorrow |
|
|
|
|
11-03-2012, 12:09 PM
|
#3 |
|
Leaky Injector
|
Some better pictures as promised
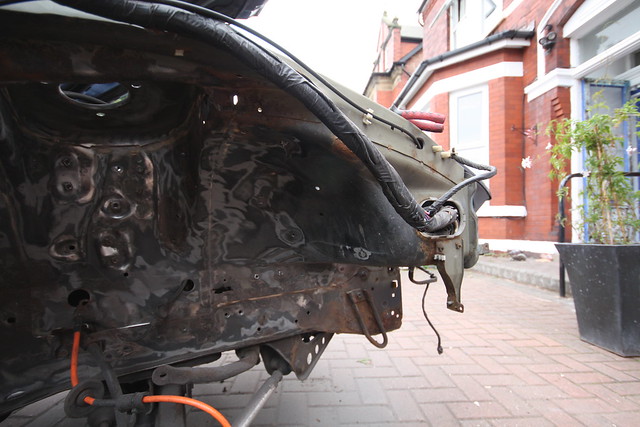
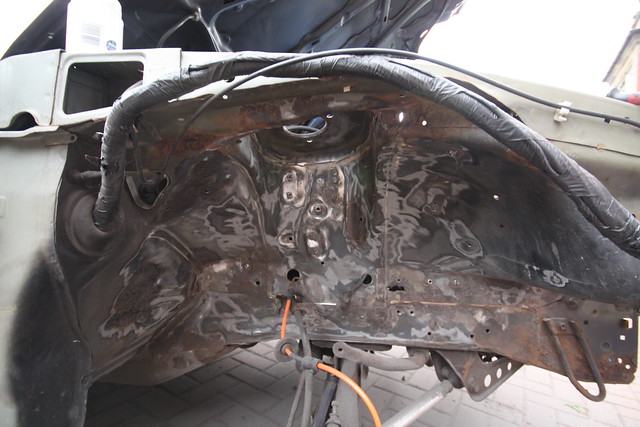
Bay after engine came out, very oily and rank 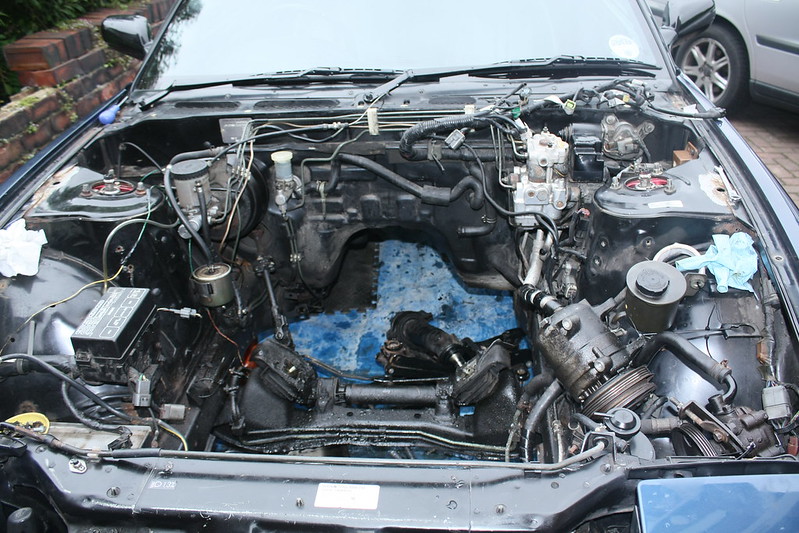 Degreased and power washed, much cleaner 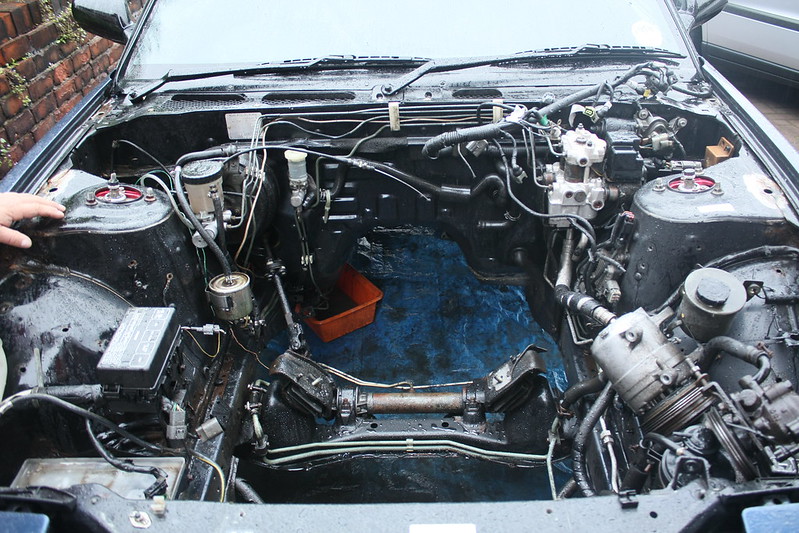 Engine out, can see how oily the back of the block and bell housing is from here 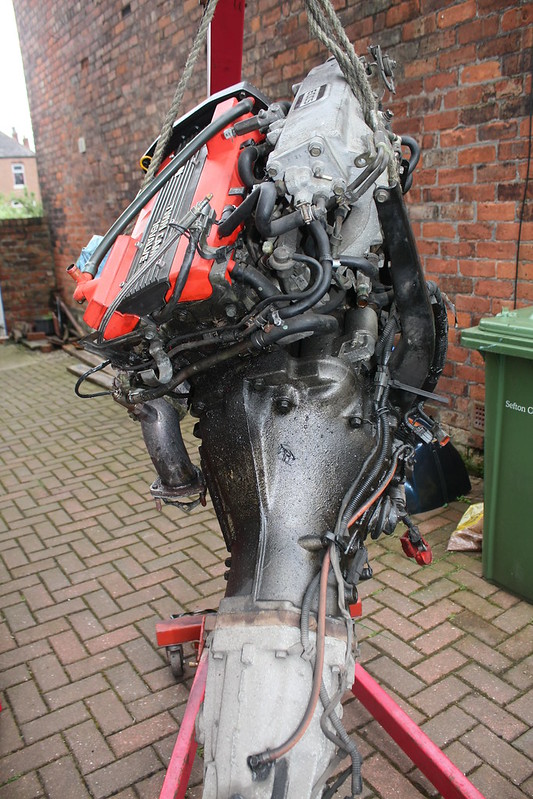 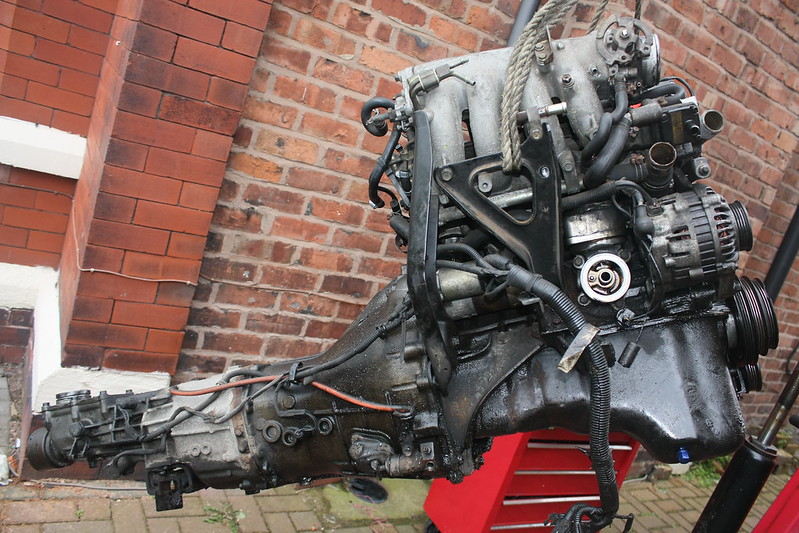 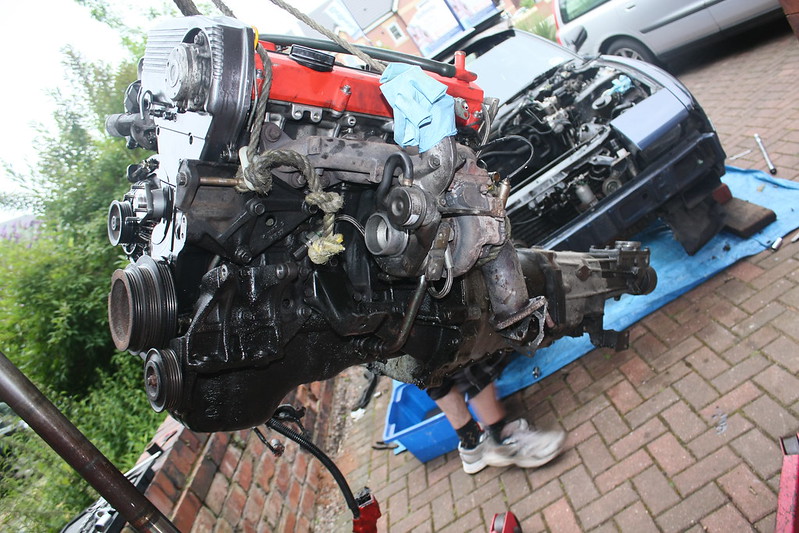 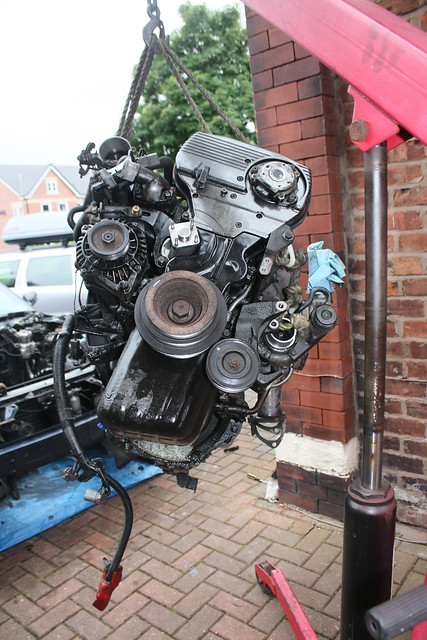 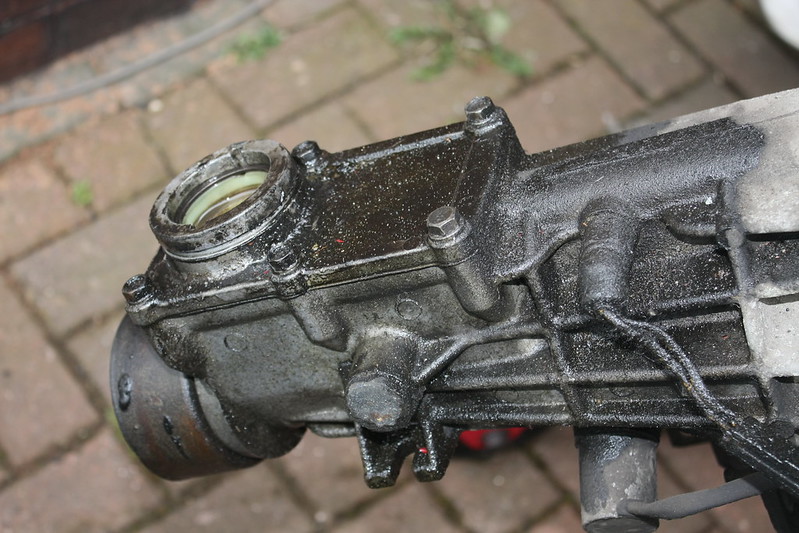 As you can see, definitely a couple of oil leaks occurring here! Degreased everything then powerwashed the majority of the oil and muck off 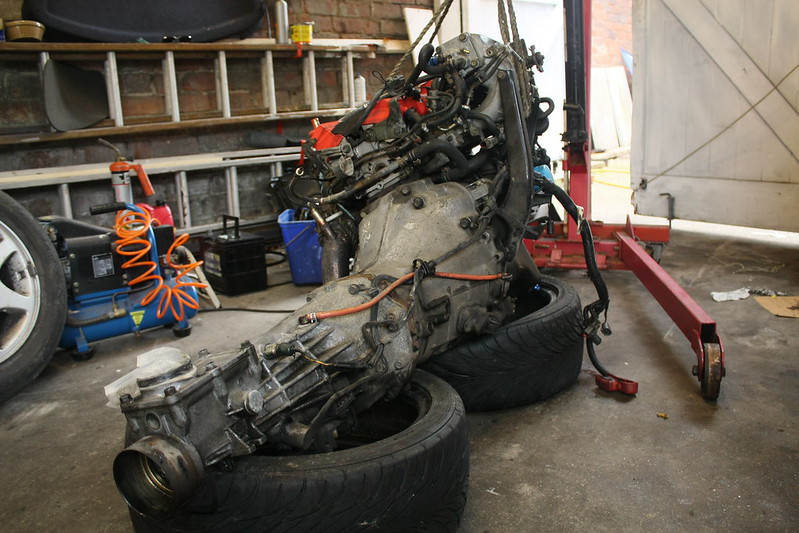 Since I'm replacing the half moons i thought I'd refurb the cam covers front and top, going with a bronze for the rockers and plain black for the coilpack cover and front cam cover, pics to follow when they're dry tomorrow Gives me an opportunity to check the state of the cams, which look in great condition still, no gunking up anywhere 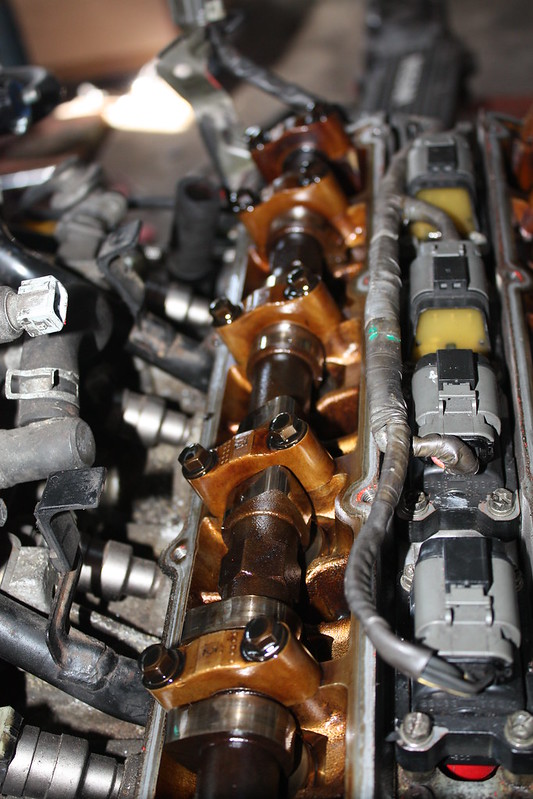 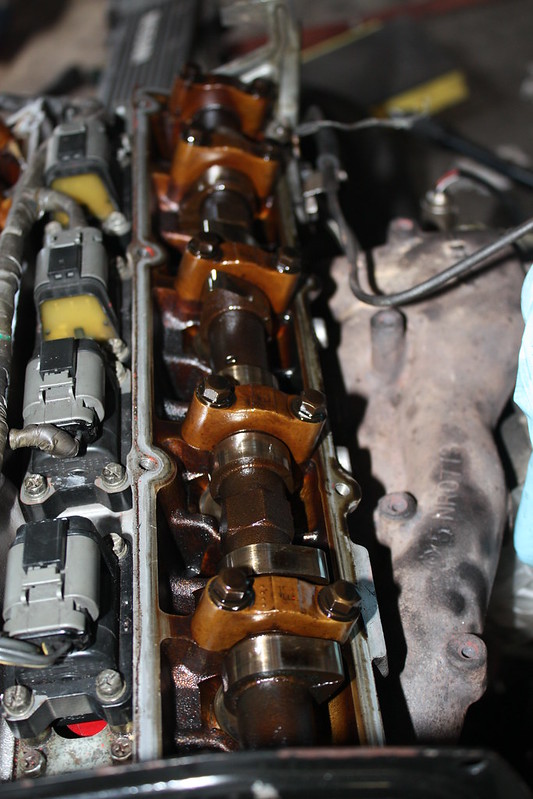 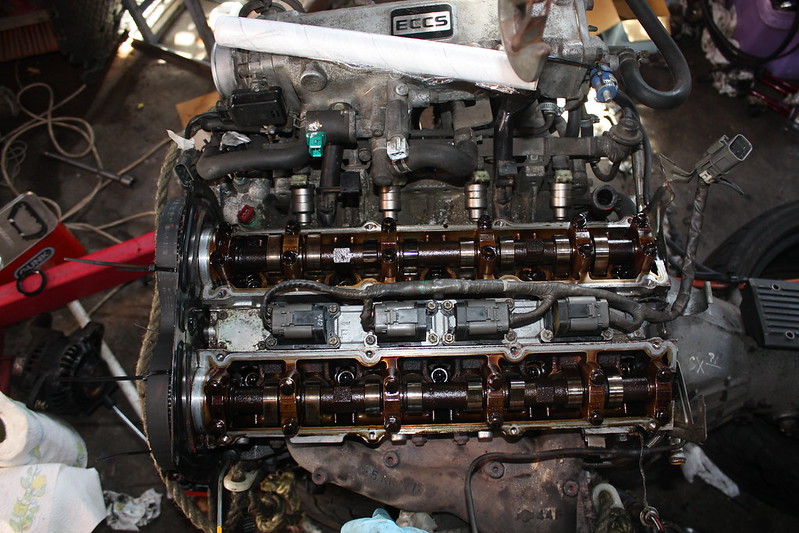 With the insides of the rockers looking just as clean as when I cleaned and replaced the rocker gaskets last year.  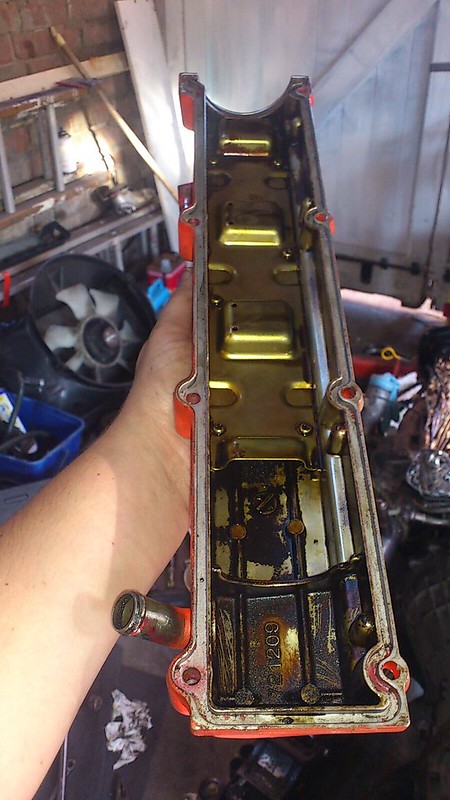 Took off the front set of cam covers to take a look for the oil leak, quick tip, cable tie the belt to the cams when its set to TDC so you don't have to faff around later re-timing everything. Cleaned up all the oil before I took this snap, excuse the rope 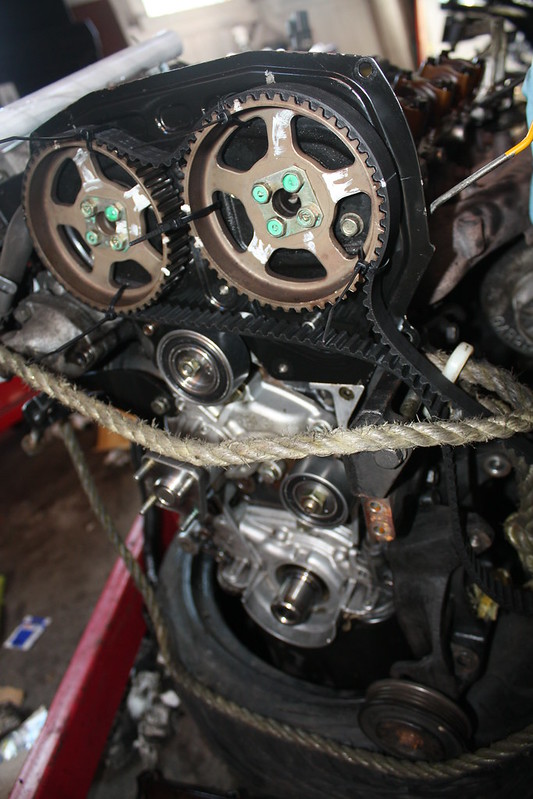 Inspected the crank, and it looks like there's a little groove in there but not too much so I think I've fouled the seal when I've come to install it 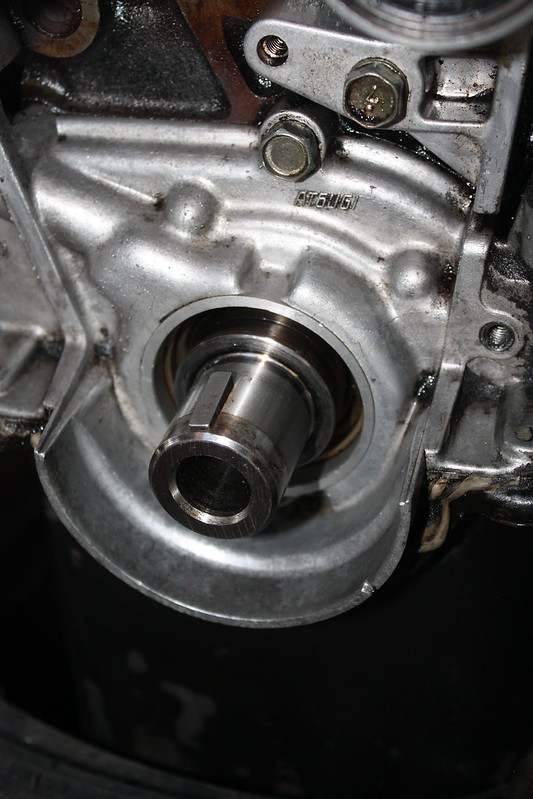 So, I've cleaned up the block all round and all the wiring up as well, will be tightening the sump bolts also tomorrow after getting back from Nissan with my new seal and half moons Update time, new seals in from Nissan, picked them up so there is 3 spare half moons at Chorley Nissan in stock as they come in a pack of 5 and i only 2 turns out the originals where rock solid, bent and full of liquid gasket, with bits of what i presume to be rocker gasket down by the end of the cams, luckily they hadn't been sucked into the rest of it! Quick glimpse of paint in the corner 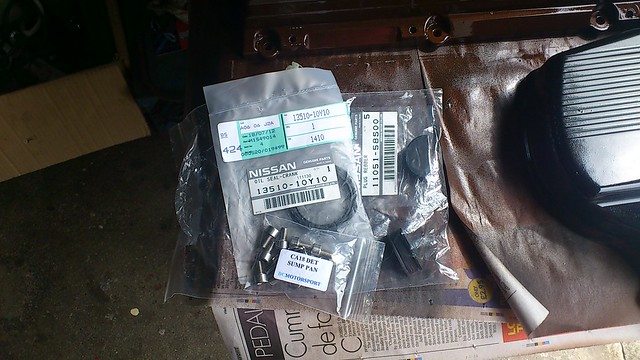 New sump bolts installed, cleaned up the bottom of the sump and nipped them up nice and tight New crank seal in, and so far *touch wood* is installed correctly and not weeping any oil as yet, but only been on a couple of short runs No oil down the back of the block either, and no drips on the floor that I've found, as of yet. So couple of snaps, this on of how the senders sit on the sandwhich plate if anyones struggling to get to get them sitting flush, this was with the alternator at its farthest adjustment and there was still a couple of mm space between that and the sender. 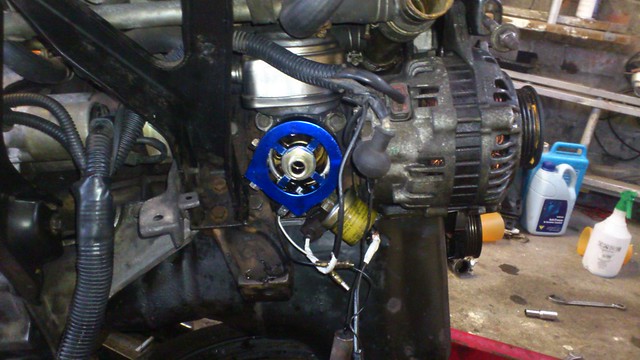 New rockers done in a ford aztek bronze, looks a bit dark really, was hoping it'd come out a tad lighter, but it really shines in the sun! 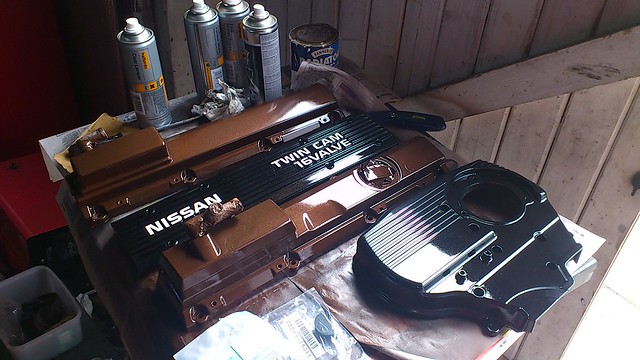 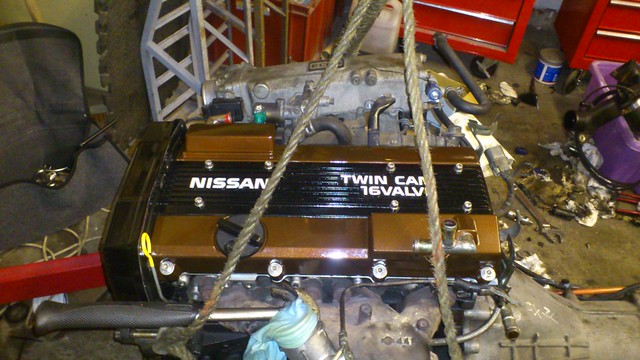 And back in again, mid way through 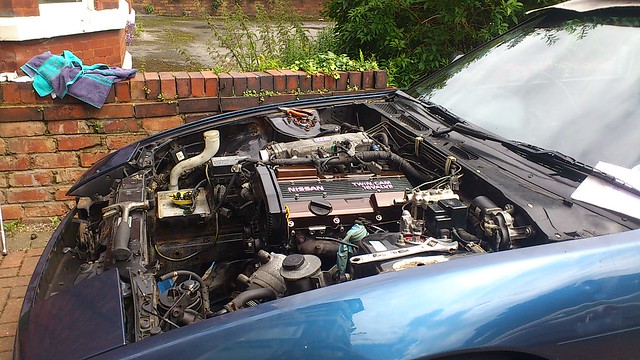 Ended up re-making a gasket for the oil drain to the sump from the turbo, made a fatal mistake of not putting the main hole in it for the oil to drain through, so I've managed to cover the inside of my exhaust in oil... total rookie mistake as i'd done it in a rush! I only ran it until it warmed up so maybe 2-3 minutes before realised what i'd done, anyone know if it'll cause me any issues in the future? But besides that minor hiccough and the massive amounts of smoke I'm getting from burning off that oil, everything seems to have gone well and runs as it should! Also fixed my gear gaiter that sits on the back of the box so hopefully that'll keep the oil in the box instead of on the floor! The boot is now dry after re-doing the rear lights too! Having difficulty bleeding the clutch, but had a quick read up in S13 tech, figured out it must be the damper so will be looking at that tomorrow morning! Was just about to head back to Lincoln, but had one of those epiphanies and checked when my MOT is due, turns out its today.. so booking that in in the morning and just hoping it flies through so i can get home in the evening! Never rains but it pours it seems at the moment! new alloy rad and FMIC are on their way through the postal system! Will be fitting in two or so weeks when my Uni project is over. Will throw some pics up when they arrive. For now FMIC, shoutout to GDUK Dazl71 for this one  Has some overspray on it, but looks in ok nick and suits my tight budget. Hopefully bit of thinners and some careful toothbrush work, and it'll come up good as new. Hopefully the new rad will cure the issues I have with water temp Well my new (to me) FMIC arrived, spent some time sorting the fins out as some where a bit of a mess, the back is a little worse, but will go over it again when I have a bit more time to maximise the air flow through it. Quick put together where I think the pipes go for now before I get it on the car to ensue everything's there 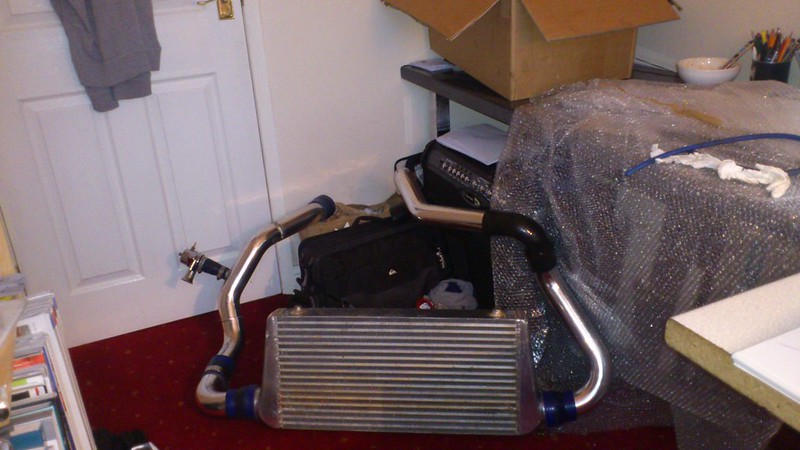 Also new toyosports Rad has arrived along with some Apex rad hoses 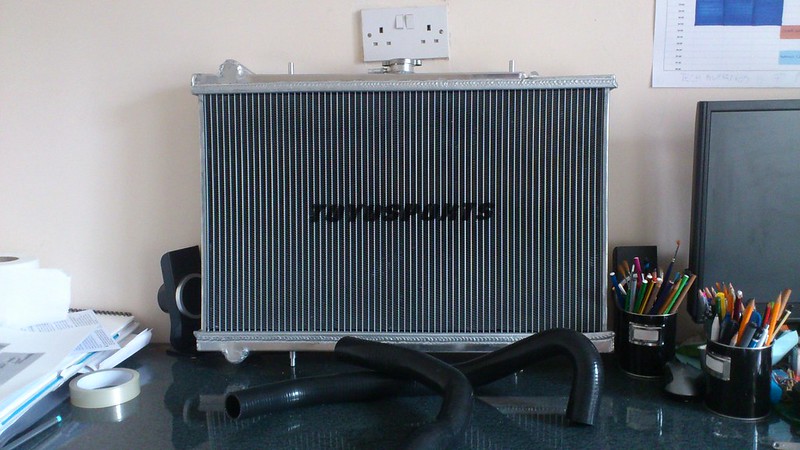 New thermostat arrived from a chap on DW in portugal as it was quicker than Nissan! With the thermostat holder in there as well 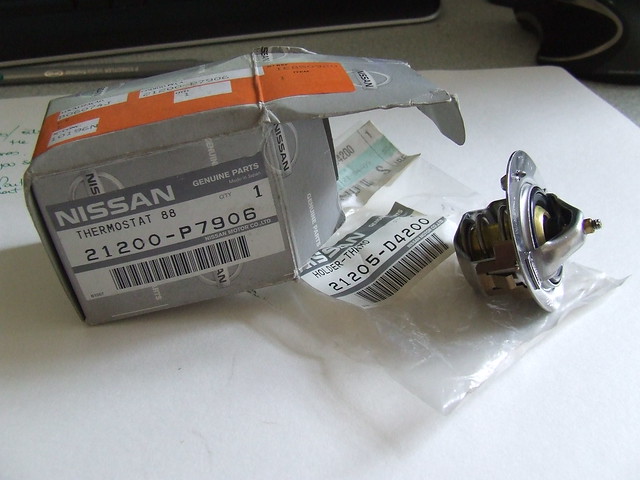 New Windscreen fitted today with new seals from Nissan, although the top part didn't come with them, so they had to reuse the old one National Windscreens did the fitting, super top blokes, knew what they where doing had a good chat about cars and bikes and didn't mind me nosing around Had a look under the old screen before they popped in the new one on and there's no rust whatsoever, it'd apparently had the screen replaced before as this one was pretty poorly fitted with tonnes of uneven mastic everywhere, they cleaned it all up made sure it was all flat, primed and then bonded the new one in. Refreshing to see a job being done properly And fitted.  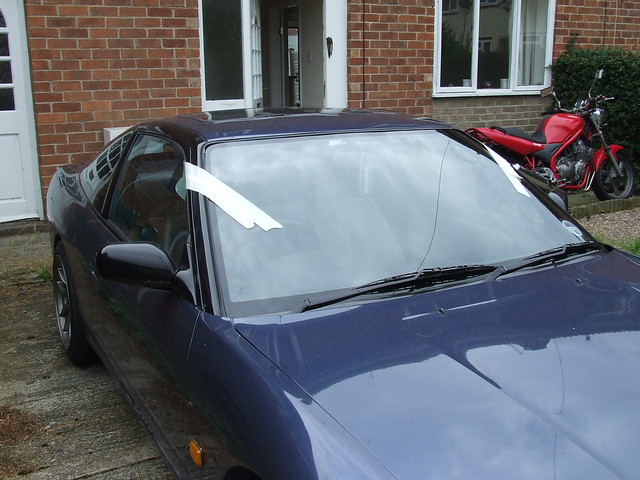 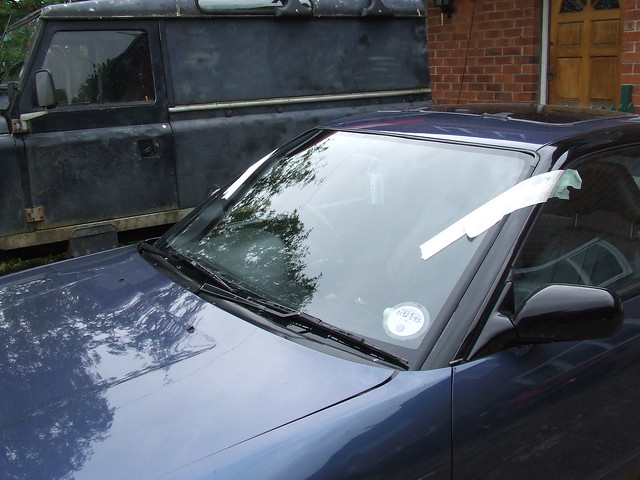 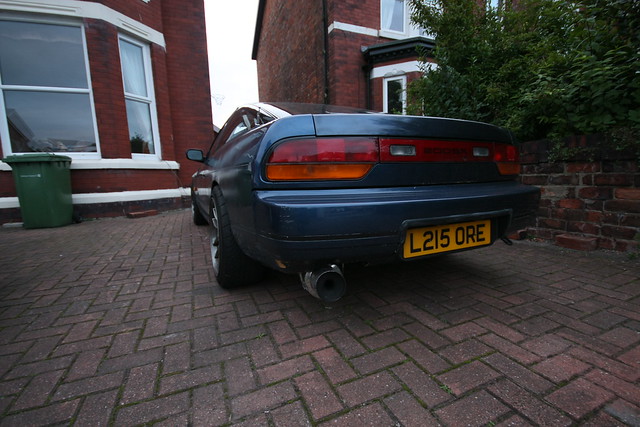 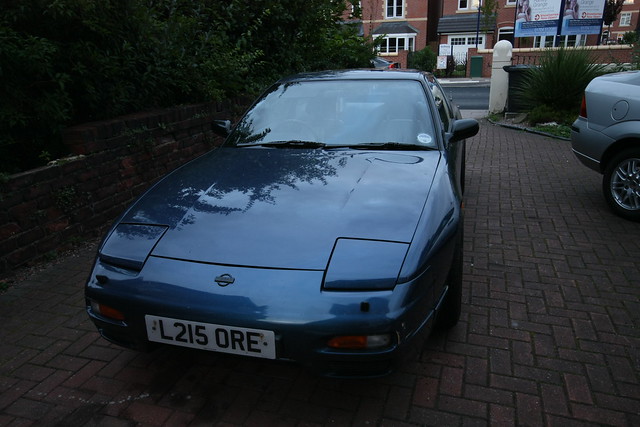 Slight rear flare 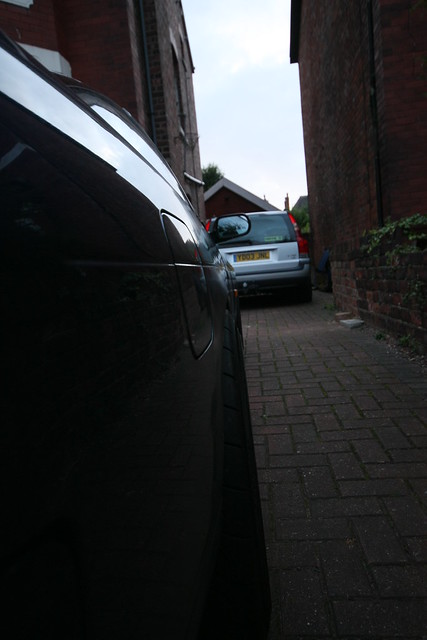 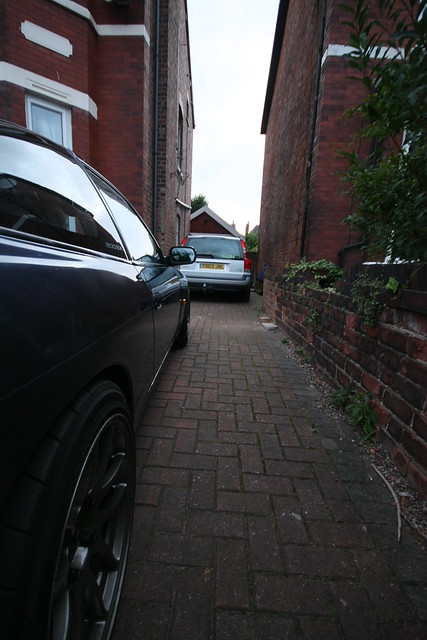 Front Fitment, looking pretty fat! 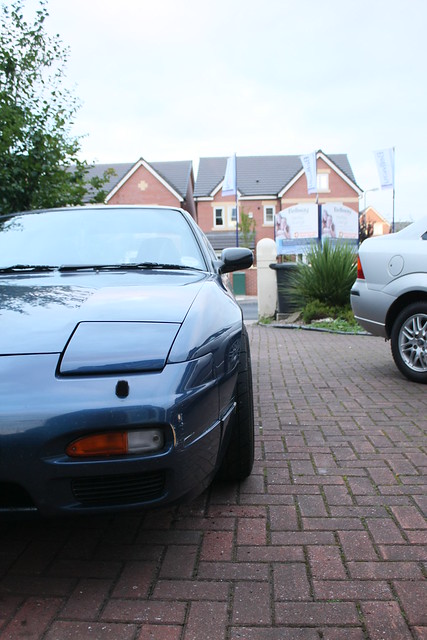 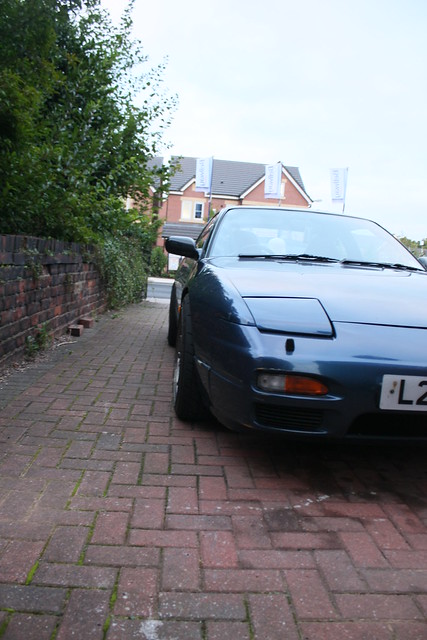 Got a little bit to fix on this arch, 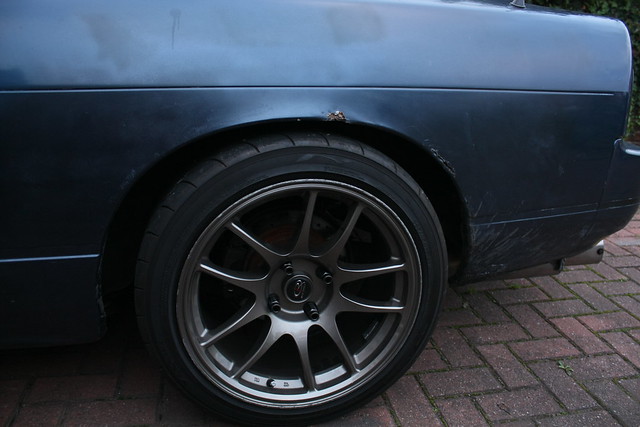  Will be lowering it a bit more this week, already dropped the front an inch but still needs more! Lowered it to a decent level now 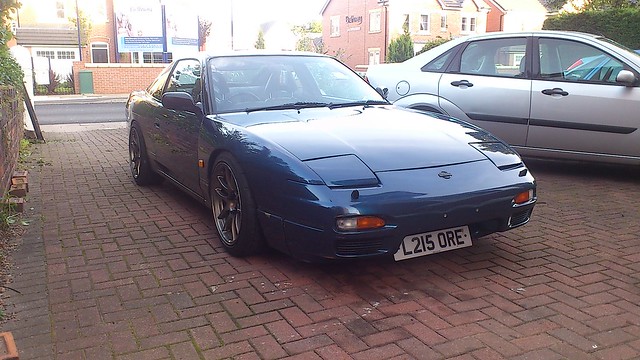 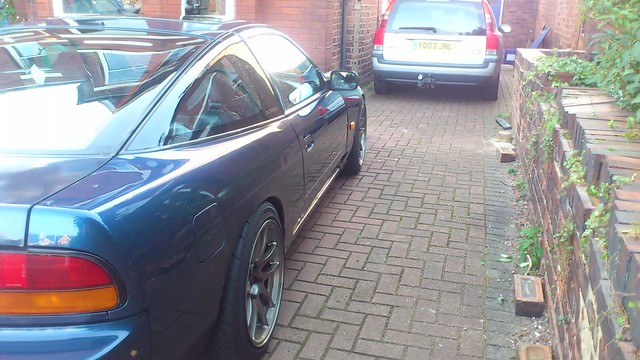 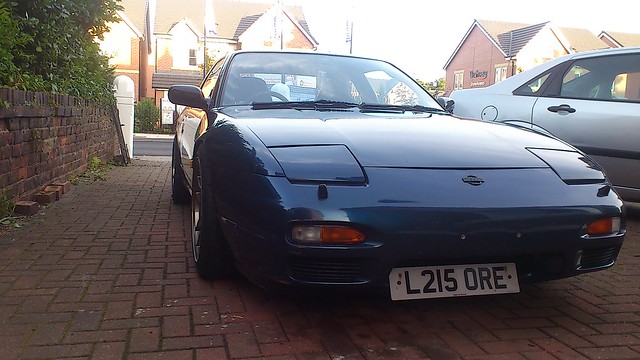 Getting a few scraping issues, but that'll be sorted when i fit the fmic, will whip the wings off and tuck the loom a little better, might even extend the loom a few inches and sort all the fitment out as all the shut lines are screwed due to missing/snapped bolts. Can't wait to sort some brackets out for everything and tidy it all up nice! Also going to make two new wing supports as they rusted to dust. Will be wire-brushing all the arches whilst the wings are off and rust proofing as I go, as I have time to this time and its looking a little sketchy Started getting the car ready to accept my FMIC and sorting out my arches/wings etc 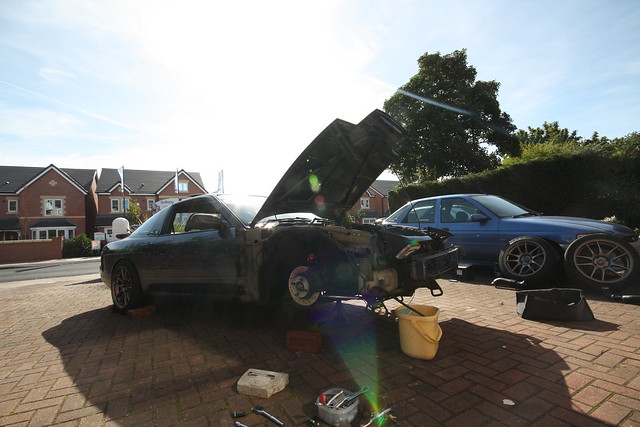 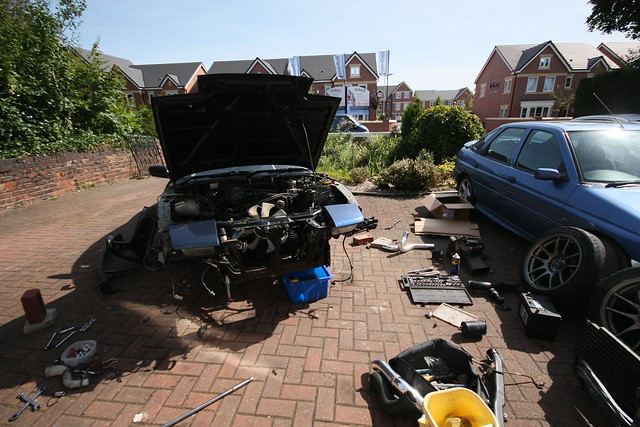 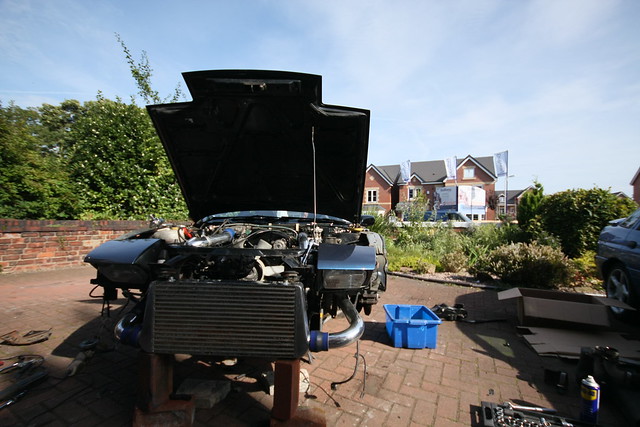 tried to see if i could get the normally battery to squeeze in, but it wont when the rads back in 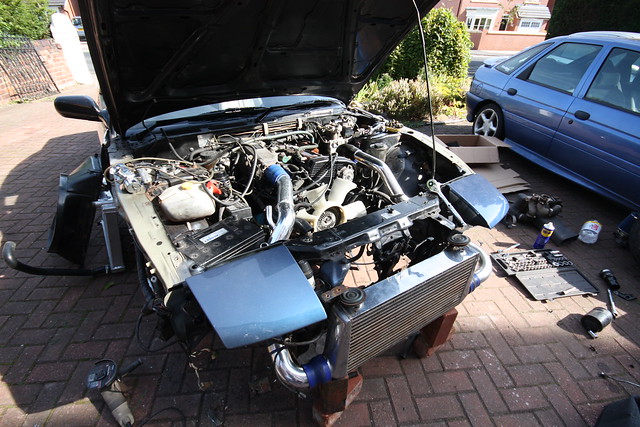 Left it there for today, measured up for all of brackets i need to make. I've pulled it higher than the lower cross section under the rad to keep it away from grids/speedbumps etc Need to pick up a new battery, going with a smaller one and just making a new box for it so keep everything simple. |
|
|
|
|
11-03-2012, 12:12 PM
|
#4 |
|
Leaky Injector
|
Started by wirebrushing the whole arch, photos show about half of it done.
   Not too bad actually, a bit of corrosion and only one smallish looking hole for now. Krust'ed everything after I'd finished 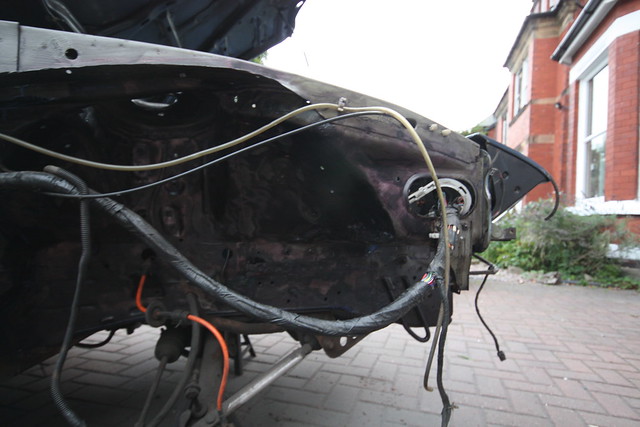 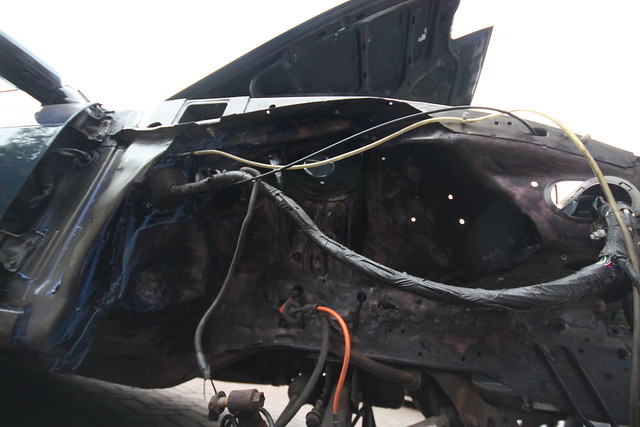 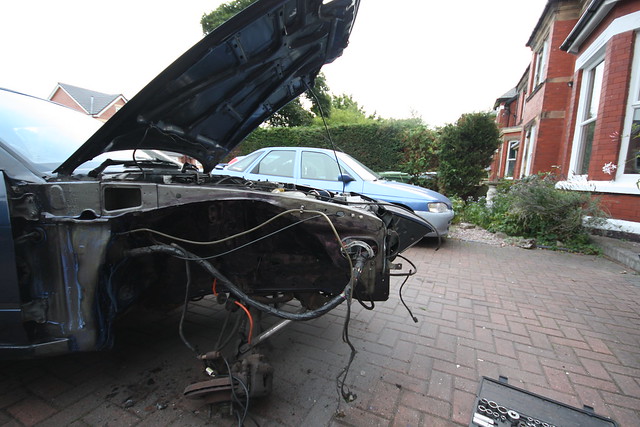 Small bit of welding on the drivers side arch needed 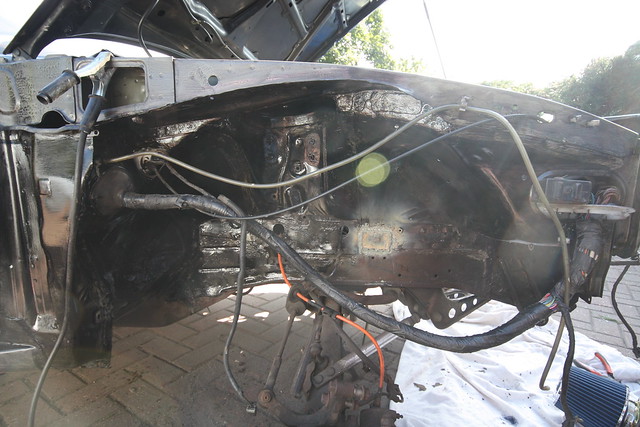 Front crossbrace derustified and krusted, little hole on the left, but leaving it be as its been well treated. 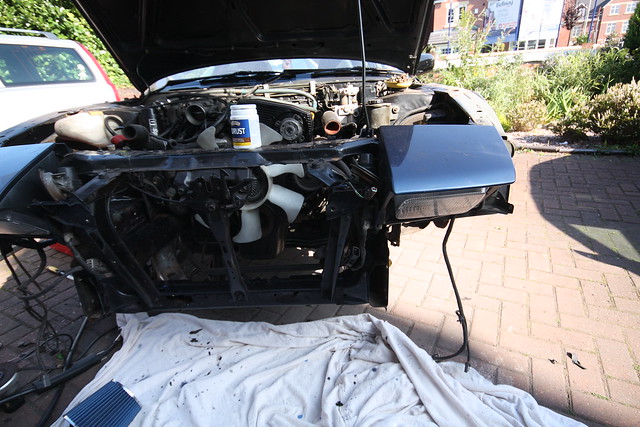 and hammerited  Passenger side after de-rustifying, seam sealing and then first coat of hammerite  Cut pipework tray and battery tray derustified   Quick snap of what I've done to the lips on the arch sides and top you can see it flattened in these pictures 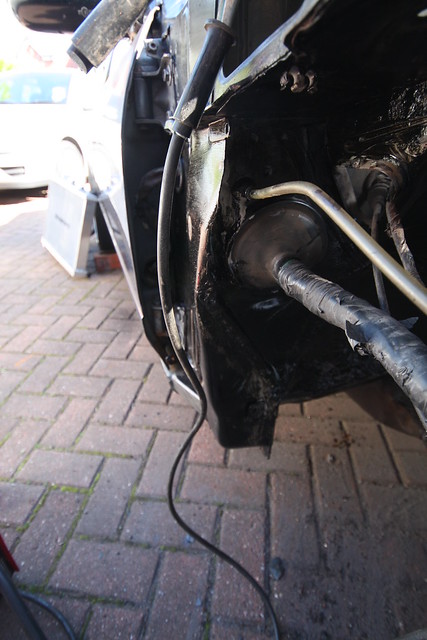 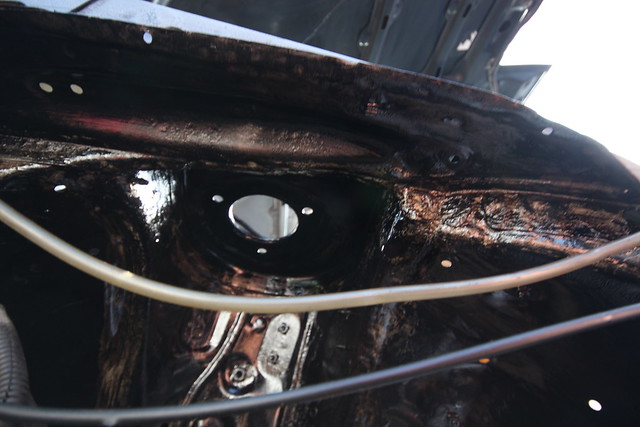 I've also undersealed both arches so it's now all protected with krust, two layers of hammerite and a layer of underseal, will probably do another coat of that tomorrow. Started to cable tuck the driver's side, I've pulled the washer jet and rear washer jet tubes through the frame rather than round the outside for extra clearance under the wing as it was quite tight last time causing the panel gap to be out. Finished up the arches with two coats of under seal and started to bolt things back together at last!  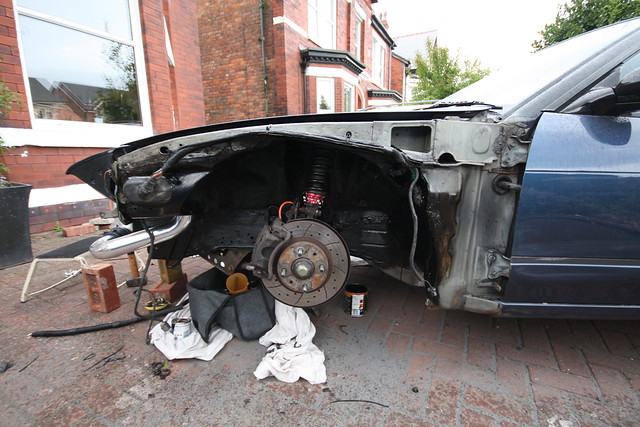 Mounted up the intercooler ready to make the brackets and make sure it was going to fit. 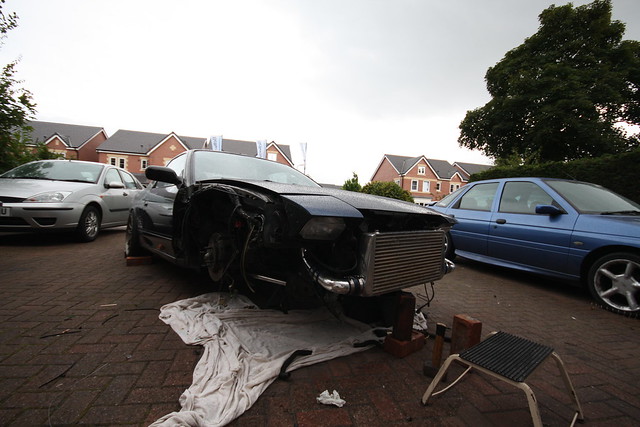 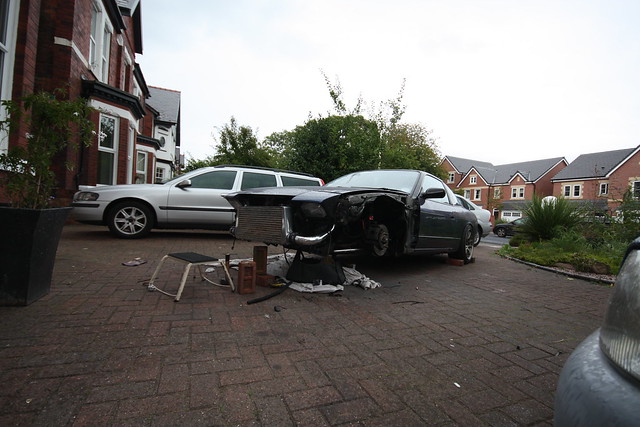 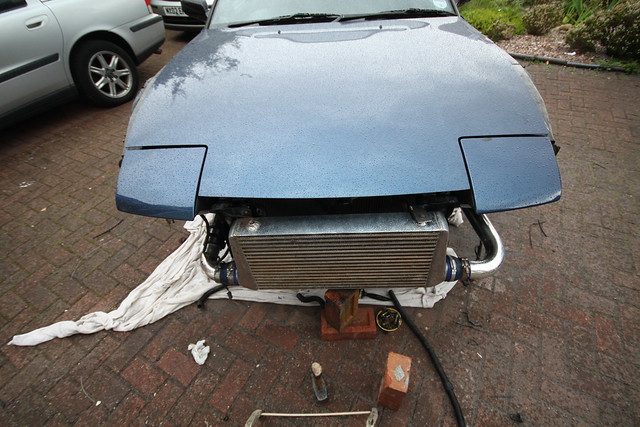 Mounted up the radiator as well with new brackets also, few bits to tidy up then its ready to go I think managed to get everything back on and running yesterday, managed to get down to mascrat manor without any testing, literally put it on the floor and set off. Everything was alright till the way home where my bodged bung where the dumpvalve had previously been on the fmic pipework popped out, easy fix though so making a proper one today. Only other hiccough was smashing my number plate off on the drive when i pulled up.   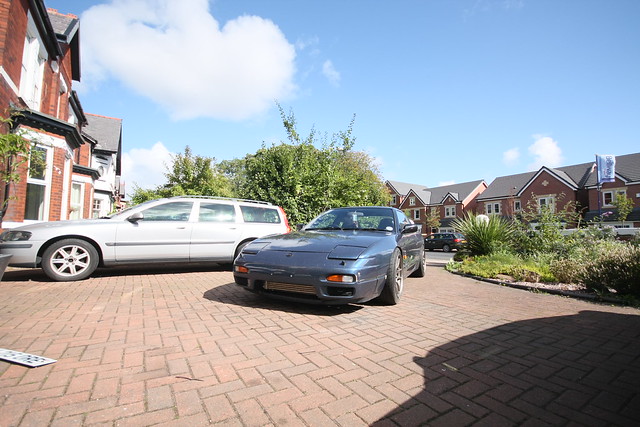  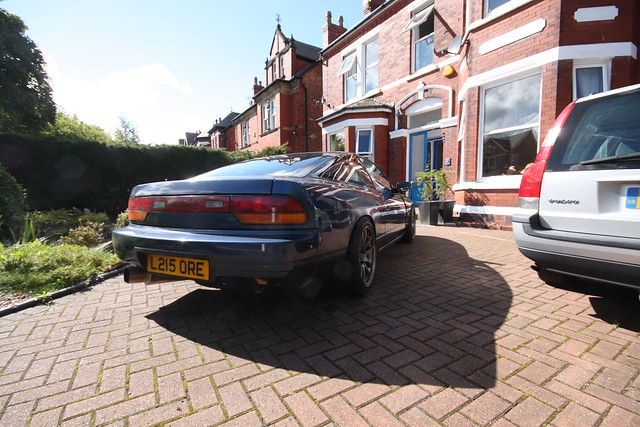 and a few interior snaps  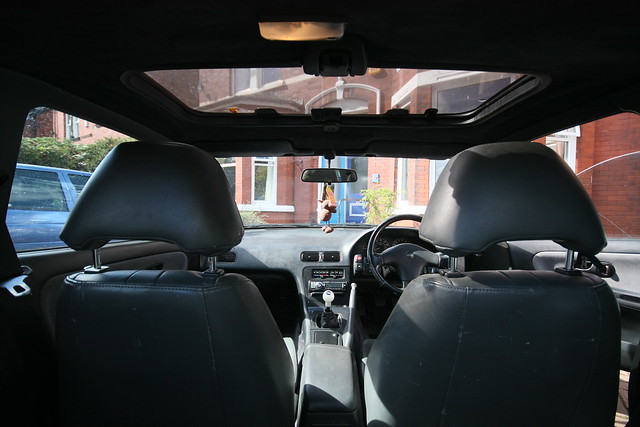 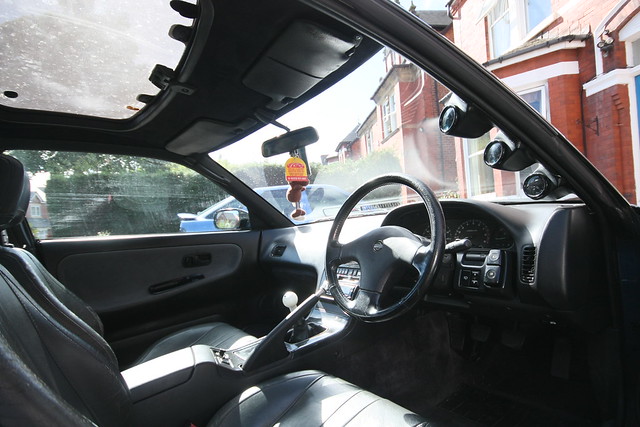 That's about it for now, next is to get the alignment near ready and then get to work on some comfort stuff, making the interior a bit nicer, stripping the rear seats out, some audio stuff maybe Dodgy 3 wheeling to get new studs installed 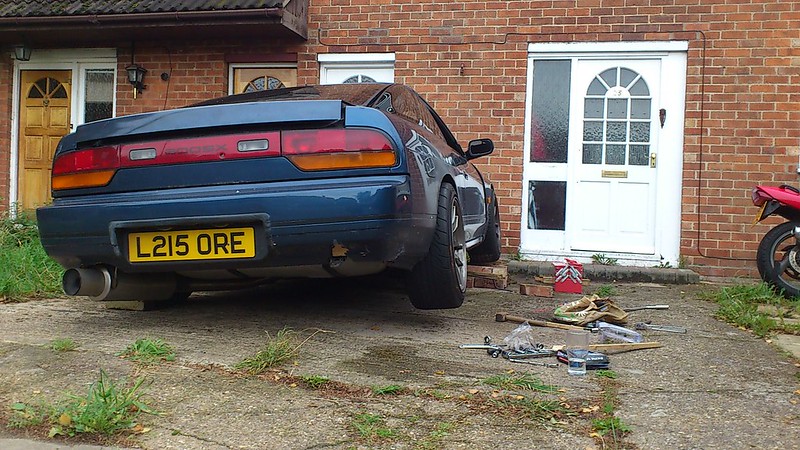 And back down. 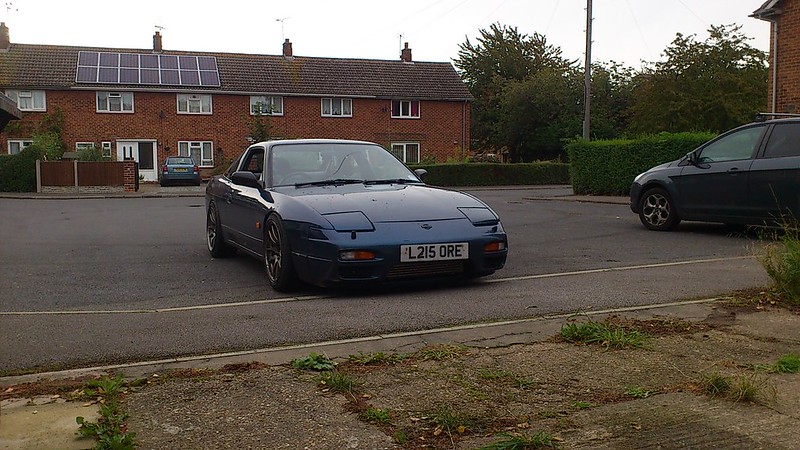 These ford ones are a much much better fit So I've got a bit bored of not being able to listen to the radio, current aerial was all right, but the innards where broken, so wouldn't go up and stay up or retract, that added to the fact that I'm also not keen on it meant I got a glass mounted aerial. Since I installed that it's not seemed to work properly probably because I left the box of tricks that connects via a big multi plug on the original aerial unplugged. So plugged that back in after realising my stupidity turned the ignition and all was fine, and I could finally hear the radio again, but when I turned the key and started it up it lost all its signal again. I think this may be down to the live that I've used to power it, as it was well grounded. So I've ripped it out as you can see before it was i bit of an eye sore from outside (rear quarter window the thing hanging down). My idea being to remove the box from the aerial part so that i can hide the box with the electronics and place the aerial piece some place better, maybe behind the blacked out part of the window So I've decided whilst i sort out the 12v+ Live issue i may as well make it a bit more hidden and visually acceptable, as the above attempt doesn't cut the mustard. In true Blue Peter Style Take one glass mount aerial: 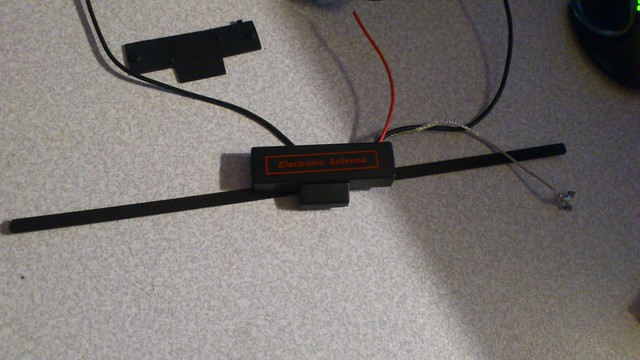 Remove rear screws and dismantle, leaving you with a circuit board and the long rectangle of the aerial, before I took the photo I'd removed the rectangle aerial piece from its holder and separated it from its wire which connects to the circuit board 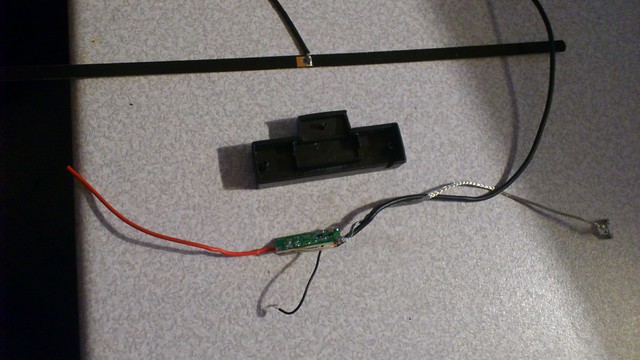 Find a new length of wire and solder one half to the aerial like so; 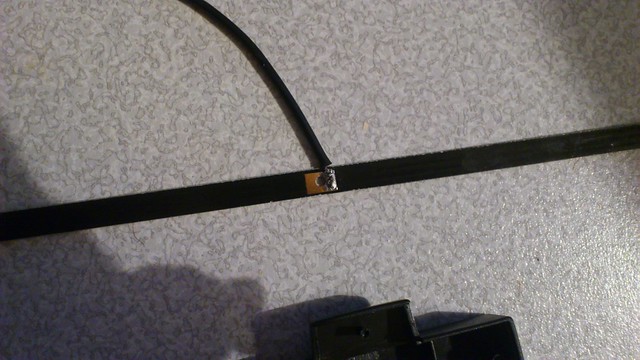 Re-solder the other side of new wire to the correct part of the circuit board  and then reinstall gubbins back into the original box 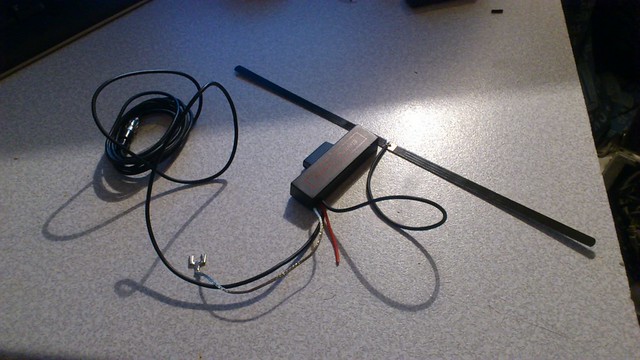 I have hopefully left myself enough room for me to mount the plastig box within either the roof lining, or the B pillar plastics. This should then allow me enough length on the wire to position the aerial in a nicer position. note: the red live wire is chopped and going to be soldered to a decent 12v ignitioned live when I re-install. |
|
|
|
|
11-03-2012, 12:16 PM
|
#5 |
|
Leaky Injector
|
So had a chance to install the adapted glass mount aerial today, some pics:
antenna installed behind the blacked out part of the window 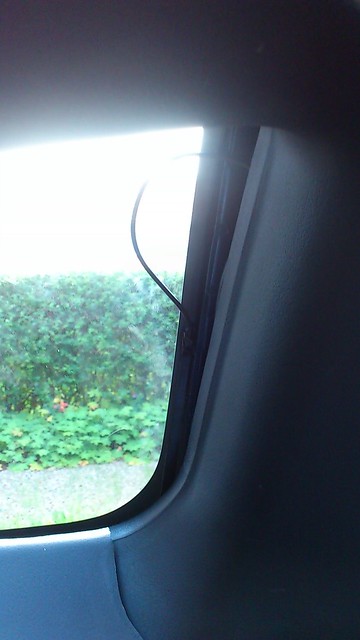 all the wiring tucked up nice, had to take the elctronics out the box as there wasn't enough room for it to sit behind the pillar trim. Electrical tape wrapped then double sided taped to the pillar metal to hold it  Pillar trim re-installed, as you can see its hidden nicely just behind the plastic  And you can't see if from the outside either  Now this worked really well when the radio and centre console where apart, and testing everything to ensure it was all good before soldering. Then fine after soldering and installation but is completely rubbish when all the console is back together, all I get is static. Where as when the console is out on my lap or on the floor it picks up all the stations with great quality. So I re-earthed all the original radio connection, and also the frame work for that holds the radio in place. But still no joy. If I leave it on whilst I install it back into the console you can hear the static set in and then take over as its locked into place. Anyone any ideas why this might be? I have my gauges earthed to the same place and they function just fine :S Super confused, took it for a drive and still crap and wont find signal for any station. 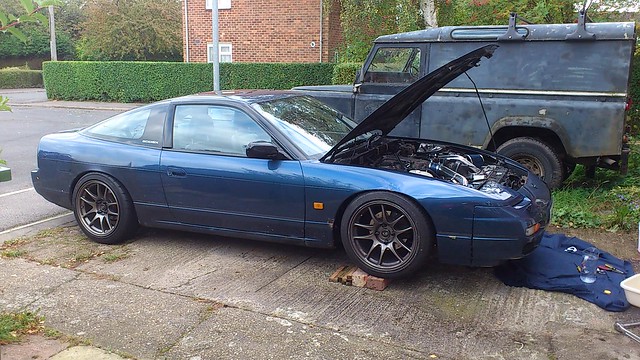 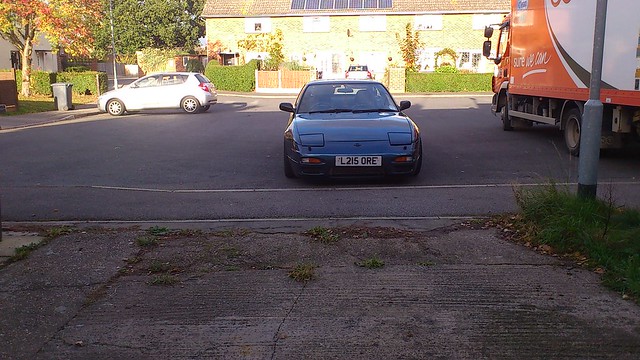 Also just ordered some new steering rod ends as mine are looking a mess and im pretty sure they're the cause of my steering vibrations at about 60-80+ and whilst I change them I can sort my toe out on the front passenger wheel Thought I'd go visit the girlfriend for a few days last week, but the car had a different plan! I stopped off at Roy's to pick up some 4 stud hubs he had lying around so that the new studs I have could seat properly and so i could replace the rears as I've a dodgy bearing, the car had ran pretty well all the way back. But shortly after leaving Roy's I noticed the water temp smash through the red followed by a cloud of steam. Was pitch black but could tell that it was coming from around the back of the plenum/block area. Limped it home the last 3 miles keeping an eye on the oil temp gauge, which stayed below 100 thankfully. By this time it was 11pm so just pulled up the drive and left it to drain whatever was left of the fresh 20 quid coolant I'd replaced earlier in the week... Had a nosy in the morning, filled it up and took it out to warm it up. Looked for the leak and couldn't find it no matter how many times I took it out. Needing to be back in Lincoln by 10am Sunday morning and it being now Thursday afternoon I decided to start the hunt, be it either a split pipe/knackered gasket or whatever. Before i did anything too drastic i replaced the one front hub that Roy had found, and re-seated the other side, whipped off the steering arm ends and replaced. Took it out for a drive to check and they seemed fine. Left the rears for later. So then stuck it into the garage and ripped all the heater pipes off at the rear to find they where all fine bar one which seemed to not be tightened up so much at one end. So re=attached thinking I'd found the issue after a good few hours of catching my fat hands on every pointy/scratchy jubilee clip/connector/clutch and brake line there is around there. No luck still leaking, this time its pouring out even on tick over under barely any pressure. So remove all the pipes and go get Roy's opinion on them, as I couldn't find anything wrong! Thankfully he gave me a couple of bits of pipe and suggested to just replace some with new pipe work from Halfords as its dirt cheap and sold by the meter. So with this done I whipped of the inlet manifold to see what else could be leaking as we'd found the area but still not the source. turns out it was the water pipe to the oil cooler exchange unit above the oil filter, it had split in 3 little places. Replaced all the pipes I could with new 15.8mm piping, made new gaskets for both inlet pieces and thermostat housing and set about putting everything back on. This being saturday afternoon now it was dragging on. Joys of old clips hard to reach places! Couldn't get the fuel lines that go around the back of the plenum to sit right, thought i'd finished, went to start it up and it spat fuel everywhere. To get them back on i had to move the clutch master cylinder to the side to be able to get my hands back down again. Finally with that on I managed to get it started up and out for a test drive as no leaks where showing! Hurrah I thought that's the end of that, all done sorted and replaced where needed, and again i had a water leak from somewhere, turned out to be the metal thermostat/radiator inlet pipe piece, tightened it up, still leaking. So made a new gasket again and replaced, still leaking! took it off had a look at the metal housing, and there's a ruddy great chip in it all the way to the edge!! Nightmare, needed to leave in 8 hours and the cars still a mess! Called Roy (again) and he had the part I needed to replace it with so bombed it down there at 11pm to pick it up and come back. Fitted it at 5:30am next morning and set off straight to Lincoln at 6am! What a weekend, mega stressful, barely saw the missus, missed the Halloween party I was meant to be hosting and ended up loosing the footie match I was playing in Lincoln Sunday morning! So it all sucked! There's a wire out on my lambda sensor so used tonnes more fuel than usual, although it ran super smooth and very well. I'd forgotten what it was like to have power as I could barely drive it over 60mph before due to steering arm ends being so knackered. Snapped up a fiberglass copy kouki spoiler which needs a little work to be mint off Roy, but before it goes on I have a lot of other body work to get on with so this will be a small part in comparison, as well as a new lambda sensor, which I need to get wired in asap. If you read all that congrats and have some pictures as a reward 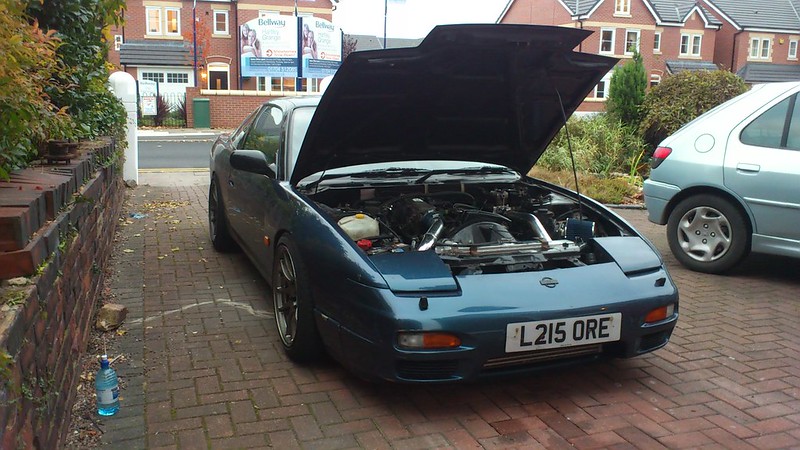 It actually balances on 1 wheel when jacked up like this! 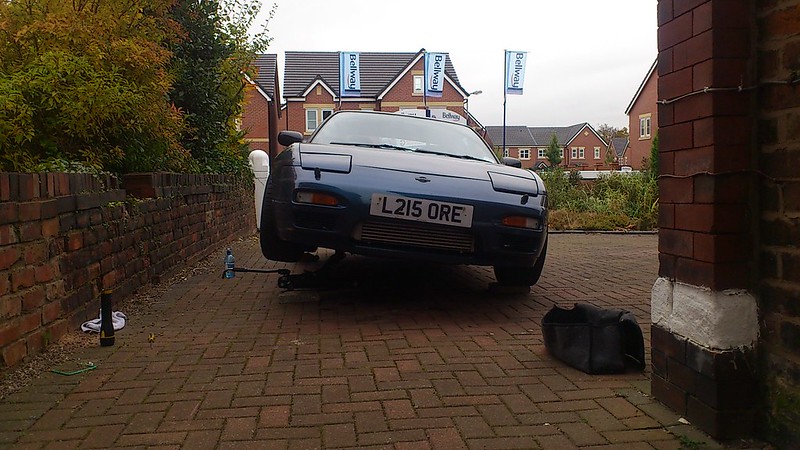 Offending thermostat housing, chipped my belt cover. mega boo. 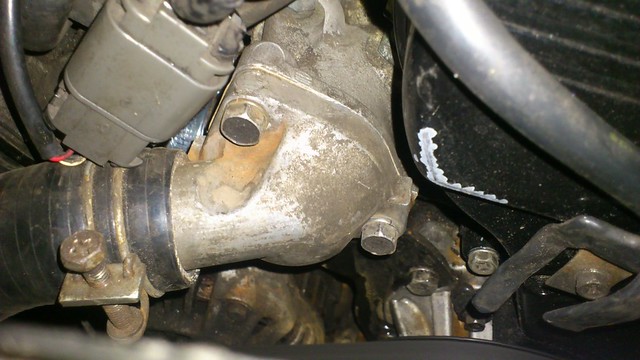 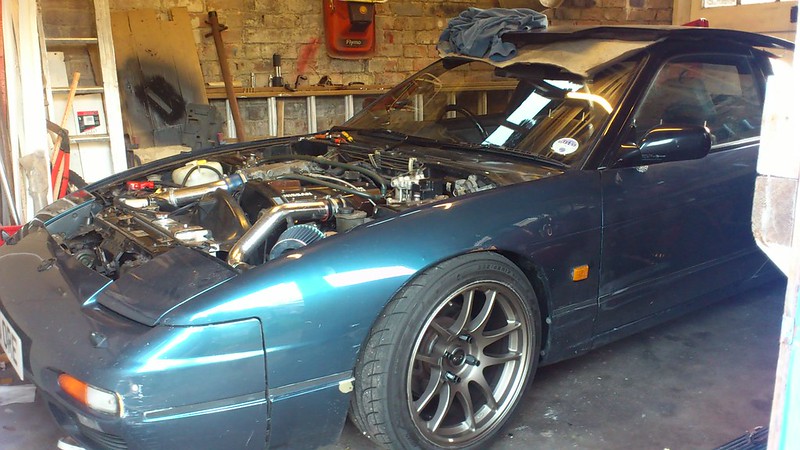 Pipes out, clutch master cylinder moved out the way for access 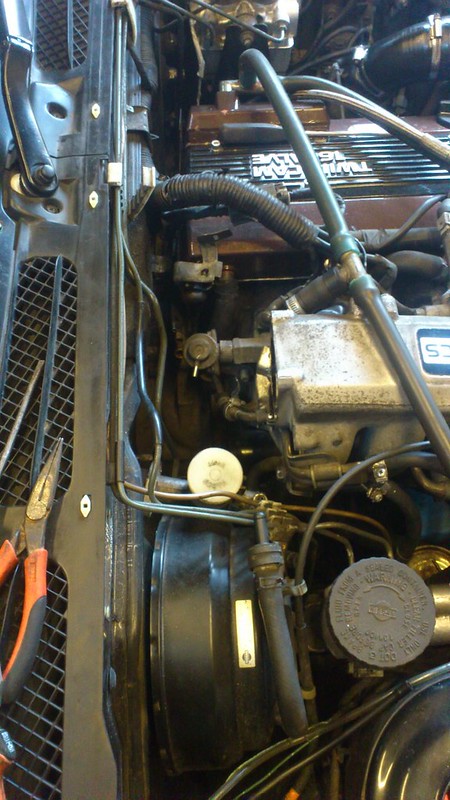 Offending water pipe, before ripping everything out so i could get to it [IMGhttp://farm9.staticflickr.com/8464/8135763748_ecc0b82cfa_c.jpg[/IMG] My view at 12am and 5:30am yesterday morning.. 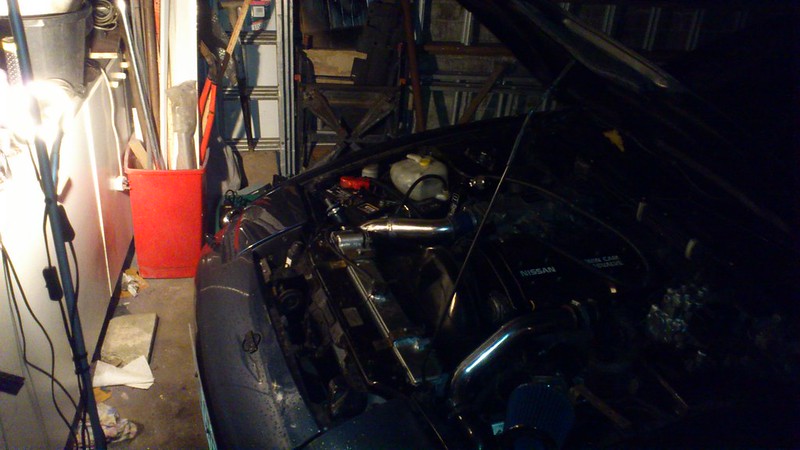 Didn't manage to get any more pictures as it was such a rush, and just me working on it. Also grinded away the bonnet hinges so that i can open it 90deg since I cba taking the bonnet off every time this shit happens. Next up sort rear hubs out and the other front hub that I didn't replace, also figured why my abs light is on, the right hand side front abs sensor metal that sticks out towards the hub is snapped off! Massive massive thanks to Roy, who also took me out in his RB S13 which is just utterly fantastic. Now I've seen it in the day light too its just immense :notworthy So I'm having a bit of a parts collection at the moment for some interior stuff I've been looking at doing for a while, just to make it a bit more up to date OEM+ kind of deal. Parents have offered to get me some stuff for xmas, nothing massive as we're all a bit skint at the moment, so perfect time to get these little bits ordered in. Bits I'm going for are footwell lights, which I've picked up from a ford escort, as finding the JDM 180sx ones are like hens teeth, so figured I'll make my own.  Then a Z32 ignition ring led S5BQSWL-cTDg~~60_12.JPG) To make into one of these that i spotted over on here, but in white, as I'm not into this whole ricer LED look. 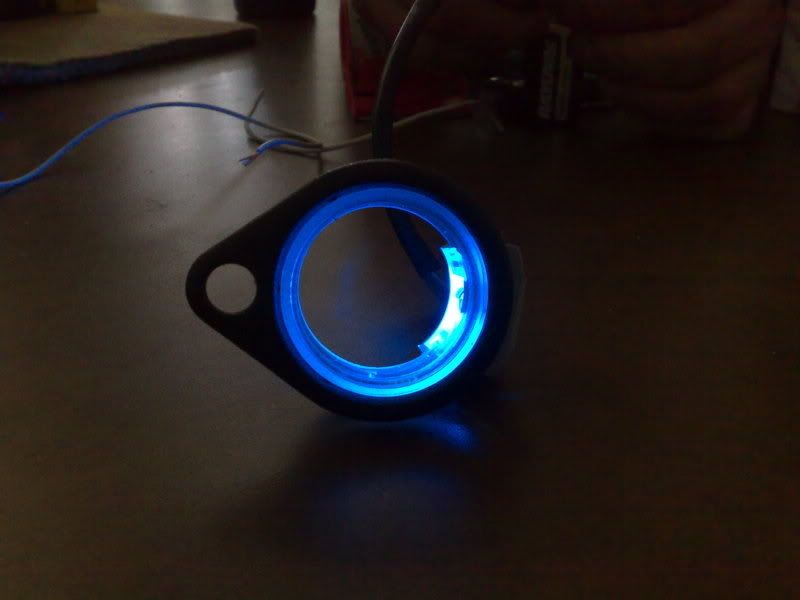 Also ordered an interior light dimmer, which keeps the interior lights on for 60 seconds and then fades it out, something pretty useful, I'll be wiring this in so that not only does the centre light stay on for a while, the footwell and ignition ring also stay on long enough for you to get settled. Also ordered a switch so that I can run a cut off to the fuel pump supply as added safety over and above my immobiliser for when it's parked in less desirable areas. New dash bulbs for the instrument cluster, those 360 ones along with some red led's for the needles, when I figure out which ones I need and how I'll go about it. I've also wired up my S14 map lights ready to be installed after a coat of matt black on the grey surround to see if I can get them fitted, as I use toll roads quite a bit, and the rear S13 light might as well not be there when routing for change in the dark. I'll obviously do a write up on how to fit/adapt these parts to fit when I get my hands on them after xmas. |
|
|
|
|
11-03-2012, 12:18 PM
|
#6 | |
|
Post Whore!
 Join Date: Dec 2010
Location: SoCal 909
Age: 31
Posts: 4,743
Trader Rating: (42)
  Feedback Score: 42 reviews
|
You have done a lot! Looks ten times better then our 40s that age
__________________
Quote:
|
|
|
|
|
|
11-03-2012, 12:44 PM
|
#7 | |
|
Leaky Injector
|
Quote:
Definitely done a lot, seeing it all on one page puts it into perspective! There's quite a lot of the early stuff that I haven't documented either, mainly through working on my own on it. Still a lot to come, mainly visually as its quite scruffy at the minute from the outside, but will be sorted in time! |
|
|
|
|
|
11-03-2012, 12:47 PM
|
#8 | |
|
Post Whore!
Join Date: Dec 2010
Location: SoCal 909
Age: 31
Posts: 4,743
Trader Rating: (42)
Feedback Score: 42 reviews
|
It's held up great compared to American 40s
__________________
Quote:
|
|
|
|
|
|
11-03-2012, 04:23 PM
|
#11 | |
|
Leaky Injector
|
Quote:
|
|
|
|
|
|
11-05-2012, 05:01 AM
|
#13 | ||
|
Leaky Injector
|
Quote:
 Quote:
Hopefully for a bit it should be just be bits that I want to do and then I can get out and smash it sideways and have the fun I thought I was going to have originally! |
||
|
|
|
|
11-23-2012, 11:42 AM
|
#15 |
|
Leaky Injector
|
Got my stereo brackets through this morning so I can relocate the stereo to behind the centre console plastic as it was intended to be!
Cheers Ben at Emperor Garage, quick delivery perfect :thumbs: Here's a quick write up of what I've done This is how it's been since I've had it  From behind  Slopy fitting down the sides, pet peeve right here.  How it looks with the front off, cage fitment is pretty rubbish also  Mocked up headunit and flip down din unit onto the brackets, because of the size of the unit itself you could have seen loads of gaps around the edges so I made a black card surround to fill the gap  Fits really nice, and looks spot on too built up  No fitted pictures yet, its too dark outside. Also fitted new battery terminal adapters as my small battery uses small terminals, so stripped the old ones off and got the new ones off, now I don't have to worry about them falling off :wack: Installed pics   I used one of my graphics pens to black out the inside edges in black so that they would be less noticeable, this is how the card surround looks without the headunit front  The Moose, Why Moose? Because I don't know.  Looks tonnes better than before, pics remind me I need to re-dye my carpet! I've also relocated my iPod cable into the centre console arm rest glove box, saves me having to reach over to the drop down glove box every time I plug it in (lazy I know) Plan on pulling a small LED into there so that I can see when I open it up too, wire it up to the one in the ash tray. So I've had a few bits and pieces arrive through the post, ready for use after xmas!  Few cheeky bits I've not mentioned yet in there, steering hub, snap off release, switch and a matt sunstrip (very ricer, not sure if I'll like it yet, but I'll put it on and see first) Got a wheel coming too but not saying what it is until i have it here and inspect it see if it's worth it. Switch will be for a hidden fuel pump cut off switch, added safety when parked in dodgy areas. I do have a different switch position in mind for this, which is very discreet and you just wouldn't know it was there if I can pull it off, but it needs a few attempts to get it right, and this switch will do until I've perfected my uber mega discreet awesome switch. Also tried out my footwell lamps, might need to order some more of these LED bulbs check out the difference  I'll be upgrading all the bulbs to LED to match, including the over head lamps. Also managed to get hold of a 180sx map light including bracketry so I've ditched the idea of retro fitting the s14 lights.  |
|
|
|
|
12-01-2012, 07:00 PM
|
#16 |
|
Leaky Injector
|
Gave the poor girl a wash as she's looking pretty mucky recently with the weather and hasn't had a clean for a few months! Bad owner I know!
Pic Whoring time! 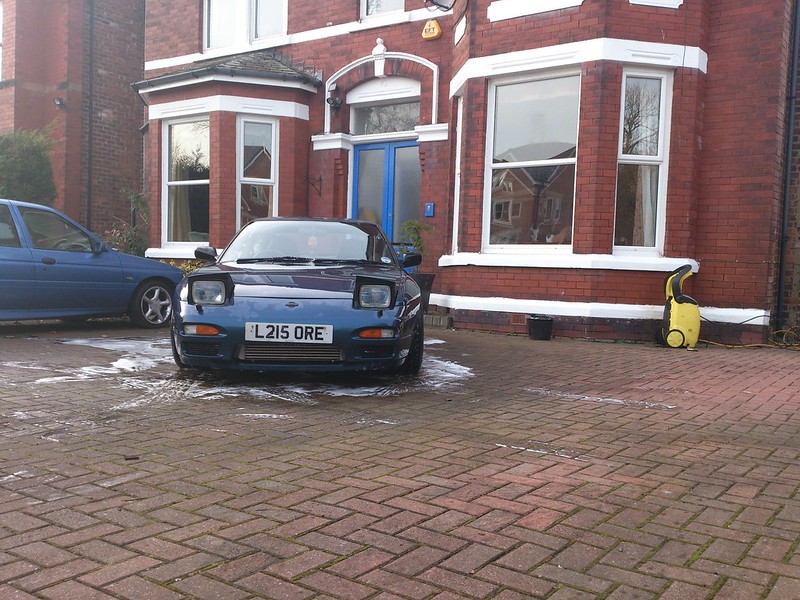 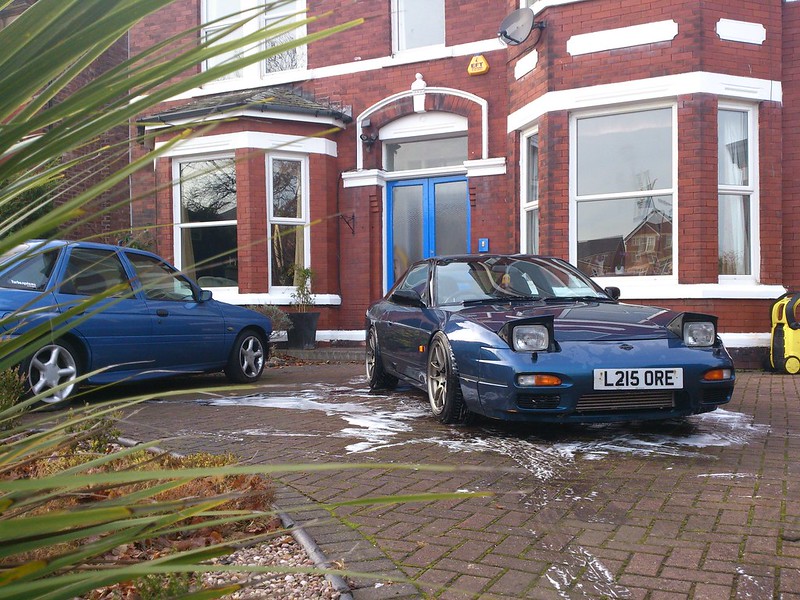  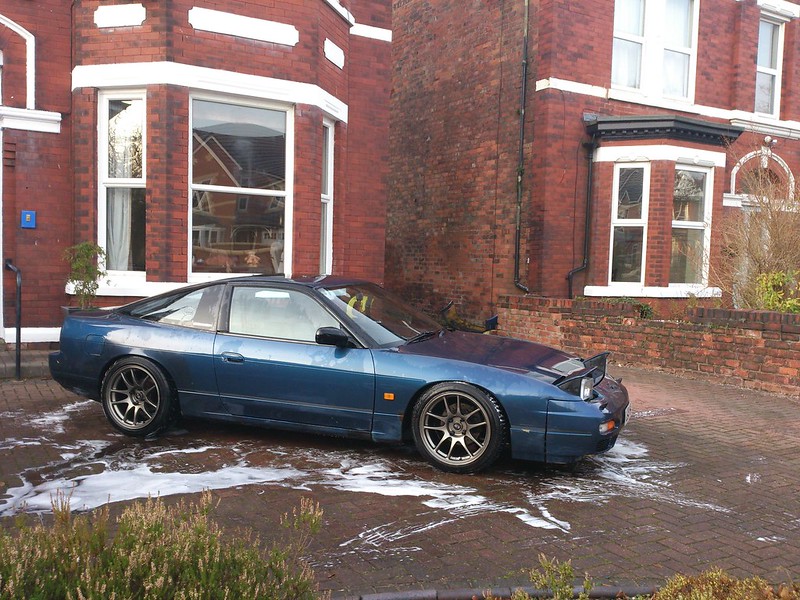 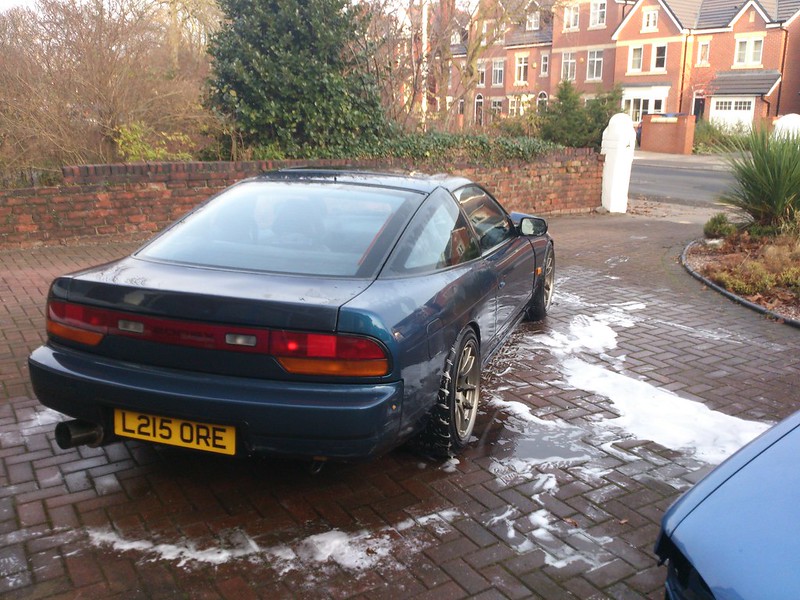 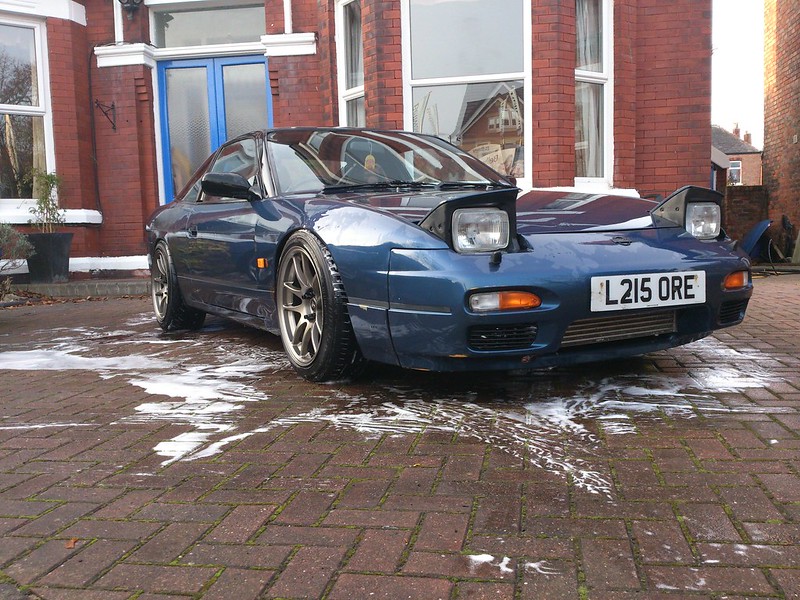 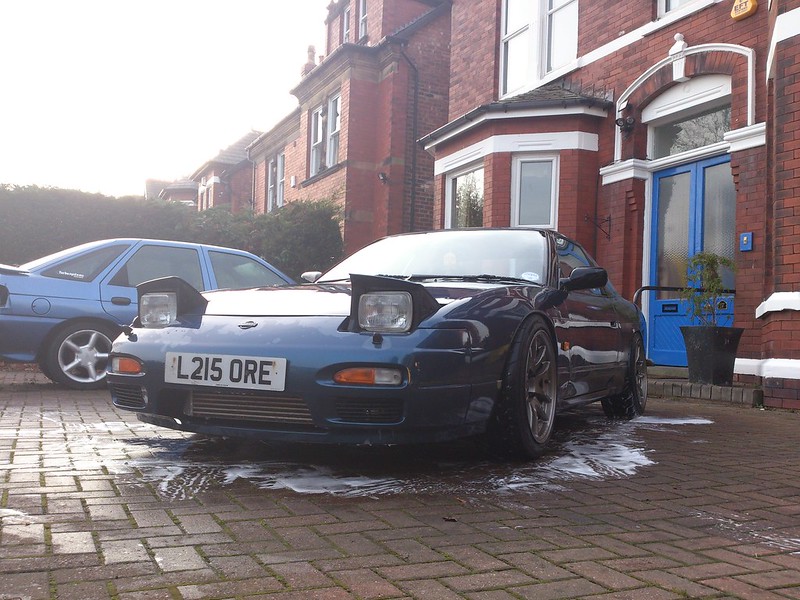 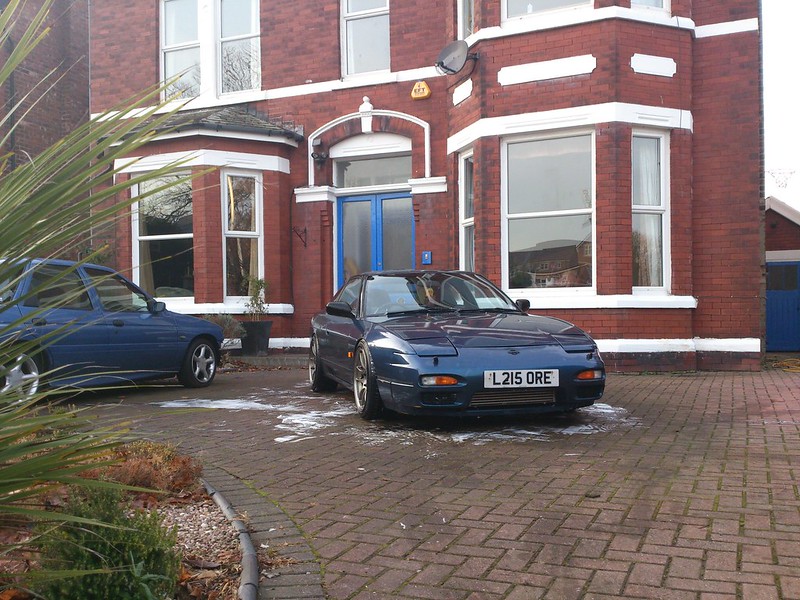 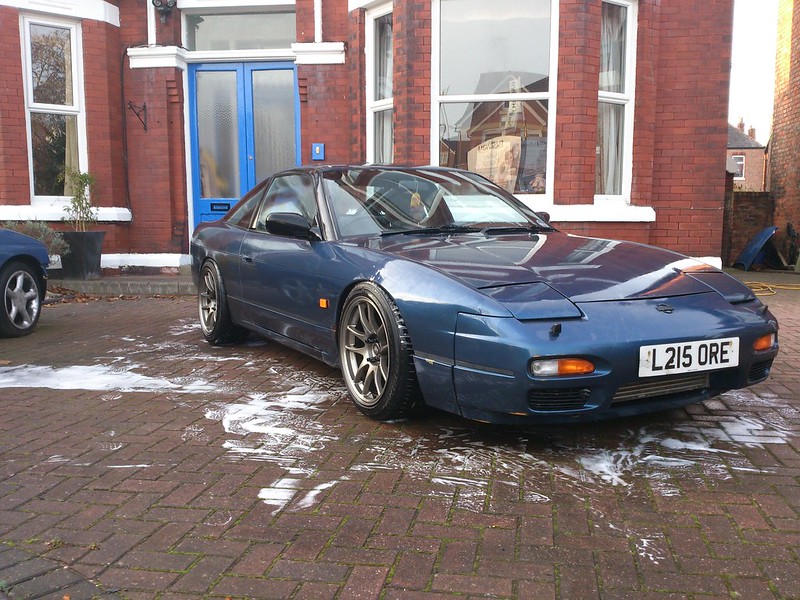 Yes it's still wet, but that's the only time that it looks any good :wack: Much better, I'd nearly forgotten what colour the wheels where! Last edited by steve109; 12-01-2012 at 07:33 PM.. |
|
|
|
|
12-03-2012, 09:25 PM
|
#20 |
|
Zilvia Addict
 
Join Date: Jul 2008
Location: Canada
Age: 37
Posts: 720
Trader Rating: (0)
Feedback Score: 0 reviews
|
Props to you for sticking with the car even though it keeps letting you down. +1 for a well documented thread too
__________________
-Jordie Lewis '93 Skyline Type M |
|
|
|
|
12-04-2012, 05:05 AM
|
#21 | ||
|
Leaky Injector
|
Quote:
Quote:
 |
||
|
|
|
|
12-28-2012, 11:01 AM
|
#23 |
|
Leaky Injector
|
Have a couple of things in the pipe line at the moment z32 maf & t28 and elbow pretty much sorted, just waiting on some 444cc's or more to crop up (I missed out on some the other day that went super cheap on the bay, gutted!)
These will all probably go on some time next year along with a re-map which should see me at stage 3, but i'll make sure all my cooling system and everything else is running properly before then obviously. Also started my kouki savings pot recently, so if a few things crop up cheaper than I can buy new, but in good condition, bits could come in relatively quickly, aiming to pick up the lot before April. Looking at Magic Aero bits as the genuine stuff is way out of my price range for now and the quality of his work is just top notch. Hope you all had a super christmas and santa brought you all the gifts you wanted! I know I got what I wanted, since I bought all mine! Fitted my Nardi Replica, for now without horn or indicator cancellation or quick release as it was raining and getting dark, its also on the piss! nothing like doing things right first time hey! All I did was to remove the 10A fuse for the horn in the engine bay, then remove the cover in the centre of the steering wheel, undo the 19mm centre bolt, wiggle the steering wheel in and out, left to right, and voila off it came. To re-fit without horn, place boss over steering column splines (so the wheel will be straight, unlike how I did it), then replace the nut, tighten it up, and bolt up the wheel. I'll do a quick write up on how to wire in the horn and sort out an indicator cancelling fix when I come to do it, but for now here's it fitted.  Seems to fit quite nice, yes its not as solid as the real thing, but I won't be yanking on it to test its solidarity. There's only me that drives it so it should be just fine for now. It feels really nice and comfortable plus I think looks pretty well inside too. Only little thing that bothers me is this gap between the boss and the steering column surround, so I will at some point be making a cover, extending the column moldings to hide this, as it looks rubbish with it. These need to come off anyway to allow me to fit my keyring light so that won't be such a huge issue to sort out.  I've also fitted my LED bulb in the centre interior light and by jove its bright! Apparently my phone camera doesn't like night time photography with long exposure so its created many pixels instead..   Might need to give the light fixture a one coat of tinting spray on the inside to just calm it down a little, will have to wait and see. Few quick ones for today, put on my sun strip, still not sure on it yet, but it'll at least keep the sun out of my eyes whilst its winter. So will decide on that later, also straightened my steering wheel up!   I've also been on the LED offensive again, and started on my gauge cluster Before:  Mid way through:  And finished, although for some reason I now have my petrol light on all the time.. will look into that tomorrow when it's light again, might just be a case of the bulb being in the opposite way, but if anyone can shed some light on the situation then that'd be awesome  It's starting to become a rather nice place to be sat in! |
|
|
|
|
12-29-2012, 06:24 PM
|
#24 |
|
Leaky Injector
|
I managed to sort out the LED's for the cluster the outer edges where a little dull, as the smaller LED's weren't lighting so turned them 180 deg, and they're now working Petrol lights managed to go off somehow also whilst it's been out.
Caught the back of the clocks on the steering column and shorted the clock backlight, so had to do a little solder work to sort that out. Damage  Fixed  Proof  much better dispersion of light now, battery and petrol symbols light up just as much as everything else now  Also whilst I was there I had a check to see if the Key ring light would fit over the ignition barrel  Yep its a winner! Bought a dremel today so I can work on the ignition ring tomorrow, also fitted a different column top surround to get rid of the little red LED that was attached to nothing for a cleaner LED free one. Also made a fill piece to fill the gap where the new hub boss is and it looks much much neater. Will grab a picture of this tomorrow as it was too dark to get one when I'd finished. Decided to get a head start on my ignition ring light Started with the standard ignition bezel   Ground down the inner part of the bezel so that you can still see the width of it  Then Dremel'd it out slowly to the size of the light ring, then polished the clear plastic part of the ring light And voilaaaa  More soon |
|
|
|
|
12-30-2012, 10:46 AM
|
#25 |
|
Leaky Injector
|
Started work on my footwell lights today, making the original holes fit the Ford Escort lights I managed to source
Both original light holders are a little too small for the light covers I managed to get hold of, so I've set about making them the correct size to accept them. Quick write up on how I've gone about it, same process for both light holes On the back of the panel there is a little raised area like so  File or dremel this down like so (also gave the panel a wipe as it was filthy) and then I widened it a few mil as well and neatened up the edges  Then created a square to accommodate the footwell light, for this i used a spare piece of s13 interior that i had lying around to keep the colour/texture the same   Then secure in place, I used aroldite for this as that's all I had to hand  repeat for the other panel and the final product should look like so Under steering column panel  Passenger side kick panel  Can't wait to get these hooked into the loom Also some quick snaps of the steering column cover to bridge the gap behind the hub adapter   Enjoying this recent spate of making! |
|
|
|
|
12-30-2012, 06:36 PM
|
#26 |
|
Zilvia Member
 Join Date: Nov 2012
Location: Carson, CA
Age: 31
Posts: 167
Trader Rating: (5)
Feedback Score: 5 reviews
|
In case the fuel light goes off again in the future, just change the light bulb with an old fashioned bulb. I just did the LED light swap and had the same problem, although mine didn't go off. The clusters don't really accept the LED light bulb for that specific spot, it might be a capability issue with the fuel sensor.
Regardless, great build. I'm inspired by the footwell lights, and basically everything you've done. |
|
|
|
|
12-31-2012, 08:26 AM
|
#27 |
|
Leaky Injector
|
Thats exactly what i did, just replaced the bulb with the original, certain ones need a normal bulb which i found out, so its all working nicely now. Cheers for the info and the compliment!
|
|
|
|
|
01-02-2013, 05:21 PM
|
#28 |
|
Leaky Injector
|
Right update time, got a little bit further with my LED footwell lights and keyring and 180sx maplight upgrade
Started prepping the map light, took it apart and gave it a clean up with some soapy water and the rough side of a scouring pad      That's that painted up nicely in map light so put the new bulbs into the housing, needed to bend the negative upright a little bit further back to make them sit snug but that's no big deal  I've also built myself a new wiring loom for the footwell and ignition ring lights so now they're all connected Please forgive the chair and cusion combo... it's not mine..   Just need to get them in and try out the fade out unit as I don't have a 12v supply to test it in the house with. Should look real nice hopefully not too OTT, I also want to wire them in to a separate switch too but need to figure that out at another time I think |
|
|
|
|
01-03-2013, 11:53 AM
|
#30 |
|
Leaky Injector
|
So I've near enough finished my install now, its all wired in and fitted bar the front map light and screwing together the cowlings
Super pleased with it, prepare yourself for some crappy phone pics, it's not over the top at all and feels natural when you step in      Not managed to get my fade out box to work so for now they go off when the doors are shut. I did blow up a 9v battery when testing my circuits so chances are I've cooked its insides, but I might be able to fix it with a box of tricks I have somewhere Can't wait to get the 180sx map light in now  |
|
|
|
|
| Bookmarks |
|
|


 Linear Mode

