|
|||||||
| Tech Talk Technical Discussion About The Nissan 240SX and Nissan Z Cars |
 |
|
|
Thread Tools | Display Modes |
 11-18-2005, 05:41 PM
|
#1 |
|
Zilvia Junkie
 
Join Date: May 2005
Location: In my garage....
Posts: 301
Trader Rating: (0)
 Feedback Score: 0 reviews
|
How To: JDM Conversion S13 w/pics
I dont remember who it was that asked about it, but here it is. I know it's not a complete hardcore DIY write, but will get you through it. Alot of people were giving people crap for asking "how do I install my JDM front?"...so I took it upon myself to take most of mine apart and take pics of putting it back on. Keep in mind, I already had this installed and am just taking it off to help people out so they will know how to put it on, and what is essential to the process.
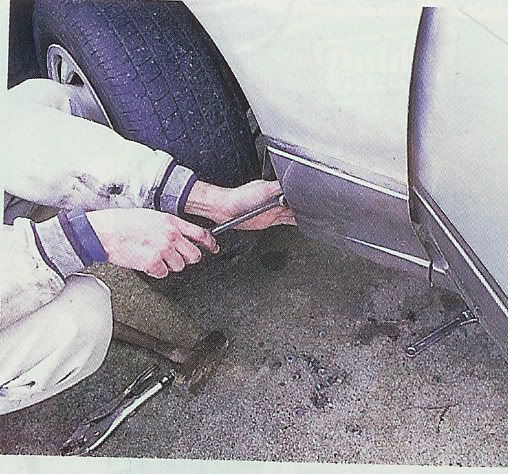
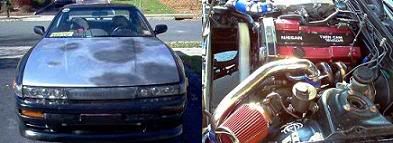
First off, all that is essential is: 1. Common knowledge. 2. Common tools..ie ratchet set, open/closed end wrenches. 3. Patience I believe throughout the process I used a 10mm, 12mm, 14mm, and maybe a 17mm socket. The first step is to completely unbolt the original pop-up headlights. DO NOT try to disassemble them to take them out...take out the whole thing in one piece. IIRC, there are about 4-6 screws holding the headlight assembly in place. These can be seen in pic 1. 1.)  After removing those screws it should look like that as well. You will of course do this for both sides...duh...so here's another pic for reference. 2.)  Once you have both light assemblies out I would start removing the bolts that hold the stock bumper to the stock fenders. These are a little harder to see and also prove to be a little more challenging to get at...especially the top ones. I believe there are 4 on each side and you should be able to see most all of them in the following pic (pic 3). 3.)  After you have gotten to all of these on both sides I would next recommend disconnecting all electrical connectors (lights, turn signals). Or you could have done it to begin with....either way. The next step for me was to loosen the front bumper supports and remove the USDM version. Where the bumper attaches and detaches can be seen in pic 4. 4.)  Once removed it will look like this. As you can tell, the bolt closest to the bumper comes out completely, the one further back is to stay in place and just have a nut that comes on and off. This helps out alot when trying to do the removal/install by yourself. Just set it up on the two back bolts and then slide it in and secure it with the other two. Here is another pic with the support removed (pic 5). 5.)  After the support and bumper is removed you should be left with something like this shown in pic 6 & 7 6.)  7.)  This should leave you with only having to remove the fenders now. I believe there are 4...maybe 5 bolts along the topside of the fender shown in pic 8. 8.)  There is also another bolt hidden behind the door when you open it. You can see it here in pic 9....obviously mine is missing (that can't be good). 9.)  Then you just have to take out the bottom ones (I hope) and you should be able to SLOWLY pull them away from the body. I say I hope cuz there might be another bolt I might have missed. It should be all good to remove though. The previously mentioned bolts are here in pic 10. 10.)  This should leave you with a naked front end....once again a pic! 11.) The install is just the opposite of the removal with a few exceptions. First off, unless you buy the JDM headlight buckets you will need to make something to secure and support the headlights. I made my own and have a DIY posted on www.240sxforums.com. I have not been able to get on that site in a few months now, so I will try to access it from another PC. If not, I can just repost the DIY on here for you. It is a real straight forward fabrication though, and requires little to no skill at all to make one. I do have a few pics so you can see what it looks like at least though. See pics 12 & 13. 12.)  13.)  All the lights should just be plug and play...no need to cut splice anything unless you want to change the configuration of your lights....(ie, parking lights, turn signals). The hood is of course self explanatory. Take off old, put on new. Just make sure to check and double check your body lines so it doesn't come out looking like a freak. This should be pretty easy and straight forward. If you have any questions or need any additional pics just PM me. I will try to also add the DIY for the headlight bracket. Here it is as promised. The link for the DIY headlight bracket as well. http://www.240sxforums.com/forums/sh...ad.php?t=56800 A few pics I forgot to add before. They show how the headlights are supported and where they bolt to the bracket.    Final Product: Before:  After:  I am in no way perfect, nor do I claim to know everything....if there is something I forgot to mention please feel free to add comments about the procedure. I hope this proves useful and helps. 
__________________
'93 Coupe BlkTp-SR '07 Chevy HHR - DD Last edited by Shawn_of_the_Dead; 11-19-2005 at 09:07 PM.. |

|

|
| Sponsored Links |
|
11-18-2005, 06:09 PM
|
#2 |
|
Join Date: Jul 2005
Location: Redlands CA
Age: 41
Posts: 36
Trader Rating: (0)
Feedback Score: 0 reviews
 |
nice of ya to do that alot of work to when its was alreay done. thanks
__________________
92 240 sx/ 92 sr20 red top,energy susp., seam welded,z32 brake swap..........so on n so on 
|
|
|
|
|
11-18-2005, 06:27 PM
|
#3 | |
|
Zilvia Junkie
Join Date: May 2005
Location: In my garage....
Posts: 301
Trader Rating: (0)
Feedback Score: 0 reviews
|
Quote:
__________________
'93 Coupe BlkTp-SR '07 Chevy HHR - DD |
|
|
|
|
|
11-19-2005, 03:07 PM
|
#6 |
|
Zilvia Junkie
Join Date: May 2005
Location: In my garage....
Posts: 301
Trader Rating: (0)
Feedback Score: 0 reviews
|
I dont know why, but for some reason unknown to me....I cannot get into the DIY page to make the bracket I posted in the original post up top. If anyone else is having trouble accessing it, please let me know and I will just add it to this thread.
__________________
'93 Coupe BlkTp-SR '07 Chevy HHR - DD |
|
|
|
|
11-19-2005, 03:25 PM
|
#8 |
|
Admin Asshole
 
Join Date: Mar 2002
Location: Retired
Age: 45
Posts: 20,394
Trader Rating: (0)
 Feedback Score: 0 reviews
|
Pretty decent write up. Although I find it hard to believe someone couldn't figure out how to un-bolt the USDM parts and replace them with their Japanese counter-parts. Oh well, I'm sure someone will find it useful.
__________________
"Speak softly,..." -Pres. Teddy Roosevelt "Be polite, be professional, ..." -Gen. James Mattis |
|
|
|
|
11-19-2005, 03:46 PM
|
#9 | |
|
Zilvia FREAK!
 Join Date: Jun 2003
Location: Berkeley/San Francisco
Posts: 1,435
Trader Rating: (0)
Feedback Score: 0 reviews
 |
Quote:
they might be helpful as well: useful how-to
__________________
 There is a time in every man's education when he arrives at the conviction that envy is ignorance; that imitation is suicide; that he must take himself for better for worse as his portion; that though the wide universe is full of good, no kernel of nourishing corn can come to him but through his toil bestowed on that plot of ground which is given to him to till. -Emerson |
|
|
|
|
|
11-19-2005, 07:07 PM
|
#10 |
|
Premium Member

Join Date: Jan 2005
Location: Cali
Age: 56
Posts: 1,371
Trader Rating: (29)
Feedback Score: 29 reviews
|
Very nice, and you did forget one bolt. The bottom one on the inside of the fender. The one that you must remove the inner fenderand use a long extension to get to it.
 Good write up. |
|
|
|
|
11-19-2005, 07:21 PM
|
#12 | |
|
Zilvia Junkie
Join Date: May 2005
Location: In my garage....
Posts: 301
Trader Rating: (0)
Feedback Score: 0 reviews
|
Quote:
Ahh, thank you. I thought I might have been missing one. 
__________________
'93 Coupe BlkTp-SR '07 Chevy HHR - DD |
|
|
|
|
|
11-19-2005, 11:58 PM
|
#13 |
|
Zilvia FREAK!

Join Date: Jul 2005
Location: Lng Bch Calfna
Posts: 1,442
Trader Rating: (20)
Feedback Score: 20 reviews
|
Again nice write up on the headlight brackets but its kinda hard when the pictures are attachments..
I think it would be easlier if it was added in this write up.. just my opinion. Great none the less! |
|
|
|
|
| Bookmarks |
|
|


 Linear Mode

