|
|||||||
| Tech Talk Technical Discussion About The Nissan 240SX and Nissan Z Cars |
 |
|
|
Thread Tools | Display Modes |
 05-11-2008, 06:30 AM
|
#1 |
|
Zilvia Addict
 Join Date: Mar 2007
Location: San Francisco
Age: 38
Posts: 756
Trader Rating: (17)
  Feedback Score: 17 reviews
|
Tips/Questions after installing Stance GR+ Pro
Hi fellow members, after the two days of learning-mistakes installing of this Stance Coilover Gr+ Pro (purchased from Enjuku), I have come up with few tips and crucial questions.
After looking at the online resources, I decided to DIY the coilover in order to learn a few things. Immeadiately, there were few questions came up which also asked by other members but answers couldn't be found online. For installing, here is a good reference: [ame]http://www.youtube.com/watch?v=sP52K8O2MSg[/ame] Front Coilover Tips 1: when taking out the two bolts at the bottom (front suspension), it is good to use a jack at the bottom to support the "bottom control arm", because you can adjust the angle of the joints but leveling up and down of the jack and push and pull of the brake assemply. If you get the angle right, both bolts should come out easily. (Of course, you will need grease like wd40 and soft hammer). Also, remember, get the bottom bolt first, so the brake assemply wouldn't fall immediately and got stuck. Tips 2: remember to preadjust the height before put on the new front coilover!! My hands were wounded, but still couldn't turn the thread to adjust height after they were installed. If you don't know you how to adjust it and don't want to repeat the process of taking out the wheels and puting them back on to find the height, then keep reading. Rear Coilover Tips 3: There are only one bolts instead of two for the rear damper, and two nuts on top in stead of three. Go from the bottom first, then repeat the procedures from the clip. Again, preadjust the height before installing. Tip 4: Can't lower your coilover? Put a jack under the control arm to push the weight of the control arms, bars, rods, brake assemply, etc., so the thread body should be turnable now. Notice, don't push up the control arm too much which this will lock up the damper. Just push up a little bit then turn the thread body till to the point you can't turn no more, then continue to adjust the jack a little bit to push up by a little. Repeat this procedure could save you a lot of effort. Tip 5: If you went into trouble, be calm, and don't freak out. There is always a way to get around your problem. Don't rush. When you rush, you will run into more problems, which will ended up in wasting time. If you can't finish your work, spread your works in two or three days. In this way, you will enjoy your time and work on your car! For Height Adjustment I'm not an expert, this is also my first install, so I'm also having questions in this setp. Please feel free to correct me. Not sure how to adjust the height? Here is how: 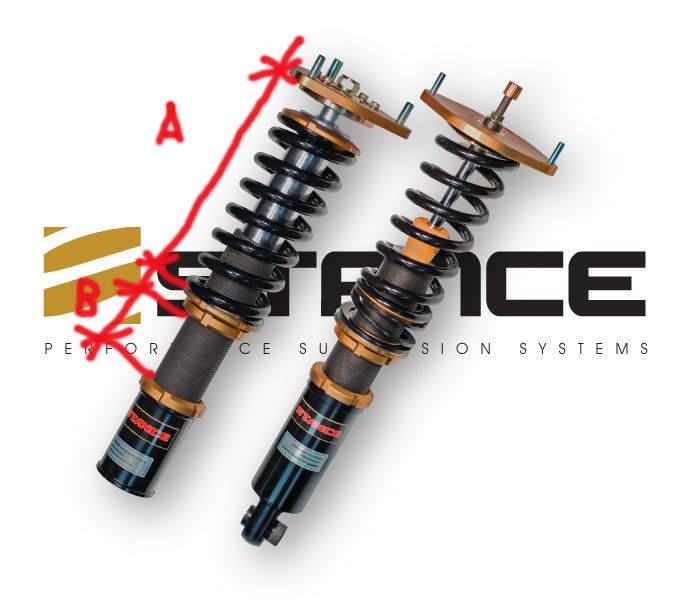 Many answers I have found are people who are saying that just lose the bottom collar (gold color below B), and turn the thread body (B). But in these two days of repeatedly adjusting the height, I found out this way might be a little problematic. When only adjusting the thread body, it will change the height of the whole coilver, which it will also change the ride height. However, at the end, you will find out that both rear coilovers are running on different height. It is because the weight distribuation at the back is different. I used the 6kg/mm spring rate and the difference between compressed height verse the uncompressed height to make an calculation, which in the results, the rear passenger side is approx. 800 lbs and the driver side is approx. 600lbs. This will give you a different compression rate when you racing on the track or driving on the street. Therefore, I thought of another mathematical way to adjust it. Instead of only adjusting the height of the part B, I also adjust the height of A, which it is meant to acheive the same compression rate for both rear coilovers. From below the camber plate to the silver plate on top of the thinner gold collar, I made couple measurements in A verses the ratio with the measurement in B. Based on the weight distribution, there is my current data: (recorded when uncompressed, which means lifted up without wheel) Passenger side A=10in, B=6.75in Driver Side A=7.75in, B=6.75in In theory, this should give you the same compression height/rate when the car is lowered, and they will give you the same height of 24.25in on stock rims from the fender wheel well to the group, which is no finger gap for both rear wheels. extra: Front Spring when uncompress 8.7in Rear Spring when uncompressed: 10in With Driver, Driver Side Spring would compress 0.05in Both Front A = 8in, B = .5in This will get you 23.75in from the fender wheel well to the ground. About 5in from the ground to front nose. The result (ride height) will change if you change any of the numbers (height of B or A), which means you might have to do anothe calculation. Again, this is my personal calculation, please use it as concerned. (This might be an absolutely unnecessary since I heard some people say don't touch the preload?) However, I have found out the ride has become a lot better/solid comparing to my initial adjustment when just adjusting the height of B without A. I'm assuming this is the reason why some people are complaining about coilovers' bouncy ride. Also, these data are calculated with the variables of helper spring which is at a different (linear) spring rate than 6kg/mm. Questions 1: When I remove the original rear damper, I found out the difference at the bottom where it holds the bolt. The stance one is thicker which seems the bolt won't go in as much as the thinner stock damper. Would this lead to an danger of unsecured bolt?  Questions 2: How to put back the metal clips that holds the brake line in position? Questions 3: How can you be sure your bolts are tightened up and won't come loose under hard driving? That is it, I hope this would help some people, and I hope other members can throw your height adjustment numbers in here with ride height, so we all can use it as a reference. I still haven't got time to turn adjust the stiffness on top (15ways)? We will see what happens later. Here is my ride after two days arousal    Last edited by dongoesby; 05-11-2008 at 10:17 PM.. Reason: additional info |

|

|
| Sponsored Links |
|
05-11-2008, 07:04 AM
|
#2 |
|
Nissanaholic!
 Join Date: Nov 2006
Location: Orange County, CA
Age: 40
Posts: 2,071
Trader Rating: (9)
Feedback Score: 9 reviews
 |
Nice right up.
I had my shop do mine, but I still need to figure out how to adjust the dampening haha. I have no clue. I'd like to have it set softer when those rainy days come along and maybe for whenever I feel like having a softer ride instead of a rough'ish one on a bad freeway haha. Got the same ones you did and they do feel better, but feel the same as my tokico blues with cut front springs ( good in the back ) and tokico blue shocks f/b. Previous owner cut the springs -.- More responsive at least though and a hell of a lot grippier in the back. It is a night and day difference with hard driving and drifting though. Makes it so much easier. Btw, did you get two extra springs when you got your coils? I did.
__________________
1986 Porsche 944 Turbo (951) 1995 Nissan 240sx (S14) Miss ya. |
|
|
|
|
05-11-2008, 10:22 PM
|
#3 |
|
Zilvia Addict
Join Date: Mar 2007
Location: San Francisco
Age: 38
Posts: 756
Trader Rating: (17)
Feedback Score: 17 reviews
|
Hey thanks, I'm not sure if I'm right. There are many different sayings of should or should not adjust the preload. As for now, I notice my preload is too high, which it is causing a steering memory (the steering lean towards to the previous turn direction). I'm assuming the spring got stuck and unable to rotate or return back to position, which causing this problem.
And yes, I do a nice set of extra spring, 9/7  |
|
|
|
|
05-12-2008, 05:51 AM
|
#4 |
|
Nissanaholic!
Join Date: Nov 2006
Location: Orange County, CA
Age: 40
Posts: 2,071
Trader Rating: (9)
Feedback Score: 9 reviews
|
Hah, I get the same thing. "steer memory"
Wish I understood suspension more haha.
__________________
1986 Porsche 944 Turbo (951) 1995 Nissan 240sx (S14) Miss ya. |
|
|
|
|
05-12-2008, 06:31 AM
|
#5 |
|
Zilvia Member
 |
adjusting both point A and B changes ride height but before even installing the most crucial adjustment that should be very exact on both left/right side is the "A". that is what is called spring preload. its not necessarily the same for front/rear, that depends on weight(cross) distribution and spring rate too. Leaving "A" too loose means your spring has unnecessarily play and you'll get ALOT of clunking and general lack of traction over bumps. Too tight of "A" means your springs will bind and you may get inconsistency especially on the rebound.
"B" can be eye-balled roughly because it will require adjustment later once you install and let the coilover settle for a few days. ofcourse you cannot adjust it with the weight of the car on the coilover (DUH!) hehe. To be honest get exact as possible because you will never know if you got it right as long as you are not a suspension guru and dont have a roadcourse to test it on. |
|
|
|
|
05-12-2008, 11:45 AM
|
#7 |
|
Post Whore!
 Join Date: Nov 2004
Location: North Korea
Posts: 14,579
Trader Rating: (27)
Feedback Score: 27 reviews
|
dongoesby: PM me... I'm local to SF and can help you out. I don't want you fucking your shit up.
Or at the least can tell you what to do over the phone.
__________________

|
|
|
|
|
05-12-2008, 02:10 PM
|
#8 | |
|
Post Whore!
 
Join Date: Aug 2002
Location: Fremont, CA
Posts: 4,937
Trader Rating: (12)
Feedback Score: 12 reviews
|
aww mel.. so sweet of you to help a person in need. haha
i can answer the easy questions 2 and 3. #2 the brackets that help hold the brake lines in place can be gently tapped back in with a bfh (or a normal sized one) and whatever tool you find necessary to help like a flat head. #3 use torque wrench and torque to specs. you can add loctite to help, but don't use the red ones. those are like permanant and will be impossible to break loose later. (probably break the nuts and bolts before you get them loose)
__________________
 Quote:
Last edited by FRpilot; 05-12-2008 at 08:11 PM.. |
|
|
|
|
|
05-12-2008, 07:47 PM
|
#9 |
|
Zilvia Addict
Join Date: Mar 2007
Location: San Francisco
Age: 38
Posts: 756
Trader Rating: (17)
Feedback Score: 17 reviews
|
thanks guys for so much of good and supportive info!!
I'm temporarily zip-tie-ing the brake line right now, can't find better solution. And yes, I found out the stance's spring is at a linear spring rate, which means it has a linear constant (spring rate is consistant at any compression). If this is correct, then manually adjusting the spring compression to match the left and right is not necessary. Also, I just found out this to be problematic too. It is commonly known that if there is zero preload, the spring will not sit in position, especially happen in a rebound. However, if there is too much preload, there will be a steering memory (the steering will lean toward to the previous turn direction), which is bad. Also, if there is too much preload (compression) to the spring, it means it is shortening the struct travel at the same time. Therefore, assuming all above is correct. The ideal setup for the coilover is to have even struct travel. !Zar!: maybe we can meet up during weekends? |
|
|
|
|
05-12-2008, 08:07 PM
|
#10 |
|
Join Date: Apr 2007
Location: Minnesota
Age: 47
Posts: 37
Trader Rating: (0)
 Feedback Score: 0 reviews
|
Very nice write-up. I too installed the Stance GR+ pros and am having trouble with the adjustment associated with them. I realize these are advanced suspension components and ideally, corner balancing and four wheel alignments are necessary to get the most extracted from their use. However, just for DD and occasional hard driving, adjusting height with tape measure and seat of the pants tuning will work for me.
My question is, the instructions say to adjust the height, jack car up sans wheel, use the spanner wrench to hold the top most gold collar lock in place while the nut on the top of the pillow ball is loosened. Then loosen the bottom most gold collar lock and turn the entire shock body at B in your diagram in effect pulling the knuckle and brake assembly upward; result, lower car. The damn spanner wrench doesn't fit in the suspension tunnel below the camber plate in the wheel well easily, therefore making the task of loosening/tightening/torqueing the nut difficult. Input? Also, for preload, the instructions say to tighten the preload collar by hand then use spanner wrench to complete two revolutions. This should be a good starting point for preload amounts correct? |
|
|
|
|
05-12-2008, 08:35 PM
|
#11 | |
|
Post Whore!
Join Date: Nov 2004
Location: North Korea
Posts: 14,579
Trader Rating: (27)
Feedback Score: 27 reviews
|
Quote:
PM me your number or aim me and we can work something out.
__________________
|
|
|
|
|
|
05-13-2008, 03:24 AM
|
#12 | |
|
Zilvia Addict
Join Date: Mar 2007
Location: San Francisco
Age: 38
Posts: 756
Trader Rating: (17)
Feedback Score: 17 reviews
|
Quote:
As for preload, it is correct with two whole turn (approx 2mm). However, it is always depending on how knowledgable you are about driving and car components. Indeed, Stance has made it adjustable, I'm sure it is meant to be adjusted in certain condition. In my experience, I hand tightened the spring until i feel force, then i make the two whole turn with the spanner wrench. Hope this help! |
|
|
|
|
|
05-13-2008, 09:44 AM
|
#13 |
|
Nissanaholic!
Join Date: Nov 2006
Location: Orange County, CA
Age: 40
Posts: 2,071
Trader Rating: (9)
Feedback Score: 9 reviews
|
Sometimes I wonder if I should of gotten the Teins with the computer for dampening adjustment. =x
__________________
1986 Porsche 944 Turbo (951) 1995 Nissan 240sx (S14) Miss ya. |
|
|
|
|
05-14-2008, 06:12 AM
|
#15 |
|
Nissanaholic!
Join Date: Nov 2006
Location: Orange County, CA
Age: 40
Posts: 2,071
Trader Rating: (9)
Feedback Score: 9 reviews
|
Hah, finally figured out where the dampening adjustments knobs where at. Jees, so damn simple.
Now my ride is super smooth. Harder to kick out though, but I can change that on the fly.
__________________
1986 Porsche 944 Turbo (951) 1995 Nissan 240sx (S14) Miss ya. |
|
|
|
|
12-30-2011, 11:06 AM
|
#16 |
|
help with GR+ coilovers
Hey everyone, bring this thread back from the dead!!
 I need some help with my stance GR+ coilovers. I recently purchased a IS350, and it came with Stance GR+ coilovers, but the ride is sitting too low in the back, it rubs anytime i good over the smallest bumps. So I would like to adjust the ride height and while im at it I would also like to make it smoother (only in the rear). Now, Im a complete nembie with suspension or coilovers, but I have been doing a lot of research on different forums. I have a good idea of how to make adjustments, but before I touch my car I want to be absolutely certain of what I am doing, so please let me know if this is correct: First, Im going to adjust for damping by rotating collar A counter-clockwise, im not sure how many revolutions I should do, so I'll do 2 complete revolutions and see how that rides. After I will rotate collar B counter-clockwise untill its very tightly sitting under collar A. Thats all for damping correct? Second, I would like to adjust the ride height. Here I'm going to rotate collar C counter-clockwise untill its lose. After I will grab the entire threaded body and rotate counter-clockwise, which will spin up and out of the base of the coilover. I want to lift the car up half-an-inch, so I'll rotate 3-whole revolutions and see how that turns out. Does the process sound correct, for damping and height adjustment? thanks for the help |
|
|
|
|
|
12-31-2011, 01:34 PM
|
#18 | |
|
Zilvia Addict
Join Date: Mar 2007
Location: San Francisco
Age: 38
Posts: 756
Trader Rating: (17)
Feedback Score: 17 reviews
|
It's been a while and I almost forgot this thread.
To answer your questions... Well, forget about pretty much everything I said above. It's very much misleading when I look back now. To adjust your ride height: 1) loosen the two collars between the coil (A) and the thread body (B). 2) loosen the collar at the bottom of the thread body. *These steps would pretty much loosen your coilover for height adjustment. 3) grab the thread body with your hand (better with a glove) and rotate to your ideal height. 4) lock all the collars. 5) use a tape measurer and match the exposed thread body to the other side (the passenger side if you were doing the driver side, vice versa.) 6) if you are not happy with the height, repeat the steps from 1-5. 7) done. The steps are done assuming you have the same height adjustment for both the Left and Right coils (A). If you are not sure about this, bring it to a shop, and better, have them perform a corner balancing for you.  This is not rocket science. After a few months, you may find the collars loosened by themselves and yo have the do it all over again. It's a daily car. It doesn't have to be 100% precise. Welcom to the coilover world. Don Quote:
|
|
|
|
|
|
12-31-2011, 03:16 PM
|
#20 |
|
Man w/ CTSV & a Car Seat

|
Another thing to think about when adjusting your ride height, you cant really go counting the threads on the coilover and expect the height to be even. You're gonna have to constantly adjust it, lower the car, measure the height on both sides kinda deal. Then you have to throw in the fact that when the car is lifted off the ground, the suspension pulls out a bit, takes some time for it to sag back down. I'd usually pop the trunk and jump up and down to help the suspension settle back down when I'm adjusting the ride height.
Biggest thing to remember, do not try to fuck around with the spring collars if you dont have to. This will throw off the ride of the suspension since you'll potentially change the spring rate/compression load. |
|
|
|
|
01-02-2012, 10:22 AM
|
#21 | |
|
damn i just saw your post. What would happen if the spring collars are also adjusted? I may have changed their positions on the coilover by one or two turns. thanks
Quote:
|
||
|
|
|
|
03-01-2012, 12:23 AM
|
#23 |
|
Zilvia Junkie
 |
I have a question about the rears, is there a wrong way to install them? I couldn't find any instructions as to which side the bottom portion of the strut should be mounted. If you look at it closely one side of the strut the rubber insert is thicker than the other, so which side faces in toward the car and which one faces out towards the wheel.
I included a picture just incase, the part in question is circled in red [IMG] 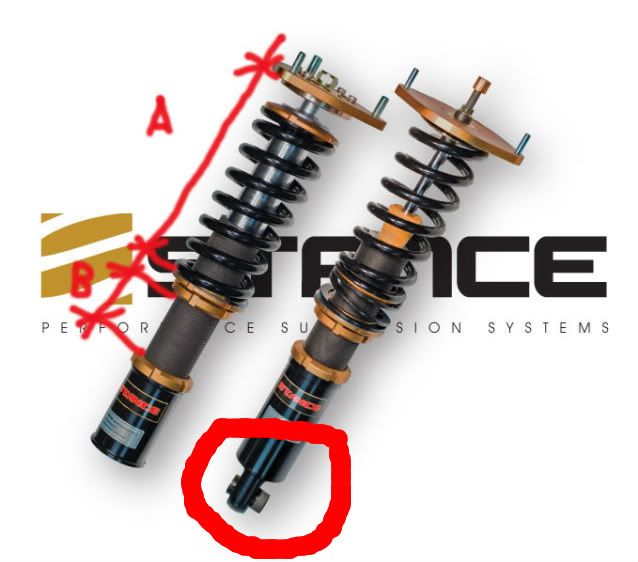 [/IMG] [/IMG] |
|
|
|
|
| Bookmarks |
|
|


 Linear Mode

