|
|||||||
| Home | Rules & Guidelines | Register | Member Rides | FAQ | Members List | Social Groups | Calendar | Mark Forums Read |
| Chat General Discussion About The Nissan 240SX and Nissan Z Cars |
 |
|
|
Thread Tools | Display Modes |
 01-19-2006, 03:28 PM
|
#91 |
|
Post Whore!
 Join Date: Jan 2005
Location: queens NYC
Age: 39
Posts: 2,561
Trader Rating: (8)
 Feedback Score: 8 reviews
 |
what do you mean by adujust the led to shine the brightest? im asking b/c i just ordered led for my dash so i want to convert the needle to red. just trying to visualize it but im a little lost. thanks.
__________________
 s14 kouki ka-t |

|

|
| Sponsored Links |
|
01-19-2006, 05:41 PM
|
#92 |
|
Leaky Injector
Join Date: Jan 2006
Location: Go Ducks! Go Blazers!
Age: 39
Posts: 98
Trader Rating: (0)
Feedback Score: 0 reviews
|
well l.e.d.s shine in a form of a projectile not like regular bulbs. so if you dont aim it right through the plastic piece in the back, it will not shine as bright or shine at all for the needles. i used 2 6 volt batteries to test how the shine was coming through, then i mounted them in place with shrink wrap.
  again...the white bubs are stock, blues are l.e.d.s, and the needles all shine as bright as the speedo/rpm. the camera made the other two shine much brighter. ~Xuan ----------------- SEE NOW--DRIFTABILITY |
|
|
|
|
01-19-2006, 06:37 PM
|
#93 |
|
Zilvia FREAK!
 
Join Date: Sep 2004
Location: Bay Area (East Bay)
Age: 41
Posts: 1,294
Trader Rating: (0)
Feedback Score: 0 reviews
|
i really like your gauge, Zoomxxl!!! i will try to make it also if i have time... (busy school... ><)
__________________
~小アレンのリベリオン~ いくせ, 勝負た! 轟こう, オレのKRMS13!!! オレの得意技!蹴り進入!角度の少ないドリフト! 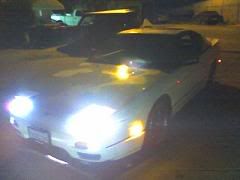
|
|
|
|
|
01-19-2006, 09:48 PM
|
#94 |
|
Post Whore!

|
For those that wanted pictures, here you go (this is the back of the tach):
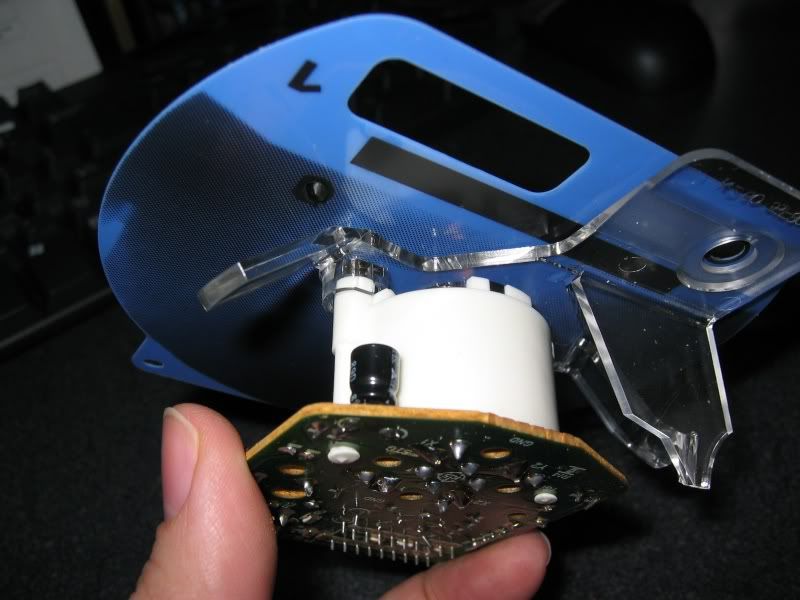 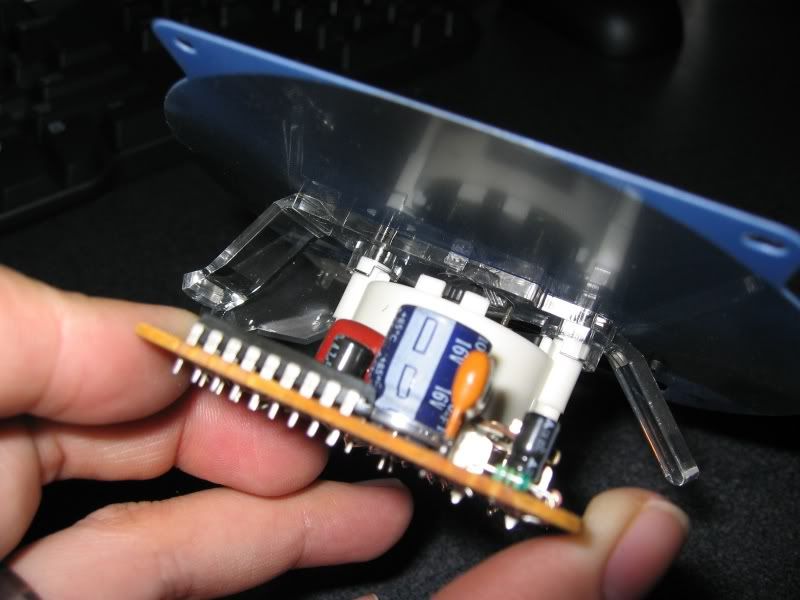 As you can see, there are little clear 'legs' coming out from the base of the needle. The ends of these 'legs' point at the bulbs in the cluster and funnel the light to the needle. If you attach an LED of your color choice to the end of these, you will be able to change the color of your needles independent of the rest of your gauges. |
|
|
|
|
01-19-2006, 11:09 PM
|
#95 |
|
Post Whore!
Join Date: Jan 2005
Location: queens NYC
Age: 39
Posts: 2,561
Trader Rating: (8)
Feedback Score: 8 reviews
|
thank you sir that helps alot. ill be trying this to my s14 dash. if all go well ill have white led backlit and red led gauges.
thanks
__________________
s14 kouki ka-t |
|
|
|
|
01-20-2006, 03:26 AM
|
#96 |
|
Leaky Injector
Join Date: Jan 2006
Location: Go Ducks! Go Blazers!
Age: 39
Posts: 98
Trader Rating: (0)
Feedback Score: 0 reviews
|
thanks for your comment allen. its a pretty nice mod and easy the second time doing it. the only part thats a pain in the rear is mounting the led to the "legs" then trying to bolt the gauges back onto the cluster WHILE keeping the leds from moving from their positions or else youd have to take it apart again and re-line the led. plus wires run everywhere for each led, so you gotta know where to run your extra lines out from the cluster.
|
|
|
|
|
01-21-2006, 08:17 AM
|
#97 |
|
Leaky Injector
 Join Date: Aug 2003
Location: Downingtown Pa
Age: 45
Posts: 113
Trader Rating: (0)
Feedback Score: 0 reviews
|
For those of you guys who want a drop in kit without any fabrication you can use for free shipping for Zilvians. Here's a couple links for the lighting:coupon code 6307 on our website
#194 Bulbs Hyper Red and White ( Not LED Bulbs ) http://www.importintelligence.com/FM...dex.html&-Edit Needle Kits: http://www.importintelligence.com/FM...dex.html&-Edit Here's a collection of pics from the past.   
__________________
Signature Exceeds Forum Limits |
|
|
|
|
01-21-2006, 01:41 PM
|
#98 | |
|
Zilvia Junkie
 |
Quote:
__________________
ASE Master Technician |
|
|
|
|
|
05-21-2006, 01:23 AM
|
#99 |
|
Leaky Injector

|
would my s14 dash look like the picture on importintelligence if I go led's? I want to put led's but dont want it bright in one area and light in another area, and also light sticking out like the pic, If I get the bulbs from where nbrindley got em would they be even all around? Thanks
|
|
|
|
|
05-21-2006, 02:06 AM
|
#100 |
|
Zilvia Addict
 |
|
|
|
|
|
05-21-2006, 02:15 AM
|
#101 |
|
Nissanaholic!
 
Join Date: Jul 2002
Location: Wilmington NC
Age: 40
Posts: 2,060
Trader Rating: (3)
Feedback Score: 3 reviews
|
I did this about 6 months ago. I used a transparent paint so the lights would shine through the needles. Red paint for the needles, and amber bulbs.
    -Charles. |
|
|
|
|
05-21-2006, 04:25 AM
|
#102 |
|
Zilvia FREAK!
Join Date: Sep 2004
Location: Bay Area (East Bay)
Age: 41
Posts: 1,294
Trader Rating: (0)
Feedback Score: 0 reviews
|
i have a similar setup like u, but i just have not paint the needle... hehe, i used 2 red bulbs and one amber bulb for the gauge
__________________
~小アレンのリベリオン~ いくせ, 勝負た! 轟こう, オレのKRMS13!!! オレの得意技!蹴り進入!角度の少ないドリフト!
|
|
|
|
|
05-21-2006, 04:49 AM
|
#103 |
|
Man w/ CTSV & a Car Seat
 
|
Im running red bulbs for my cluster using polarg bulbs. Only downside is that after a couple of years, the red bulbs have a tendency to fade. Im on my
2nd set of bulbs since i started doing this back in 02. Stock white faced cluster with red bulbs, looks like the shiet at night. |
|
|
|
|
05-21-2006, 06:22 AM
|
#104 |
|
Zilvia FREAK!
Join Date: Sep 2004
Location: Bay Area (East Bay)
Age: 41
Posts: 1,294
Trader Rating: (0)
Feedback Score: 0 reviews
|
i am running polarg and some other JDM bulbs also... i dunno if they will fade... but couple years... i dun care, hehe
__________________
~小アレンのリベリオン~ いくせ, 勝負た! 轟こう, オレのKRMS13!!! オレの得意技!蹴り進入!角度の少ないドリフト!
|
|
|
|
|
05-21-2006, 08:46 PM
|
#106 | |
|
Zilvia FREAK!
Join Date: Jun 2005
Location: Not Applicable
Posts: 1,183
Trader Rating: (0)
 Feedback Score: 0 reviews
|
Quote:
Man this is the colour that I want at night...not at morning though. |
|
|
|
|
|
05-22-2006, 03:27 AM
|
#108 | |
|
Nissanaholic!
Join Date: Dec 2001
Location: torrance, ca
Age: 41
Posts: 2,407
Trader Rating: (4)
Feedback Score: 4 reviews
|
Quote:
Also a note on the LEDs, it will not work because LED's light angle is not wide enough. Basically, the bulb lights up around the bulb, and the LED lights up more in one direction. Since the instrument panel is designed for the regualr bulb, when you chuck a LED in there, it'll be complete failer.
__________________

|
|
|
|
|
|
05-22-2006, 03:34 AM
|
#109 | |
|
Zilvia FREAK!
Join Date: Sep 2004
Location: Bay Area (East Bay)
Age: 41
Posts: 1,294
Trader Rating: (0)
Feedback Score: 0 reviews
|
Quote:
__________________
~小アレンのリベリオン~ いくせ, 勝負た! 轟こう, オレのKRMS13!!! オレの得意技!蹴り進入!角度の少ないドリフト!
|
|
|
|
|
|
05-22-2006, 07:46 AM
|
#110 | ||
|
Post Whore!
|
Quote:
Quote:
__________________

|
||
|
|
|
|
05-22-2006, 03:16 PM
|
#111 | |
|
Post Whore!
|
Quote:
I used the generic bulbs at Pep Boys. They look great at night, but its a little pink when its light outside. |
|
|
|
|
|
05-22-2006, 05:45 PM
|
#113 | |
|
Post Whore!
|
Quote:
Its covered on the previous pages.. but since I'm feeling nice... Bulb size 194.... brand doesnt matter... |
|
|
|
|
|
05-29-2006, 05:01 AM
|
#117 | |
|
Zilvia FREAK!
Join Date: Sep 2004
Location: Bay Area (East Bay)
Age: 41
Posts: 1,294
Trader Rating: (0)
Feedback Score: 0 reviews
|
Quote:

__________________
~小アレンのリベリオン~ いくせ, 勝負た! 轟こう, オレのKRMS13!!! オレの得意技!蹴り進入!角度の少ないドリフト!
|
|
|
|
|
|
06-01-2006, 06:18 PM
|
#118 |
|
Post Whore!
|
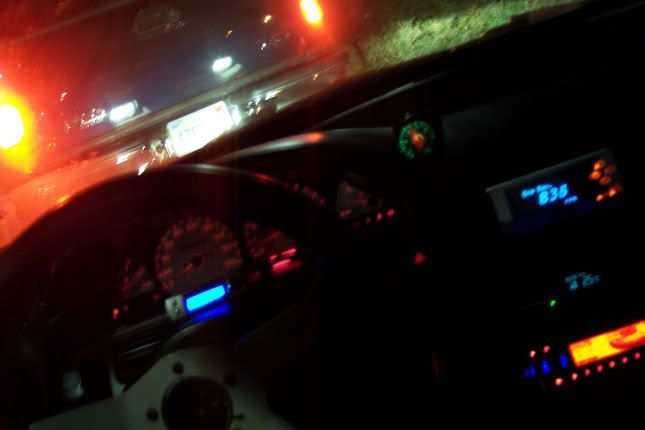
I've been getting a lot of questions regarding my HVAC illumination, so here is a little how-to. It is not terribly in-depth, since I didn't take pics of every step, but it should be enough info to get people started, and if anyone has questions, feel free to ask me. For those who haven't seen the pics in the pic thread, here's how my dash currently looks:
 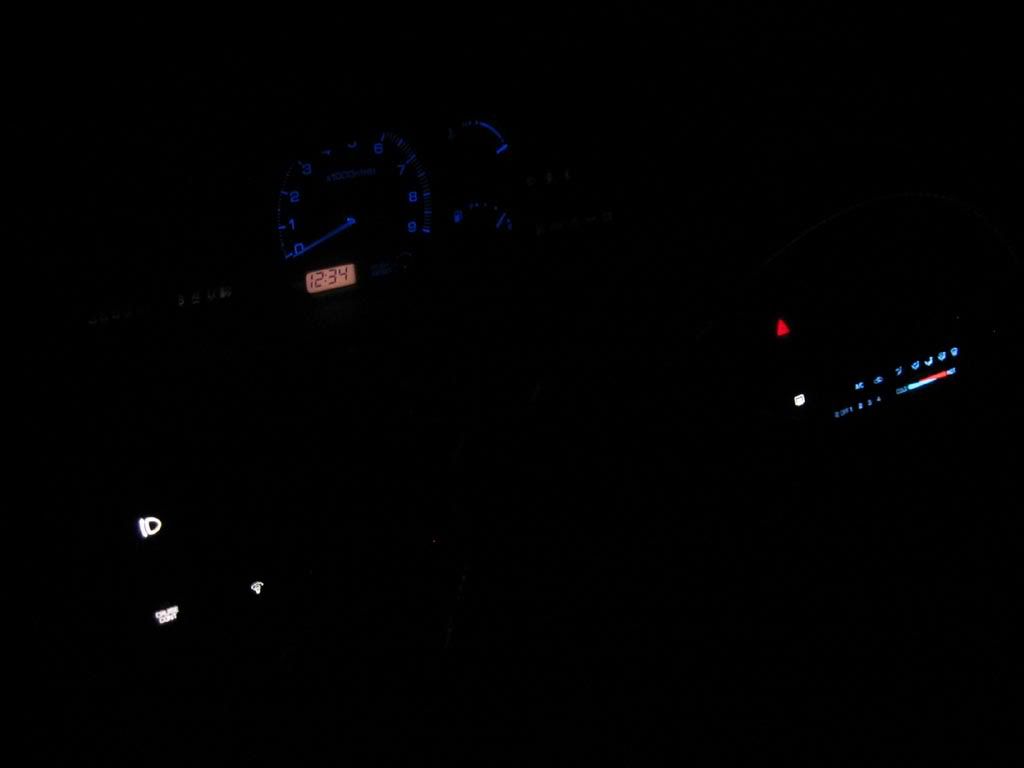 I was inspired to do this by a thread on freshalloy, along with some know-how gleaned from hidplanet. For the HVAC illumination, I used 5mm white LEDs from superbrightleds.com, specifically the RL5-W2545 (quantity 7). This is the circuit I used (from the LED Wizard:  I'll assume you can figure out how to remove the HVAC controls from your car. If you do need some tips, let me know. Opening the controls isn't too difficult. If I remember correctly, I think there is just one screw on the top of the unitand the rest of the case is snapped together. The hard part is disassembling it without breaking the snaps (I broke them), all is not lost if they do break. You will have to slide the bottom half of the case off of the unit. To do this, you will have to unplug the short plug on it (that goes to the main unit) and pop off the handles of the sliders (they just snap back on, all you have to do is pry them off). After removing the housing, you will see the backside of the circuit board on the top (with the two lightbulb sockets) and the lighting prism on the bottom. You will have to remove both sockets, and then the prism, which is just sitting in the housing. I built a circuit that sits where the prism used to be. In order to power the circuit, you will have to determine which lead for the lightbulbs is +illumination, and which is -illumination. To do this, simply trace the leads back to the plug on the back of the unit and identify which pins they are connected to. You can use a multimeter and test for continuity to double-check. In order to determine which is positive and which is negative, simply go back to your car and measure the voltage of those two pins that you have identified when you have the headlights/driving lights on. Here is a picture of the circuit installed in the unit. The first pic shows the top cover in place, the second pic shows it removed. You will have to remove it to access the circuit board. 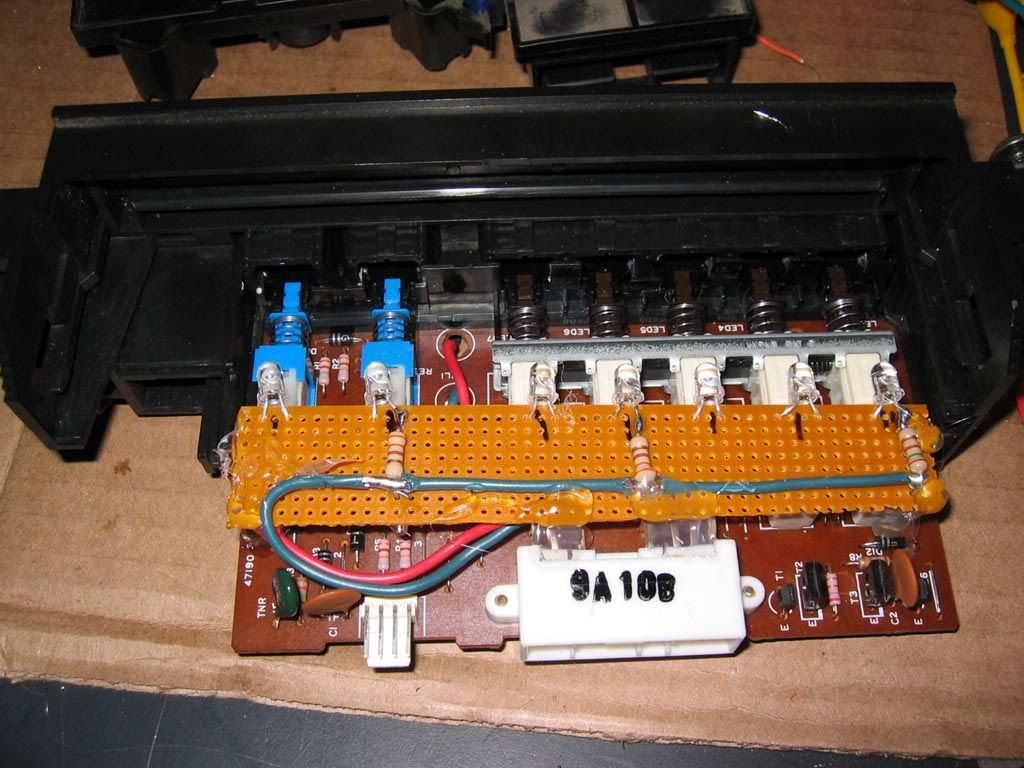 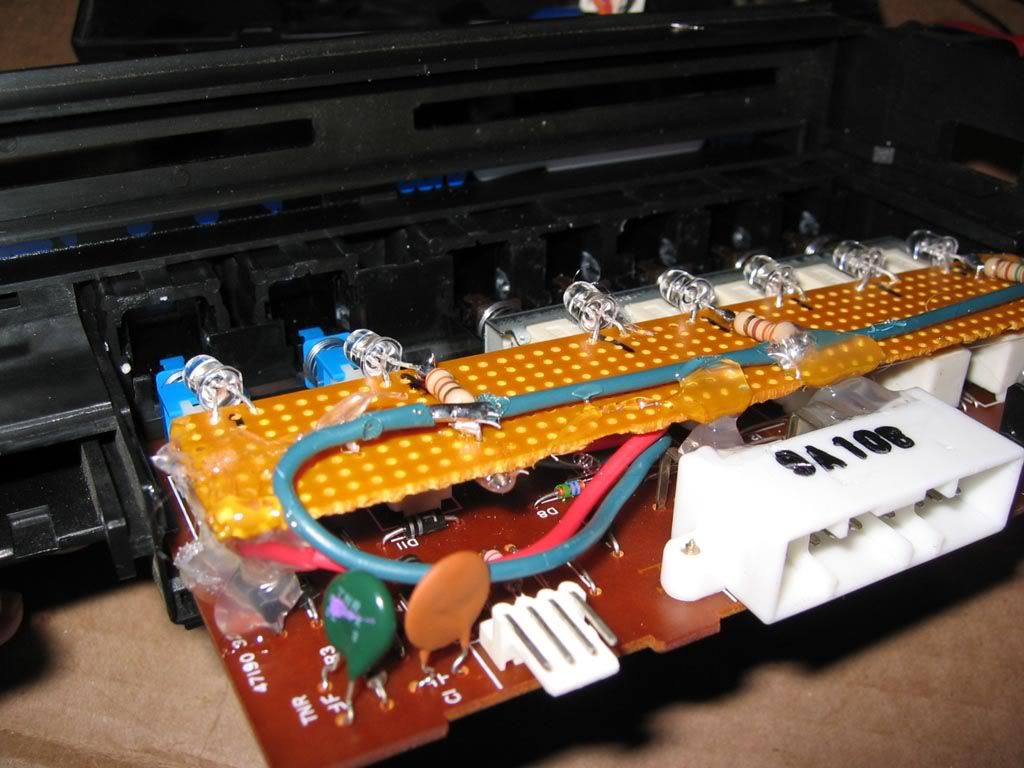 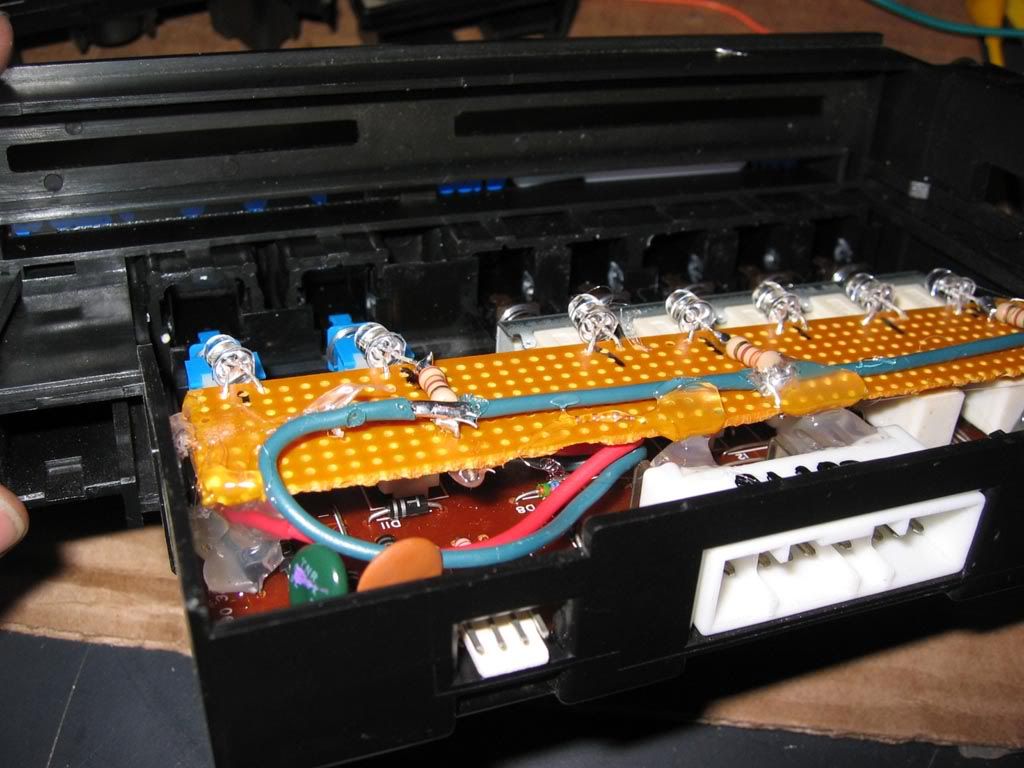 As you can see, I have one LED mounted behind each button. The viewing angle of these LEDs is only 45 degrees, so I wanted to ensure complete coverage. The two on the left side are angled slightly to illuminate the entire slider. (I seem to remember that I had to slide the HVAC circuit board back a little bit for some reason, perhaps to remove the prism. To do this, you have to unsnap each of the button covers from the actual button on the circuit board, and then gently pull it back.) For power, I soldered some leads to the original lightbulb leads. Here are the results: 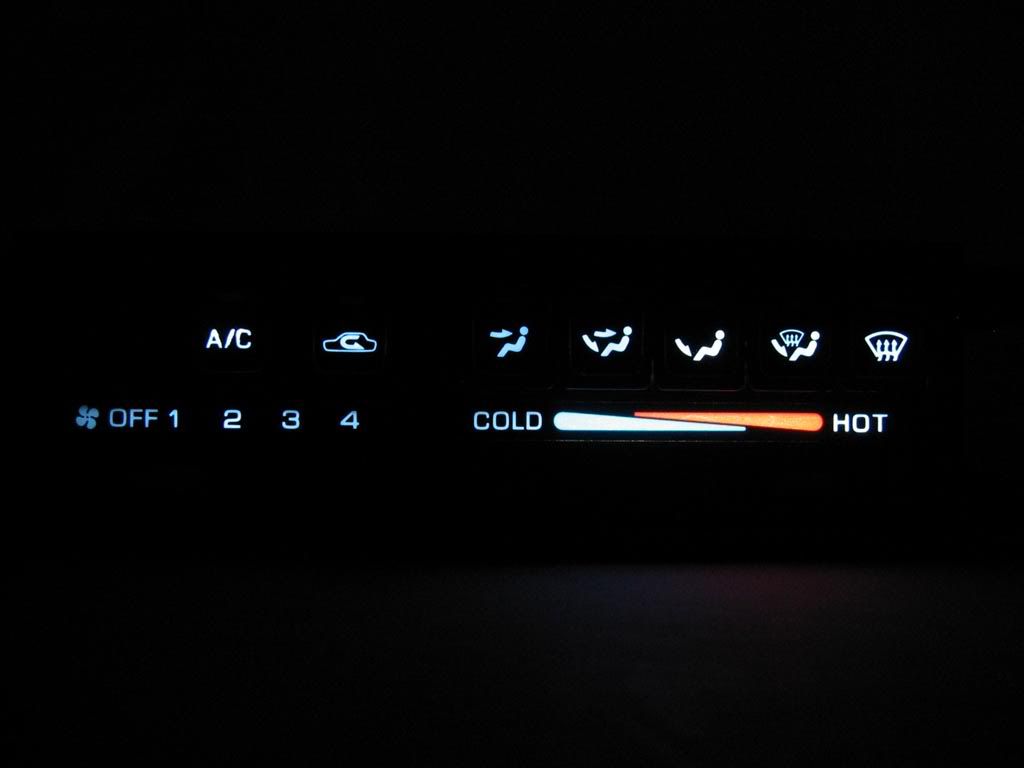 The color is actually much more even than this pic would suggest. The buttons were a little trickier. Some of them have little sockets that you can remove and replace the bulb with. Others have to be disassembled. For the ones with a socket, I simply removed the lightbulb and put an LED in it's place. You will have to use 3mm LEDs here (I used RL3-W3030 for white, RL3-R4545 for the Hazards). At first, I attempted to mount the resistor with the LED so that I wouldn't have to modify the wiring, (see below) 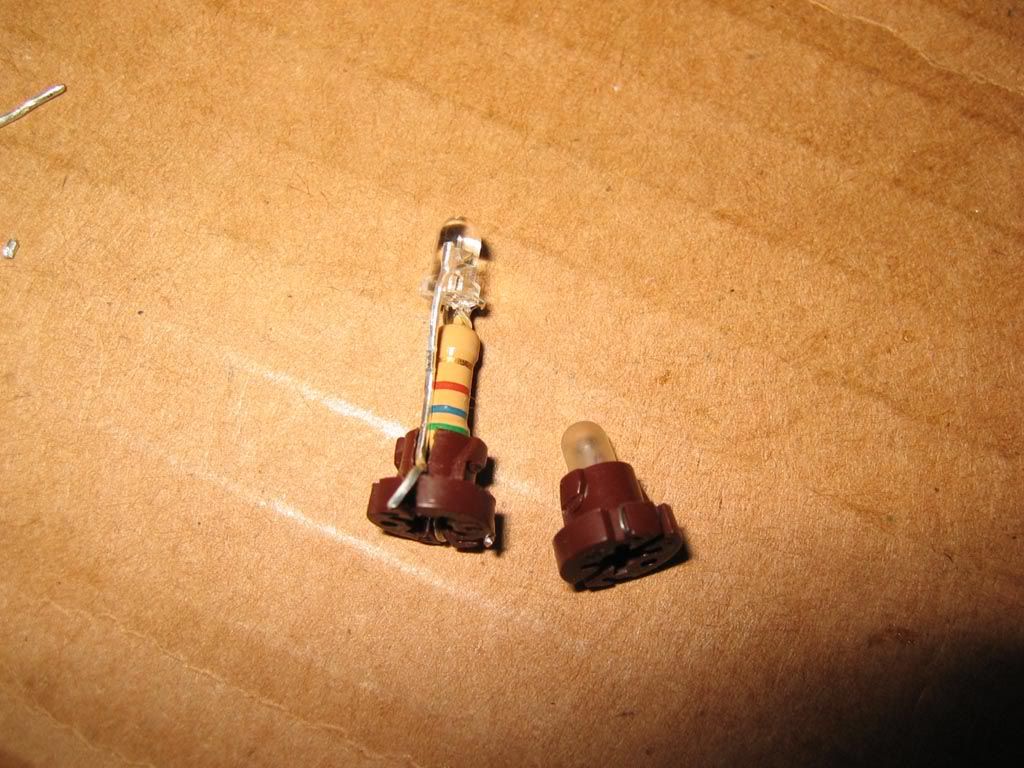 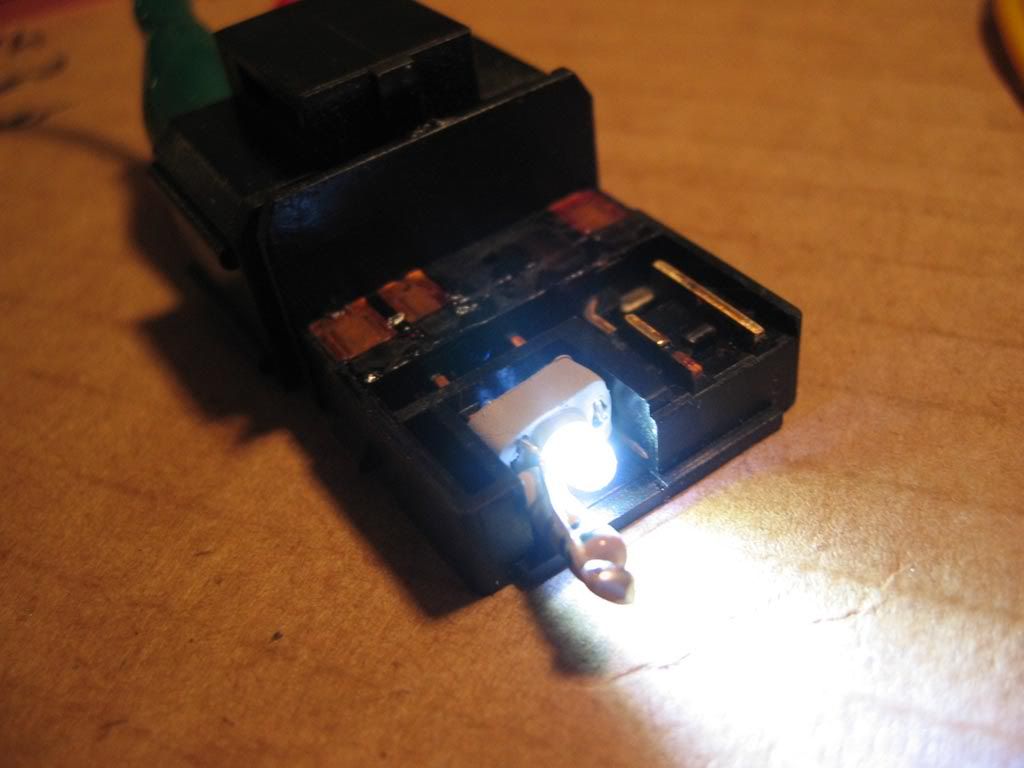 The first pic shows the sockets, and just how tiny these bulbs are (that's the original bulb on the right). The second pic shows one of the switches that have to be disassembled. Be careful you don't lose any springs or other parts when you disassemble them!!! But that really only worked on one switch, where the bulb was mounted on the back of the switch. On at least 2 of the switches, the sockets are on the side of the switch, so that the LED had to be mounted perpendicular to the socket. It proved to be too difficult to mount the LED with the resistor on these, so I gave up and lounted the LED only within the switch. I then snipped the wire leading up the the switch an mounted the resistor there, in series with the switch. For the buttons, you will again have to determine which pins are +illumination and which are -illumination. Here's some results with the buttons: 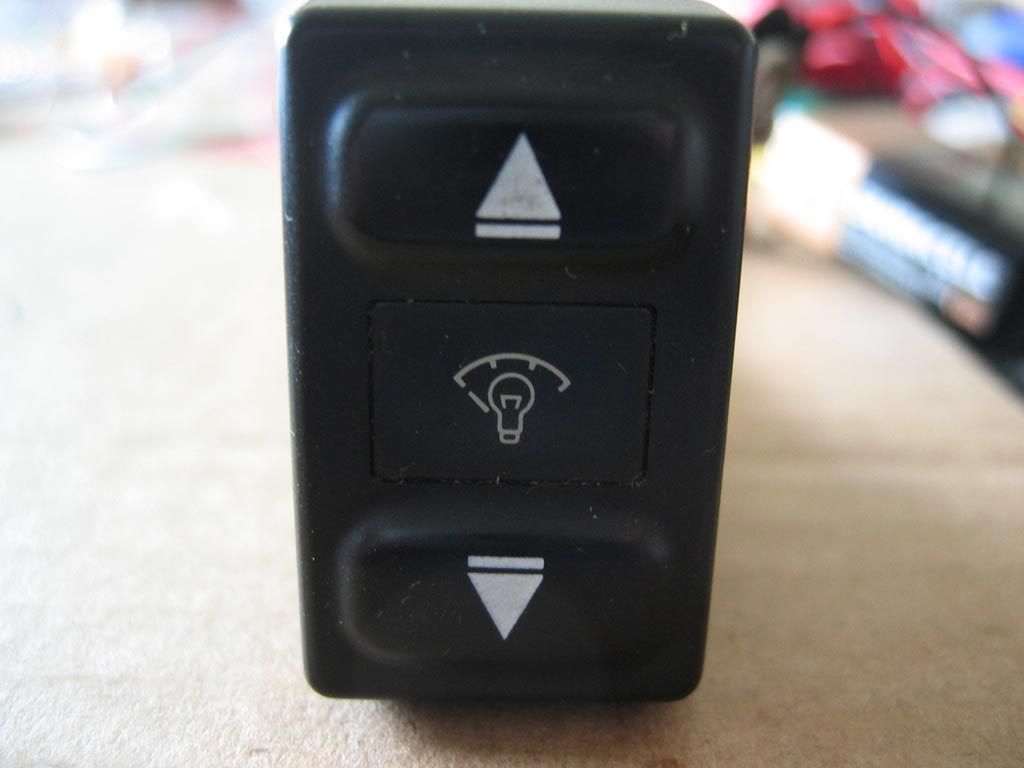 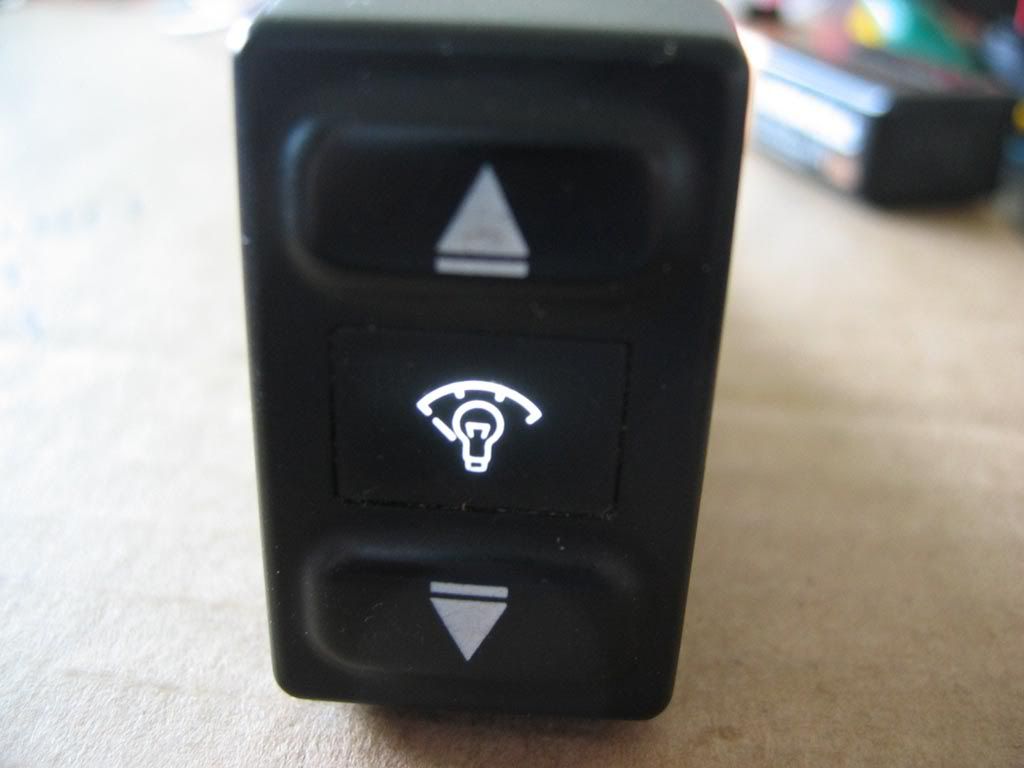 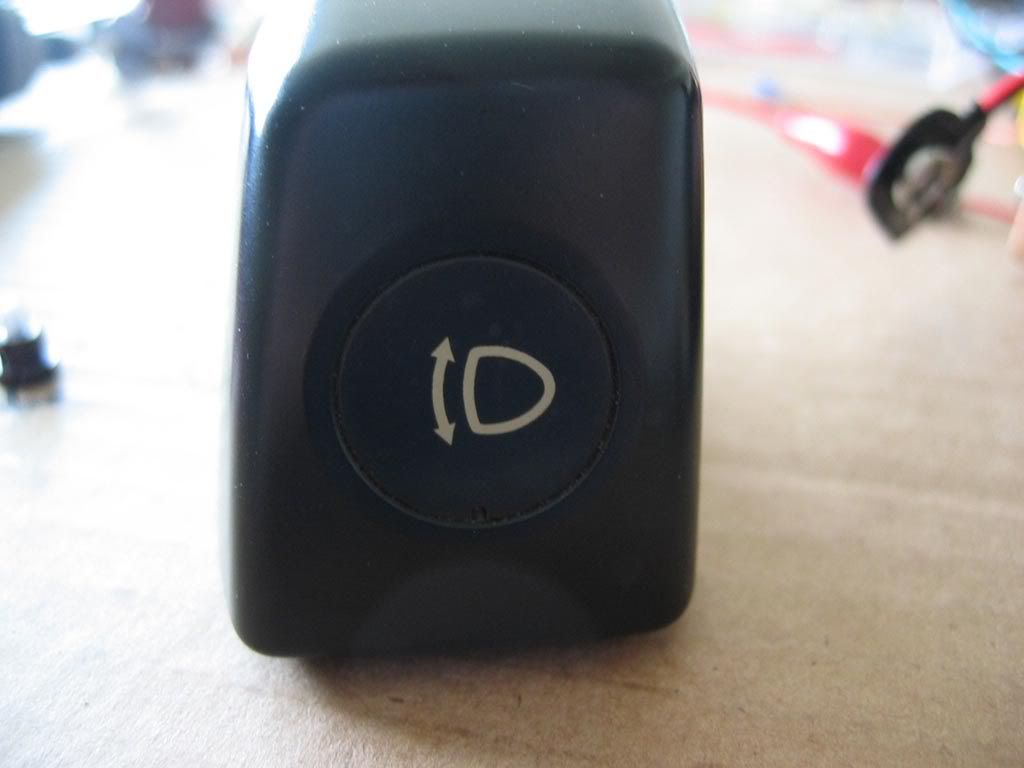 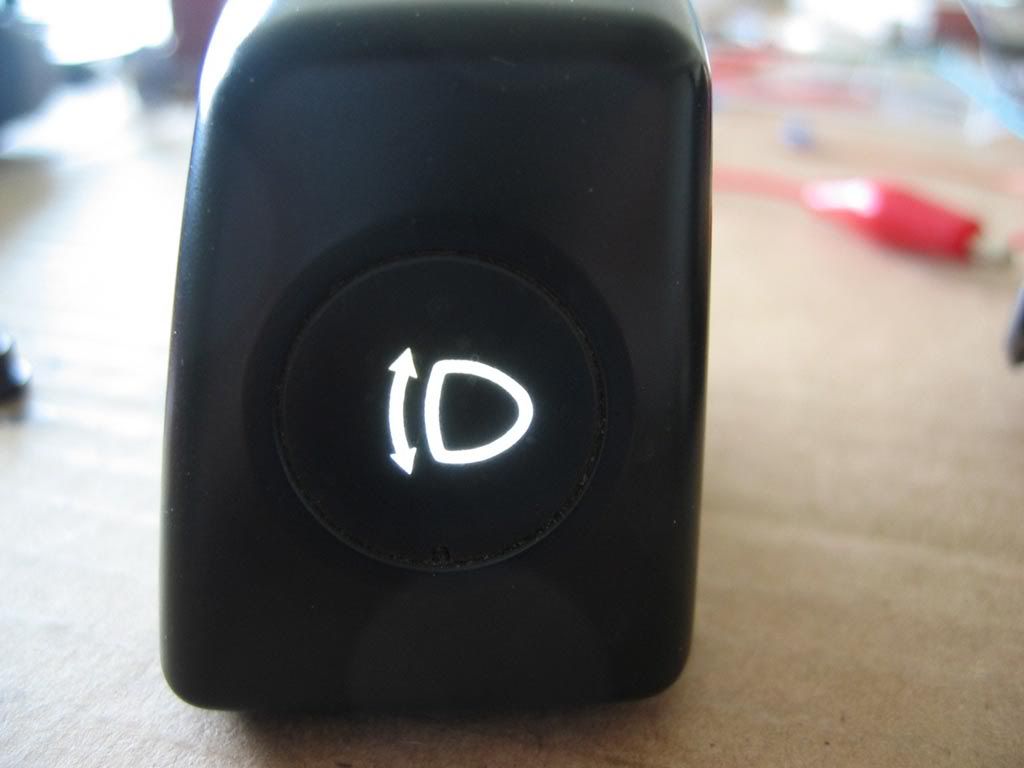 For the HVAC controls, the buttons are tinted blue to overcome the inherent yellowishness of the incandescent bulbs. The result is a light, icy blue which looks very good to me (see first pic). The buttons have no such tinting, so they appear perfectly white. Both are more than bright enough.
__________________
|
|
|
|
|
| Bookmarks |
| Thread Tools | |
| Display Modes | |
|
|


 Linear Mode

