|
|||||||
| Tech Talk Technical Discussion About The Nissan 240SX and Nissan Z Cars |
 |
|
|
Thread Tools | Display Modes |
 11-18-2006, 10:04 AM
|
#33 |
|
Super Moderator
 
Join Date: Jun 2004
Location: SoCal Temecula
Posts: 16,893
Trader Rating: (73)
  Feedback Score: 73 reviews
|
After I relocated mine, my hood release has problems springing back.
It got rubbed a little bit by my tire initially, but it's not electrical, I don't know why it's broken.
__________________
 Best way to do business with me? Make your best offer FIRST. |

|

|
|
11-18-2006, 12:10 PM
|
#34 |
|
Nissanaholic!
 
Join Date: Oct 2002
Location: VA.. And for those that keep PMing me asking what kit I have, it's Origin Stream.
Posts: 1,730
Trader Rating: (3)
Feedback Score: 3 reviews
|
You've got it pretty high(motegineon)... You might have trouble getting the fender to go back on. I dunno. I had mine like that but it still wasn't high enough. BTW, for those of you that do this method, some of my zipties broke at one point and I started rubbing through the harness again. KEEP AN EYE ON IT. I ended up buying some stainless steel zipties at Harbor Freight to hold it up there. Then I got new wheels and went lower and had to relocate it through the engine bay. You guys with the harness over the strut tower really should have taken the time to do it right. Mine is run right by the frame rail, and the only wires I had to extend were the 2 wires for the parking light, and redo one little ring terminal ground. Looks SO much cleaner. My main problem was I actually rubbed through the rubber grommet taking the harness through the firewall. It rubbed it and popped it out of the firewall, then ripped a chunk out of it. I ended up with a much better solution and it should never rub again. Here's a couple of quick pics. The flash made it look a LOT more... textured, than it really is.
  Basically what I did was take the grommet out and make a "false firewall" to cover the hole. The grommet is like 4" in diameter, but the harness is only about an inch thick. My grommet was ripped to shreds from rubbing, so I need another solution. The reason I couldn't use a new grommet is the firewall needs to be flat where the hole for the grommet is, and needed the beat the fuck out of that area to stop the rubbing. So, I went Advance Auto Parts and picked up a few sticks of a product by JB Weld ( I think it's called Stick Weld or something). It comes in a little plastic tube. It's basically a 2 part putty form epoxy. It's in a little log roll shape, and the outside is light grey, the center is dark grey. You break of a section of it and knead it until it's one uniform color, then apply wherever you want. The problem with this stuff is it dries very quickly, so you have to have everything exactly the way you want it and work VERY quickly. I bought like 4 tubes of that and what's called a body patch. It's basically a very thin piece of mesh designed to repair holes in body panels so you can bondo over it (it's made by Bondo). The patches are adhesive backed, so I cleaned it really well with Brake Cleaner to get the adhesive off, then scuffed both sides of it with like 220 (or was it 100, I dunno). Then I scuffed the edge of the hole in the firewall where the grommet once resided. Then I proceded to "reform" that area to my exact specifications with a precision instrument I like to call 'Brutus' (my BFH). I beat on the firewall until it was concave enough that I though it wouldn't rub. Then I beat it some more. I pulled the harness all the way to the top of that hole. Since it normally goes through the center of the grommet, therefore the center of the hole, pulling it up to the top gives you another inch or two clearance. That's where I was rubbing the harness, not in the middle, but the back, because it had to come down to the center of that hole to pass through the firewall. Anyway, I pulled the harness up to where I wanted it (all the way at the top) then took a 1/2" extension and beat on the area right behind where the harness would be to kind of "notch" it (for lack of a better word). This lets the harness sink back in the firewall a bit and be even more out of the way. It also helps to keep the harness still and immobile. I took a short piece of 1" heater hose and sliced it lengthwise and wrapped it around the back side of the harness where it pressed against the firewall, just to be safe. Then wrapped the entire section in electrical tape (3M of course). I drilled one hole on each side of the "harness notch" and put a stainless steel ziptie around it to hold it in place. Then I made a template for the mesh out of paper. I made it over hang the edge of the hole about 1/4"-1/2" all the way around, and cut out a notch for where the harness went through. Once I got that exactly the size I wanted it, I traced it onto the body patch and cut it out. I cut it a little bigger than the paper to be safe and then trimmed it down. The mesh patch needs to be pressed up to the hole and "formed" to the shape of the newly beaten firewall (kinda curved), that's why I made it a hair bigger than the template. Once that fit perfectly and I was sure there was enough clearance for the harness, I was ready to actually make the "false firewall." I opened the tubes of Stick Weld (or whatever it's called) and cut a bunch of small sections off, so they were ready to knead. I also had a cup of water handy to dip my fingers in, because it smoothes out much better if you fingers are wet. Once everything was ready and wiped down with alcohol, I was ready to start. I took the patch panel that I precut to the perfect size and started kneading some SW (Stick Weld). Once it was one uniform color, I pressed half on one side and half on the other side, so it "sandwiched" the mesh. I started in the middle and worked my way to the outside. The SW is easier to knead it it's in smaller sections. Too big and it takes forever to get it one color. So I kept doing that until the entire piece was covered in SW. I also made sure the notch for the harness had enough SW on it so that the edge of the notch was smooth, no jagged metal poking out that could hurt the harness. Then I held it up to the hole and used some more SW to go all around the edge of it, pressing it onto the pre-scuffed/cleaned firewall. Kept doing this untill I was comfortable with the amount of overlap I had on the firewall. Then it has to dry, which takes 24 hours IIRC. After it's dry, I fill the gap around the harness with clear silicone caulking so now water could get in (all the fuses/wiring are just on the other side of that firewall). Done and Done. There was one thing I forgot to do that I wanted to do when I was doing this, but I got caught up in a rush and totally forgot. I was going to make a little "ear" or two on the mesh patch and put a couple tiny litle #6 screws through it into the firewall (make sure they're short because of the fuses/wiring behind the firewall). That way the SW isn't the only thing holding this panel to the firewall in case it happens to come loose one day. As long as the firewall is scuffed really well with 100 grit, I don't think it'll be a problem, but I wanted to do it anyway. BTW, my hood release doesn't spring back either, and it's been rubbed through in at least one spot. I think that's why, don't think it has to do with relocating it, because mine didn't start acting wierd till it started rubbing. Hope this helps some people out, I hadn't anticipated writing this much, I just kinda did. If anyone needs any clarification, let me know.
__________________

|
|
|
|
|
11-18-2006, 03:01 PM
|
#37 | |
|
Nissanaholic!
Join Date: Oct 2002
Location: VA.. And for those that keep PMing me asking what kit I have, it's Origin Stream.
Posts: 1,730
Trader Rating: (3)
Feedback Score: 3 reviews
|
Quote:
__________________
|
|
|
|
|
|
11-18-2006, 03:29 PM
|
#38 | |
|
Zilvia Junkie
 
Join Date: Mar 2006
Location: Richmond, CA
Age: 36
Posts: 324
Trader Rating: (0)
Feedback Score: 0 reviews
 |
Quote:
haaa, that shit happened to me too
__________________

|
|
|
|
|
|
11-18-2006, 03:29 PM
|
#39 |
|
Zilvia Addict
 
Join Date: Aug 2003
Location: Berkeley, CALifornia
Posts: 785
Trader Rating: (0)
Feedback Score: 0 reviews
|
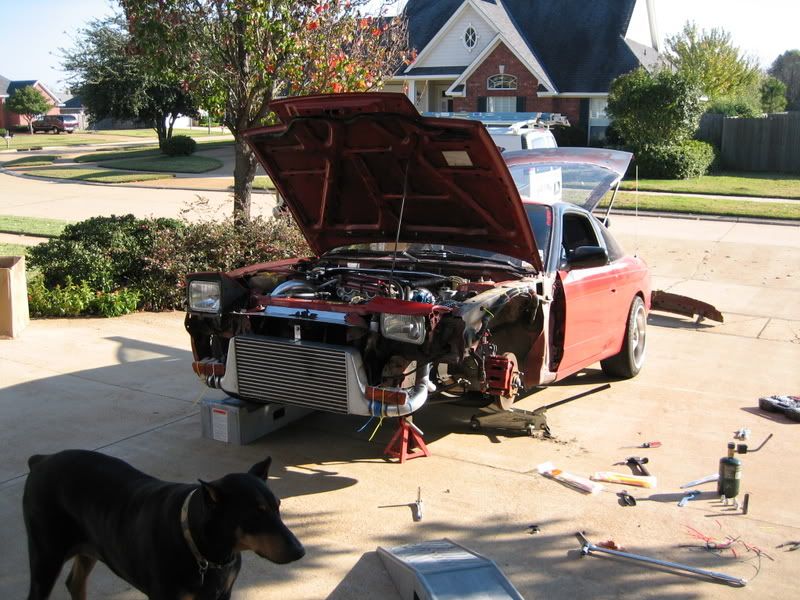
man... hard to see how u can still rub even after tucking it way up like that red car.... wont the tire hit the frame b4 it gets up to the tucked harness?
+1 for vice grips: 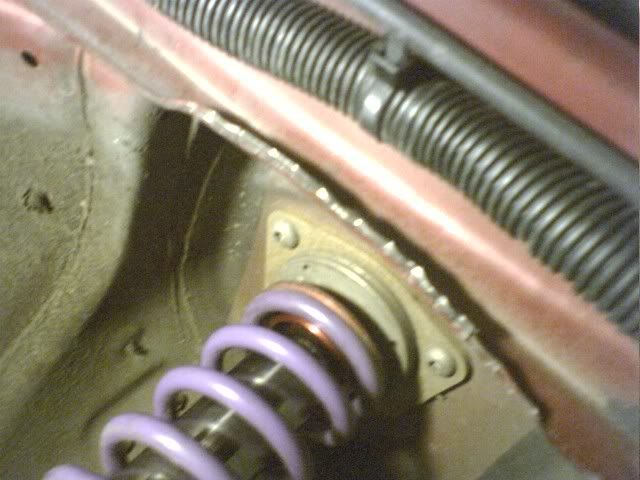 Havent tucked the harness above the ridge thing... but im not super slammed like the hardcore folks. Will def do it tho sometime... That ridge i bent was tearing into my tires bad. No pic, but theres alarmingly deep slits cut into my new tires... coming fast down a hill and compressing the front could explode the tires in a snap! Lowered ppl, DO IT ASAP!
__________________
KYB AGX w/ dust boots $500obo... sadly serious 
|
|
|
|
|
11-19-2006, 01:17 AM
|
#43 | |
|
Zilvia Member
 
|
Quote:
|
|
|
|
|
|
11-19-2006, 03:26 AM
|
#44 | |
|
Super Moderator
Join Date: Jun 2004
Location: SoCal Temecula
Posts: 16,893
Trader Rating: (73)
Feedback Score: 73 reviews
|
Quote:
__________________
Best way to do business with me? Make your best offer FIRST. |
|
|
|
|
|
11-19-2006, 03:43 AM
|
#45 |
|
Post Whore!
Join Date: Apr 2006
Location: Milford, CT
Age: 40
Posts: 10,519
Trader Rating: (8)
Feedback Score: 8 reviews
   |
Wow, thats alot of jbweld. I did mine like that cause i was stuck somewhere lol....thats why its over my fender.
__________________
2015 Subaru Outback Overlander - Wagonofdoom |
|
|
|
|
11-19-2006, 08:07 AM
|
#46 | |
|
Post Whore!

Join Date: Apr 2004
Location: Virginia, USA
Posts: 5,764
Trader Rating: (5)
Feedback Score: 5 reviews
|
Quote:
I thinned mine out significantly and it was able to fit between the strut tower and the hood. |
|
|
|
|
|
11-19-2006, 10:54 AM
|
#48 | |
|
Post Whore!
Join Date: Apr 2004
Location: Virginia, USA
Posts: 5,764
Trader Rating: (5)
Feedback Score: 5 reviews
|
Quote:
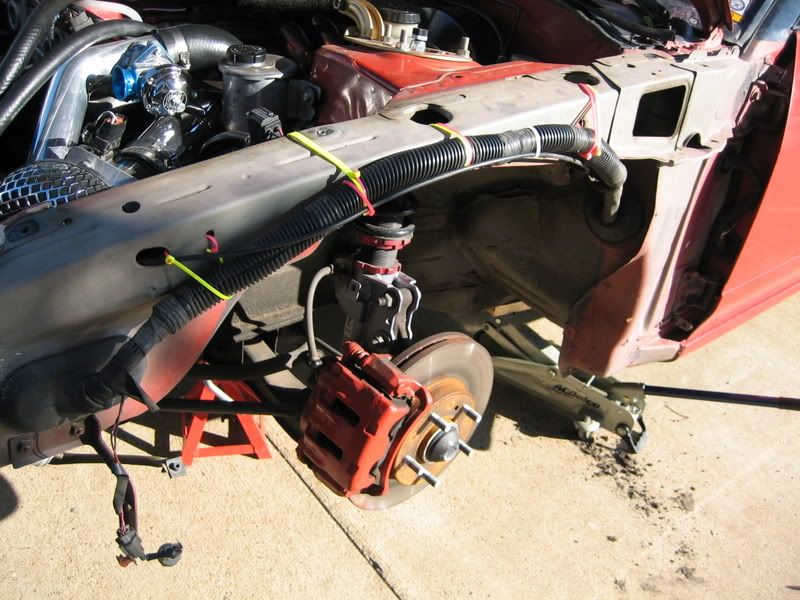
The furthest away I could get the harness is in the picture below. Unless he has something special I don't know about, that's the best place to put it to keep it away from heat.  |
|
|
|
|
|
11-20-2006, 10:22 AM
|
#49 |
|
Nissanaholic!
Join Date: Oct 2002
Location: VA.. And for those that keep PMing me asking what kit I have, it's Origin Stream.
Posts: 1,730
Trader Rating: (3)
Feedback Score: 3 reviews
|
I'm not turbo, so it's not THAT hot. And no offense to you guys running it over the strut tower, but that looks like asshole... sorry. I'll try to get a pic for you guys to show you, but it's run down low, right by the frame rail, then back up under the BMC and back thru the hole. The problem wasn't in the center of the fender so much as it was towards the back of the fender. I was rubbing it where it came down to go thru the grommet/hole. So I went through the bay, and that didn't solve it completely, so I did what I showed you. Now I have NO rubbing at all, except where I rub the bottom of the strut tower, which can't be fixed, so oh well. When my motor is done and gets put in (built KAT), I'm relocating everything in that harness inside under the dash (except the lighting wires obviously, which will be run THROUGH the framerail). MAJOR WIRE TUCKING gonna happen... ;-)
__________________
|
|
|
|
|
11-22-2006, 12:16 AM
|
#50 |
|
Zilvia Addict
Join Date: Aug 2003
Location: Berkeley, CALifornia
Posts: 785
Trader Rating: (0)
Feedback Score: 0 reviews
|
lesson for ppl tucking it up above the ridge: KEEP an eye on the harnes when u re-install your fender! I was rushing, and it was at night. I only did one side so far. I used existing holes on the left/driver side harness for my zip ties. Put my fender on, had to force it down into proper position to line up bolts... and guess what i see once its all bolted down...
FRIKKEN wires got pushed down below the ridge by the fender! So I gotta do it all over again! Its even lower now, but its way farther outside, maybe on the outer edge of the tire, but not touching... o well, just letting everyone know to check again before bolting on the fender.
__________________
KYB AGX w/ dust boots $500obo... sadly serious
|
|
|
|
|
11-22-2006, 05:18 AM
|
#51 | |
|
Post Whore!
Join Date: Apr 2004
Location: Virginia, USA
Posts: 5,764
Trader Rating: (5)
Feedback Score: 5 reviews
|
Quote:
|
|
|
|
|
|
11-22-2006, 05:21 AM
|
#52 |
|
Post Whore!
Join Date: Apr 2006
Location: Milford, CT
Age: 40
Posts: 10,519
Trader Rating: (8)
Feedback Score: 8 reviews
|
same here
#1 concern for me was not to rub through it a second time
__________________
2015 Subaru Outback Overlander - Wagonofdoom |
|
|
|
|
08-08-2008, 10:25 AM
|
#54 | |
|
Post Whore!
 Join Date: Aug 2006
Location: Des Plaines, IL
Age: 36
Posts: 3,069
Trader Rating: (7)
Feedback Score: 7 reviews
|
idc that i'm bumping this...
but what size wiring should i use to replace wires? fuccin burnt thru mine last night on the way home after hitting a pothole hard as fuck and shaking it loose.
__________________
Quote:
|
|
|
|
|
|
08-08-2008, 12:48 PM
|
#55 | |
|
Post Whore!
Join Date: Apr 2004
Location: Virginia, USA
Posts: 5,764
Trader Rating: (5)
Feedback Score: 5 reviews
|
Quote:
|
|
|
|
|
|
08-08-2008, 01:06 PM
|
#56 |
|
Zilvia FREAK!
 
Join Date: Jun 2005
Location: San Jose, CA
Age: 38
Posts: 1,550
Trader Rating: (0)
Feedback Score: 0 reviews
|
Suscribing to this thread.
Did you have to drill a hole through the firewall to reroute it through the engine bay? or did you just use an exsisting hole? |
|
|
|
|
08-08-2008, 01:36 PM
|
#57 | |
|
Post Whore!
Join Date: Apr 2004
Location: Virginia, USA
Posts: 5,764
Trader Rating: (5)
Feedback Score: 5 reviews
|
Quote:
|
|
|
|
|
|
08-08-2008, 01:45 PM
|
#58 | |
|
Post Whore!

Join Date: Jul 2007
Location: Simi Valley, CA
Age: 42
Posts: 9,006
Trader Rating: (106)
Feedback Score: 106 reviews
|
Quote:
|
|
|
|
|
|
01-04-2009, 01:14 PM
|
#59 |
|
Zilvia FREAK!

Join Date: Nov 2006
Location: South Fulton, TN
Age: 34
Posts: 1,043
Trader Rating: (4)
 Feedback Score: 4 reviews
|
I know i'm bumping an old thread. I thought i would show how i did mine. I didnt see no vert on here, and verts have a fender brace from the factory. so its a little harder to get the back of the harness up high.

__________________
92 vert converted 5speed and other little things 
|
|
|
|
|
01-04-2009, 02:10 PM
|
#60 | |
|
Zilvia Junkie
Join Date: Mar 2005
Location: Cincinnati / Gaithersburg
Age: 39
Posts: 360
Trader Rating: (2)
Feedback Score: 2 reviews
|
Quote:
|
|
|
|
|
|
| Bookmarks |
|
|


 Linear Mode

