|
|||||||
| Chat General Discussion About The Nissan 240SX and Nissan Z Cars |
 |
|
|
Thread Tools | Display Modes |
 06-23-2008, 09:28 AM
|
#31 |
|
Post Whore!
 
Join Date: Jul 2005
Location: LA
Age: 39
Posts: 3,402
Trader Rating: (19)
  Feedback Score: 19 reviews
|
Here's my cut off from my JRT lighting kit 4300K.
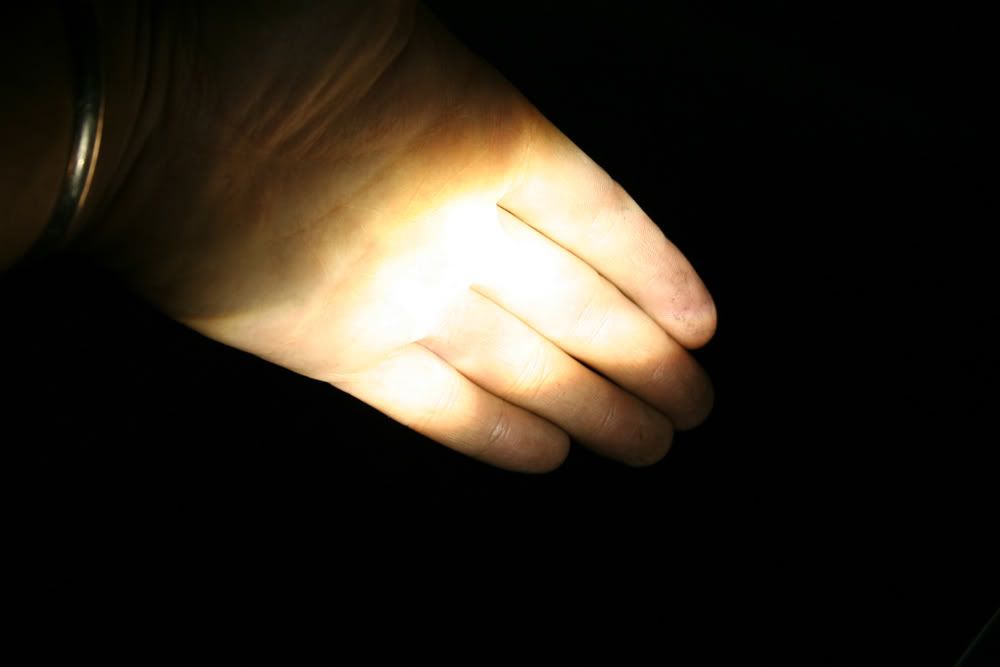 They're not adjusted in this picture, I got them better looking then that: 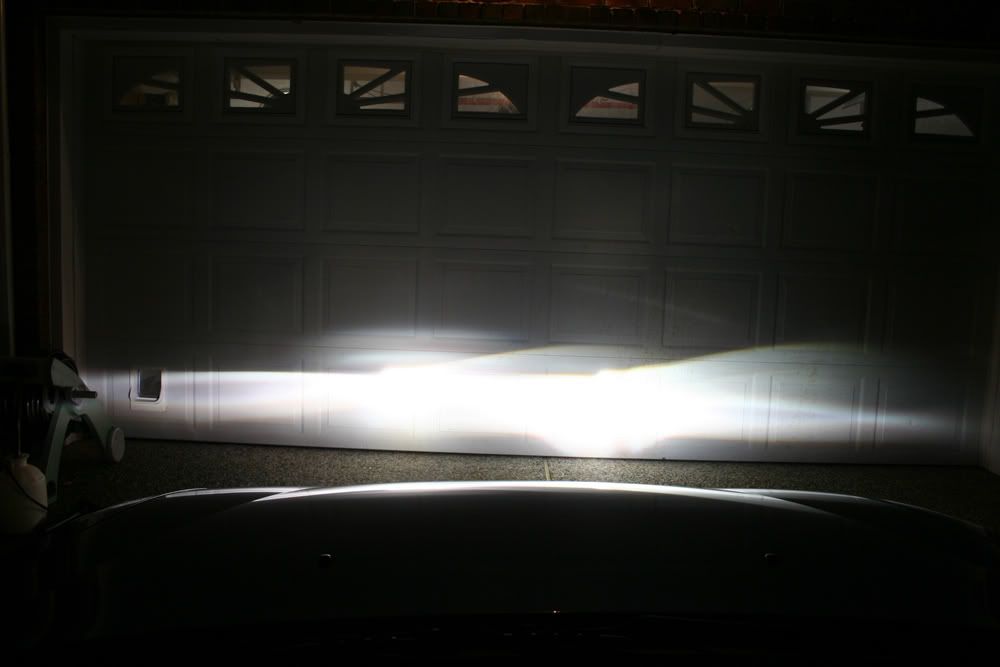 HID on Left, regular on right:  The cut off is very good from further away. When I drive through the tunnels and shit around here I can see my cut off on both sides is a nice straight line and in front of me it isn't over people's rear bumpers.
__________________
 Instagram - SJKnoop |

|

|
| Sponsored Links |
|
06-23-2008, 03:19 PM
|
#32 | |
|
Nissanaholic!
 Join Date: May 2005
Location: East Bay
Age: 39
Posts: 2,110
Trader Rating: (0)
Feedback Score: 0 reviews
 |
Quote:
sir that cutoff looks like pure ass
__________________
 parking lot pimpin... Seller Feedback here: http://www.zilvia.net/f/showthread.p...ight=pbcstylez |
|
|
|
|
|
06-23-2008, 03:48 PM
|
#33 |
|
Post Whore!
 
|
tight.
its going to light up the road. 90% of the people on here are such pussies.
__________________
http://bhworld.wordpress.com/ |
|
|
|
|
06-23-2008, 05:22 PM
|
#34 |
|
Zilvia Junkie
 Join Date: Sep 2004
Location: east coast
Age: 43
Posts: 333
Trader Rating: (0)
 Feedback Score: 0 reviews
|
I'm not trying to specifically condone HID retrofit kits in a kouki, but GFD the stock H1's suck SO much ass that I'm beginning to consider a retrofit myself.
The glare doesn't look too obnoxious and I dont care much about sharpness of the cutoff, but I just wish I could see the hot spots in person. my concern is that my eyes are going to be adjusting for an ultra bright spot on the ground 50ft in front of my car and I'm not going to be able to see much happening anywhere but in that spot. |
|
|
|
|
06-23-2008, 08:48 PM
|
#35 |
|
Post Whore!
Join Date: Jul 2005
Location: LA
Age: 39
Posts: 3,402
Trader Rating: (19)
Feedback Score: 19 reviews
|
I can see very well, I've never had complaints from anyone (I even had my friend drive in front of me at different distances and come from the other direction and he reported nothing worse then a stock TSX/any other car with stock HIDs), and you really can't beat the ease of doing it as well as the cost and the fact that it is 100000 times better then the stock headlights.
__________________
Instagram - SJKnoop |
|
|
|
|
06-23-2008, 10:05 PM
|
#36 | |||
|
Nissanaholic!
Join Date: May 2005
Location: Louisiana. LA is for Louisiana. L.A. is Los Angeles.
Age: 36
Posts: 2,315
Trader Rating: (2)
Feedback Score: 2 reviews
|
Quote:
God the Kouki projectors blow.
__________________
 Quote:
http://zilvia.net/f/sale-items/24807...-stuff-fs.html |
|||
|
|
|
|
06-25-2008, 05:03 PM
|
#37 |
|
Zilvia Addict
 
|
you want the best?
the BEST of the best? like really really kills pretty much 100% of the cars on the road, including those with retrofits? Let me tell you what you need. TL projectors Clearlens Apexcone 55w D2S Slim Ballasts Philips DL50 bulbs. those will fucking rock anything on the road. $200 + $90 + $200 + $100 (if you can find them) ~$600 will yield you over 10,000+ lumens, not including reflector & lens loss two standard HID bulbs yield 6400 lumens before losses. |
|
|
|
|
11-01-2009, 06:37 PM
|
#38 | |
|
Leaky Injector
 Join Date: May 2007
Location: Charleston, SC
Age: 40
Posts: 122
Trader Rating: (4)
Feedback Score: 4 reviews
|
Back from the dead!
After getting sick of being flashed because everyone thinks my high beams are on I decided it was time for a change. So, after reading all of the helpful hints that were listed in this thread this caught my eye... Quote:
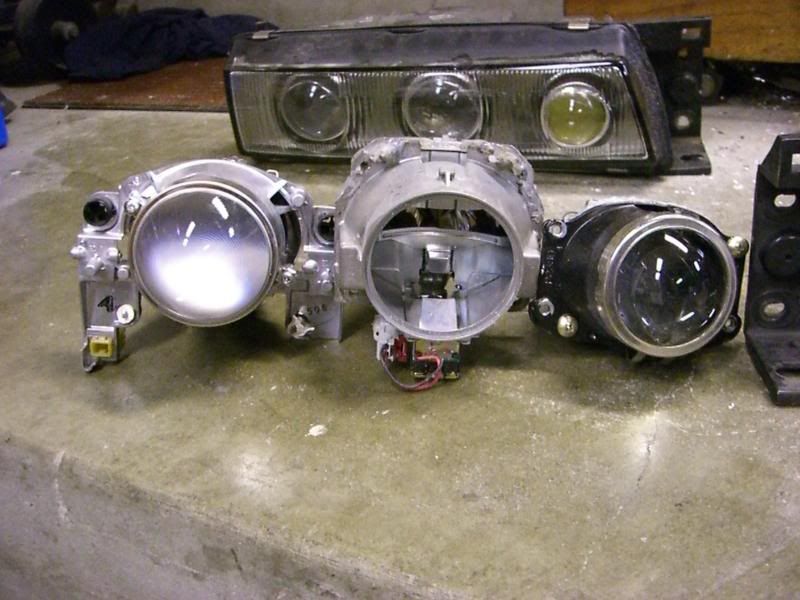
First to compare the 2 projectors: FRONT-  SIDE-  REAR-  BOTTOM-  Next I had to figure out how to fit the damn things into the housing. As you can see from the pics the solenoid on the bottom of the TL projector hangs down quite a bit. So much, that I would have to either cut into the headlight housing or cut off the solenoid. Since each headlight cost roughly $250 and each projector was about $80, I decided to cut the projector instead. After I was able to slide the projector into the housing I noticed the adjustment screws getting in the way. These things seem to be impossible to remove without cutting them out so I decided again to cut into the projector to make the screws fit. So It was time for some measuring of the holes where the adjustment screws were placed in the original S14 projector. TOP Outer dimensions:  SIDE Outer Dimensions:  SIDE Inner Dimensions:  TOP Inner Dimensions:  Then I made a template out of cardboard and placed it onto the TL projector.  On the drill press lined up and ready to go!  No turning back now  Then Magically its where it should be!  This is what it looks like with the shroud on.  Now with the glass on.  Here it it hooked up to a 55w Digital ballast with 8000k HID bulbs. This all came in a kit off of fleebay.  Finally the beam pattern!!   A couple of key notes about these headlights vs. the USDM version. JDM Projectors are 3" (s2000 retrofit would have looked like a toy inside of them) JDM glass does not have as many louvers in the glass so it means a better cut-off. JDM projector housing is completely different than the USDM one. Now this retrofit is not 100% completed yet as I have not installed the plastic adjustment things so I can use the original adjustment screws but, I'll be sure to take pics when I get off my lazy ass and do it.
__________________
 |
|
|
|
|
|
11-01-2009, 09:14 PM
|
#41 | |
|
Premium Member

Join Date: May 2004
Location: Santee California
Posts: 2,107
Trader Rating: (6)
Feedback Score: 6 reviews
|
No , really Bro.
 I got rid of my headlights and made deletes. lol I got rid of my headlights and made deletes. lolBro. http://www.kognitiondesign.com/headlight_delete.jpg  Quote:
Last edited by kognition; 11-02-2009 at 03:24 PM.. |
|
|
|
|
|
01-24-2010, 06:56 PM
|
#42 |
|
Leaky Injector
Join Date: May 2007
Location: Charleston, SC
Age: 40
Posts: 122
Trader Rating: (4)
Feedback Score: 4 reviews
|
I received a few PM's from people about this retrofit so I decided to tackle the rest of the job and take more pics along the way.
Before I start - PLEASE stay on topic "Need Sugestions: JDM Kouki Hid Retrofit" This is about a retrofit not getting rid of your headlights completely or something completely unrelated. Anyways... To start you want to preheat your oven to 250-300 or so and remove the metal tabs holding the glass and plastic housing together. Then put everything on a cookie sheet or something close to that and leave it in there for around 7mins or so. After that take it out of the oven and start to pry it apart. I used a flat head screwdriver and a razor blade to cut the sealant apart. Be very careful not to put to much pressure on the edges of the glass with a screwdriver because you can easily chip it. Also, if its too hard to pry apart toss it back in the oven for another 5 mins and try again. After everything is pried apart it should look like this. 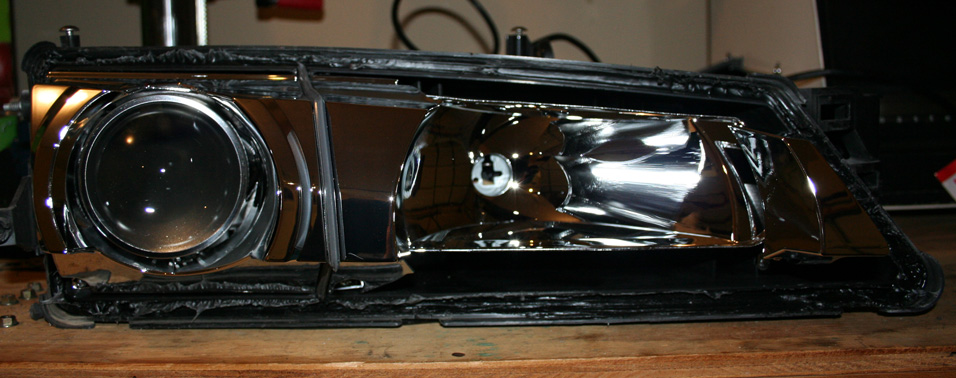 This is the stock JDM Kouki Headlight without the glass. Next you want to take the shroud off of the projector. This is attached by 2 philips screws at the bottom. And then BAM - this is what it looks like. 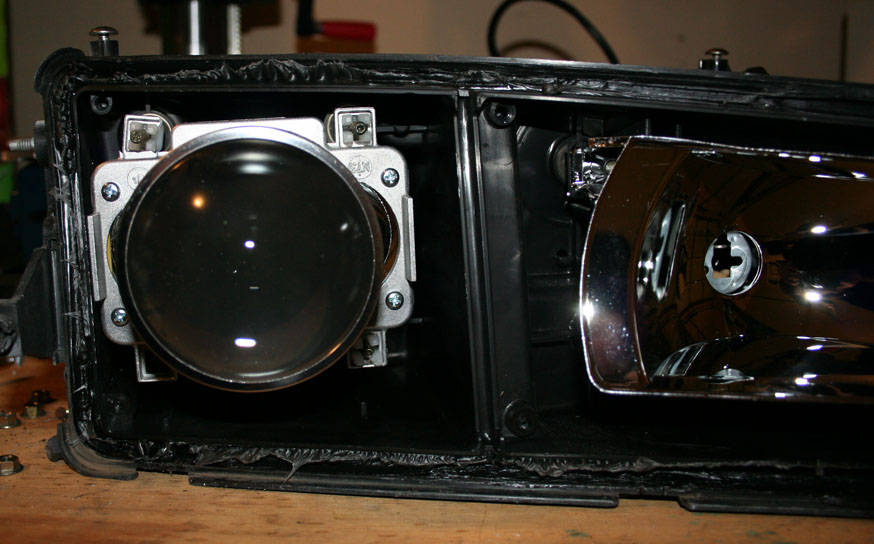 You may notice on mine one of the metal tabs at the top left of the pic has been broken. This is one of the reasons why I chose to retrofit another projector because I could no long adjust mine so it wouldn't blind others. Use the adjusters on the back of the headlight to remove the projector. This is what it should look like.  Now its time to mess around with the TL projectors. These projectors are bixenon (meaning they can be used for both High and Low beams) Since the solenoid for the bixenon is at the bottom and makes it impossible to fit into the headlight housing it must be removed. This is what the solenoid looks like. 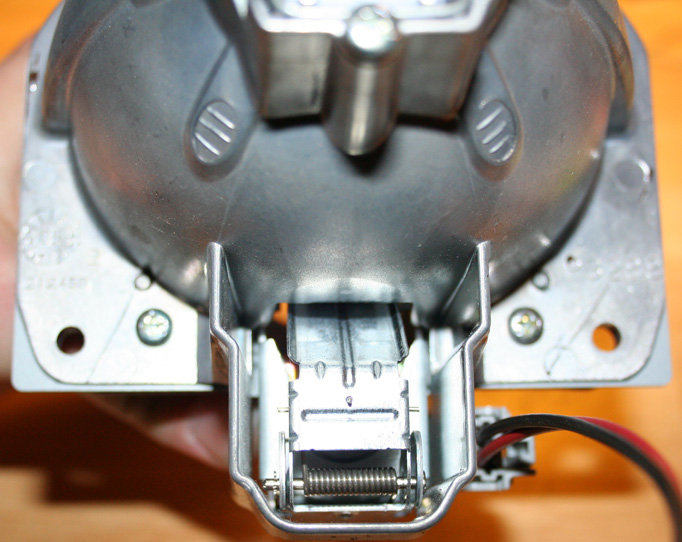 There are 4 philip screws located on the back side that must be removed. Once done it should look like this. 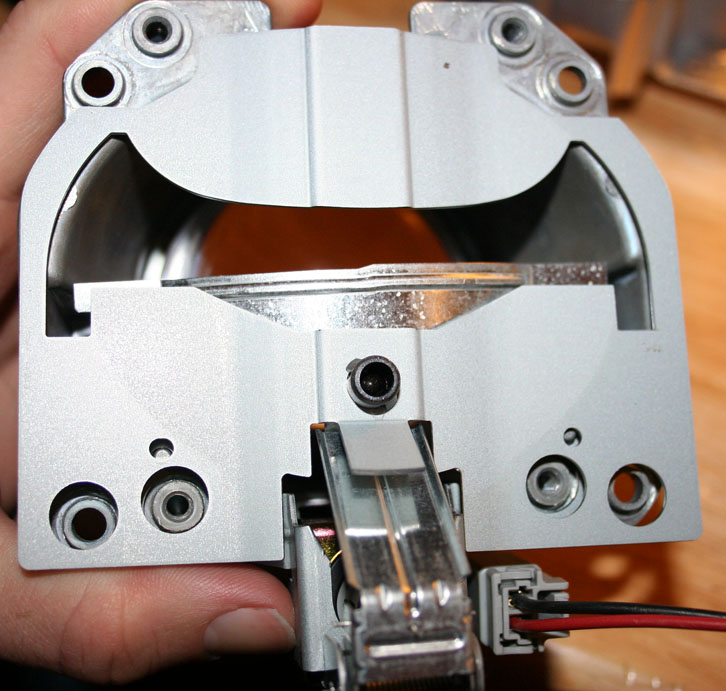 To remove the solenoid itself you must first take the lens out by removing its shroud and then the solenoid will fall out. Since the cutoff line is attached to the solenoid it must be removed and bolted back into the housing. This is fairly strait forward and only requires a small flat head screwdriver. After your done taking it apart this is what you are left with. 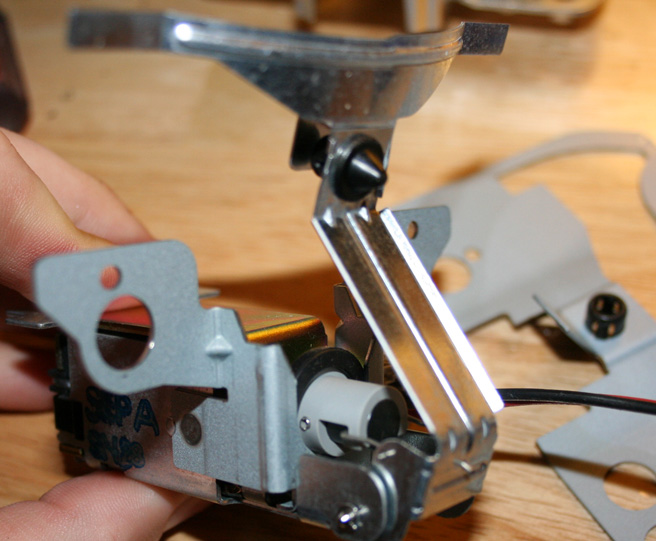 There are black plastic stoppers located on the cutoff line and a bracket inside the projector housing that need to be removed in order to install a bolt. These just pop right out. 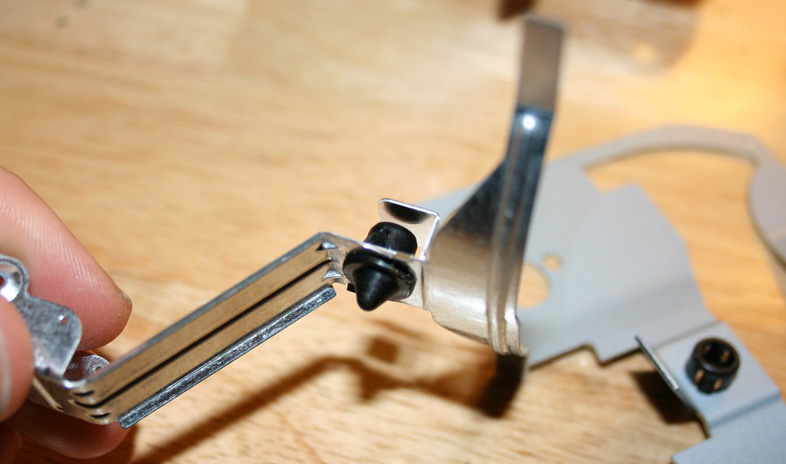 This is everything you need to install the cutoff line to the bracket. A small bolt, mine is a M6x12mm, also need a nut, washer, and lock washer. 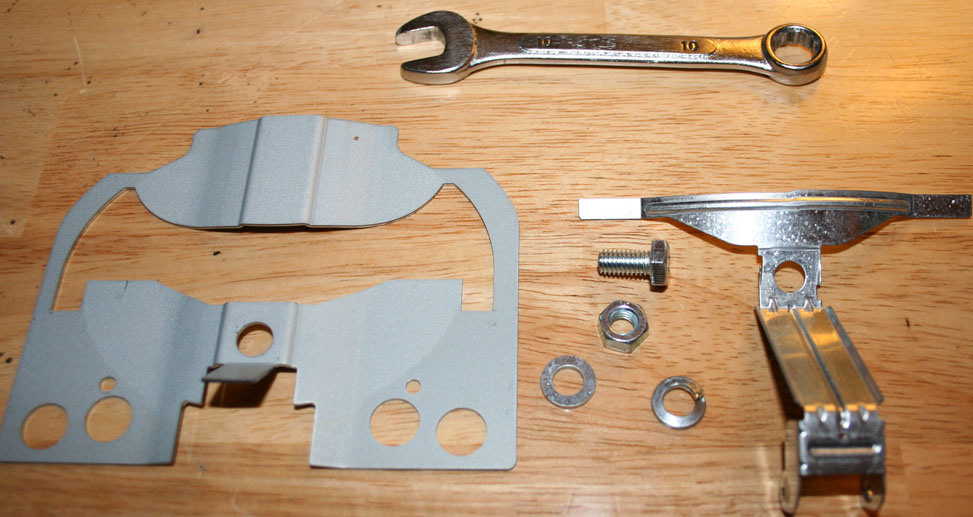 This is what it looks like when your done. 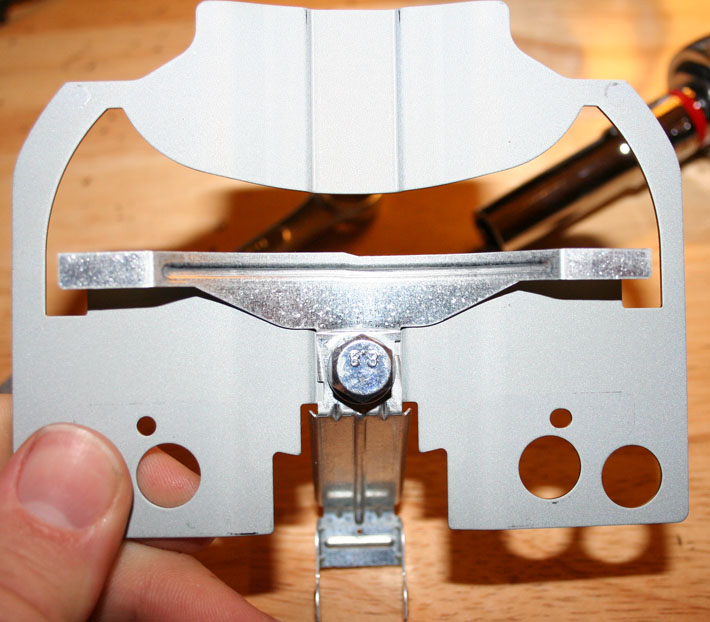 Now its time to trim the housing a little. Where the solenoid was located, needs to be removed. 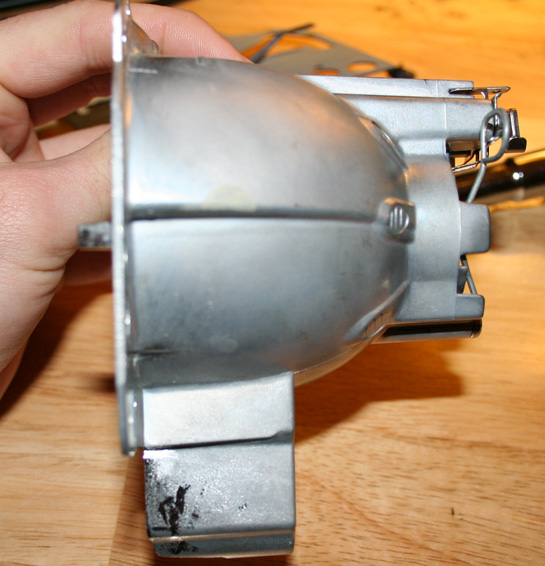 This is when having a air cutoff tool comes in handy, but a Dremil, or even a hacksaw would work if your desperate. 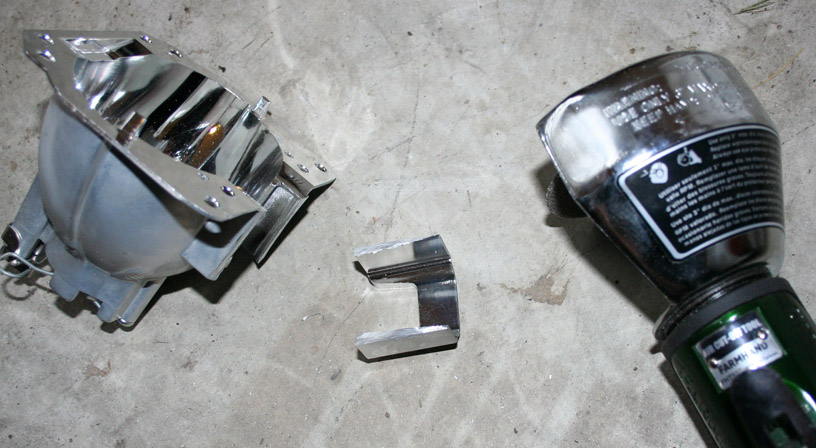 Now that the bracket is removed you can see the end of the cutoff line where it used to be connected to the solenoid needs to be modified. 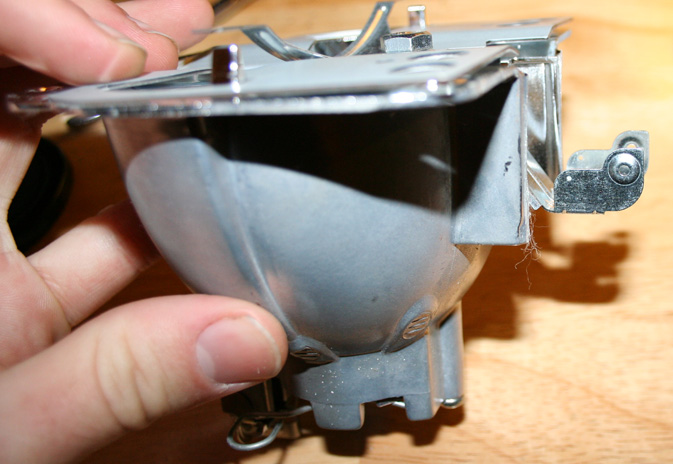 I chose to just bend it back and this is what mine looked like. 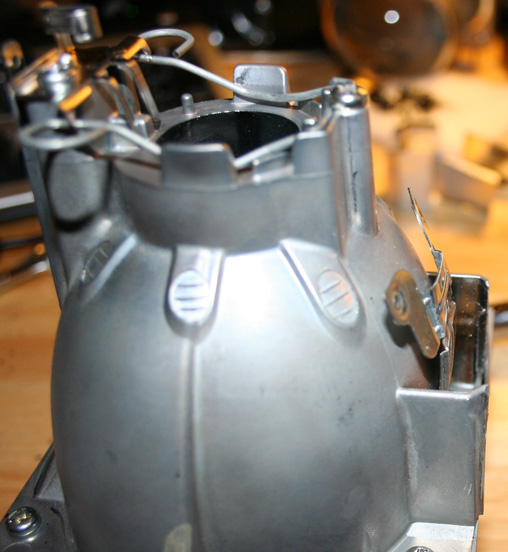 Here the projector is all ready to be drilled.  This is a closeup of the top part of the projector. There needs to be 2 holes drilled on this side and the basically you drill in between the screw and the hole already located there. 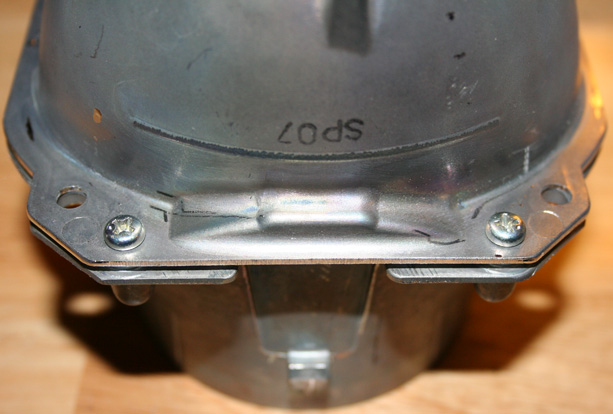 This is a closeup of the bottom of the projector. Only 1 hole needs to be drilled here and it depends on if its going to be your left or right projector since TL projectors are exactly the same. 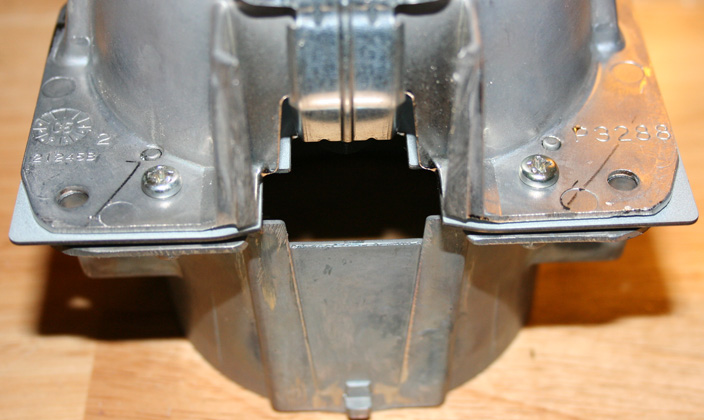 Basically where the laser intersects is where the hole should be for the top mounts.  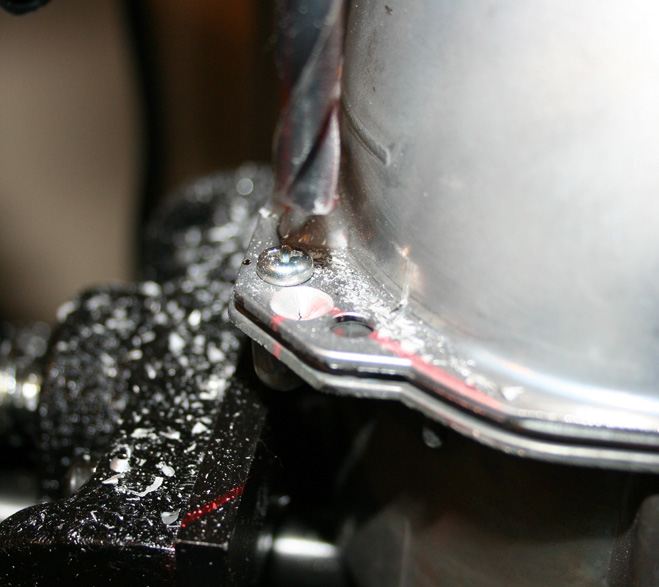 Here it is with all of my holes drilled.  Next I test fitted it into the headlight housing and noticed there was a bracket on the backside preventing it from going all the way in. 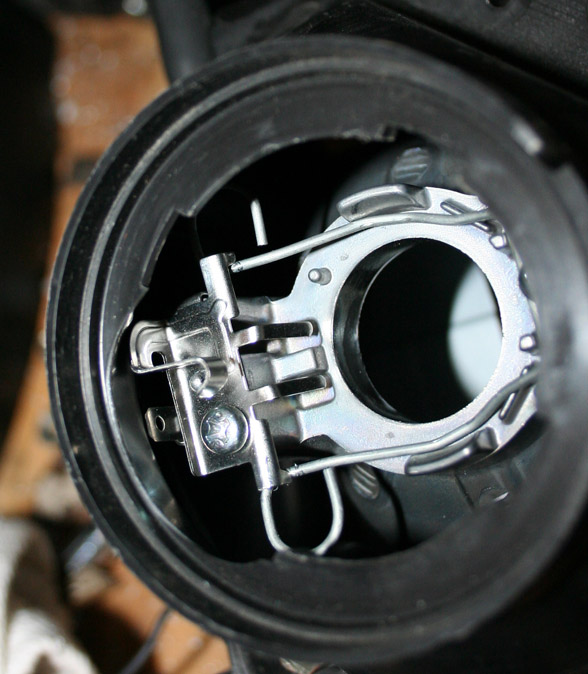 Nothing that a pair of metal shears couldn't handle. 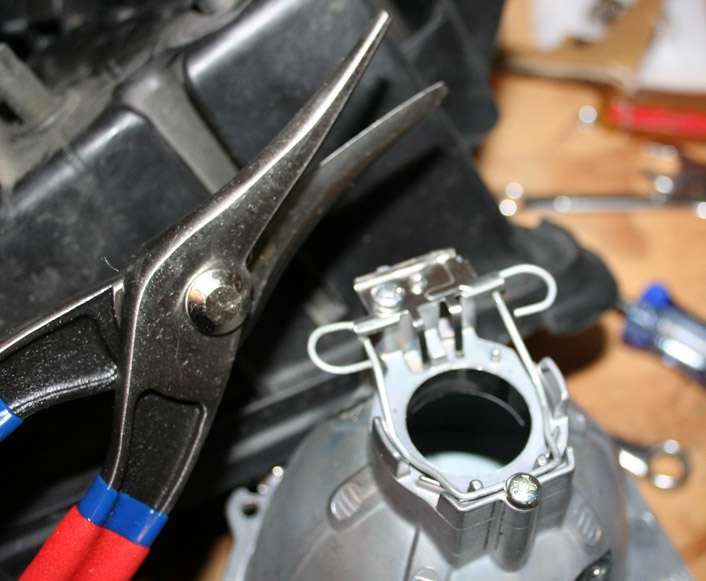 Next I test fitted it again and there was a black tab inside of the housing that was hitting the projector located in this pic. 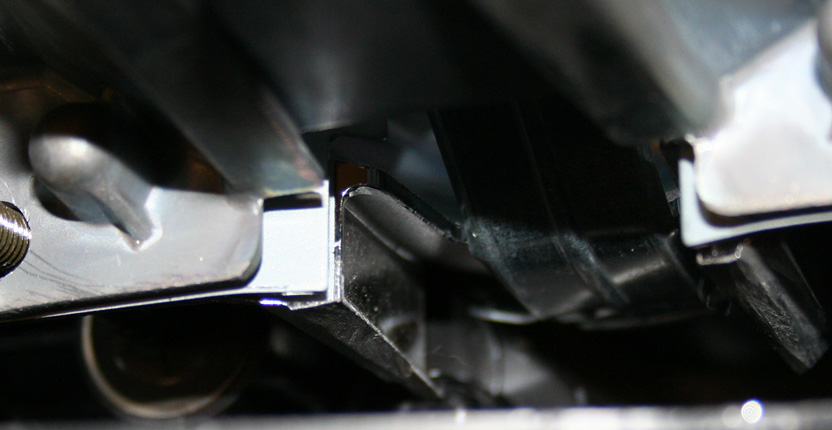 Again I used the cutoff wheel and this is what it looks like now. 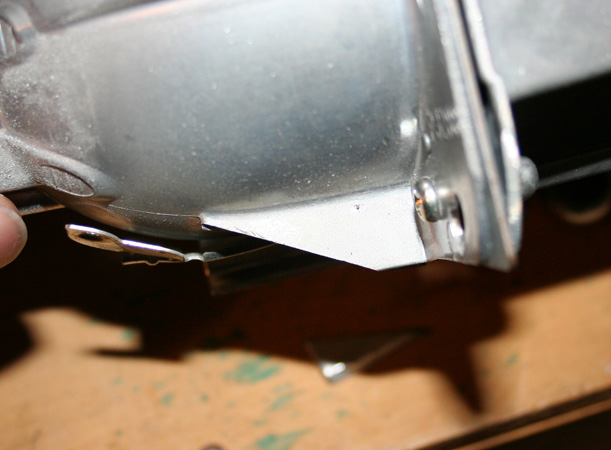 Here is the TL projector mounted inside of the Kouki projector. Notice I made a mistake while drilling my holes on the bottom so there is an extra one of the right side. 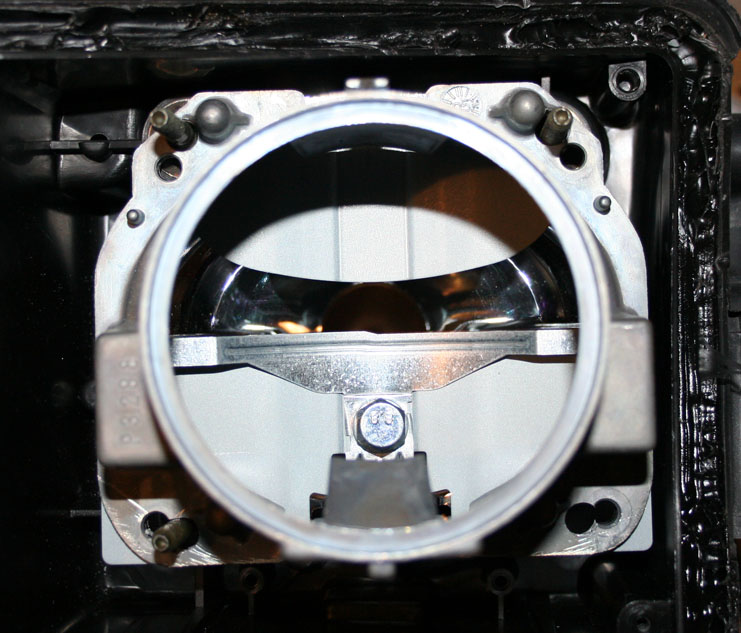 Now that it fits in there properly Its time to install the new lenses. Here is a comparison between the TL lenses and the ZKW-R ones. Notice the TL lens on the right is frosted and this would cause a crappier cutoff line. 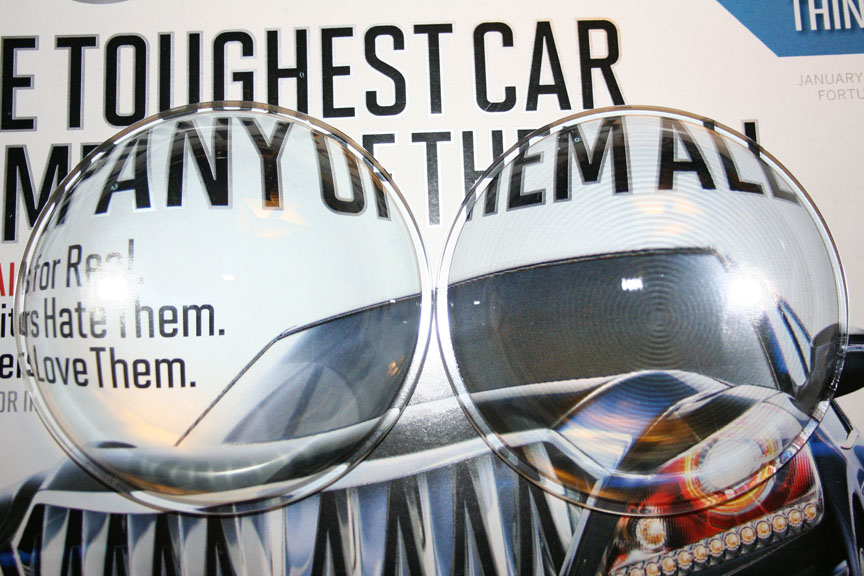 Here the new lens is at home. 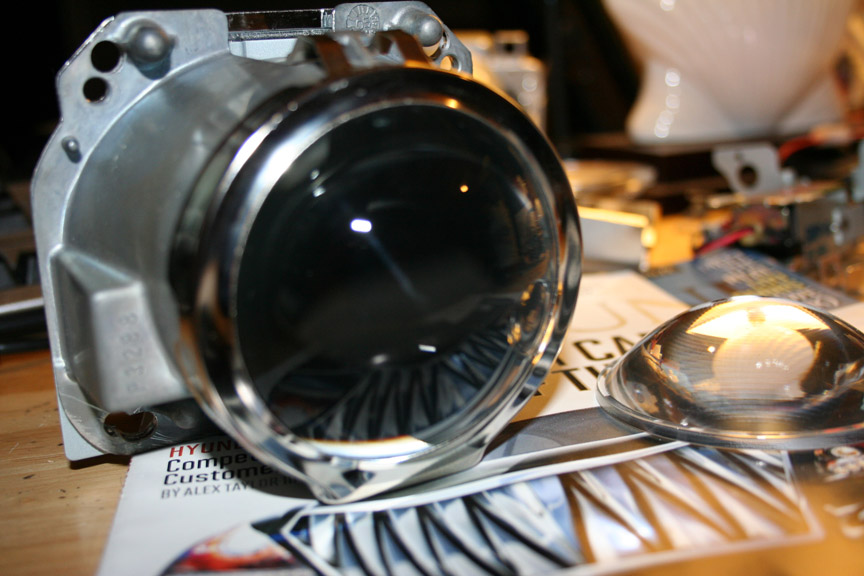 Now to mount the projector inside of the headlight housing. I used the existing plastic adjustment tabs that came with the headlight because I could not find a nut that would fit on the mounting bolts. I tried a standard #10x32 and a metric 5x.08mm... neither would work. What I did was cut off the little arm parts and here is whats left over. 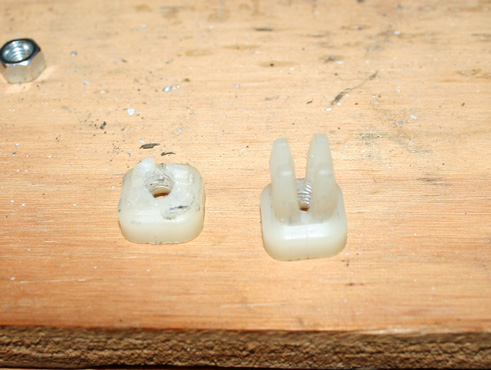 Next I screwed some of the tabs behind the projector and some in front of the projector so that I could adjust it the way I wanted until I thought everything looked right. 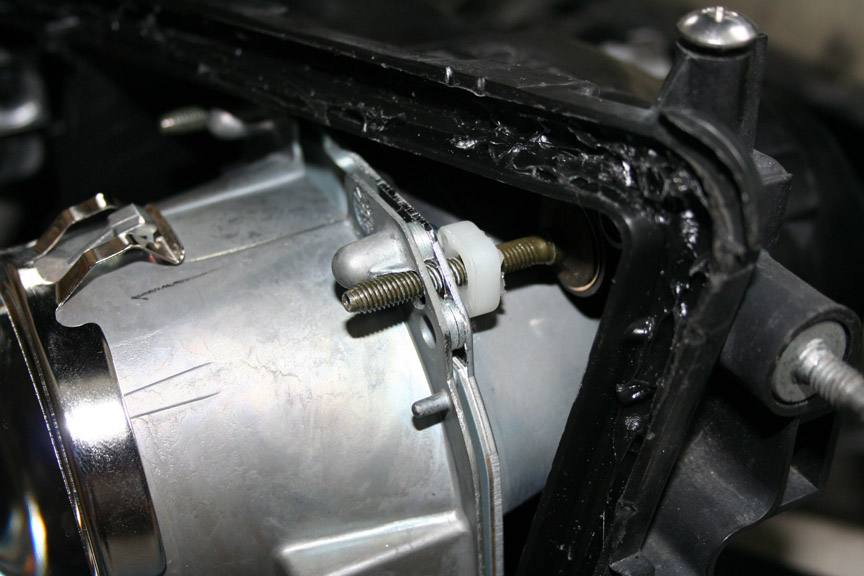 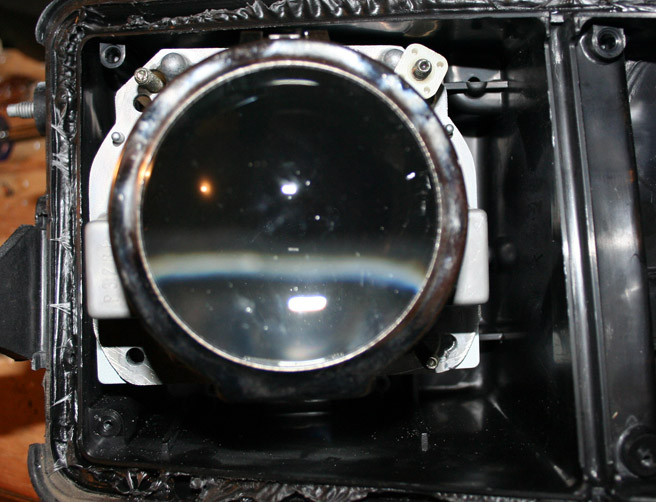 The original shroud needs to be slightly modified. As you can see on the inside there are a few tabs. Just pull them out and the whole center piece can be removed. 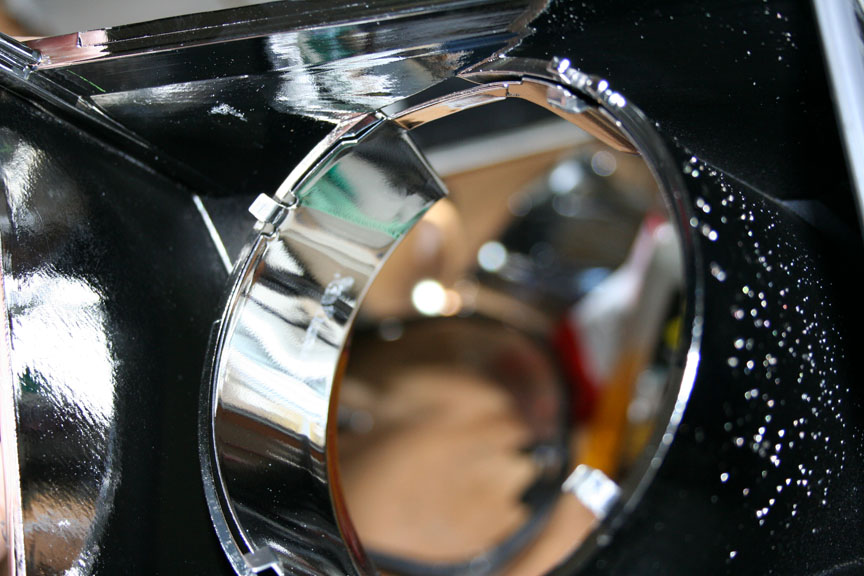 Now the shroud will fit over the new projectors. 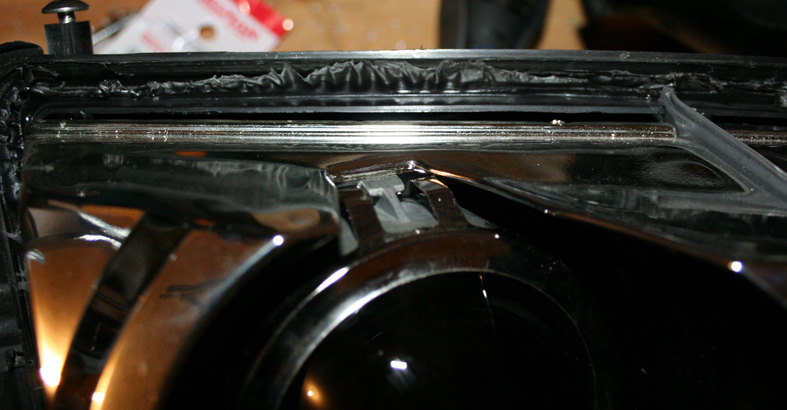 Now its time to test everything. I googled "Proper Headlight adjustment" and eventually found a guide and used it. Make sure your beam for both of your headlights is perfect before you put everything back together because its a real pain in the ass. 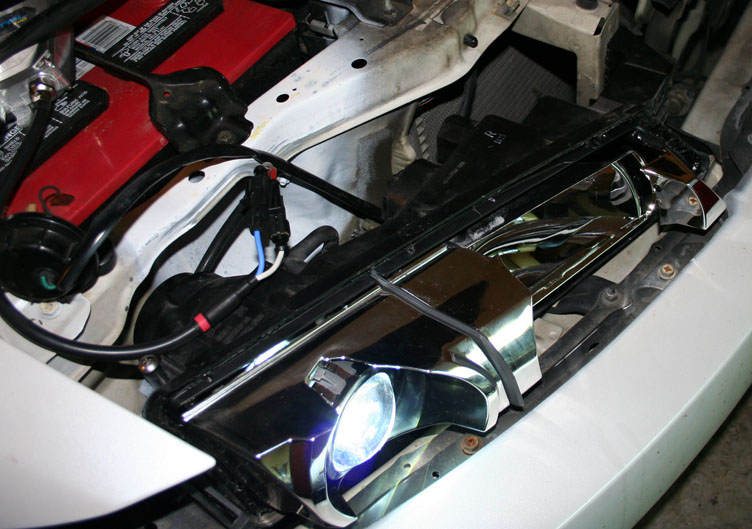 When everything looks good toss your glass and headlight into a 300 degree oven for about 5 mins, just to get the glue nice and soft. 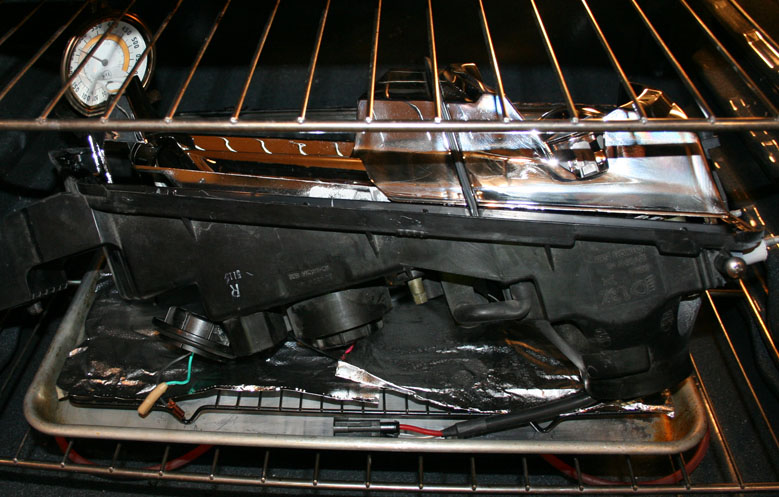 Then put the two pieces back together and dont forget to put the metal tabs back on. 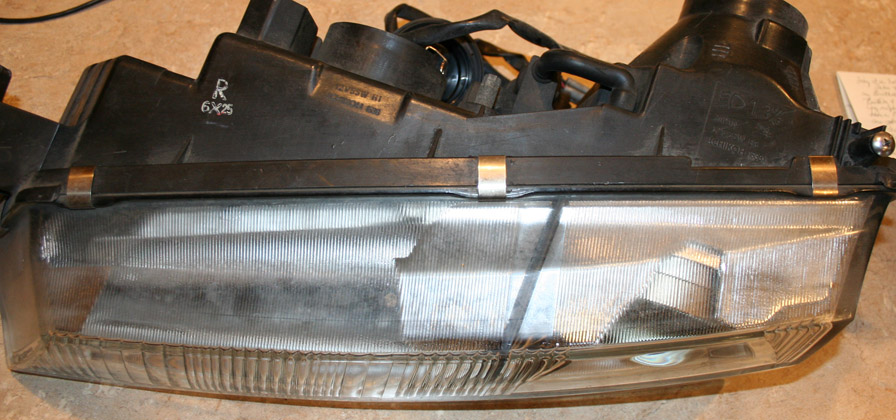 Wiring it up depends on a lot of different things so I'm not going into that but here is the final results.  p.s. I know I need a paint job but its too cold right now to start  I'll try to get some pics of them outside at night when I get a chance. If anyone has some questions don't hesitate to PM. - Thanks
__________________
Last edited by wbarrett48473; 04-01-2016 at 08:35 PM.. Reason: Rehost Pictures |
|
|
|
|
01-25-2010, 07:57 PM
|
#44 |
|
Leaky Injector
Join Date: May 2007
Location: Charleston, SC
Age: 40
Posts: 122
Trader Rating: (4)
Feedback Score: 4 reviews
|
Yeah I wish I could have kept the bixenon but since the headlight itself costs so much and I didn't want to cut it up I ended up cutting the projectors.
Fitting a 3" projector with bixenon inside of those housings may be possible, but I haven't looked at all of the different types of projectors to measure them.
__________________
|
|
|
|
|
01-25-2010, 08:59 PM
|
#45 |
|
Leaky Injector
|
I wonder if this could be done with the USDM headlights. It would be nice to have some other options besides s2k projectors, even in the USDM kouki hl's I think they are pretty small.
|
|
|
|
|
01-28-2010, 11:24 PM
|
#46 |
|
dude you rule! this is exactly what i want to do... and now i can have my 3 yr old do it for me because your write up is so freakin easy to understand.....only prob is where did u come up on the ZKW-R lens?
|
|
|
|
|
|
01-28-2010, 11:37 PM
|
#47 | |
|
Leaky Injector
|
Quote:
Im gonna be buying stuff from there probly. They got clear lenses,ballasts,projectors,etc... |
|
|
|
|
|
| Bookmarks |
| Tags |
| headlight, hid, jdm kouki, tl projectors, xenon |
|
|


 Linear Mode

