|
|||||||
| Builds (and builds only) Got a build thread? It goes here, build threads anywhere else on the forum will be locked and never moved. |
 |
|
|
Thread Tools | Display Modes |
 10-07-2014, 07:42 AM
|
#961 | ||
|
Zilvia Addict
 |
Quote:
Quote:
Hahaha yup, sounds like the devil to me.. lol Love it!!.. Its so loud if two people are talking to one another next to the car while it is running you can not hear them.. Crazy..
__________________
http://zilvia.net/advertise.html |
||

|

|
| Sponsored Links |
|
10-19-2014, 06:00 PM
|
#964 |
|
Join Date: Sep 2008
Location: Oceano, CA
Age: 42
Posts: 47
Trader Rating: (0)
 Feedback Score: 0 reviews
|
Wow I spent the last few days at work and home reading this; and you sir, like others have said, are an inspiration. I sold my first project car earlier this year because I really want to build a drift car myself but Im having so much trouble figuring out what to do. Now I think maybe Ill try to just find an old 350z learn how to drift then go with an LSx swap. Probably nowhere near is high end because I dont think I'll ever be pro but man this is amazing! Job very well done!
|
|
|
|
|
10-20-2014, 11:34 AM
|
#965 | |
|
Zilvia Addict
|
Quote:
Oh man thanks for the kind words.. Comments like these keep me going and make every stressful night worth it.. So thank you sir for that. Now if I had to do it all over again I would differently find a water damage Z either 350z or 370z and start building that.. Instead of taking my daily driver\track car off the streets for 3 years.. But hey you live and learn.. Next build will def be a 370z tho.. Can't wait for your build, if you every have question hit me up..
__________________
http://zilvia.net/advertise.html |
|
|
|
|
|
10-22-2014, 09:51 AM
|
#967 | |
|
Zilvia Addict
|
Quote:
Hahaha don't know about that, those cars are a beast.. But thanks for the compliment.
__________________
http://zilvia.net/advertise.html |
|
|
|
|
|
11-17-2014, 01:31 PM
|
#968 |
|
Zilvia Addict
|
Got a new vid up.. Friend came over and wanted me to start her up so I was more then happy to do so..
LS1 Startup "Scaring Kids" on Vimeo
__________________
http://zilvia.net/advertise.html |
|
|
|
|
11-17-2014, 02:21 PM
|
#969 | |
|
Post Whore!
 Join Date: Dec 2010
Location: SoCal 909
Age: 31
Posts: 4,743
Trader Rating: (42)
 Feedback Score: 42 reviews
|
When will we see this thing drive?
__________________
Quote:
|
|
|
|
|
|
11-17-2014, 07:46 PM
|
#970 |
|
Post Whore!
Join Date: Jul 2009
Location: nepa
Age: 41
Posts: 2,775
Trader Rating: (13)
Feedback Score: 13 reviews
|
Everything about this build is amazing. Great attention to detail and very high quality pics. I'm a big fan of the front bumper/splitter combo as well. I did notice the headlights change a couple times. Are you sticking with the current ones?
|
|
|
|
|
11-18-2014, 07:35 AM
|
#971 | ||
|
Zilvia Addict
|
Quote:
Quote:
Thanks for the kind words.. So still up in the air with the head lights.. Might switch back to my 06 OEM lights. but first I want to see how these look when the car is all one color.. With that being said still going to keep these as spares.
__________________
http://zilvia.net/advertise.html |
||
|
|
|
|
11-18-2014, 10:05 AM
|
#972 | |
|
Post Whore!
Join Date: Dec 2010
Location: SoCal 909
Age: 31
Posts: 4,743
Trader Rating: (42)
Feedback Score: 42 reviews
|
Didn't want to say it but since you did go back to the OEM lights lol
__________________
Quote:
|
|
|
|
|
|
11-23-2014, 12:28 PM
|
#974 | ||
|
Zilvia Addict
|
Quote:
Most likely Quote:
Thanks
__________________
http://zilvia.net/advertise.html |
||
|
|
|
|
11-25-2014, 08:47 AM
|
#975 |
|
Zilvia Addict
|
Well finally got my Rivnut tool in the mall.. So know I can install all 24 rivnuts for my overfenders..
 More pics on the install by the end of the week
__________________
http://zilvia.net/advertise.html |
|
|
|
|
11-25-2014, 12:08 PM
|
#978 |
|
Zilvia FREAK!
 |
That tool will come in handy if you are doing Size 8 and up. I have a manual hand help Rivnut tool (looks similar to rivet tool). It is quick and easy until you get to Size 8 or larger. Then its HeMan time lol.
Do yourself a service and take a flat piece of scrap sheetmetal similar in gauge to the oem panels. Adjust the depth to where the top lip of the rivsert meets the tool while the threaded bolt of the tool sits flush with the bottom of the rivsert. This should be the proper setup for typical applications However, I found on my body (S13) was so thin that if the bolt sat flush with the bottom of the rivsert, it was too much torque and began to distort the sheetmetal. Lucky for me is was the least noticeable area. For your tool, it is just a matter of how many revolutions you place on the bolt. I would just keep the count and adjust if needed before install on your car. Avoid my mistake. |
|
|
|
|
11-25-2014, 03:11 PM
|
#981 | |||
|
Zilvia Addict
|
Quote:
Quote:
So I do have the rivnut gun also but I am running 6mm steel rivnuts, and my gun did not run metric.. And I knew the steel rivnuts would be a pain.. So just thought I would pick up something that could do steel rivnuts.. Quote:
That is good to know I will def keep a eye out for that
__________________
http://zilvia.net/advertise.html |
|||
|
|
|
|
12-04-2014, 07:27 PM
|
#982 |
|
Zilvia Addict
|
Okay finally got to installing my Rivet nuts, but first lets talk beer...
 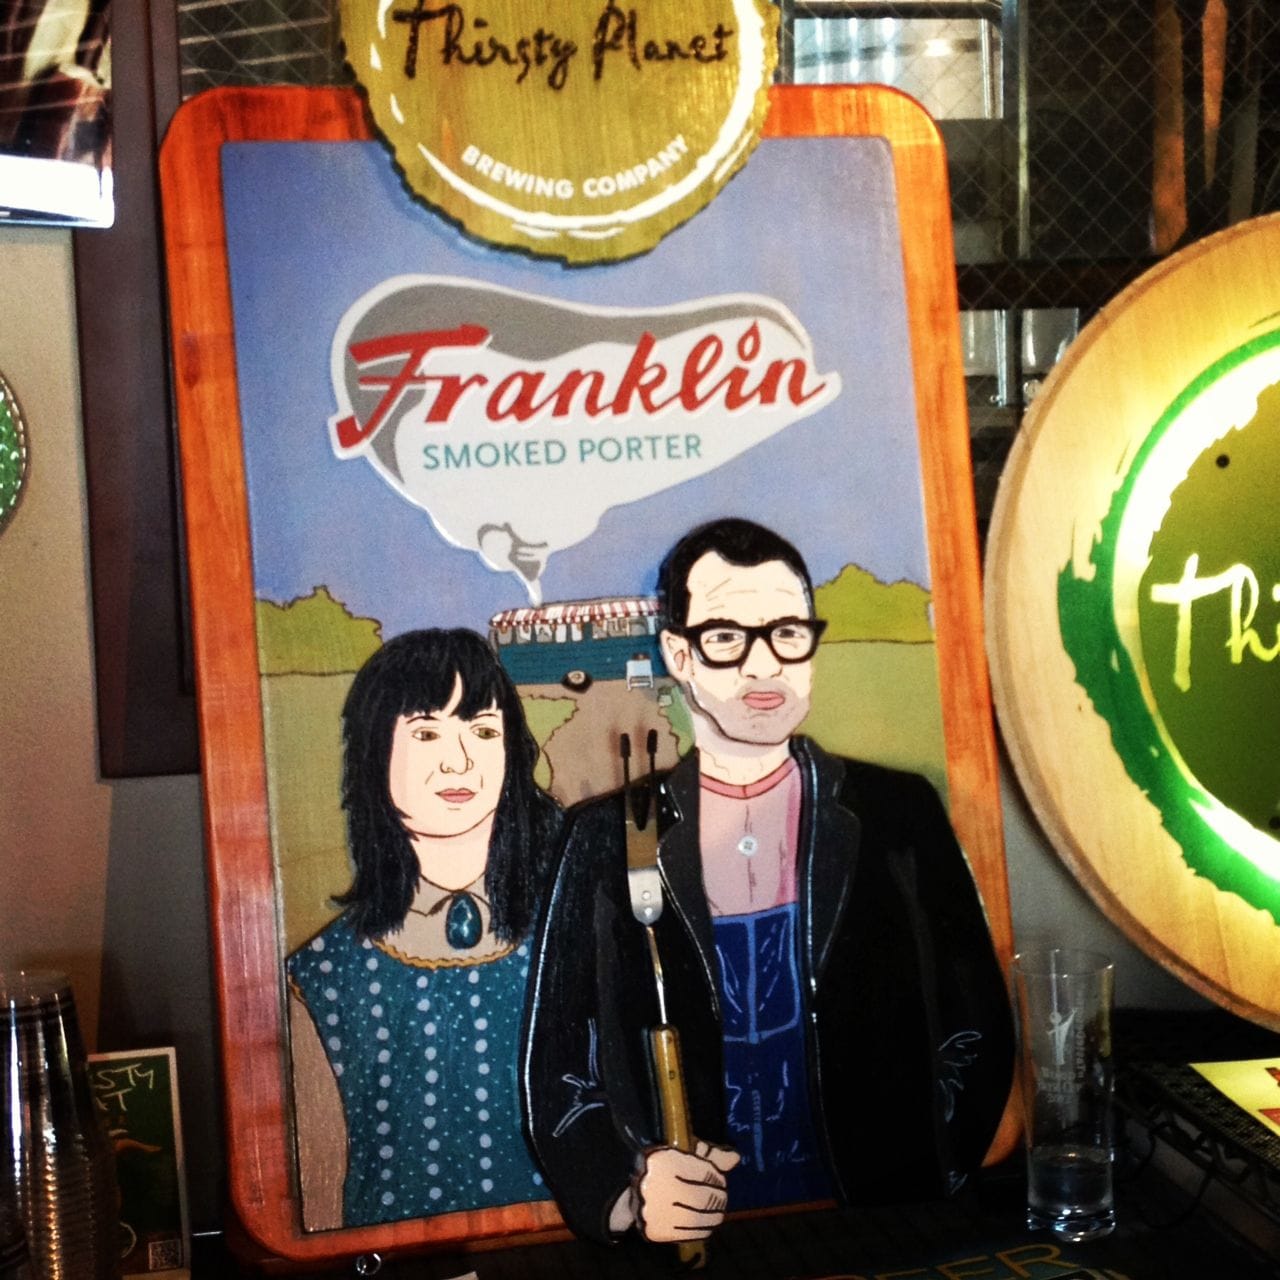 So I have not been drinking beer a lot lately, trying to cut back.. don't need that beer gut.. With that being said, I had to show case this local TX beer brewery.. Thirsty Planet Brewery, Now I just went there on a beer tour and had a blast. My favorite beer out of the bunch had to be their Smokey Porter. This was absolutely mind blowing. Every season they choose a locate TX BBQ spot for the Smokey Porter and the beers contained malts smoked by them.. The beer it self smelled like a BBQ joint. I just feel in Love with this beer.  lets start with the rivet nuts them self. I decided to do 6mm Steel Rivets. Wanted the Steel so they don't strip on me.  Here is the tool I am using to install them. And before everyone ask why not use the other hand tool like a rivetgun. Well I do have that tool too but it is in standard sizes and would be a bitch to install steel rivetnuts.  I already mocked up the fenders with your normal rivets so the holes were there, but need to be bigger to install the rivet nuts. Nothing a drill can't solve  Picked up a socket to drill bit adapter so I can use my drill to install them.. Used a 11mm socket  Getting ready to install the rivet nut. You are going to hold down the tool cause its going to want to twist on you if you don't  This is what it looks like once you have completed the install.  All you have to do is unscrew the 6mm from the rivet not add.....  BAM!!! we got a nice little rivet nut..  After I installed all 24 rivet nuts, 12 on each side. I mounted the over fenders.  The other side   At the moment I am using these temp allen bolts to make sure everything is good.. Later I will install these: 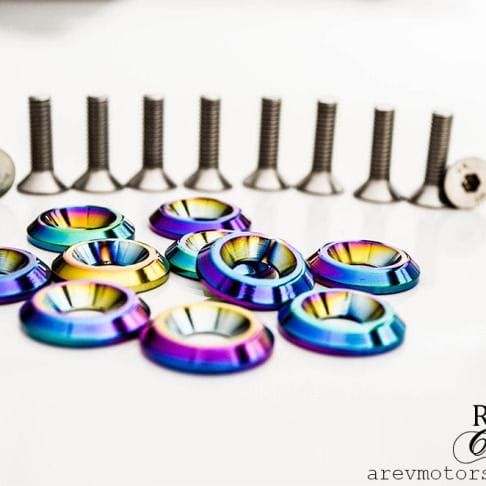 NEO Chrome bolts.. should look pretty good..
__________________
http://zilvia.net/advertise.html |
|
|
|
|
12-05-2014, 06:51 AM
|
#983 |
|
Zilvia FREAK!
Join Date: Oct 2009
Location: Near that guy you know
Posts: 1,561
Trader Rating: (11)
Feedback Score: 11 reviews
|
wow that looks like a pain in the dick to use. i've got a metric rivnut gun sitting on my cubemate's desk that will do metric, steel rivnuts. about 3 seconds each.
|
|
|
|
|
12-05-2014, 09:25 AM
|
#984 | |
|
Zilvia Junkie
 Join Date: Jun 2012
Location: central florida
Age: 32
Posts: 436
Trader Rating: (1)
Feedback Score: 1 reviews
|
Quote:
|
|
|
|
|
|
12-05-2014, 11:05 AM
|
#985 | ||
|
Zilvia Addict
|
Quote:
Quote:
Actually it only took about a couple of seconds to install just like your rivnut gun..
__________________
http://zilvia.net/advertise.html |
||
|
|
|
|
12-10-2014, 08:43 AM
|
#986 |
|
Zilvia Addict
|
 So I just linked up with a guy named Shawn that does a lot of CF work for Indy cars, we are going to be working on a few things on the Z but the first thing that is up to bat is my EndPlates. Here is a little tease on what we are working on for my Endplates for the BCL wing. I am mocking up some designs now and Shawn is going to do his thing to make these things badass. Can't wait..
__________________
http://zilvia.net/advertise.html |
|
|
|
|
12-12-2014, 10:30 AM
|
#990 | |
|
Zilvia Addict
|
Quote:
Me too, Trying to be like you Mr. CF King.. LOL
__________________
http://zilvia.net/advertise.html |
|
|
|
|
|
| Bookmarks |
|
|


 Linear Mode

