|
|||||||
| Builds (and builds only) Got a build thread? It goes here, build threads anywhere else on the forum will be locked and never moved. |
 |
|
|
Thread Tools | Display Modes |
 09-18-2012, 06:59 AM
|
#1681 | |
|
BANNED
 |
Quote:
 |
|

|

|
| Sponsored Links |
|
09-18-2012, 01:21 PM
|
#1682 | |
|
Zilvia FREAK!
 |
Quote:
You could have just cut my valve cover shots and pasted it to his bay. Looks AMAZING Toby! |
|
|
|
|
|
09-18-2012, 03:10 PM
|
#1683 | |

Join Date: Dec 2003
Location: Not sure yet...
Posts: 38
Trader Rating: (0)
 Feedback Score: 0 reviews
|
Quote:
|
|
|
|
|
|
09-18-2012, 04:50 PM
|
#1684 | |
|
BANNED
|
Quote:
we have theaters though. |
|
|
|
|
|
09-18-2012, 07:31 PM
|
#1685 | |
|
Zilvia.net Advertiser
 
Join Date: Oct 2006
Location: Normal, IL
Age: 50
Posts: 2,946
Trader Rating: (163)
 Feedback Score: 163 reviews
|
Quote:
__________________
  Follow Along For My Latest Work Follow Along For My Latest Work My Portfolio My Portfolio Please Share Please Share Check Out My Builds Check Out My Builds
|
|
|
|
|
|
09-18-2012, 07:37 PM
|
#1686 | |
|
Zilvia Addict
 |
Quote:
|
|
|
|
|
|
09-18-2012, 08:44 PM
|
#1687 | |
|
Post Whore!
 
Join Date: May 2006
Location: San Diego, CA
Posts: 9,135
Trader Rating: (19)
Feedback Score: 19 reviews
 |
Quote:
Anything goes, as long as it's not Toby making progress on his car lol.
__________________
 Jordan Innovations has a new web site! www.JordanInnovations.com -- All your favorite FD Pro Drifters love it, trust me -- www.JordanInnovations.com |
|
|
|
|
|
09-25-2012, 05:23 PM
|
#1688 | |
|
Zilvia.net Advertiser
Join Date: Oct 2006
Location: Normal, IL
Age: 50
Posts: 2,946
Trader Rating: (163)
Feedback Score: 163 reviews
|
Quote:
I'm pretty excited to make another cluster for myself. This one will be the most challenging yet as the MXL doesn't exactly fit in there.   I chose the AiM Sports because they seem to be the leader in race displays, I like the clean look of it, the display is completely customizable and I can hook it up to my LS3 ECU via these 4 simple wires and it will read every sensor on there... gotta love CAN bus! I interface with CAN bus on new vehicles virtually everyday at work. It's definitely the wave-of-the-future for aftermarket integration. 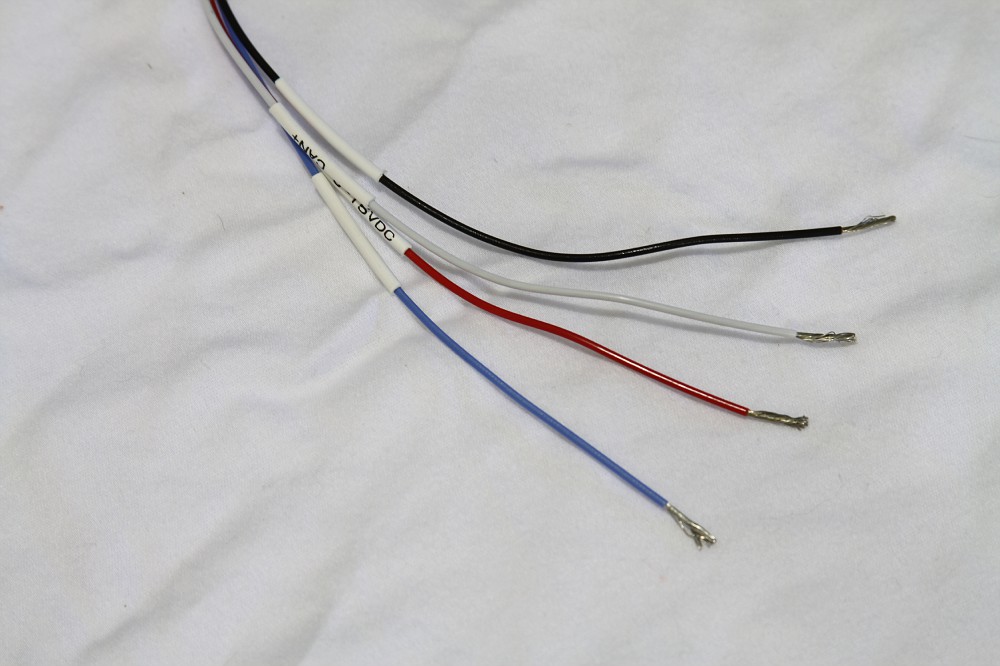
__________________
Follow Along For My Latest WorkMy PortfolioPlease ShareCheck Out My Builds
|
|
|
|
|
|
09-25-2012, 05:35 PM
|
#1689 |
|
Post Whore!
Join Date: May 2006
Location: San Diego, CA
Posts: 9,135
Trader Rating: (19)
Feedback Score: 19 reviews
|
Haha glad you finally got it. The last time I mounted one of these in a car that didn't have enough height, I just put it on the steering column, real race car style lol. I think the best option would be to make a one-piece cluster/bezel that was juuuust tall enough to see the shift lights up top and hit the page buttons down below.
Remember to leave that left side accessible though, or leave the USB cable plugged in behind the dash lol.
__________________
Jordan Innovations has a new web site! www.JordanInnovations.com -- All your favorite FD Pro Drifters love it, trust me -- www.JordanInnovations.com |
|
|
|
|
09-26-2012, 09:55 PM
|
#1691 |
|
Post Whore!

Join Date: Apr 2006
Location: bangin on my chest Account: BANNED #fucksupreme
Age: 82
Posts: 5,932
Trader Rating: (3)
Feedback Score: 3 reviews
|
Thats such an excellent gauge cluster.... I own 10 of them.
And I absolutely needed it because my car revs so quick. I could not use an analog gauge with my v10 LFA swap. |
|
|
|
|
10-19-2012, 11:10 AM
|
#1693 |
|
Post Whore!

Join Date: Apr 2007
Location: Wisconsin
Age: 37
Posts: 3,685
Trader Rating: (13)
Feedback Score: 13 reviews
|
I'm interested in seeing how you fit the cluster. Should look good with your standards being so high. just seems like a big cluster.
__________________
2JZ-GTE Swapped S13 Coupe - 1994 Supra Turbo |
|
|
|
|
10-20-2012, 02:44 PM
|
#1695 | ||
|
Zilvia.net Advertiser
Join Date: Oct 2006
Location: Normal, IL
Age: 50
Posts: 2,946
Trader Rating: (163)
Feedback Score: 163 reviews
|
Quote:
Quote:
__________________
Follow Along For My Latest WorkMy PortfolioPlease ShareCheck Out My Builds
|
||
|
|
|
|
10-20-2012, 03:32 PM
|
#1697 | |
|
Zilvia FREAK!

Join Date: Apr 2011
Location: Anaheim CA
Age: 38
Posts: 1,491
Trader Rating: (19)
 Feedback Score: 19 reviews
|
Quote:
Damn this is nice. Is there some kind of calibrating involved wen hooking up the speed sensor so it can read correctly? Or does it read it correctly automatically?
__________________
. |
|
|
|
|
|
10-20-2012, 07:27 PM
|
#1699 |
|
Zilvia.net Advertiser
Join Date: Oct 2006
Location: Normal, IL
Age: 50
Posts: 2,946
Trader Rating: (163)
Feedback Score: 163 reviews
|
My cluster build is complete. Although the finished product looks very basic, there was a lot that went into keeping the simple look. So bear with me while I post a lot of build pics during the process.
The first hurdle was the size of the MXL... it's too damn tall to fit within the constraints of the cluster framework. As you can see in the photo below(don't mind the crappy cell pics in the next four images  ) it is about 3/8" too tall overall. The top is cut off and at the bottom the buttons are smashed into the lower lip of the framework. Note: the framework has obviously already been modified to the specs of my standard clusters I make. ) it is about 3/8" too tall overall. The top is cut off and at the bottom the buttons are smashed into the lower lip of the framework. Note: the framework has obviously already been modified to the specs of my standard clusters I make.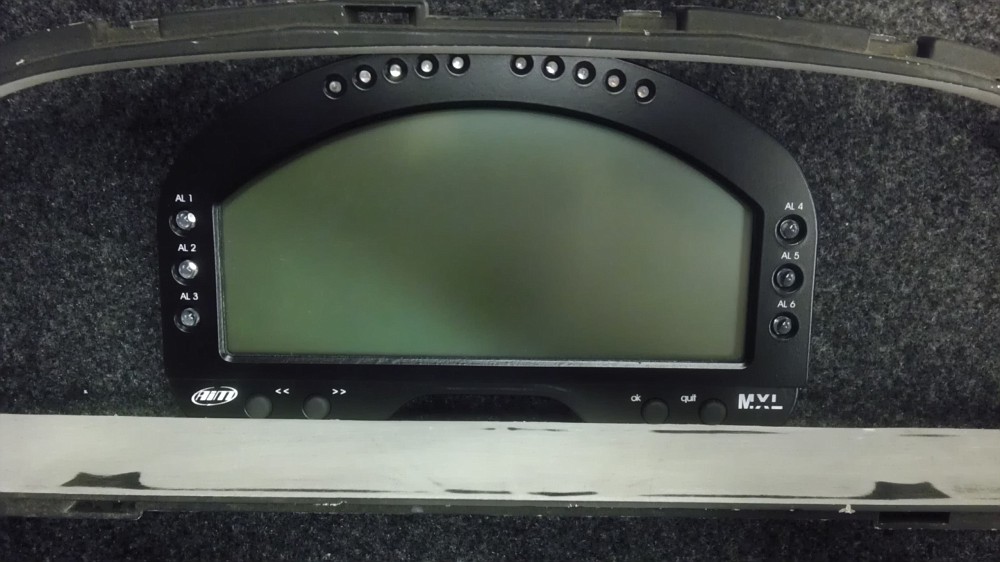 I knew that I wanted to keep the front edge of the framework as is because I need the OEM cluster surround to butt up in front of it so it fits like stock. So essentially I need the front lower edge to stay put, but the back lower edge that butts up against the plate needs to drop down 3/8". First I slit the bottom ledge at each corner just inside the lower mounting points: 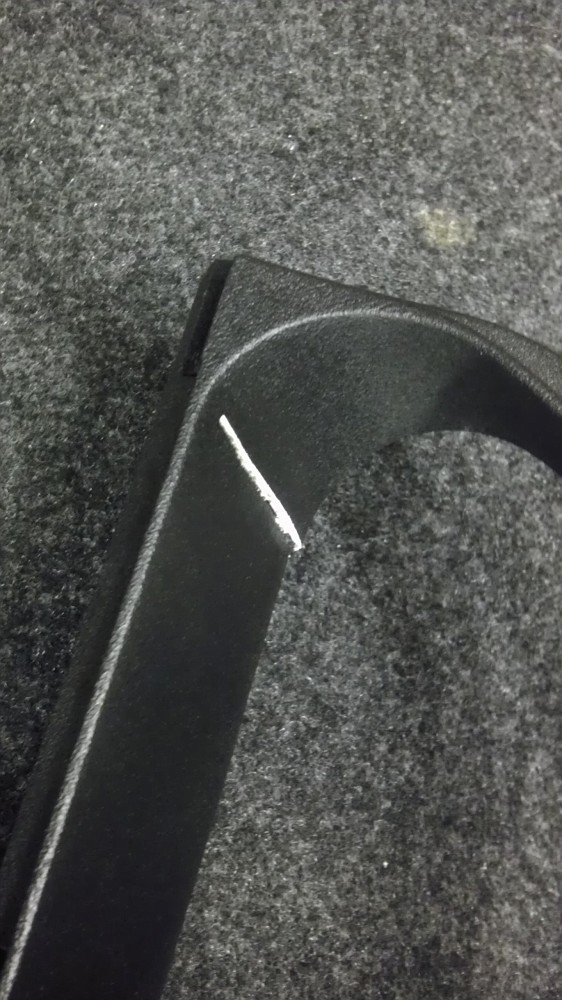 I then twisted the lower ledge down to gain the needed 3/8":  Backside shot: 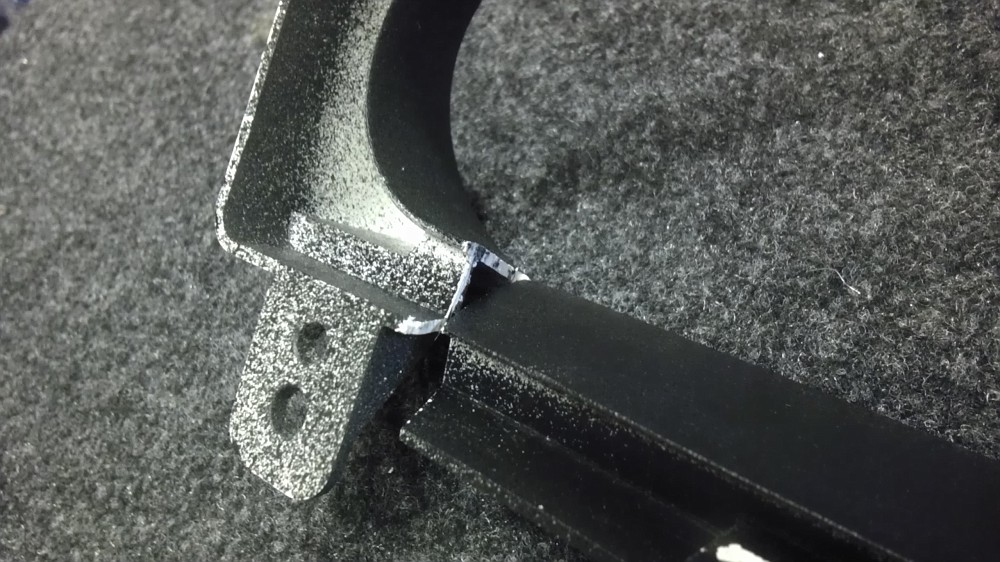 I used a piece of aluminum rod to keep the bent down section in place while I glued it up with some Norton Speed Grip:  I also filled in the small area that was now exposed because of the bent down section. It's hard to tell because the glue is also black, but it's filled in next to the slivers of white plastic:  The 2nd hurdle was to reshape the contour in the lower corners. I obviously couldn't leave that break in the plastic there. So I filled the entire backside corners in with the same Norton Speed Grip: 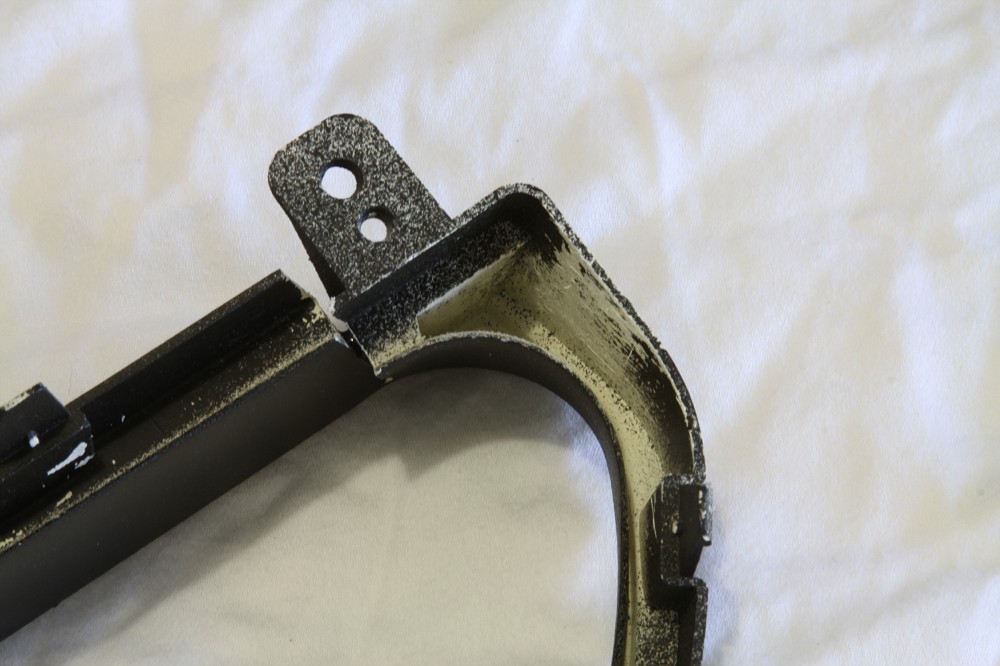 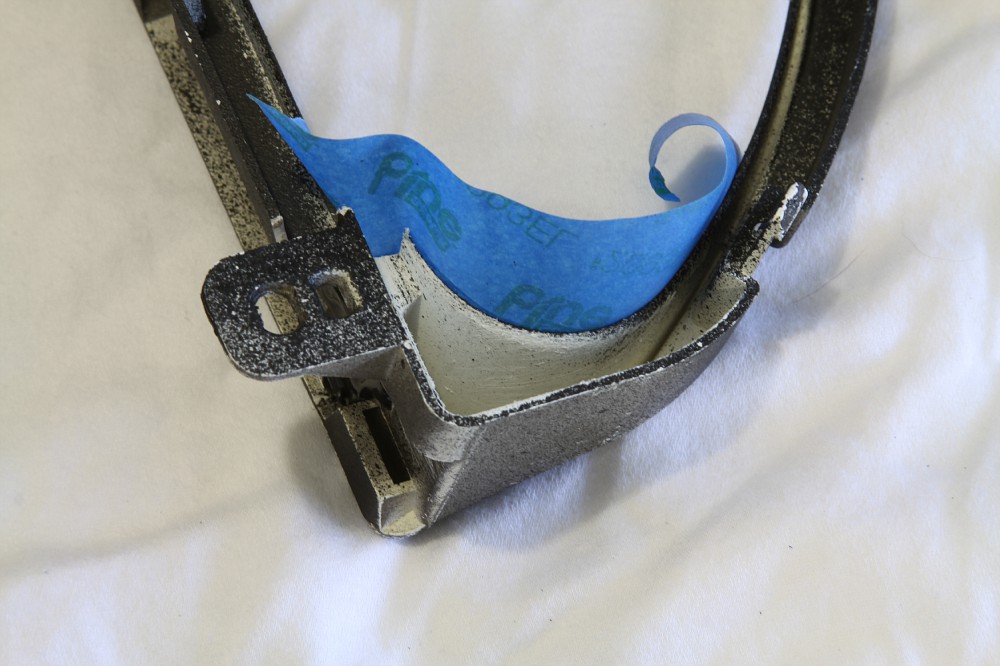 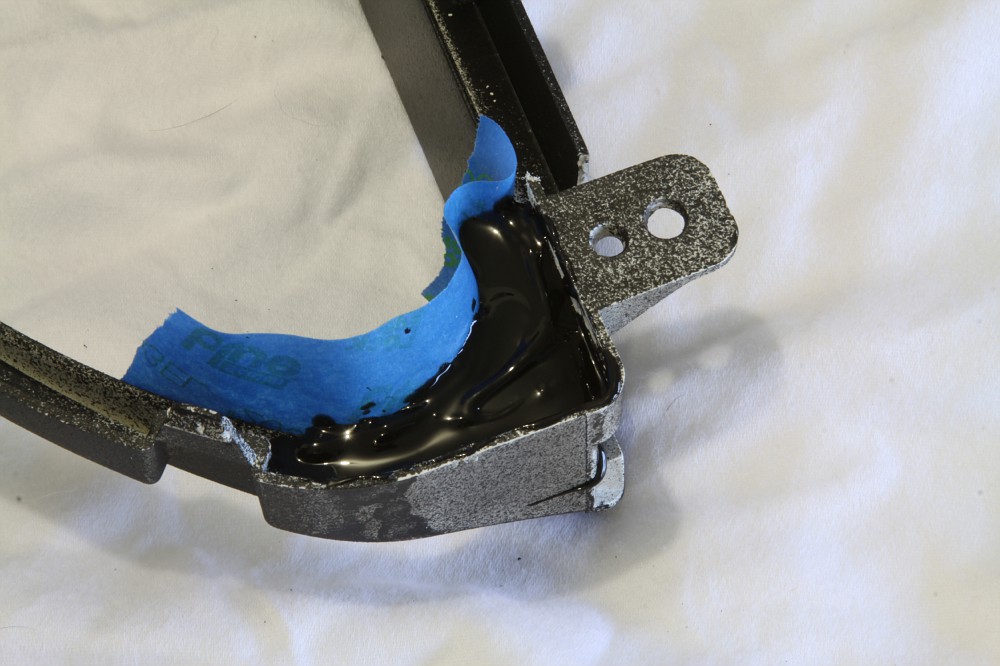  Now when I grind the corner, there is solid material there to give me my shape. Here is after grinding it with a sanding drum. The black area around the white plastic that is shaped line a "L" is the actual hardened Norton Speed Grip:  Also had to grind down the backside level to the framework so my plate would butt up against it flush:  Front view of the new lower corner contour:   Framework textured and completed: 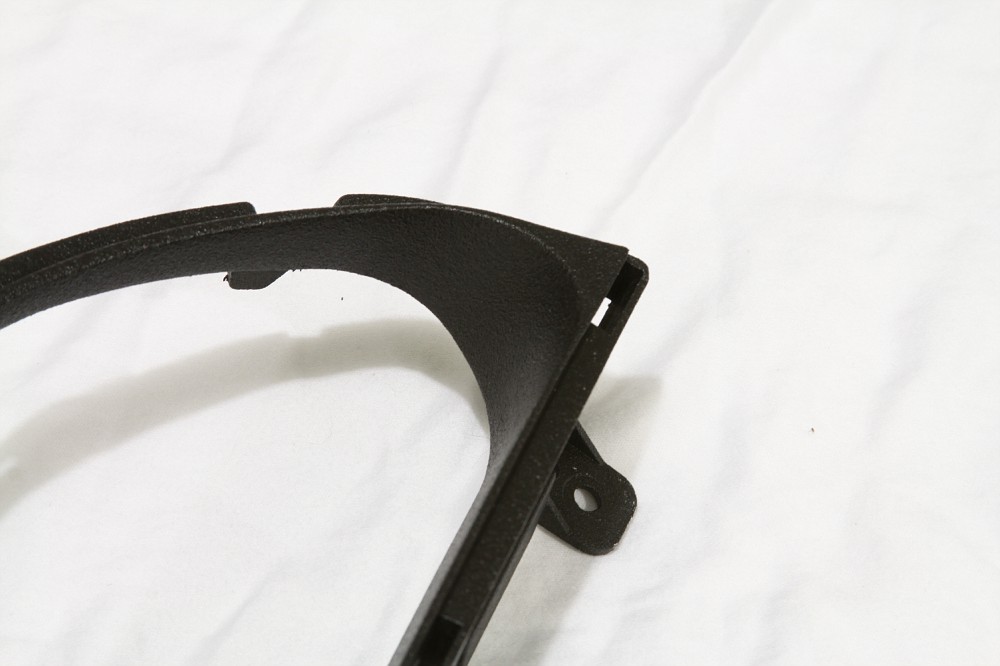 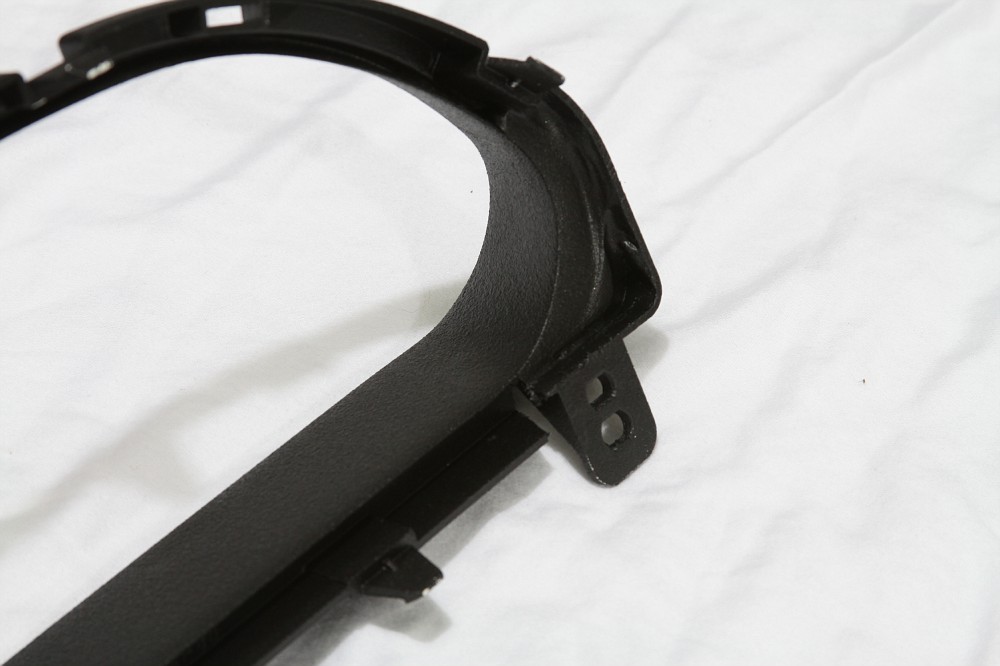  3rd hurdle is the fact that the buttons on the MXL are on a recessed area. Which means flushing it in a flat plate isn't going to work out too well... or not look finished anyway. So I came up with the idea of just covering that entire recessed section and only flushing the screen area itself. This would really frame the unit nicely since the bottom edge of the screen is flat and so is the bottom ledge of the cluster framework. So I went ahead and cut a plate out of 1/4" ABS to fit inside of the cluster framework. Once the plate fit properly and dropped in from the backside, I cut out the opening for the MXL so it would flush in the plate. Only obvious problem are the buttons... how the hell am I going to get to them now that they are covered by the plate!?! First thought was too relocate them to a completely different spot in the car. I was close to doing this, but thought to myself that this is what any typical installer with my skills would do. So I wanted to do something different, equally as cool, but keep a nice clean look to it. I decided to keep the buttons right where they are, but extend them out through the 1/4" ABS plate. To do this I needed to make new buttons, that when pressed, would depress the rubber buttons below them. First thing was to drill out the holes for the new buttons exactly above the MXL buttons. Since I already had the opening perfectly cut for the display section of the MXL, I disassembled the MXL down to the raw metal front fascia. I then popped it in place on the plate and simply used the button holes in the metal fascia to guide my drill bit through the plastic from the backside. So this is what the plate looks like at this point: 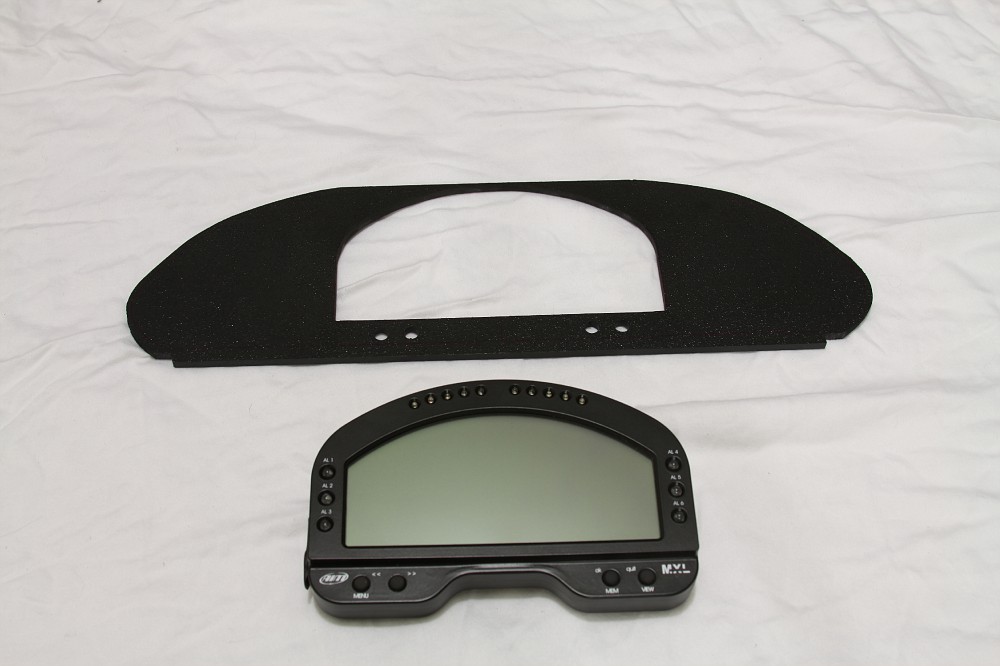 MXL pressure fit in place. You can see the rubber buttons perfectly lined up under the holes in the ABS:   A real quick peak of the panel in place... although the shadow of the framework makes it hard to see the button locations in this picture: 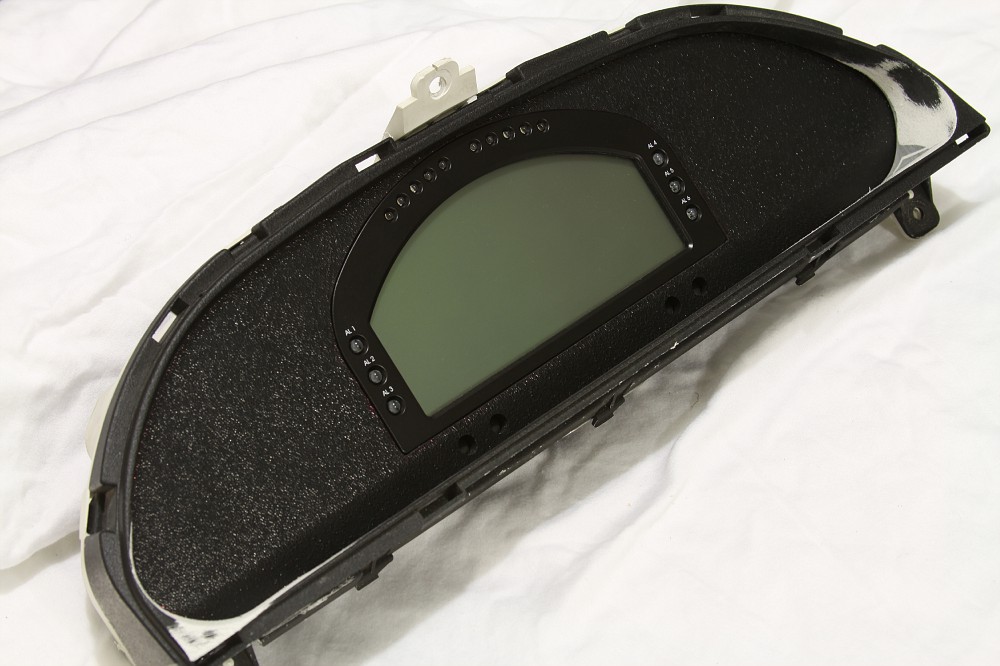 Fitment of panel from the back:  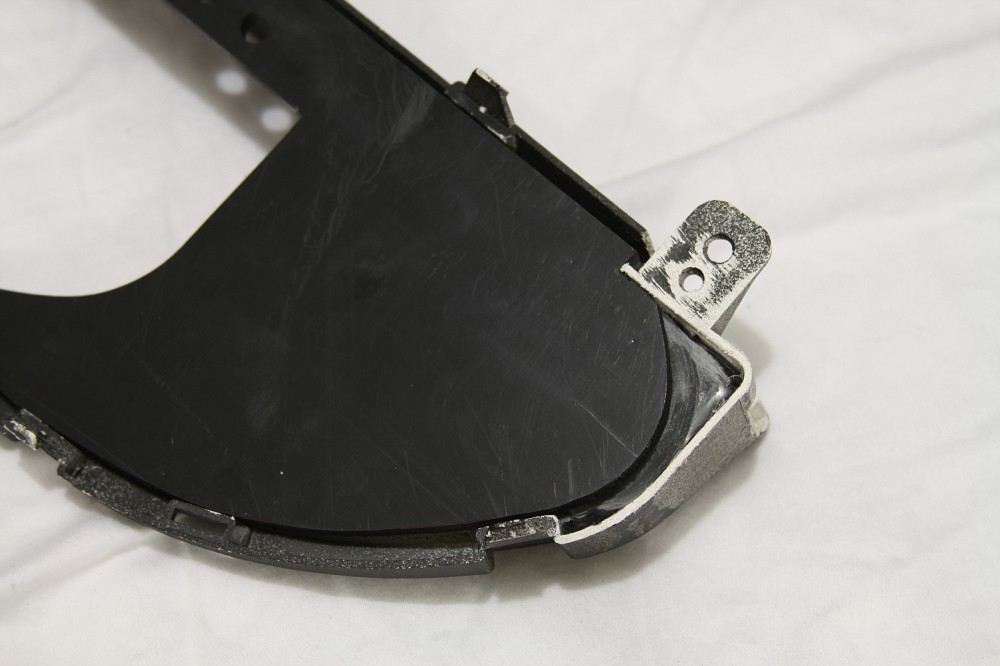 The back of the OEM cluster housing completely gutted with the three mounting locations still intact: 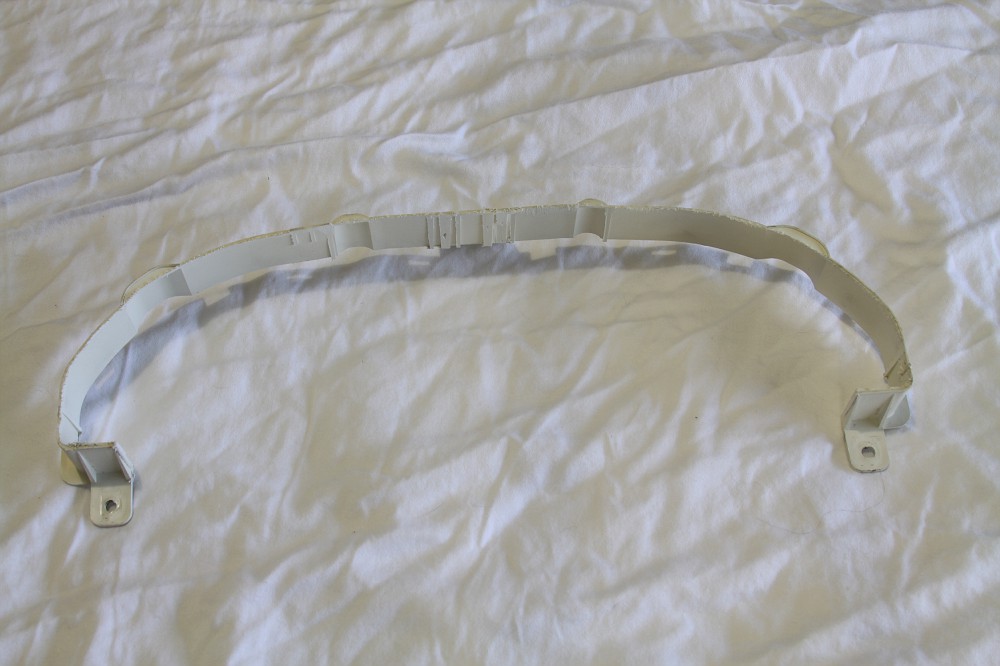 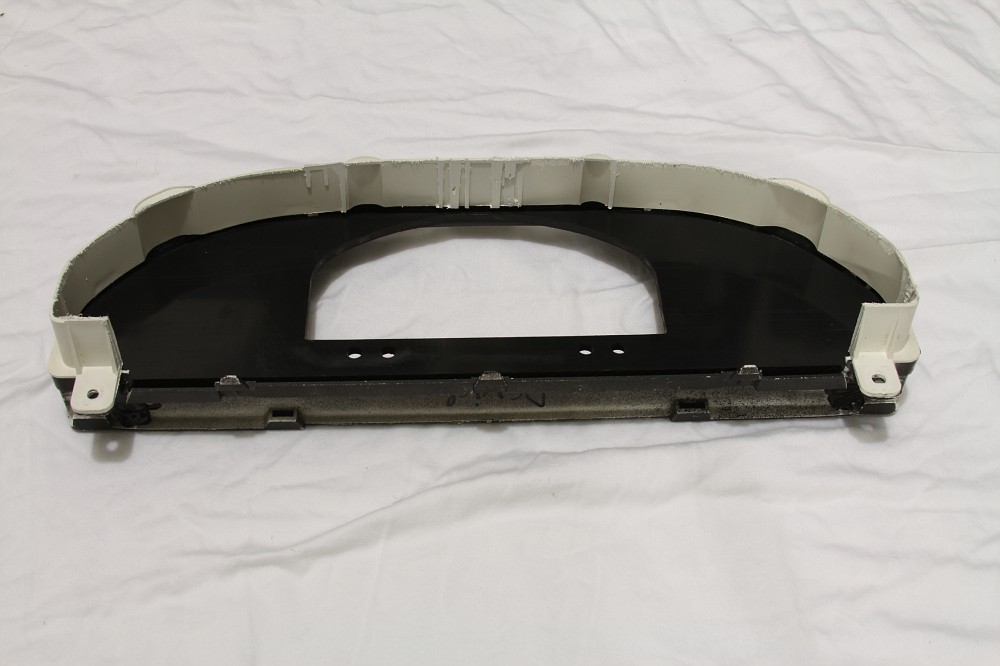 Closeup of the buttons that need to be integrated to my panel:  I also needed to put some turn signal indicators in the cluster. I thought it would look stupid if they were just floating around anywhere on the outskirts of the plate around the MXL display. So lucky for me, the shape of the MXL allowed me to install them in the dead space where the designers of the MXL intended for a steering column to reside. Also, the size of the indicators that I use are really close to the diameter of the holes I drilled for the MXL buttons. So I dropped the indicators in between the buttons: 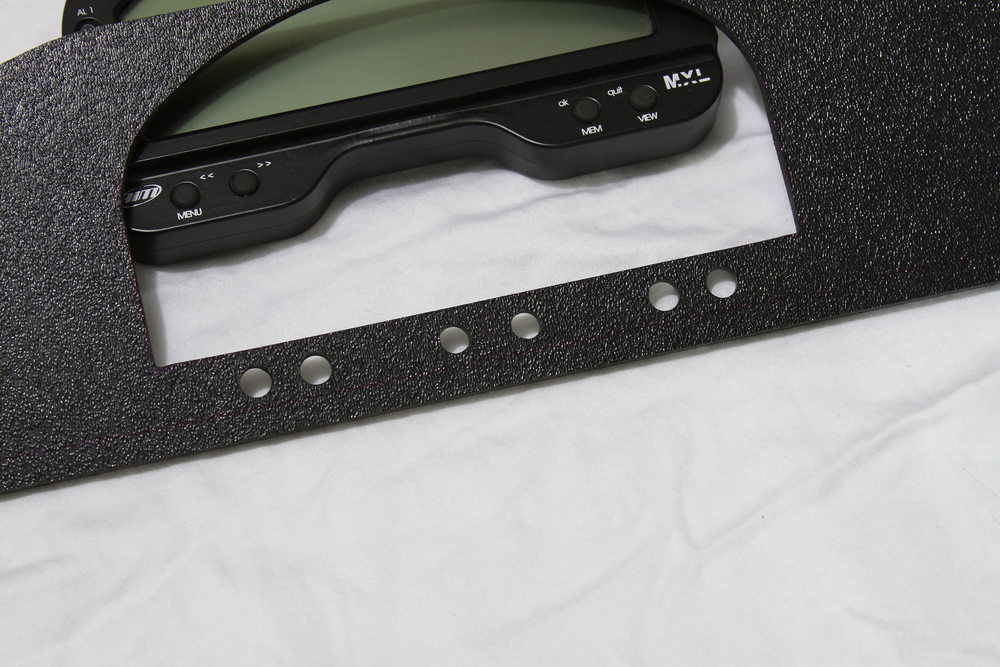 Next is making the button extensions. There were several criteria that they needed to meet in order for this to work:
So I chose to use some plastic 5/16" rod. More specifically, I chose to use self-lubricating MDS-filled nylon. It's a natural black in color, very slick on the exterior and cuts really easy.... and it's only like $.63 for a foot of it. My plan for the back-end catch was simply gluing on small washers to the back of the pieces of nylon rod: 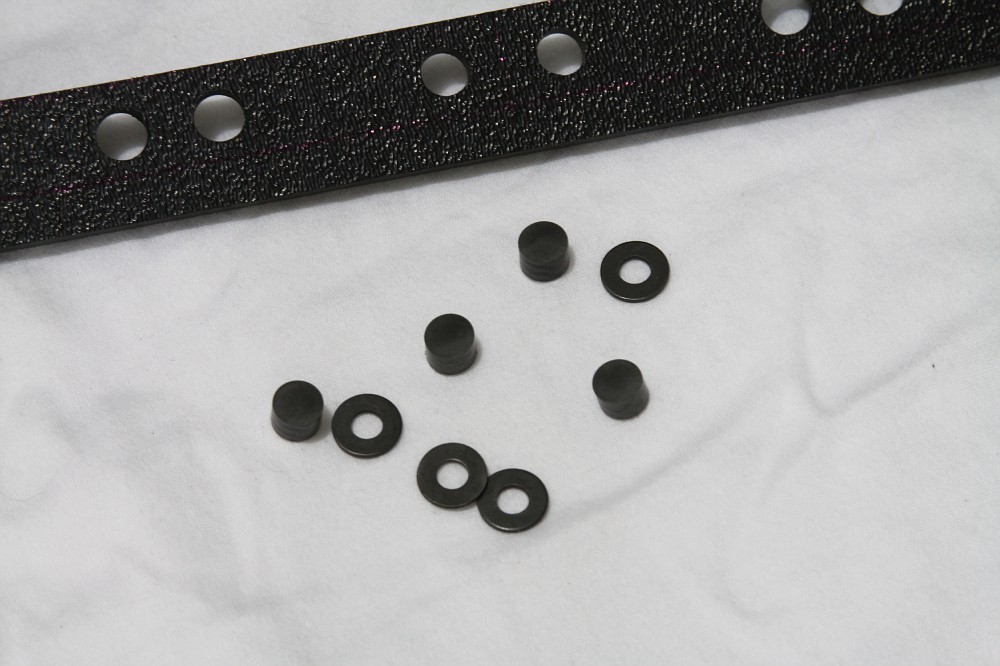 In order for the catch to work, I had to countersink the button assembly into the back of the plate. The drill press came in hand for this to get the proper depth and the centering exact:  Washer and button test fit before I glue them together:   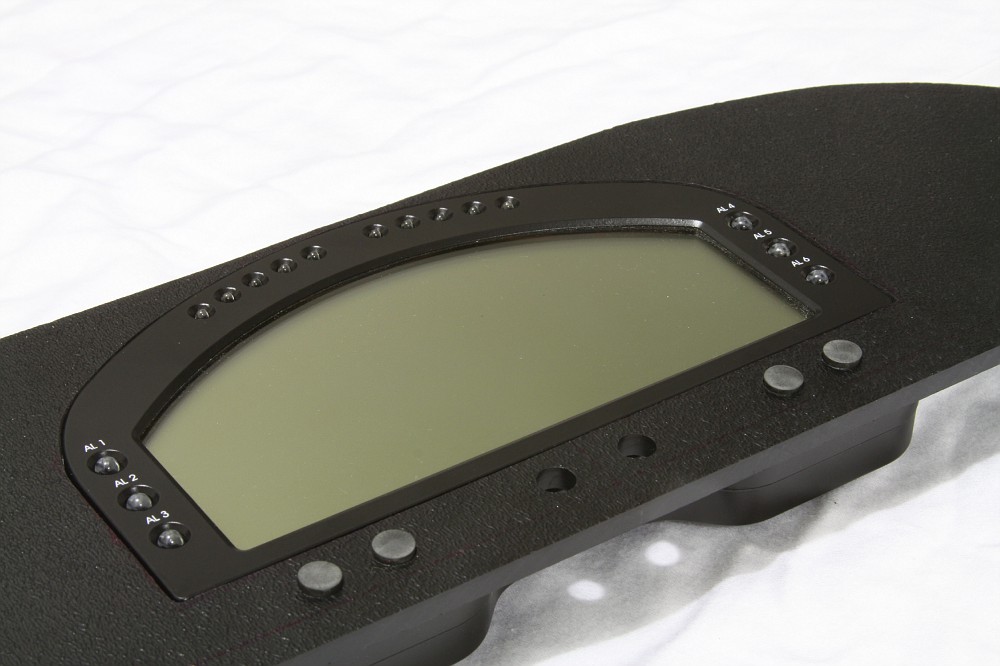 A good pic of how the extensions look: 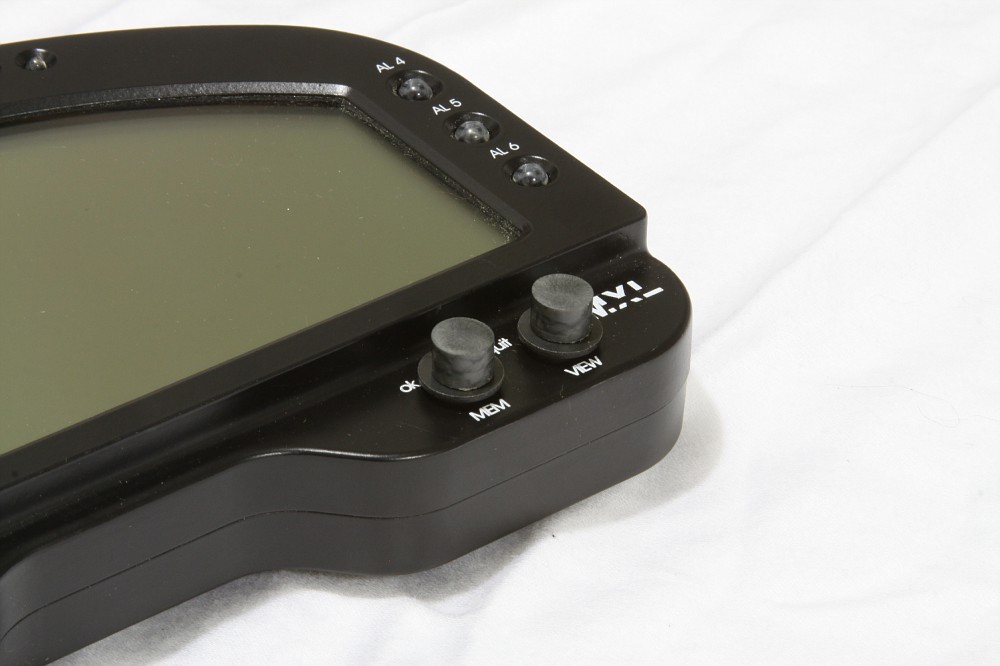 After I confirmed fitment was good, I went ahead and glued the buttons to the washers. Some good super glue and accelerator made this an easy task. I then turned the button extensions over and filled in the center of the washer with super glue to make it a level surface on the back of the button. I then sanded that down so it was perfectly level with the washer: 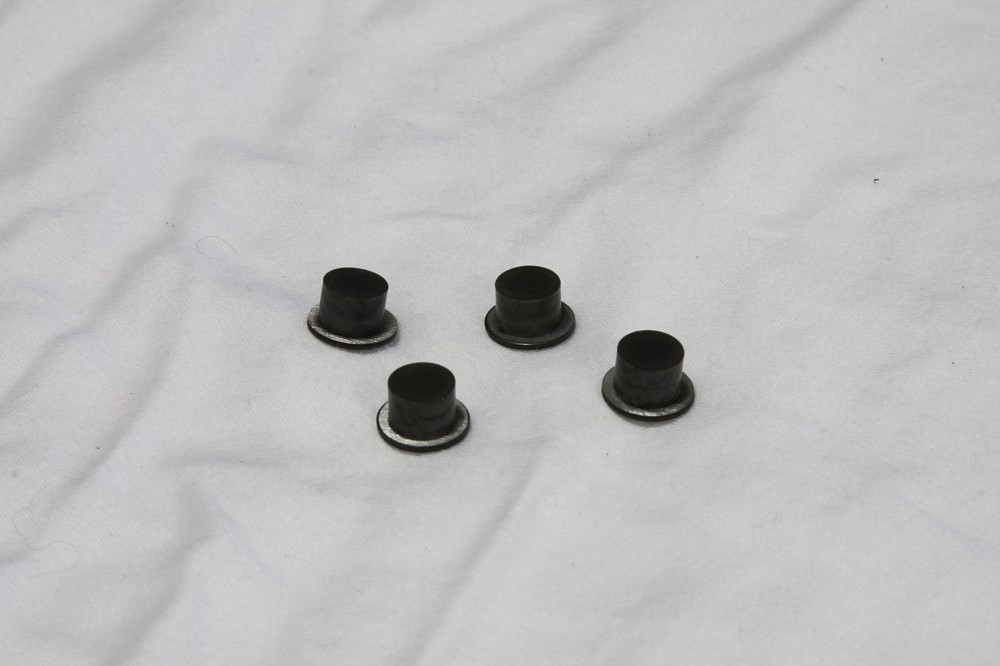   Even though the ABS is textured, I don't like the finish of it. So I sanded the main plate down and applied my texture coat to it. Everything reassembled... just waiting on the turn signal indicators to come in at this point:  Indicators in place and finished. I will not be running front glass on this cluster for obvious reasons. I really like the end result in the fact that no one will have any idea of the modifications that were necessary to squeeze the MXL into the constraints of the OEM cluster:  Backside: 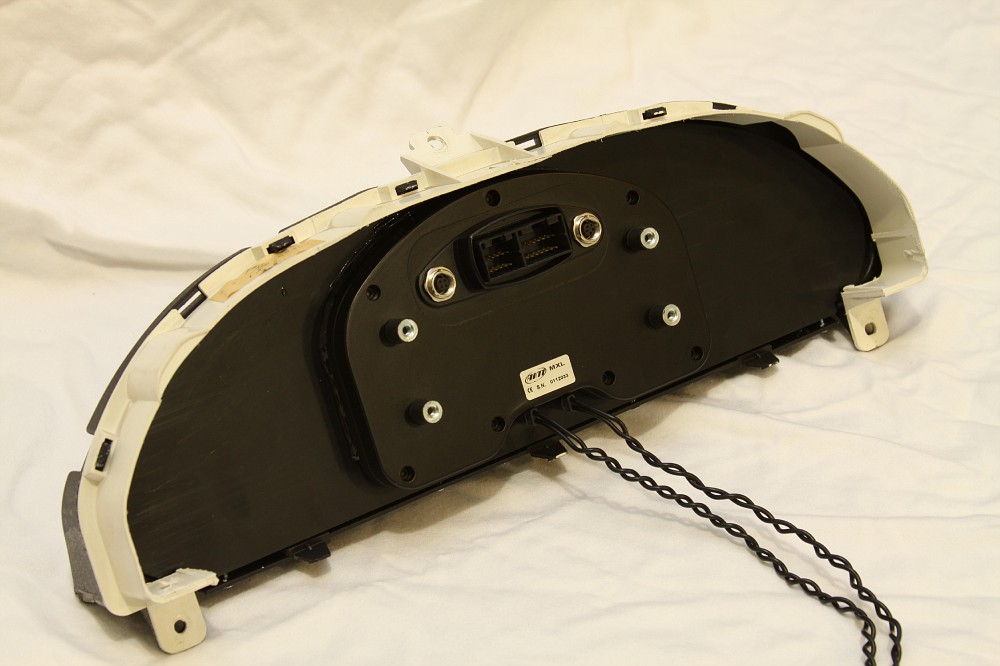 Illuminated: 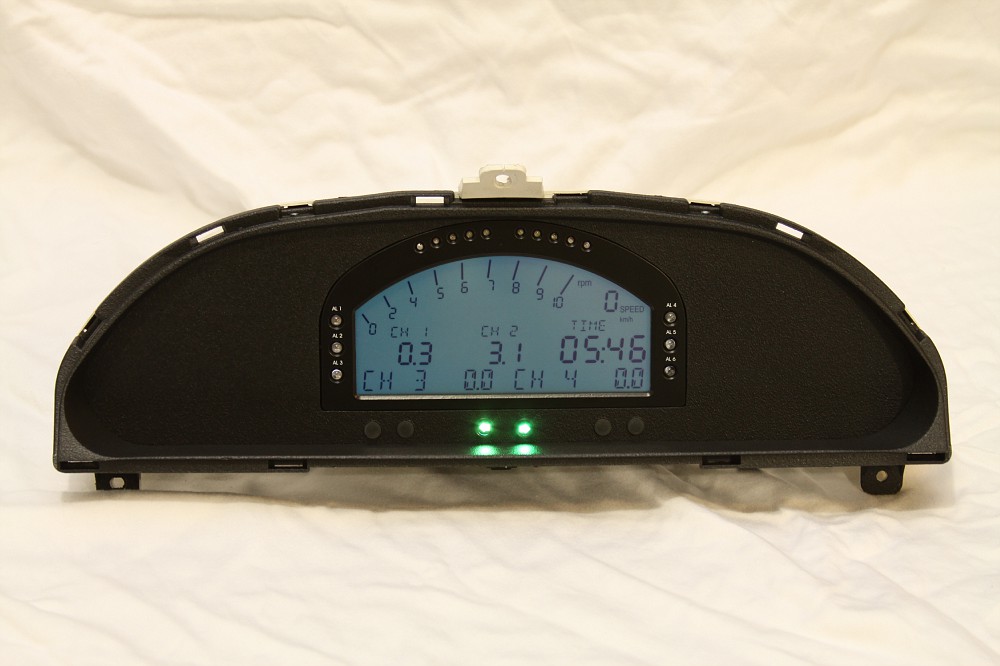 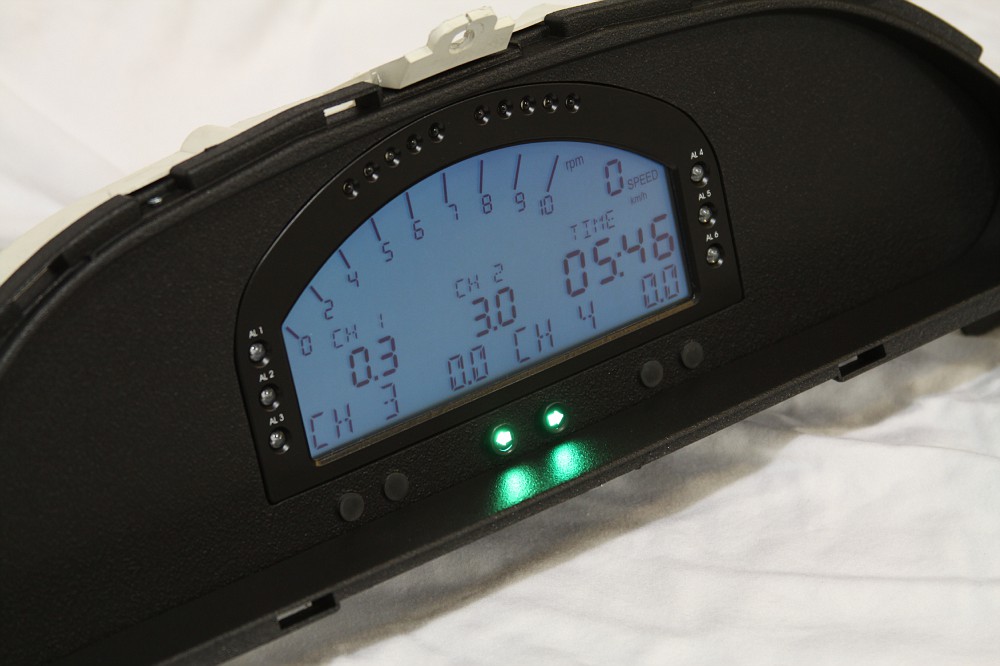
__________________
Follow Along For My Latest WorkMy PortfolioPlease ShareCheck Out My Builds
Last edited by Broadfield; 10-23-2012 at 09:02 PM.. |
|
|
|
|
10-20-2012, 10:10 PM
|
#1702 | |
|
Zilvia.net Advertiser
Join Date: Oct 2006
Location: Normal, IL
Age: 50
Posts: 2,946
Trader Rating: (163)
Feedback Score: 163 reviews
|
Quote:
__________________
Follow Along For My Latest WorkMy PortfolioPlease ShareCheck Out My Builds
|
|
|
|
|
|
10-21-2012, 03:08 AM
|
#1703 | |
|
Zilvia Junkie
|
Quote:
|
|
|
|
|
|
10-21-2012, 10:07 AM
|
#1705 |
|
Zilvia Addict
Join Date: Apr 2010
Location: kelowna, bc, canada
Age: 48
Posts: 680
Trader Rating: (1)
Feedback Score: 1 reviews
|
Nice write up Toby!, that's one of the biggest things that make you stand apart from the other great builds out there (not just on Zilvia)... your always willing to give back to the community by showing what it takes to do these things.
I always learn more about finishing trim pieces every time you post. Which comes in handy when you have to refinish every piece in your car haha |
|
|
|
|
10-21-2012, 05:32 PM
|
#1707 |
|
Post Whore!
Join Date: May 2006
Location: San Diego, CA
Posts: 9,135
Trader Rating: (19)
Feedback Score: 19 reviews
|
I really dig it. The installs we've done always look like "hey, here's my baller cluster sitting on top of a panel" unless we use the molded carbon piece, but that doesn't really fit in S13's.
__________________
Jordan Innovations has a new web site! www.JordanInnovations.com -- All your favorite FD Pro Drifters love it, trust me -- www.JordanInnovations.com |
|
|
|
|
10-21-2012, 09:12 PM
|
#1709 | |
|
Zilvia.net Advertiser
Join Date: Oct 2006
Location: Normal, IL
Age: 50
Posts: 2,946
Trader Rating: (163)
Feedback Score: 163 reviews
|
Quote:
__________________
Follow Along For My Latest WorkMy PortfolioPlease ShareCheck Out My Builds
|
|
|
|
|
|
10-21-2012, 09:49 PM
|
#1710 | |
|
Post Whore!
Join Date: May 2006
Location: San Diego, CA
Posts: 9,135
Trader Rating: (19)
Feedback Score: 19 reviews
|
Quote:
 Previous car had "The" "Final" "Countdown!". I did Mike Porter's FC with a bunch of Street Fighter tags (Hadooken, Sonic Boom, etc), that was good for some lolz. Other cars just get various names for 'dicks', or random girls names. Clearly I take Mil-spec labeling very seriously. Hilarity!
__________________
Jordan Innovations has a new web site! www.JordanInnovations.com -- All your favorite FD Pro Drifters love it, trust me -- www.JordanInnovations.com |
|
|
|
|
|
| Bookmarks |
| Tags |
| chase bays, ls3, s13, sikky, toby broadfield |
|
|


 Linear Mode

