|
|||||||
| Tech Talk Technical Discussion About The Nissan 240SX and Nissan Z Cars |
 |
|
|
Thread Tools | Display Modes |
|
|
 02-22-2011, 12:39 PM
|
#3 |
|
Zilvia Addict
 
|
Stockbee asked me for a spring reccomendation. Here's my reply
My question at this point is this: What spring rates are going to be appropriate for the added heft of the car in the front? Have any recommendations? I've heard you added about 100 lbs to the front of the car but that the rest of the added weight is from the transmission which is centrally located. I believe that the 240 spring rates shouldn't change even after the addition of an LS1. The LS1 weighs something under 450 lbs, while both the sr20 with a turbo, and the ka without, each weigh 490. However the T56 is a beast at about 140 lbs, at least 60 lbs more than any of the nissan transmissions. Fortunately the t56 weight sits right in the middle of the car not affecting the chassis balance. My Ohlins came stock with 8 kg/mm in front and 6 in rear. Here's an example of an LS14 MMDBs corner weights: "Front driver: 878 Rear driver: 697 Front Passenger: 863 Rear Passenger : 682 55.8% weight in front 44.2% weight in rear (A stock s14 is 55/45, and with the addition of a driver the s14 will usually shift an entire 1% rearward) Cross weights within .5% (within ideal, max being 1%) Total weight including myself in the car with 1/4 tank of gas, no spare tire, and everything else intact (passenger seats etc): 3120 Without me in the car: 2970 A little bit heavier than I anticipated (was thinking 2900 most), but that's with everything in the car minus the spare tire. Also, the battery is located in back of the car as well." Another LS1/T56 s14 built by Hinson weighed in at 2742 total with no exhaust, and everything stripped out of the trunk. a S14 weighs 2832 stock. That's 140 less than MMDBs stock LS1/T56 car, and 90 more than Hinsons! 8/6 = 450/337 lbs/in Which sounds low, but you have to remember that the fronts are struts which have exactly a motion ratio of 1:1 and the rear places the coilover outside so far that they also have a motion ratio of 1:1. Most unequal length cars have higher motion ratios and therefore need more spring. For autocross a lot of people have oversteer problems with an aftermarket front sway and a stock rear. Since the front camber gain sucks with the front strut design I plan on going overkill on the front sway bar to limit travel a bit. In the rear I may go even softer so that I can run a decent sway bar in the rear. Sway bars equalize traction on acceleration in the rear. A lot of guys just completely remove the rear sway, but in a high hp car I don’t think it’s the way to go. For road course or drift-use you can definitely run stiffer springs. Most guys that have tried anything over 10 (564) in the front usually go back down. MMDBs 2900 lbs may sound like a lot but There's almost 400 lbs he could ditch if he wanted to. Weight Reduction- A/C 30 Trunk lining 3 Carpet padding and tar- 30 Interior plastic and headliner 10 Sunroof 24 Steering wheel 6 Pass Air bag 8 Body Panels Hood 40 Trunk 10 Battery- 25 Wheels 2lb x4 8 Spare tire and jack 30 Seats front 50 Seats Rear 39 Bumpers and tow hooks- 80 Body Holes & hardware 10 403 lbs. There's no reason an LS14 couldn't get below 2600 lbs dry. With a cage and massive wheels I'm hoping to hit low 2700s. I'd start with 8/6 like the Ohlins maybe 5 in the rear for autocross or street or 9 in front for dedicated track
__________________
BURN OUT IN YOUR FACE! 1998 S14 LS7/T56 swap in progress, build thread: http://zilvia.net/f/tech-talk/147301...d-gto-pan.html |

|

|
|
03-18-2011, 09:55 PM
|
#4 |
|
Zilvia Addict
|
I have an alternator out of an '06 GTO, and it's heavy! I wanted to get it as low as possible, so I came up with this contraption.
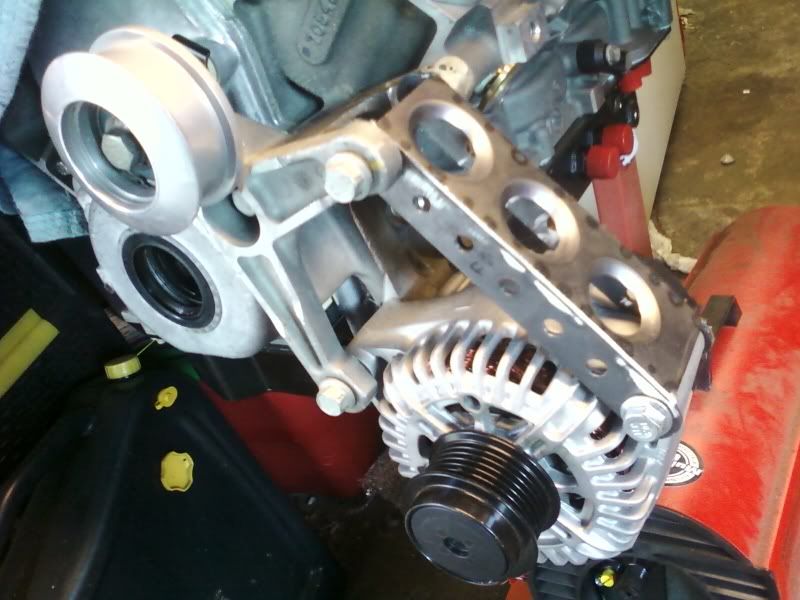 Then I had to clearance the motor plate a bit. 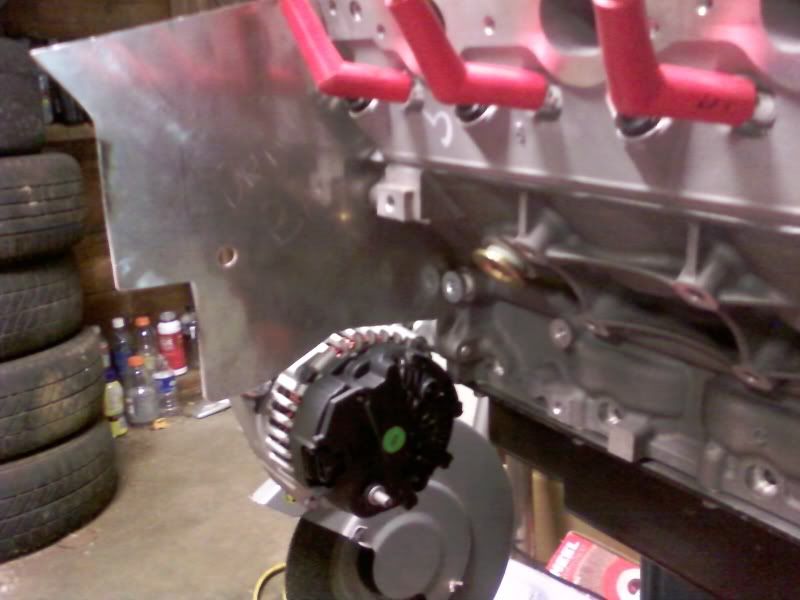 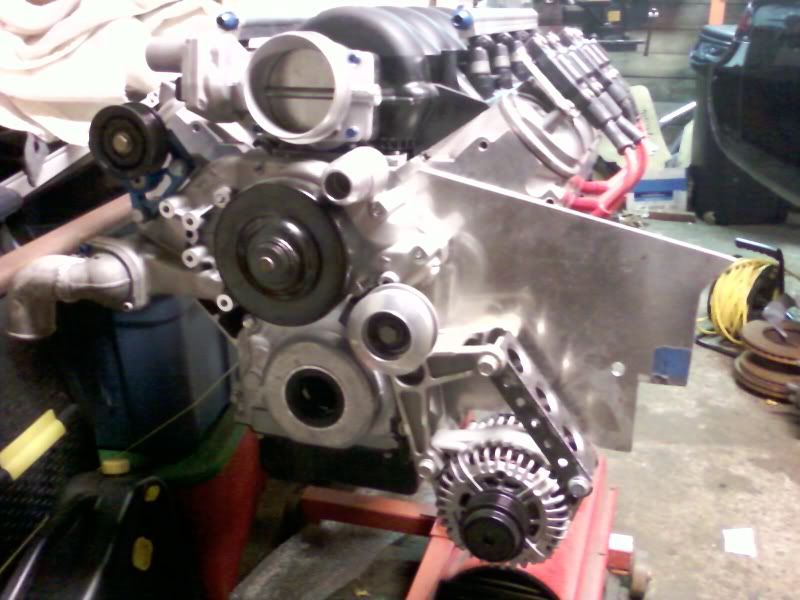
__________________
BURN OUT IN YOUR FACE! 1998 S14 LS7/T56 swap in progress, build thread: http://zilvia.net/f/tech-talk/147301...d-gto-pan.html |
|
|
|
|
05-05-2011, 08:48 PM
|
#5 |
|
Zilvia Addict
|
radiator mount and a starter that works.
I originally bought this fancy, new, high-torque, MSD starter. It was supposed to be adjustable. But every adjustment hole just moved the reduction motor out further in the way! My header secondaries are 2" OD, and I needed the header to be almost no wider than the starter mounting bolts. Found a 2008 Avalanche 5.3 starter that looked like it might fit the bill. At $180 less than the MSD it seemed like it would be worth a shot. It works perfect!
Manufacturer Part Number: 6494NSurface Finish: Painted/MetalInterchange Part Number: 89017440, 89018123, 8000288, 88861935Warranty: YesOther Part Number: 89017440, 9000939, 8000045, 8000150 The pretty 3 hp MSD starter that doesn't work 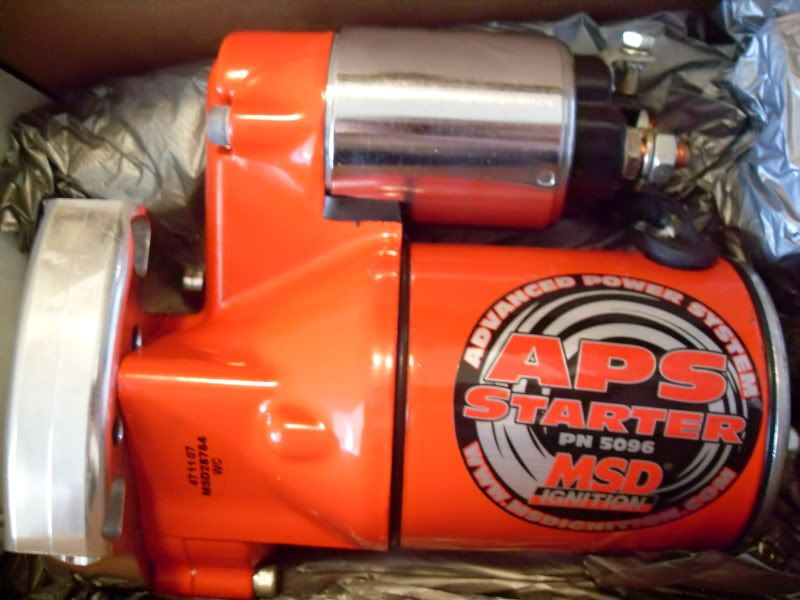 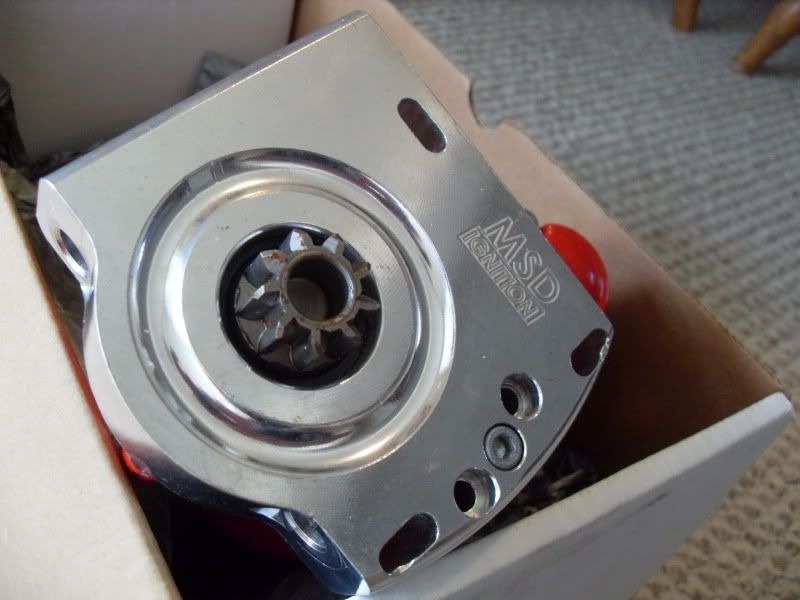 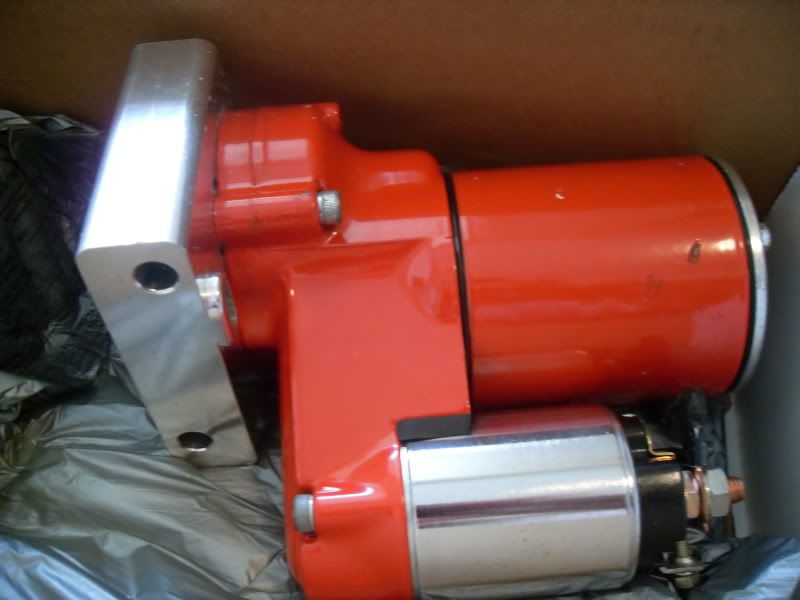 Here's the one I bought. Hopefully it won't get tired on my hi compression stroker motor. It gains me at least 5/16" of clearance over the MSD starter! Starter Family: Delco PG260D Type: PMGR Voltage: 12 Volts kW: 1.2 kW = 1.63 hp Rotation: CW Teeth/Splines: 9 Teeth/Splines Pinion/Splines OD: 25.2mm / 0.992in Mounting Hole 1: 10mm ID Unthreaded Mounting Hole 2: 10mm ID Unthreaded Approximate Weight: 7.5 lbs / 3.41 kg 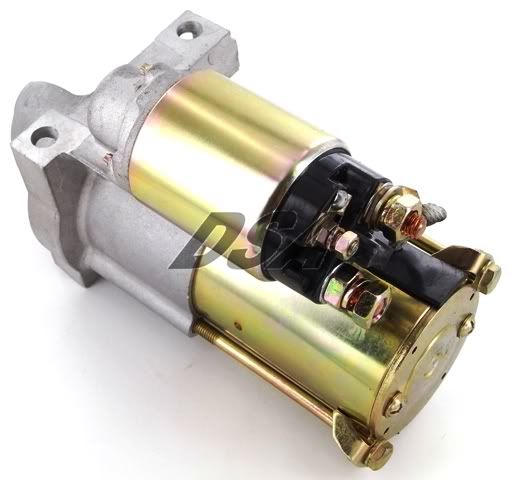 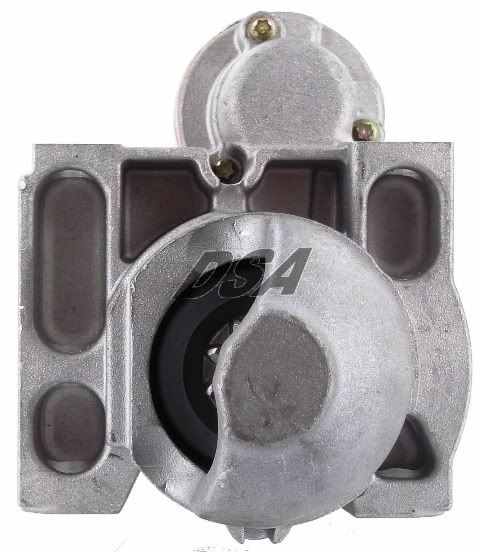 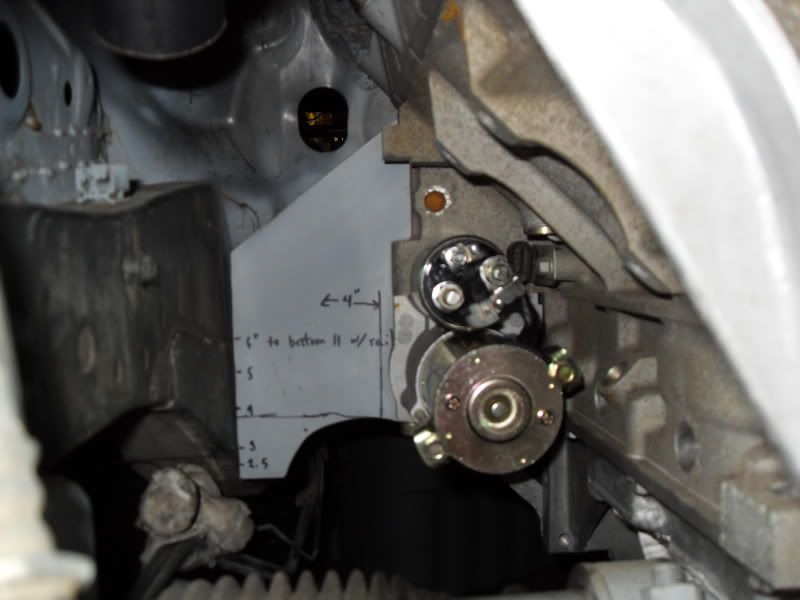 And a little progress on the lower radiator mounts: I welded a stock s14 upper radiator mount below the powerbrace. Then welded 10mm rod to the bottom of the radiator that the stock upper mount style grommets fit onto. This will locate the radiator bottom in every direction, other than vertical.  I like drilling holes in things. 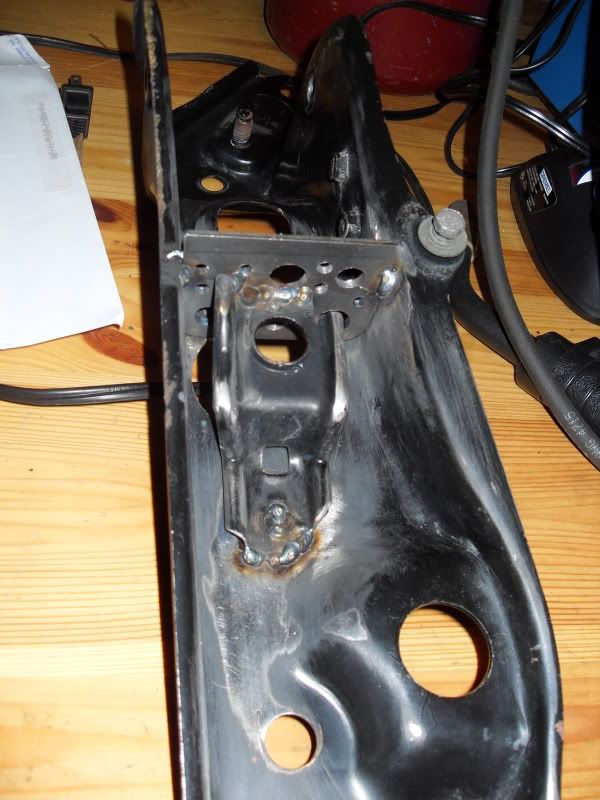 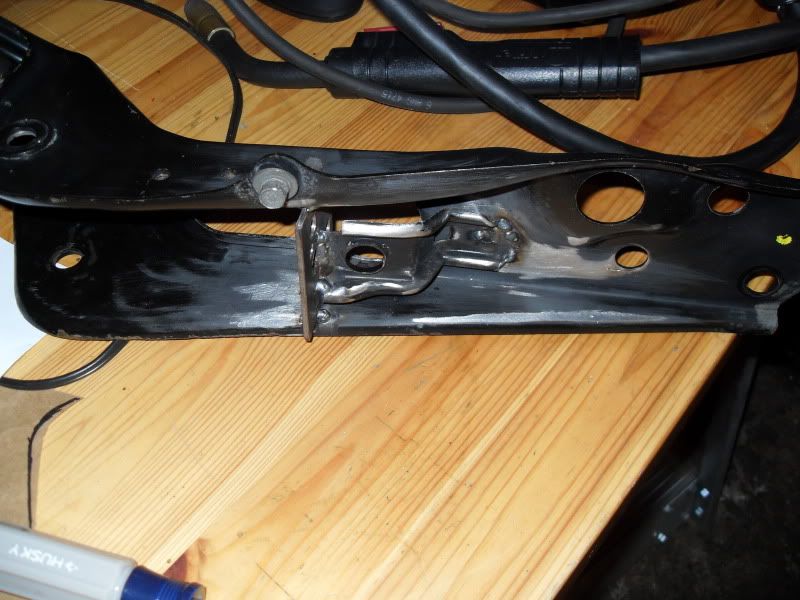 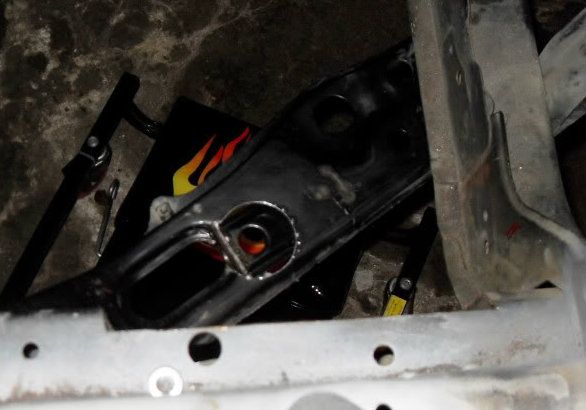 The weather is finally decent, so I'm going to re-start my rear subframe reinforcement project soon. I have a bunch of stuff that I want to paint the back of BEFORE I weld. What do you guys use? I've heard of guys using BBQ grill paint, and header paint... Any suggestions?
__________________
BURN OUT IN YOUR FACE! 1998 S14 LS7/T56 swap in progress, build thread: http://zilvia.net/f/tech-talk/147301...d-gto-pan.html |
|
|
|
|
05-10-2011, 10:57 AM
|
#6 | |
|
Post Whore!
 
Join Date: Feb 2006
Location: Spook City, USA
Age: 39
Posts: 5,396
Trader Rating: (22)
  Feedback Score: 22 reviews
 |
^Weld-through primer, perhaps? Or do you want actual paint?
__________________
-Kyle Quote:
|
|
|
|
|
|
05-10-2011, 11:55 AM
|
#7 | |
|
Zilvia Addict
|
Quote:
__________________
BURN OUT IN YOUR FACE! 1998 S14 LS7/T56 swap in progress, build thread: http://zilvia.net/f/tech-talk/147301...d-gto-pan.html |
|
|
|
|
|
05-10-2011, 12:19 PM
|
#8 | |
|
Zilvia.net Advertiser
 
Join Date: Oct 2006
Location: Normal, IL
Age: 50
Posts: 2,946
Trader Rating: (163)
Feedback Score: 163 reviews
|
Quote:
__________________
  Follow Along For My Latest Work Follow Along For My Latest Work My Portfolio My Portfolio Please Share Please Share Check Out My Builds Check Out My Builds
|
|
|
|
|
|
05-10-2011, 12:39 PM
|
#9 | |
|
Zilvia Addict
|
Quote:
If 3m weld through primer isn't meant to be painted over (once it's under a lap) you'd think they'd call it paint.
__________________
BURN OUT IN YOUR FACE! 1998 S14 LS7/T56 swap in progress, build thread: http://zilvia.net/f/tech-talk/147301...d-gto-pan.html |
|
|
|
|
|
05-17-2011, 09:19 AM
|
#10 |
|
Zilvia Addict
|
Rolled some fenders for some friends last night. My buddy scored a set of 18x10.5 +15 TE37s. He is running KYB AGX dampers which are a good bit more narrow than most coilovers, but he still had 26.8mm of clearance to the dampers! That means 18x10.5s could have +41mm of offset without hitting narrower dampers!!! Or you could run the same front space and still fit 18x11.5s. These pics are from before we did a little pull, but he had already rolled a bit. And he maxed out the camber of the stock arms, 2+ degrees of camber I'm guessing.
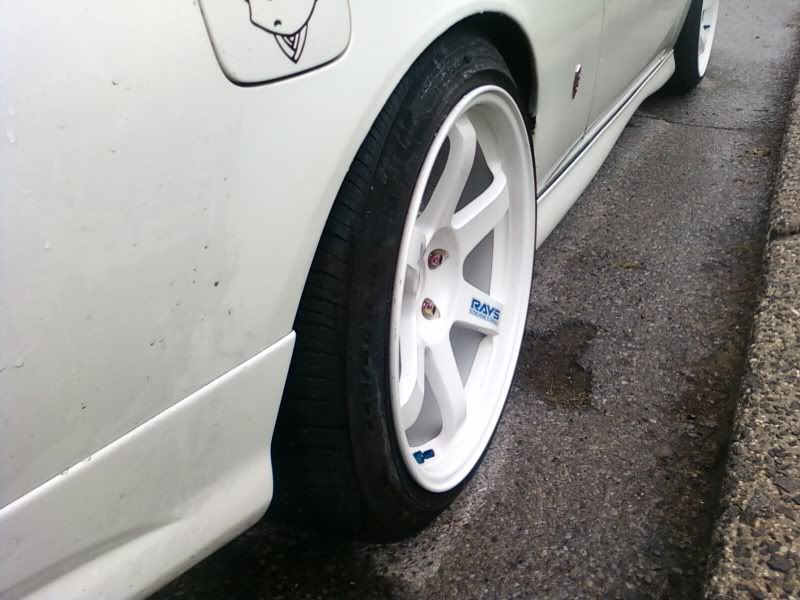  26.8mm clearance. His 245s look like dangerous stretch to me. 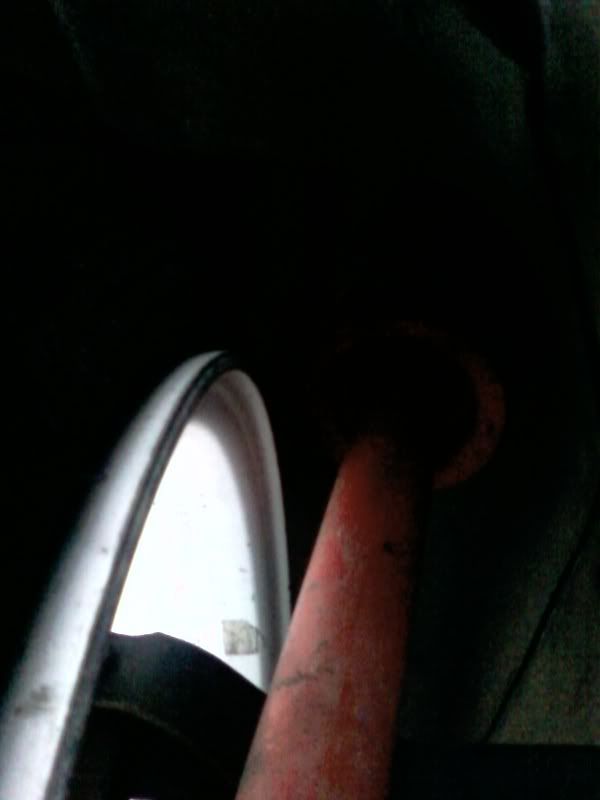
__________________
BURN OUT IN YOUR FACE! 1998 S14 LS7/T56 swap in progress, build thread: http://zilvia.net/f/tech-talk/147301...d-gto-pan.html |
|
|
|
|
05-23-2011, 09:02 AM
|
#11 |
|
Zilvia Addict
|
I've been a little concerned about using the manley pistons that I have with the oliver rods that I have. Originally I was going to custom order some low compression height Wiseco pistons, but the long block parts I got were just too good to pass up. My pistons have a standard compression height designed to be used with what has become the LSX standard 6.125" aftermarket rod. My oliver rods with the lube tubes are 6.200".
The taller rods necessitate a taller gasket. A stock LS7 gasket is 0.054" thick compressed. With the taller rods (presuming all of my measurements are exactly as advertised... unlikely) I'd need a 0.105" tall head gasket. Cometic stocks up to 0.125"! To put that into perspective for the import guys that's 3.2 mm thick! Found this here on ls1tech about variances in LS2 deck heights by ChucksZ06 back in 2006 Piston Deck Height for stock LS2 [Archive] - LS1TECH "My first ls2 block with 4" eagle crank and rods was .005 in the hole. I am now doing an ls2 block with a stock crank and 6.125 rods( same length as 402 build), same piston manufacturer and the pistons are .008 out. I think the stroke on the 4" crank was not quite right. So from my experience you pretty much have to mock up the parts or it is guessing. Good luck." Keeping the top ring below deck seems like common sense. It's common for the crevice height (top of piston to top of top ring) on performance pistons to range from about 0.180 - 0.320". So presuming (what I consider) a loose quench of 0.035" and super tall 0.125" gasket you should still be safe with low crevice volume pistons all the way down to a crevice height of 0.160". Still that's a little too close if you're running a low crevice height pistons near 0.180". 9.240" stock LS1/2/3/7 Deck height 2.000" less 4" stroke/2 1.115" less my manley piston's compression height (was designed for a 6.125" rod) 6.200" less my lube-tube oliver pistons puts me 0.075" out of the hole. for a tight 0.030" quench I'd need a custom 0.105" thick gasket. I also found Lingenfelters book on google. He mentions that he reccomends 0.250 crevice height for street engines, but has seen all the way down to 0.100" on all out N/A drag engines! Good read: John Lingenfelter on modifying small-block Chevy engines: high performance ... By John Lingenfelter John Lingenfelter on modifying small ... - Google Books
__________________
BURN OUT IN YOUR FACE! 1998 S14 LS7/T56 swap in progress, build thread: http://zilvia.net/f/tech-talk/147301...d-gto-pan.html |
|
|
|
|
05-23-2011, 12:42 PM
|
#12 |
|
Post Whore!

Join Date: May 2006
Location: San Diego, CA
Posts: 9,135
Trader Rating: (19)
Feedback Score: 19 reviews
|
You just don't want to many anything easy, do you
 I'm assuming you've already done the combustion chamber math with the 6.200" rods?
__________________
 Jordan Innovations has a new web site! www.JordanInnovations.com -- All your favorite FD Pro Drifters love it, trust me -- www.JordanInnovations.com |
|
|
|
|
05-23-2011, 01:30 PM
|
#13 | |
|
Zilvia Addict
|
Quote:
Here's a cam I'm considering having ground that would work with a stock chamber with just a .005" clean up mill to 68cc chambers. This cam has 4 degrees of advanced ground in. I'd like to run a few degrees less advance, but I like the idea of not taking the chambers too small incase I ever want to go forced induction. 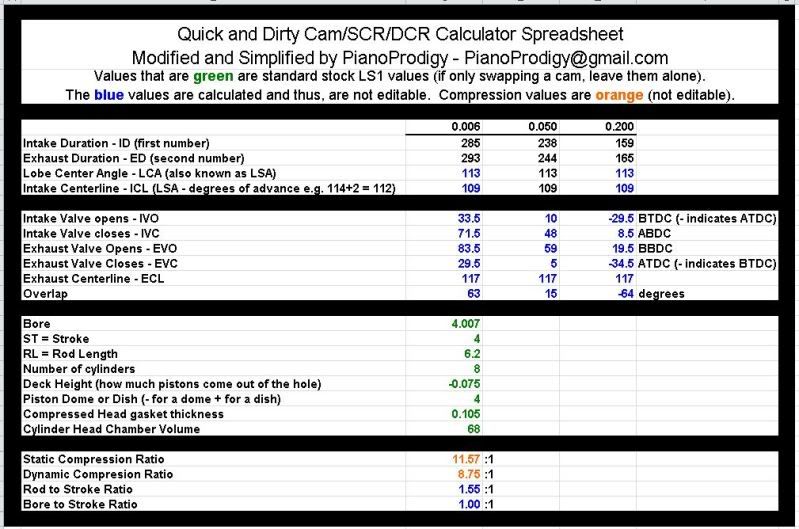
__________________
BURN OUT IN YOUR FACE! 1998 S14 LS7/T56 swap in progress, build thread: http://zilvia.net/f/tech-talk/147301...d-gto-pan.html |
|
|
|
|
|
05-23-2011, 09:45 PM
|
#14 |
|
Post Whore!
Join Date: May 2006
Location: San Diego, CA
Posts: 9,135
Trader Rating: (19)
Feedback Score: 19 reviews
|
Very sexy! That's a very standard 'aggressive' ~402ci cam setup, and 8.75:1 DCR is beautiful. 113 +4 might sound like a wide split with a lot of advance, but that's a big lobe. I'd say it looks fantastic.
__________________
Jordan Innovations has a new web site! www.JordanInnovations.com -- All your favorite FD Pro Drifters love it, trust me -- www.JordanInnovations.com |
|
|
|
|
05-27-2011, 05:57 PM
|
#15 |
|
Zilvia Addict
|
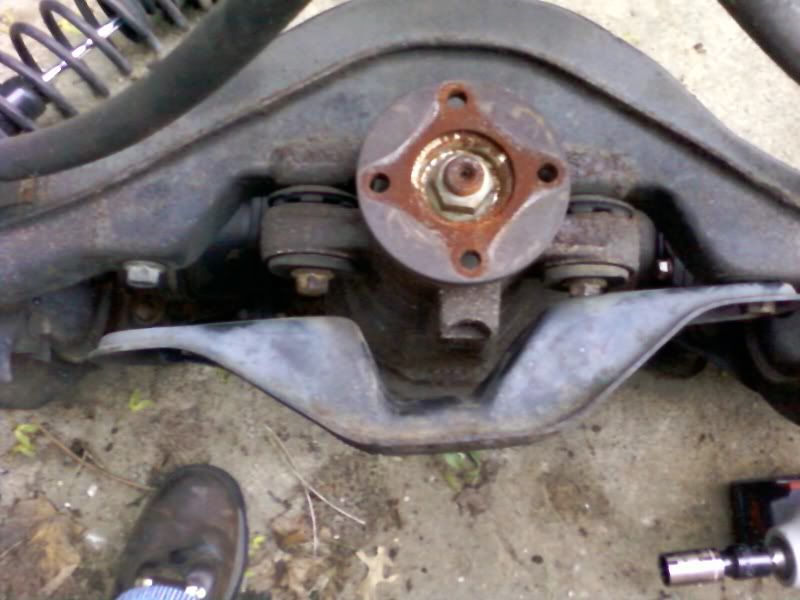
I was pulling apart a Z32 rear subframe and noticed this reinforcement that the s14 doesnt have. Can't decide if it's worth replicating or not.
 I also scanned the Ohlins instructions manual to pdf files, but they are of course in Japanese and I can't read them. If any one can help, or knows anyone that might be willing to translate them for me, please shoot me a pm and I'll email the pdf files to ya. Thanks guys!
__________________
BURN OUT IN YOUR FACE! 1998 S14 LS7/T56 swap in progress, build thread: http://zilvia.net/f/tech-talk/147301...d-gto-pan.html Last edited by SicBastard; 05-28-2011 at 08:50 AM.. |
|
|
|
|
06-08-2011, 11:20 AM
|
#17 |
|
Zilvia Addict
|
FINALLY found a rod end adjuster that has LH and RH threads in one piece
QA1 Precision Products AS12-12 - QA1 Rod End Linkage Adjusters $11.99, Linkage, Rod End Adjuster, Chromoly Steel, 3/4 in.-16 RH Female Thread, 3/4 in.-16 LH, Male Thread, Each 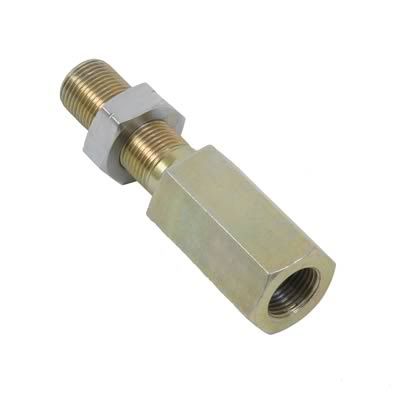 QA1 Precision Products AS12-12 - QA1 Rod End Linkage Adjusters - Overview - SummitRacing.com I wanted to modify my stock RUCA and FLCA and this was the one part that was holding me back.
__________________
BURN OUT IN YOUR FACE! 1998 S14 LS7/T56 swap in progress, build thread: http://zilvia.net/f/tech-talk/147301...d-gto-pan.html |
|
|
|
|
06-09-2011, 09:46 PM
|
#18 |
|
Zilvia Addict
|
Anti-dive
I covered anti squat and the as-engineered state of the s14. Now it's time to take a look at the other end of the car. Anti-dive is just anit-squat turned around backwards. It's calculated pretty much the same way. But for a Mac Strut car like ours with no upper control arm, the instant center is created by the intersection of the line through the lower control arm and a line perpindicular to the the top of the strut.
More caster will get you more anti dive, but very slowly. But even small changes in the FLCA mount (up), or the tension rod (down), will quickly get you more anti squat. A refresher on on calculating anti dive/squat 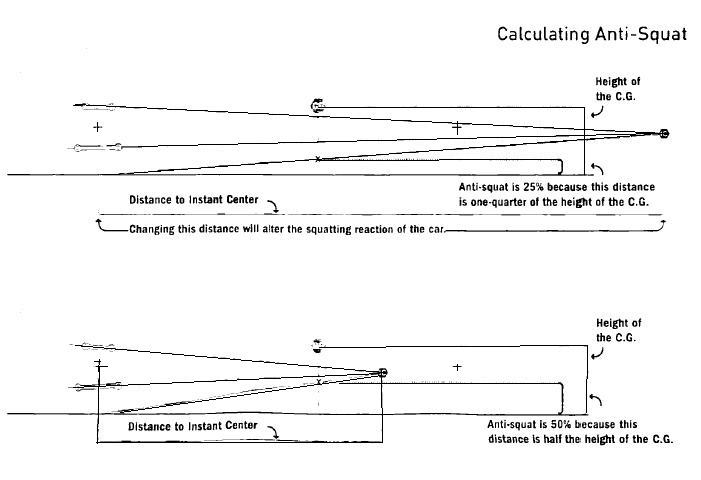 My calcs show the stock s14 with 14.8% anti-dive. My sources say that 20-25% is ideal. For the calcs I used a ground clearance of 3.2", a CG height of 10.65", with 52% front weight bias, and 7 degrees of caster. 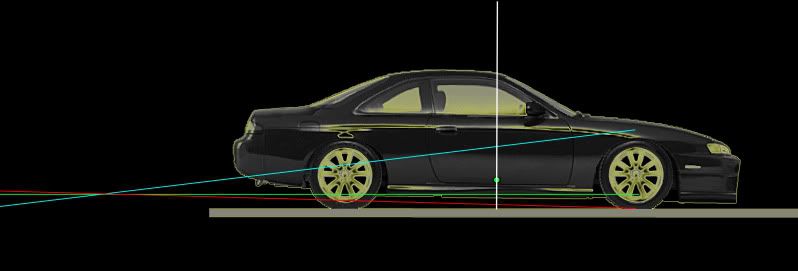 Moving the FLCA mount up 0.665" should get you upto 25%. It's also good for the roll couple. 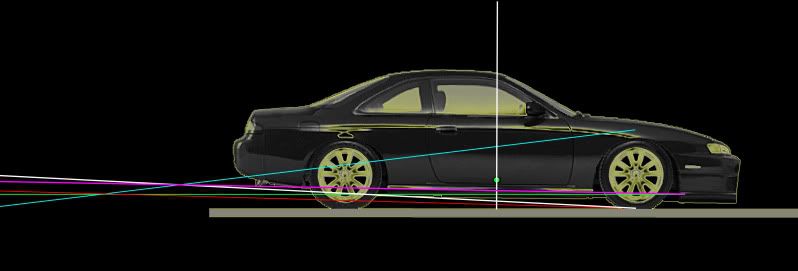
__________________
BURN OUT IN YOUR FACE! 1998 S14 LS7/T56 swap in progress, build thread: http://zilvia.net/f/tech-talk/147301...d-gto-pan.html |
|
|
|
|
06-10-2011, 12:23 AM
|
#19 |
|
Zilvia Addict
|
Roll couple, the real skinny.
I finally got a chance to play with some suspension software! It's performance trends roll center program. All the measurements came off my s14. I used a ride height of 3.125" from the ground to the bottom of the crossmember. And my LSx crank centerline as the CG height came out to 10.625" above ground. All measuremens also presume 3 degrees of static camber.
Ideal camber curves have about 1 degree of camber gain per degree of roll. The senarios I plotted varied from 0.45 - 0.63 degrees of camber gain. Such is the strut... Just from visualizing the geometry in my head I expected the set ups with roll center correction to have better and better camber gain as the FLCA angle further down towards the ball joint. This isn't the case! Improving the roll center, hurts camber gain, but not much. Who new? Before we can get to the nitty gritty of roll couple we need to talk about ball joints. I found this totally sweet pic in the roll center thread. From the pic I extrapolated that the stock ball joint is about 1.5". The whiteline and moonface pieces go for around $270, while the stockers (only 0.69" shorter) go for only $27! 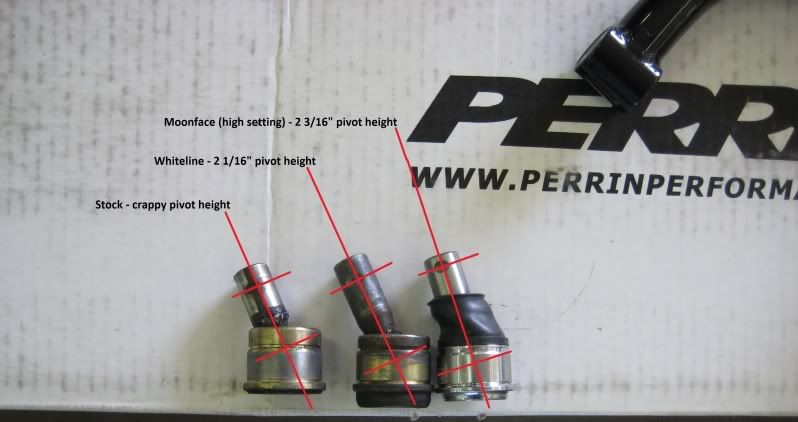 And here's an example of goin all hardcore with the ball joints. But notice that even after all this there's no more correction than the moonface offers. Looks a bit over two inches of from the ball joint articulation to mount. Of course with this kind of set up you can go bigger. But would you want to? Those bolts in single shear start to look real scary real fast. So here's what it looks like without any correction: OPTION 1 roll center 1.5" below ground 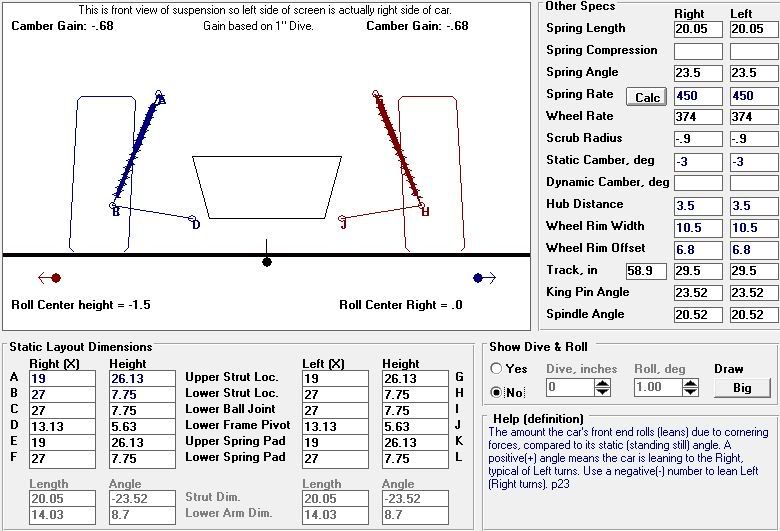 With a ball joint that is >2" long: OPTION 2 you reduce the roll couple by 1.5" (or 14%), and at least the roll center is level with the ground  Now if you cut off the bottom of the spindle, and weld in a big block of steel (2.35" tall) above the ball joint spindle taper/mount, 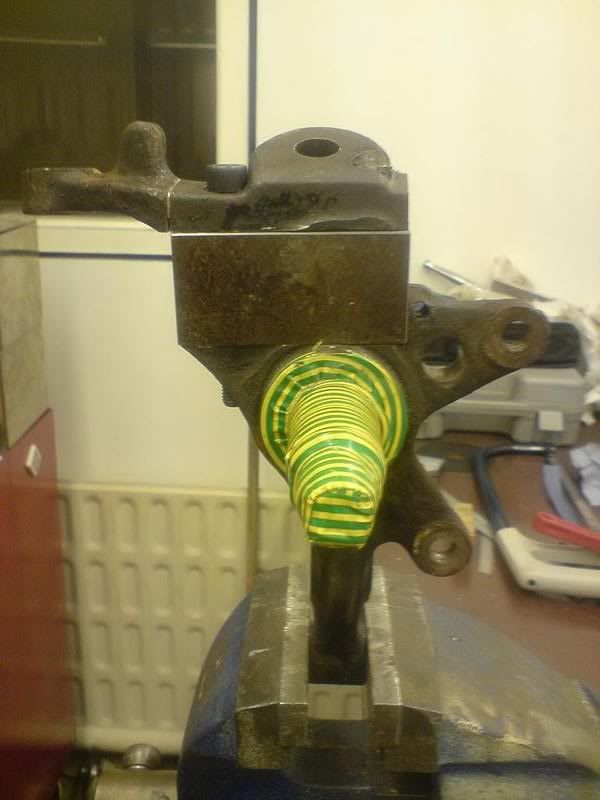 you'll get a lot more correction than the 0.69" that expensive ball joints buys you. A 275/40/17 tire has a 4" all side wall, in the below calc this 2.35" "inner-spindle spacer" puts the articulation at only 5.4" above the ground. This will be damn close to scraping the bottom of your inner wheel! This Driftworks Geomaster front spindle only has 1.97" or roll center adjustment built in and already looks damy close to these wheels! 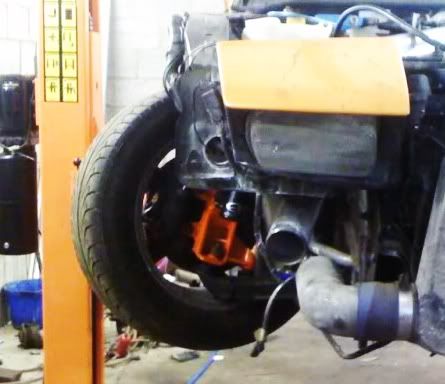 Surprisingly raising the chassis mounting point for the FLCA doesn't do much. But in the following calc it's raised 0.66" just for Anti-Dive. With these two mods here's what you'll get: OPTION 3 A roll center height of 4.7" above the ground! Thats a roll couple that's been decreased from 12.125 to 5.925, for a roll couple that's only 48% of OPTION 1. 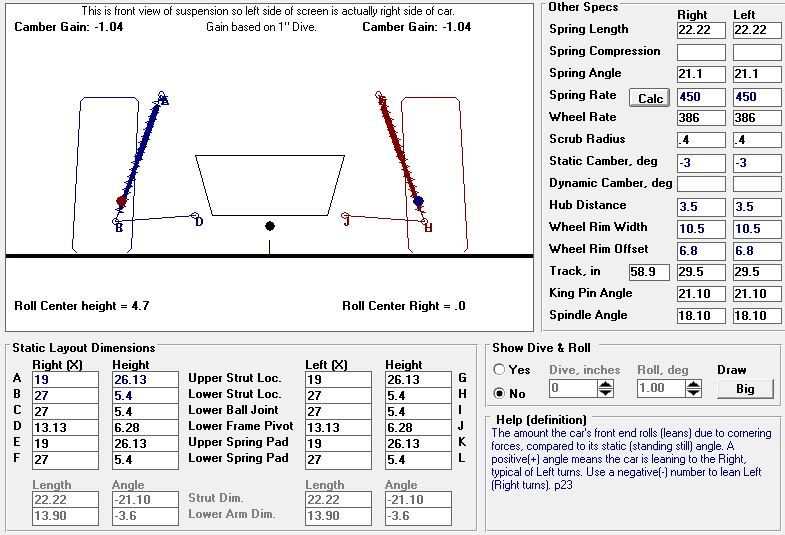 With this final set up: 3.6 degrees of chassis roll only moves the roll center down one inch. Dynamically the only way to get a negative roll couple is to have the front of the car come up >2.7" from static ride height like a wheelie. Honestly I wouldn't mind decreasing the roll couple even more, but I just don't think it's feasable without messing with the Kingpin angle, and that would take so much work that you're better off picking a different chassis or going double a-arm. And just for shits and giggles. OPTION 4. If you really want the highest roll center, don't change anything! It looks like a stock 240sx with a (STOCK???) ride height of 6" ground clearance has the roll center 5.7" above ground. But of course it also has a center of gravity 3" higher, and a roll couple (what this is really all about) 2" worse than OPTION 3.
__________________
BURN OUT IN YOUR FACE! 1998 S14 LS7/T56 swap in progress, build thread: http://zilvia.net/f/tech-talk/147301...d-gto-pan.html Last edited by SicBastard; 06-10-2011 at 01:22 AM.. |
|
|
|
|
06-10-2011, 06:40 AM
|
#20 |
|
Post Whore!

Join Date: Jul 2005
Location: LA
Age: 38
Posts: 3,402
Trader Rating: (19)
Feedback Score: 19 reviews
|
Looks like you have some extremely thorough information in here! I can tell you with my ball joint set up there is room up front to space it down another 10mm, but the LCA would likely start rubbing the brake rotor. I already had to grind my LCAs down to prevent rubbing. This leaves me to believe there is no way the moonface ones adjust as much as mine, unless they come with instructions telling you to grind your LCA down. I can get some better measurements if you like - it'll just have to be when my car is back at my house.
The GP Sports Hyper Knuckles have this diagram:  Looks like they actually shifted the ball joint location out, which is something to take into consideration if you plan on welding the ball joint mounting location down on the knuckle. Also, about weight, my car completely gutted, caged, 17X10/11, stock bumper bars, stock hood, CF trunk, full exhaust and braille battery mounted under the dash came out to almost exactly 2700 with me out of the car. Now I have a much lighter front bumper support and a CF hood, so I am curious to see how much weight that knocked off.
__________________
 Instagram - SJKnoop |
|
|
|
|
06-10-2011, 10:01 AM
|
#21 |
|
Zilvia Addict
|
Knoop,
2700 with cage and our stock depleted uranium hood!? That's awesome to hear. And your new paint looks epic, I have to be honest, I never expected the fenders to turn out that bitchin. Cutting the inner rear fender-well in back, and trailer fenders in front was brilliant! How much weight did you save with your custom front bumper? I was checking out the stock front bumper, and was wondering how much wieght could really be saved? Re. the ball joints. I think that the moonface articulation point is is almost a full inch higher compared your custom/adjustable ball joints in relation to the top of the FLCA. Which probably robs some Megan on left LOL. Stock on right, with articulation point above FLCA. 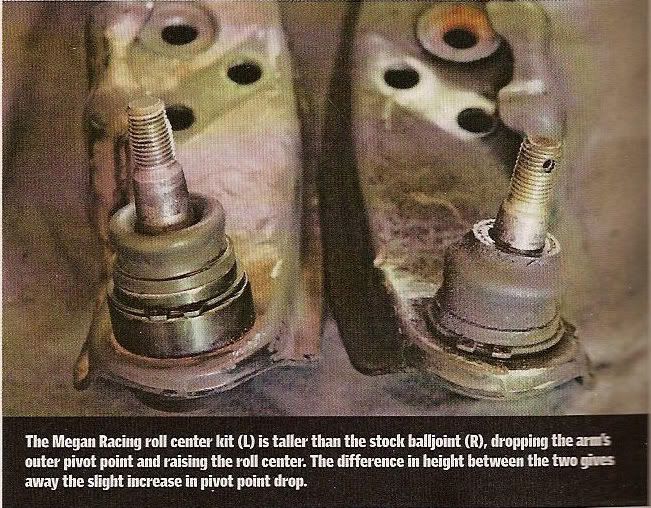 Knoops sweet custom set-up, with articulation point level with FLCA top. 
__________________
BURN OUT IN YOUR FACE! 1998 S14 LS7/T56 swap in progress, build thread: http://zilvia.net/f/tech-talk/147301...d-gto-pan.html |
|
|
|
|
06-10-2011, 11:49 AM
|
#22 |
|
Post Whore!
Join Date: May 2006
Location: San Diego, CA
Posts: 9,135
Trader Rating: (19)
Feedback Score: 19 reviews
|
Fantastic visualizations on CG, roll center, and roll couple. I'm currently going through all the measurements for my FD with Performance Trends Suspension Analyzer, and not missing strut front suspension at all lol.
You thinking of doing the cut/add block of steel/reweld method?
__________________
Jordan Innovations has a new web site! www.JordanInnovations.com -- All your favorite FD Pro Drifters love it, trust me -- www.JordanInnovations.com |
|
|
|
|
06-10-2011, 12:08 PM
|
#23 | |
|
Zilvia Addict
|
Quote:
I'm seriously thinking about it. It might be easier and lighter to copy Knoop's design, but I need to double check the failure and fatigue point of the taper/ball joint and tie rod. Those long rods make me nervous, and stock ball joints plus a block of steel are a good bit cheaper than the giant bearing and races he used. The results are the same either way though. Have you measured the FDs actual CG yet?
__________________
BURN OUT IN YOUR FACE! 1998 S14 LS7/T56 swap in progress, build thread: http://zilvia.net/f/tech-talk/147301...d-gto-pan.html |
|
|
|
|
|
06-10-2011, 03:15 PM
|
#24 |
|
Post Whore!
Join Date: Jul 2005
Location: LA
Age: 38
Posts: 3,402
Trader Rating: (19)
Feedback Score: 19 reviews
|
Thank you for the complements, I am floored with how the paint turned out. Now I just have to keep bugging the shop about my damn aero!!
As far as weight savings goes on my bumper bar, I am not entirely sure as I didn't weigh the original. However, the original one was noticeably heavier then the one I have now. I can hold my new one with both hands and shake it back and fourth pretty fast. I'd say it saved at least 10lbs....and it looks cool as shit, hahaha! I am really curious to see how much weight I saved with the hood. I didn't think the stock hood was all that heavy, I could pick it up and move it around by myself, but the CF one is definitely lighter, hopefully I saved around 10lbs there too. Also, I believe it was about 350ish to do all four LCAs with the ball joint mod. The shank I am using is for circle track cars, so I'd assume they're made to take some abuse! The part that goes through the spherical bearing is 5/8", so the tapered section is thicker then that, and I am using 3/4" spherical bearings that have a decent load rating and aren't expensive at all. The shanks are the most expensive pieces, at $20 a piece. If you were to run a 1" bearing with 3/4" reducers and a grade 8 3/4" bolt + some decent metal tubing as a spacer you could space it down even more then I have it and have it be even stronger.
__________________
Instagram - SJKnoop |
|
|
|
|
06-11-2011, 01:23 AM
|
#25 |
|
Zilvia Addict
|
Thanks for the tips on the ball joint parts. I'm pretty sure that the stock hood is 53 lbs! I know kognition once made a non-reinforced, dry carbon hood that was only 8 lbs. That's huge.
__________________
BURN OUT IN YOUR FACE! 1998 S14 LS7/T56 swap in progress, build thread: http://zilvia.net/f/tech-talk/147301...d-gto-pan.html |
|
|
|
|
06-19-2011, 11:42 PM
|
#26 |
|
Zilvia Addict
|
My miata is on ebay now, tell everyone you know who needs a 300 hp, 2200 lbs, whipple charged monster, that the funds will go to the good cause that is a 404ci L76 powered 240sx.
no reserve. No Ebay Sales 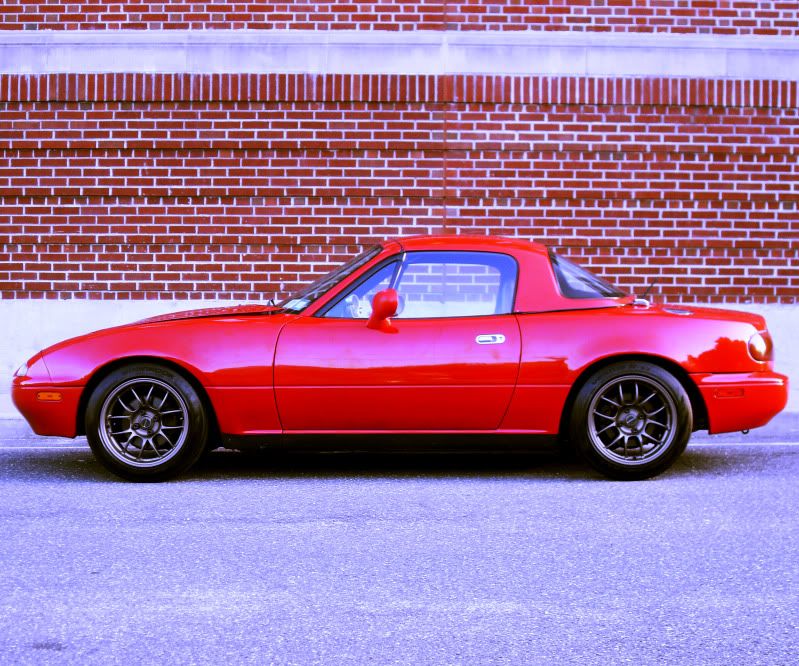
__________________
BURN OUT IN YOUR FACE! 1998 S14 LS7/T56 swap in progress, build thread: http://zilvia.net/f/tech-talk/147301...d-gto-pan.html |
|
|
|
|
06-22-2011, 10:04 AM
|
#27 |
|
Zilvia Member
 
Join Date: Sep 2008
Location: Bowling Green, Ky
Age: 37
Posts: 266
Trader Rating: (2)
Feedback Score: 2 reviews
|
Definitely awesome build going on here still. Since you all were on the subject of ball joints, what ball joints you guys would use to replace your rear lca ball joints. AAP, and O'reillys doesn't have a part # for a rear replacement.
Would a front replacement work? |
|
|
|
|
06-22-2011, 10:33 AM
|
#28 |
|
Zilvia Addict
|
Can't help ya with stock replacement, I havn't replaced them yet. On some cars you have to buy a whole damn new control arm! Sounds like a good time to weld in a mono ball race (to replace the ball joint) for some roll center correction in back. Then you could actually tune your Roll Axis!
__________________
BURN OUT IN YOUR FACE! 1998 S14 LS7/T56 swap in progress, build thread: http://zilvia.net/f/tech-talk/147301...d-gto-pan.html |
|
|
|
|
06-22-2011, 01:23 PM
|
#29 | ||
|
Nissanaholic!
 
Join Date: Dec 2008
Location: Upstate NY
Age: 44
Posts: 1,699
Trader Rating: (15)
Feedback Score: 15 reviews
|
Quote:
Or you could use UB machine part #40-4185-075 but that will require you to ream the stock spindle to a 7° taper. But its a 3/4" shank (no adapters) and the 7° stud is pretty massive comparted to the other setup. 
__________________
Quote:
|
||
|
|
|
|
06-27-2011, 03:05 PM
|
#30 | |
|
Post Whore!
Join Date: Jul 2005
Location: LA
Age: 38
Posts: 3,402
Trader Rating: (19)
Feedback Score: 19 reviews
|
Quote:
__________________
Instagram - SJKnoop |
|
|
|
|
|
| Bookmarks |
|
|


 Hybrid Mode
