|
|||||||
| Builds (and builds only) Got a build thread? It goes here, build threads anywhere else on the forum will be locked and never moved. |
 |
|
|
Thread Tools | Display Modes |
 01-07-2013, 10:04 AM
|
#1 |
|
Join Date: Aug 2009
Location: New York
Age: 34
Posts: 30
Trader Rating: (1)
 Feedback Score: 1 reviews
|
My 1JZ S14 / Zenki Swap
Hey Guys,
You can tell by my posts I'm really not too active on the forum mostly because work doesn't allow me the time. Although I try and keep up on the really different and tedious builds here. Mine isn't all that special but figured I'd share it anyways in case someone is doing the same and needed a hand with something or had any questions. Moving forward. The car is a 1995 S14 240sx. I purchased it about a year and a half ago from some dude in Jersey. Overall the car is pretty clean, no rust or serious body shots that I could find. I purchased it with full intent of a JZ swap from the beginning because I already had the motor which was supposed to land it's way in my 97 Kouki but after considerations between emissions, inspections, and the actual car I sold it to buy the 95. Anyways, I purchased the motor and transmission setup from Zerolift Auto Labs in Cleveland, OH. They shipped the motor out and the carrier they selected was spot on with communication and delivery date.  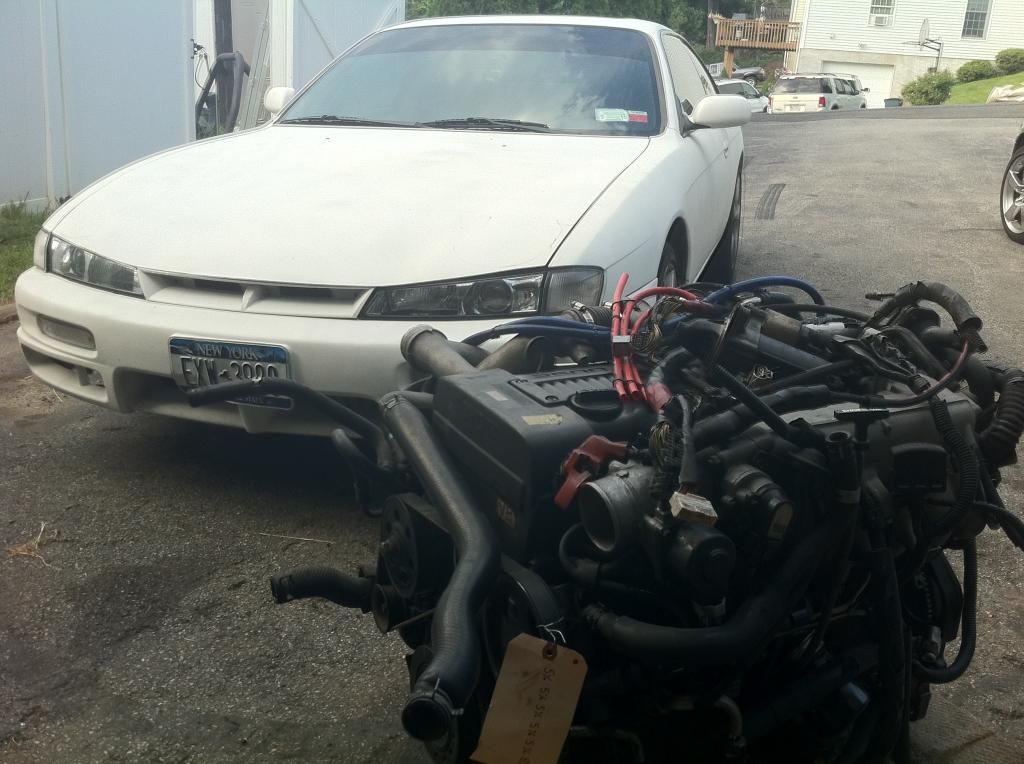 I am only 22 years old and really didn't have the money to start the swap as soon as I purchased the motor so it took me a pretty long time to get the money to even begin the process. Fortunate enough for me a buddy of mine has a lift in his garage along with an engine crane and one day it just happened. Here is a picture of the car the last time it ran on the KA right before it was pulled into the bay to start the swap.  After a few leisurely hours the KA was pulled and the car was pushed outside for the night until I could get to remove every unnecessary part and power-wash the engine bay.   As the weeks went by and I spent a majority of my paychecks on parts I finally accumulated enough to actually start the “build” process. Let me first start by saying if you don’t have the time or ability to do your own wiring I could not recommend anyone better than Yury Lyalko over at Wiring Specialties in CT. During my build I was working two jobs and doing all the labor myself and with a couple buddies. Sitting down and planning, reading schematics, extending wires, splicing and pinning properly, all of this on an engine harness that was as old as me was absolutely out of the question. I will not bash or speak on behalf of any other shop and their services but I will tell you if you want it done right go to Wiring Specialties. Yury is a great guy to do business with and his product is top notch! Moving on with the engine bay stripped of everything I would no longer need, and power washed it was relatively straight forward from here. My next move was fire up the welder and make some brackets to support the intercooler. I would tell you guys what intercooler it was but I have no idea, my buddy had it laying around from his old talon project and it just sized up perfectly for my car.   After running a battery relocation kit to the trunk and properly terminating the ends and securing them that was pretty much the extent of my custom wiring thanks to Yury. From here I moved onto the engine. I don’t have any picture I don’t think of me doing the timing belt and water pump but yes I did them. If anyone needs the exact part #’s let me know I think I have the Toyota receipt somewhere. That’s the boring maintenance part though. As for the performance and installation aspect, first off if anyone reading this ever does go the 1JZ route. DO NOT BUY the eBay Y-Pipe and Downpipe kit for the engine.  What should take about 45 seconds on any other motor in the world outside of the car took me about 5 hours. The bends of the pipe and the length and the location of the studs off the turbos will leave you cutting, grinding, bending, and denting for a majority of your day. I was too far committed into the installation with my turbos off the head and the original y pipe removed before I wanted to give up completely so I had no choice to finish it and cut my lost time. The pictures make it look a lot easier than it actually was.      In all honesty It’s pretty close to which was more of a pain in the ass. Doing those downpipes or fitting the engine in the car. Before I get to actually putting the engine in the car however I had to finish the small prepping stuff like looming the new harness throughout the engine properly and installing the clutch and transmission. If you can get your hands on a soarer R154 with the factory extended shifter do it, that saved me a bunch of time and money rather than converting the shorter more common R154. I chose a Spec Stage 2+ and OEM Flywheel configuration for my build because I knew I was going to be on stock twins for a little bit. Kind of regretted that decision when I was putting the engine in the car and realized if I ever needed to upgraded the clutch I would be doing this again but regardless as of right now I am really happy with it.  Speaking of fitting the engine in the car. You’re not doing that without a helping hand. Fortunately I had a bunch of those. My buddy has a lift at his house so that is where I was doing all the work on the car and had to get the motor from my house to his. This also required a few people, a tire, and an engine crane.  The installation of the motor was the hardest part of the whole process. I used an eBay mount kit for factory subframe and mounts. Do not do this either… I was really hurting for money at the time and was in a rush to finish the car. This kit required a whole bunch of cutting, grinding, and drilling but I got it to work. With the help of a couple of friends, two big pry bars, and a floor jack for the transmission support and manipulation she finally sat in properly.   If you made it this far it is smooth sailing from here for the most part. At this point you should just connect all of your electrical connectors and fuel lines. I splurged and purchased the chase bays fuel line kit for stock 240 lines and Toyota OEM Rail. This pricey purchase made my life really easy when it came to hooking everything up. Just DO NOT mix up the lines when connecting them. I’ve seen this way too often for a bunch of people. Luckily I did not do that. When I triple checked all my connections and made sure everything was out of the way of all moving parts the time came… The special moment where I realize if I have completely wasted my time and money on a dud motor. Here is a video of its first actual crank and run.  After touching everything up related to the motor like vacuum lines, coolant lines, oil returns and feeds, and snugging everything down I was able to move onto the final pieces before I actually got to drive the car. Installing the driveshaft was simple as anything and the custom driveshaft from “The Driveshaft Shop” made it that way. Next on my list was the radiator. Once again the broke kid purchased a cheaper godspeed radiator for a S14 KA because that was $500 cheaper than the one “designed” for a JZ swap in a 240. With my savings I was able to run to auto zone and buy a stock supra upper and lower hose and just extend the upper hose with a coupler to the proper length. This whole process wasn’t hard it was just time consuming because of how tight everything is. Here is a picture to show the fan clearance.  After the radiator was installed and all the coolant lines connected I spent about another 2 hours fabbing up some intercooler piping from a universal kit with a friend of mine. It was pretty much time to see her move on her own power. A few of my friends really helped me get this far and it’s much appreciated and this will be the only time you get to sit on my car clowns.  I don’t have any videos of her driving but after I got her on the road and found out it drove fine I finally put her back together. Of course that had a little project in itself because the brackets I welded in to support the radiator support got I the way of the headlight mounting locations and I didn’t realize this till it was time to put the headlights in. So they had to be trimmed down a little.  I drove it open downpipe for a couple of days and fixed all the stupid little things that would go wrong with a swap like this. The car is set on a manual boost controller controlling both turbos simultaneously and I hooked of the lines backwards so they were both opening at waste gate pressure. That was kind of frustrating to figure out because at first being that crappy 1J turbos I figured they were just blown. After I figured that out I started to wire in my dakota digital boxes, and boost cut controller. I have everything working properly except for the Speedometer. After 30 mph is extremely inaccurate. My last task was to make an exhaust for it. I had a buddy give me a hand with this because A. It would be too difficult for me to fabricate by myself. B. He’s a better welder than me! I finished the project up to this point about a month ago and it has been sitting in my driveway since pretty much because I refuse to drive it in the salt here in NY. When spring rolls around and it gets warm I will tidy everything up and start making the car look as good as it runs. Here is a video I took yesterday of its weekly start up. And I will update the build thread when the weather gets better and I accumulate a little more $$$. If anyone has any questions let me know I’d be happy to answer em.  |

|

|
| Sponsored Links |
|
01-15-2013, 12:28 AM
|
#5 |
|
Zilvia Member
 |
Nice write up. I am in the process of doing the same swap but with. Th400 trans and a big single on my 95. I am still working on the swap parts purchase and was wondering if you had any issues with wiring. As I am no wiring expert. So I will be purchasing the chase bays swap harness
|
|
|
|
|
01-15-2013, 09:37 AM
|
#7 |
|
Nissanaholic!
 |
keep it up, looks good
__________________
@UpshiftEngineering |
|
|
|
|
01-15-2013, 07:48 PM
|
#9 | |
|
Join Date: Aug 2009
Location: New York
Age: 34
Posts: 30
Trader Rating: (1)
Feedback Score: 1 reviews
|
Quote:
I purchased my harness from "Wiring Specialties" in CT. The owner and operator Yury was beyond great to deal with. He was always very direct and fast to reply or answer any questions I had. I will not bad mouth any other vendor because I have dealt only with "Wiring Specialties" and can speak on my experience with them. I was one of his first JZ harnesses and I had not a single problem with the harness that I did not bring upon myself. (I.E. my aftermarket y-pipe put the 02 sensor a little further away from stock location so I had to extend my wires.) And thank you for the compliments everyone else. I will be updating the build when the weather gets a bit warmer here. |
|
|
|
|
|
03-23-2013, 10:41 AM
|
#12 |
|
Join Date: Aug 2009
Location: New York
Age: 34
Posts: 30
Trader Rating: (1)
Feedback Score: 1 reviews
|
Sorry for the late reply I haven't checked the post in a long time. If it's any help don't both trying to go through the top unless you have at least 3 buddies and a engine load leveler and a jack underneath the transmission. Putting the engine in the car was defiantly the hardest part.
|
|
|
|
|
| Bookmarks |
|
|


 Linear Mode

