|
|||||||
| Home | Rules & Guidelines | Register | Member Rides | FAQ | Members List | Social Groups | Calendar | Mark Forums Read |
| Builds (and builds only) Got a build thread? It goes here, build threads anywhere else on the forum will be locked and never moved. |
 |
|
|
Thread Tools | Display Modes |
 07-25-2018, 08:21 PM
|
#1 |
|
Leaky Injector
 Join Date: Oct 2008
Location: Orange County
Age: 35
Posts: 113
Trader Rating: (4)
 Feedback Score: 4 reviews
|
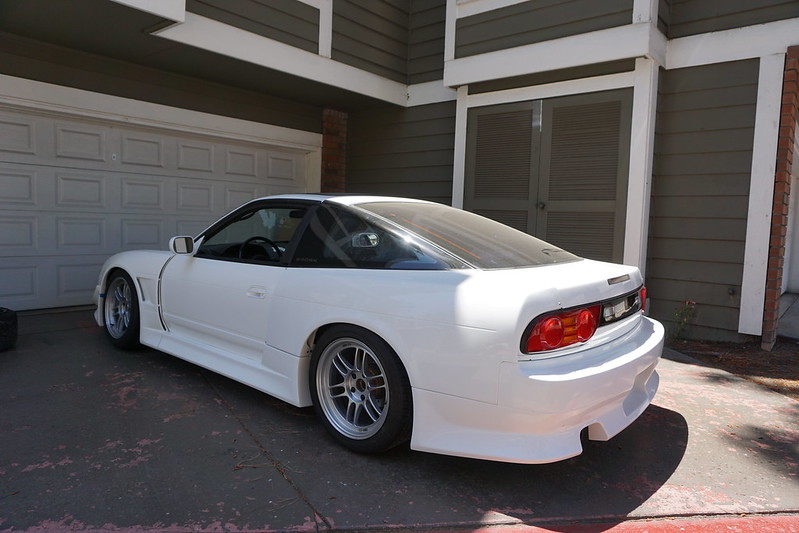 So, I've been contemplating making a build thread for the longest time and my friends have been telling me to do one. After much procrastination I finally have the time to make one. It's been many years in the making to get up to this point right here and by no means is it finished, but I am in the gravy of the build at the moment so I figured it's a good time to post. Here it is. I have to note the photos collected were taken by myself and friends over the years so the quality of photos, especially in the beginning of the journey are pretty terrible. It all started back in 09, when I purchased the car off some guy who purchased it from the original owner, an old lady. The car was in great condition and had really low mileage for its age. 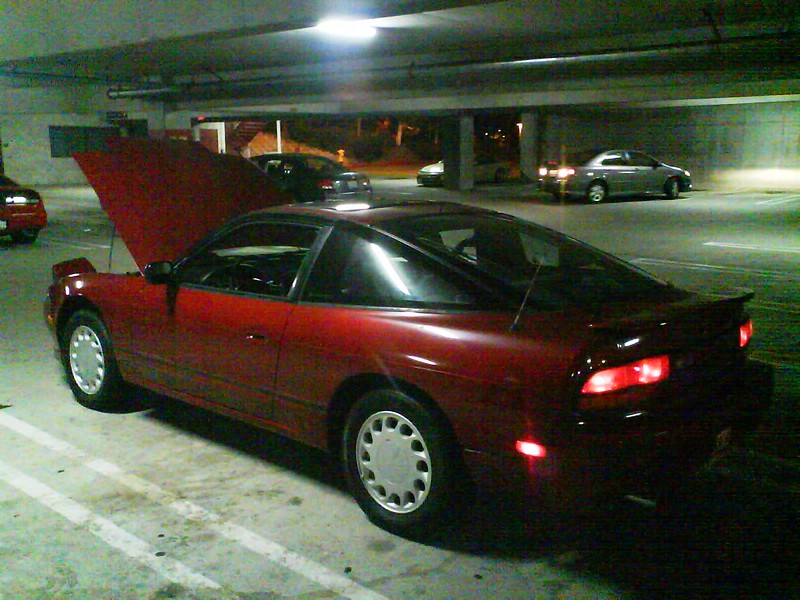 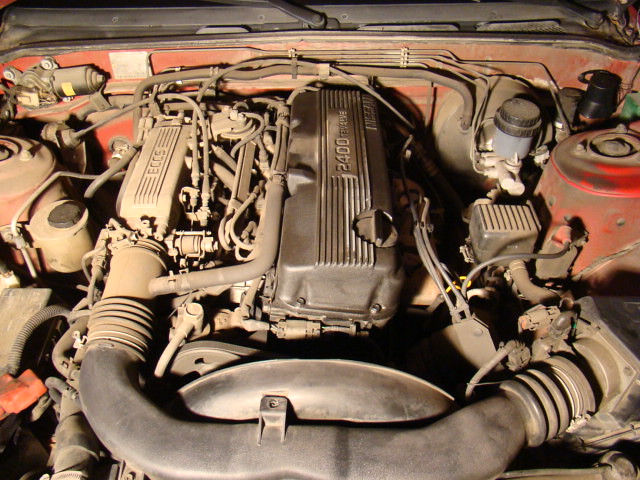 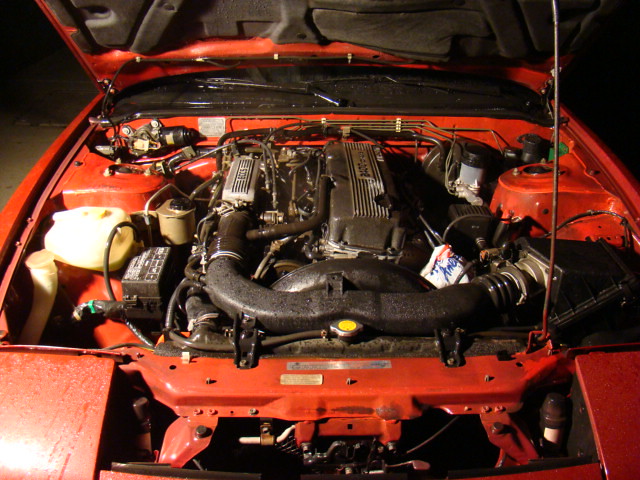 Initially, I did what most people do when they purchase a super old used car they intend to keep for awhile and I went through and redid all the engine seals from front to back and top to bottom. I even threw on a new clutch and a lightweight flywheel. 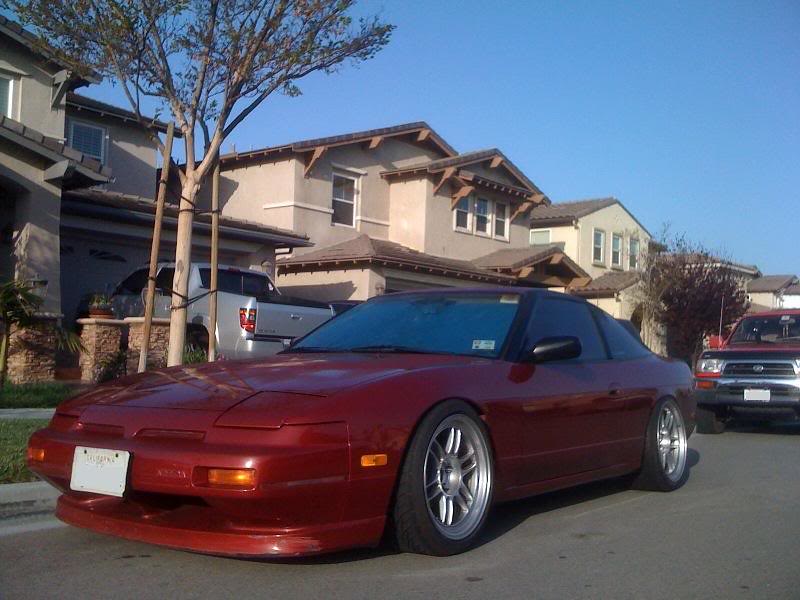 I added some coilovers, did the five-lug conversion, and bought some Enkei RPF1's.  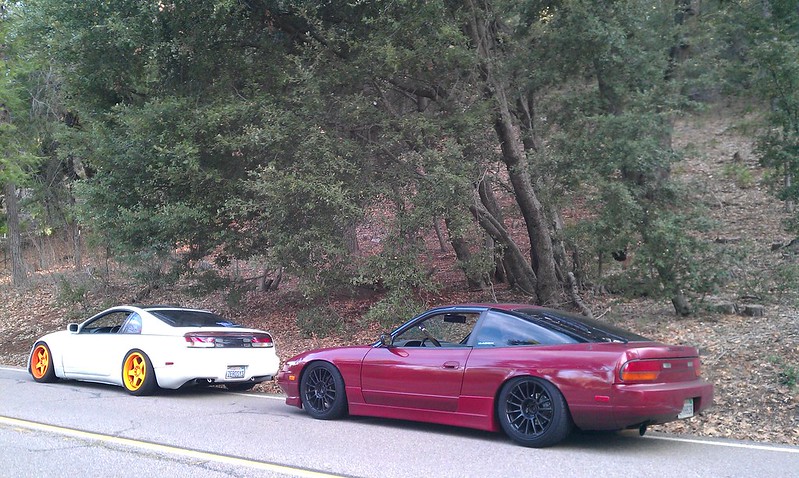 Over the years the car went through some stages and neglect. As I was going through college, I didn't have much time to give to it. Fast forward to more recently. Early 2017, this is how the car sat. The mods done up to this point are as follows: 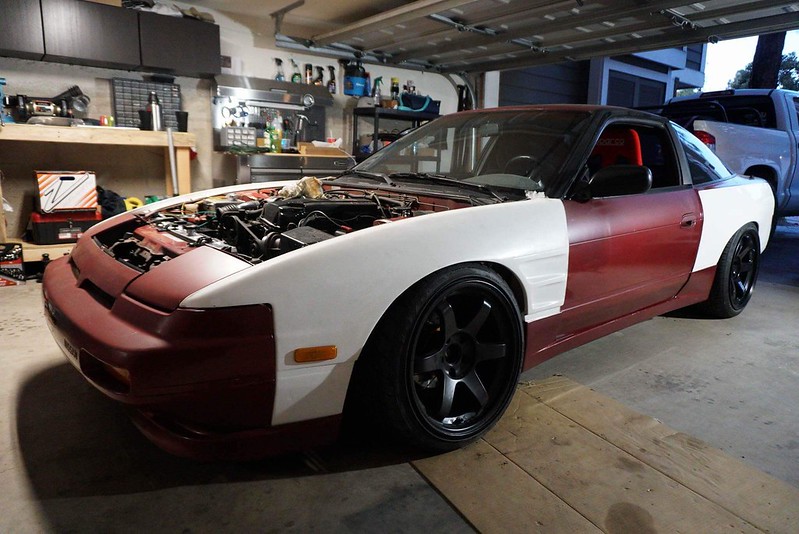 Modifications: DMAX 180SX F/R overfenders HKS Sport Exhaust KAAZ Super-Q 2-way LSD Kouki 180SX taillights Megan Street Coilovers MAX subframe collars MAX toe arms MAX RUCAs MAX extended inner tie rods MAX rack-to-ITR forward offsetter MAX Super Angle Knuckles Mishimoto Aluminum Radiator Mishimoto Radiator E-Fans OEM Nissan Silvia S13 sideskirts OEM Nissan S13 long fin differential cover Phase 2 Motortrend Tension Rods Phase 2 Motortrend Coolant Overflow tank Sparco race seat Techno Toy Tuning extended FLCAs TEIN tie rod ends Volk TE37’s staggered 17/18 Now onto the good stuff. Finally, I decided it was time to paint this thing. I really wasn't a fan of the burgundy/maroon, whatever you want to call it. Also, a couple years back I got a good deal on a Vertex Ridge kit from Jeren at DSPORT and it had been sitting around this whole time. I have been wanting to put that thing on for so long.  Stripped the car down with the help of my friends and wife. Then I sent it off to the paint shop and voila' as they say it! 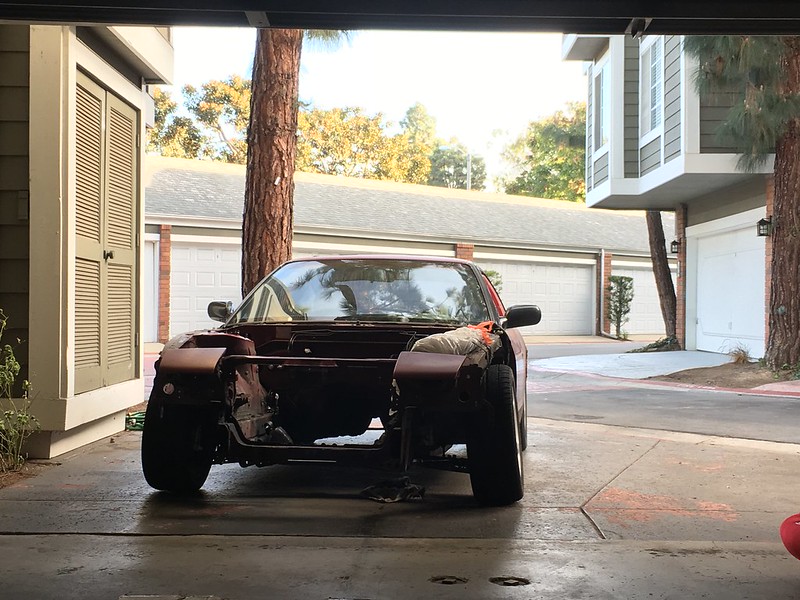 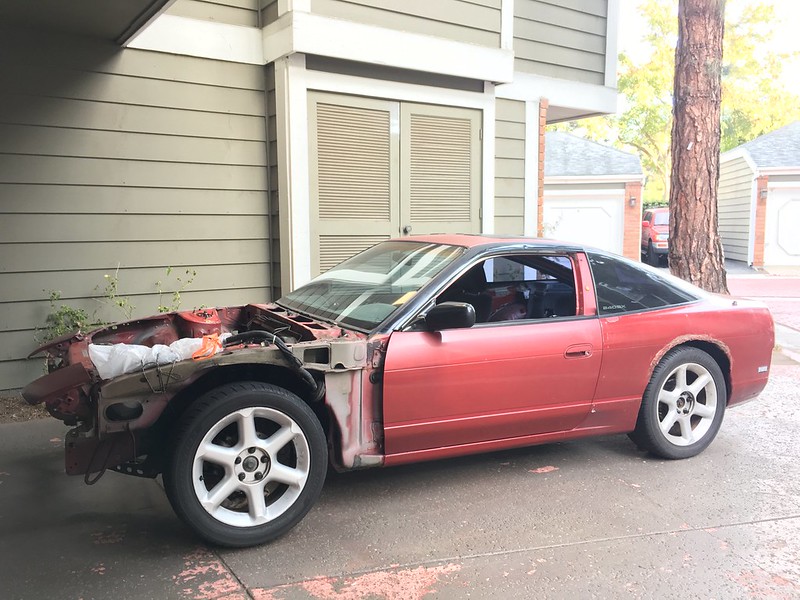 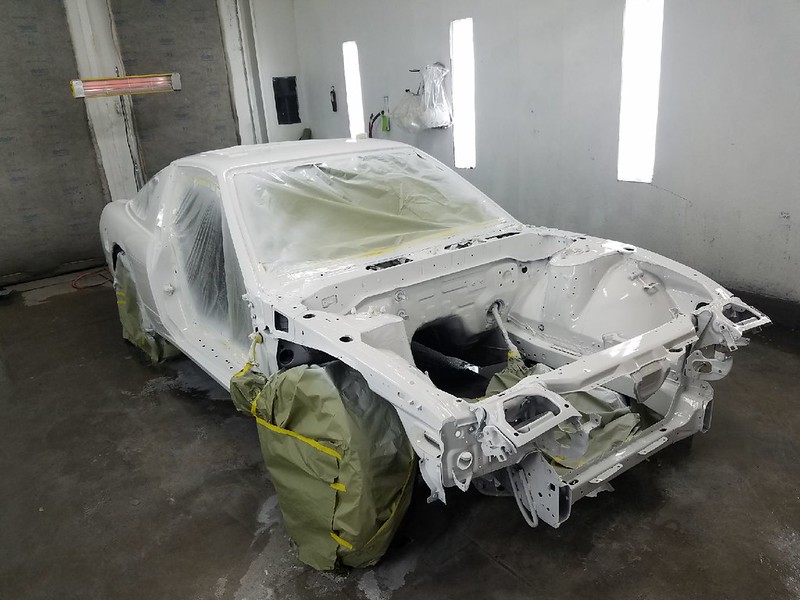 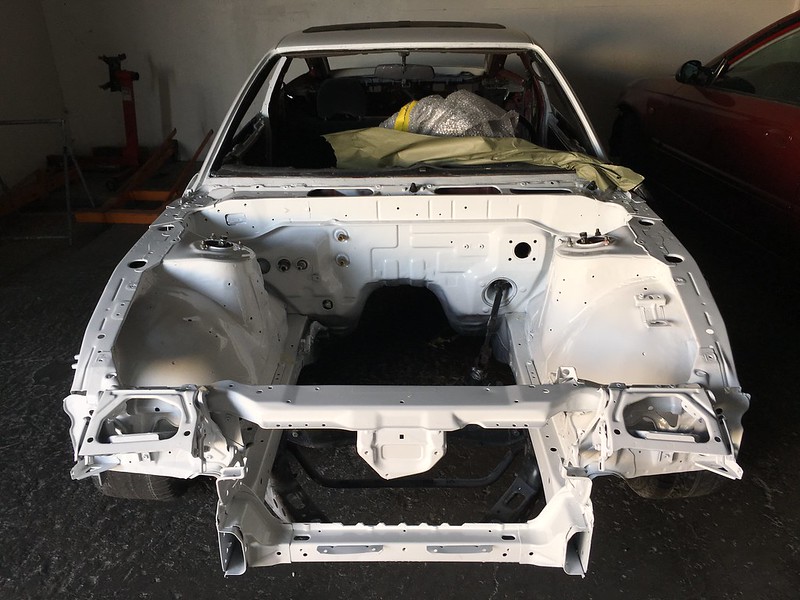 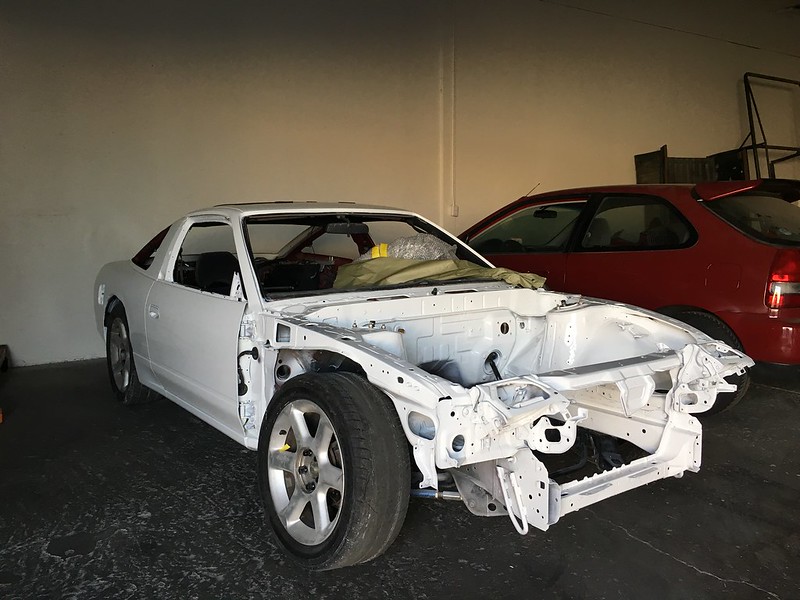 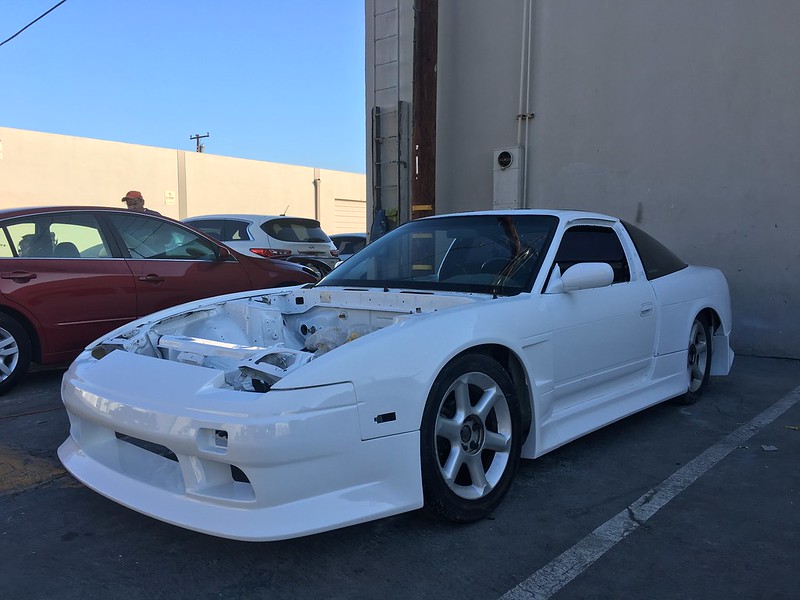 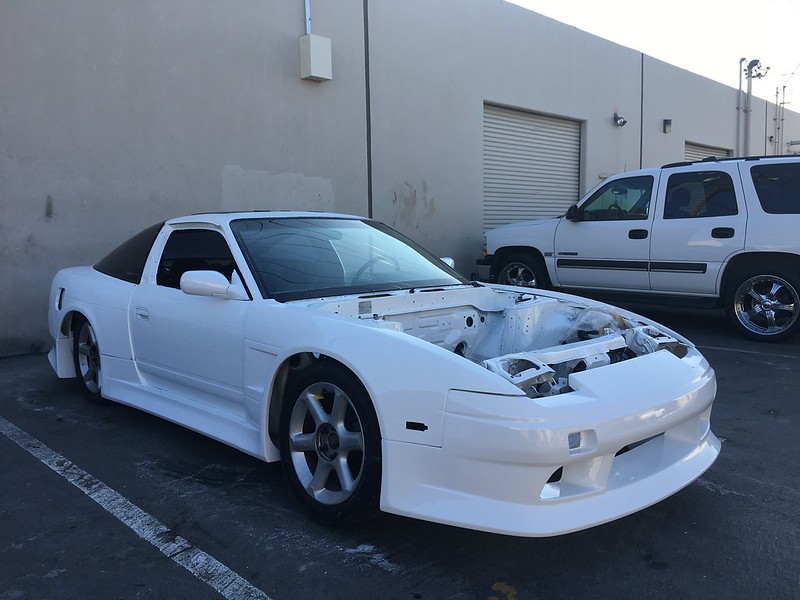 I debated for a long, hard while about what color to paint it and needless to say, went with the Toyota Super White you see here. My buddy JP at JVAutobody painted it. Also, around the same time I bought the kit, I purchased an engine from the legendary Forrest Wang  I know what you're thinking, but no it was not a JZ or an SR. It was a normal ol' KA24DE. 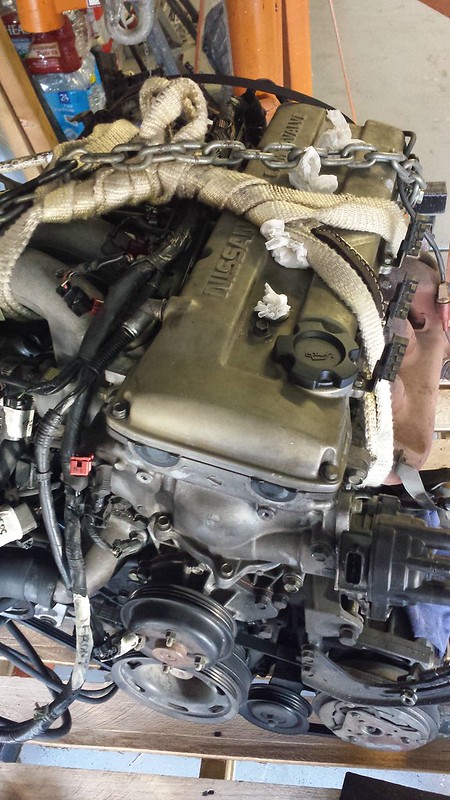  Long story short, in the beginning I just wanted to swap this thing into my car, but then I saw that Tomei was creating new turbo parts for none other than the KA24DE  Pretty rad I thought! #nerdoutmoment. So, I picked up a Tomei exhaust manifold for the soon to be KA24DET. That's really when my car build went to the next level. I had the motor cleaned up and built by the legendary Shingo at Bluemoon. This guy's work is amazing. Pretty rad I thought! #nerdoutmoment. So, I picked up a Tomei exhaust manifold for the soon to be KA24DET. That's really when my car build went to the next level. I had the motor cleaned up and built by the legendary Shingo at Bluemoon. This guy's work is amazing. 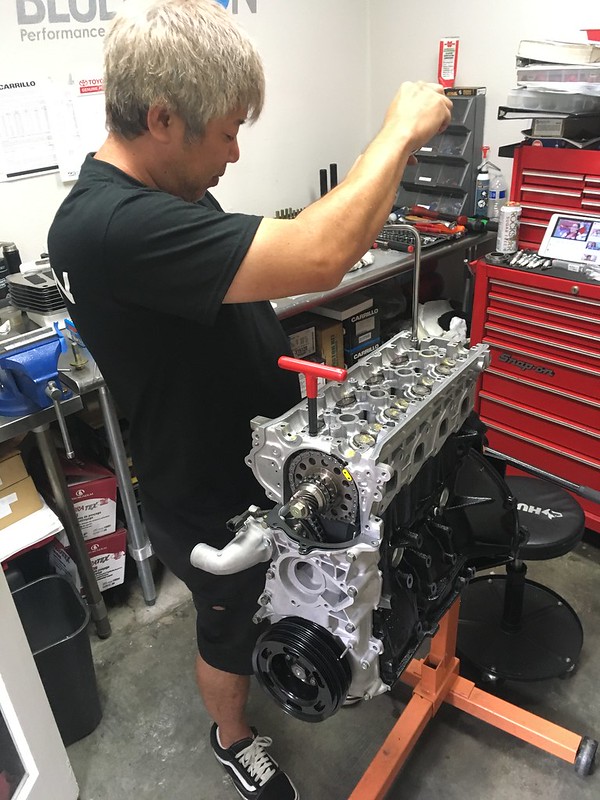 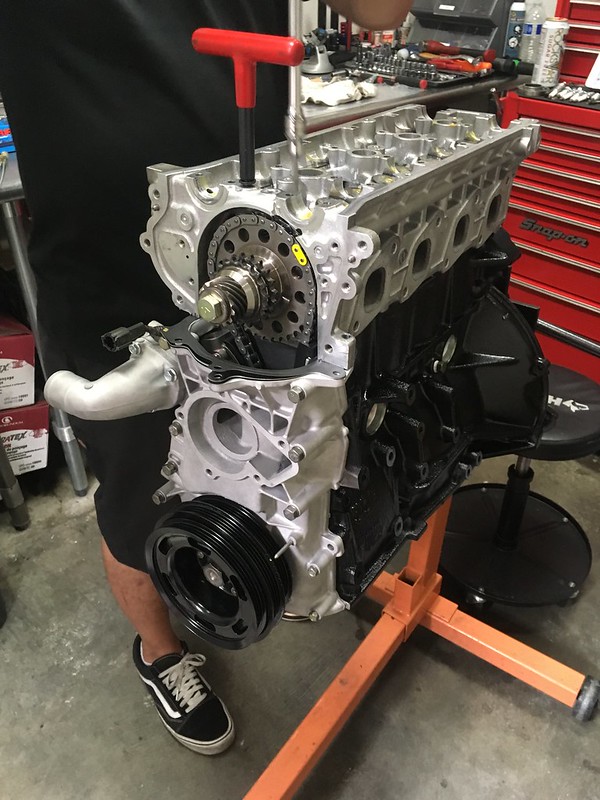 The head has Tomei cams, valvetrain, and headgasket. I even had the valve cover painted blue in homage of Tomei. Internally, it has Pauter rods, CP Pistons and the rods and oil pump gears were WPC treated. 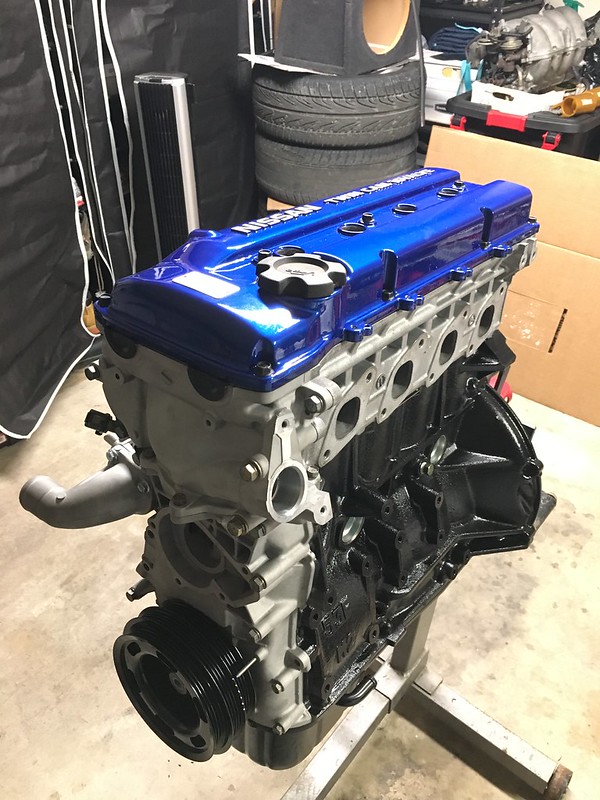 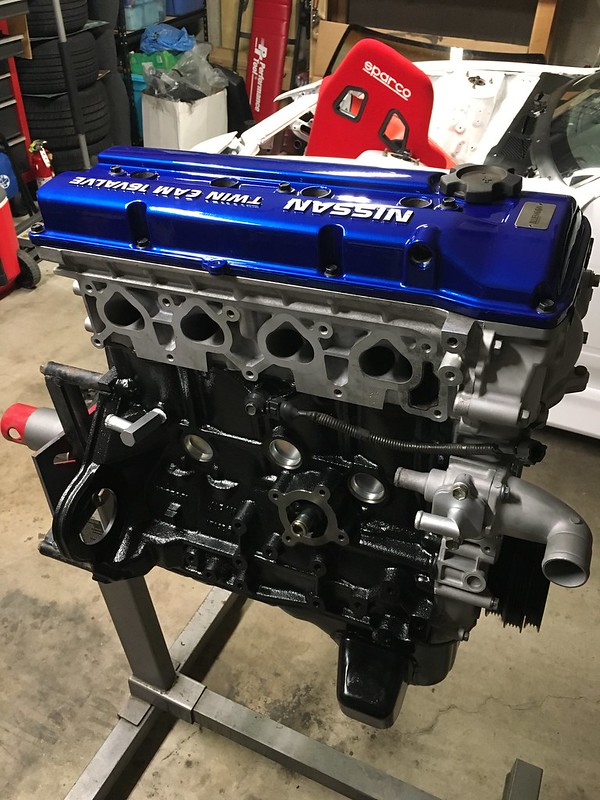 I opted for VQ exhaust manifold studs with the e-torx ends in place of the regular ones and I bought a Tomei ARMS M7960 turbo kit. Here's a mockup of it on the engine. 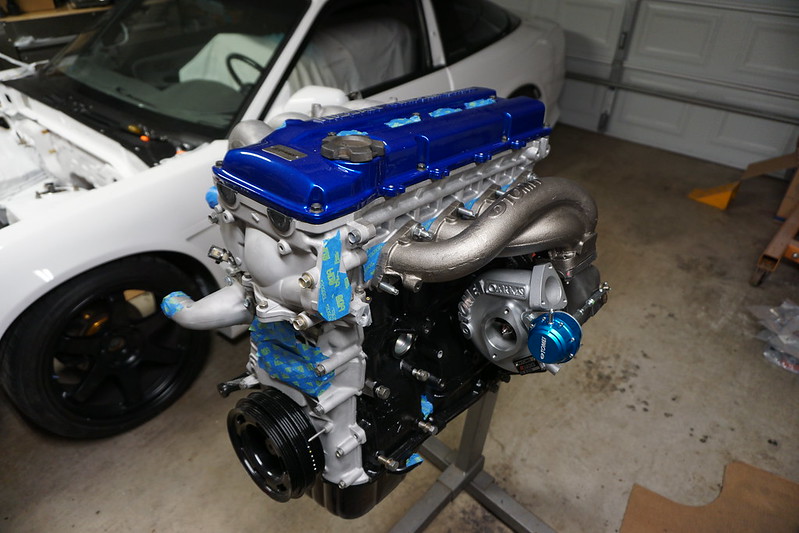  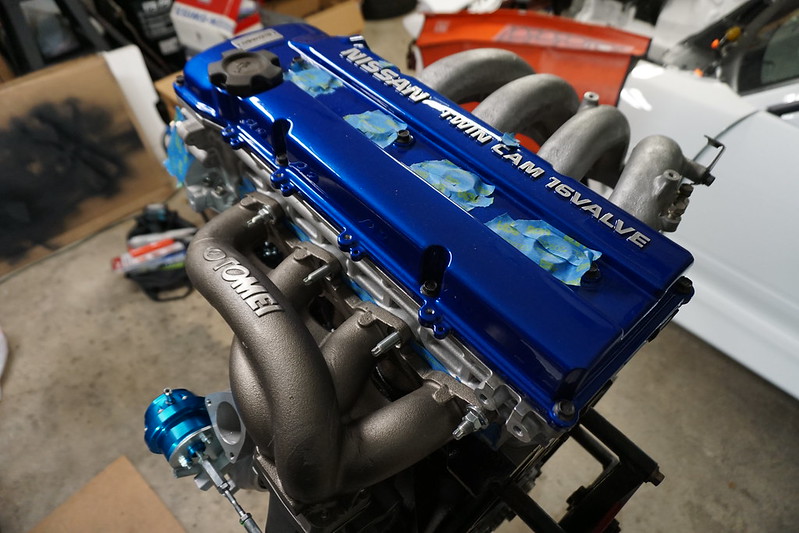 more to follow... |

|

|
| Sponsored Links |
|
08-31-2018, 02:16 AM
|
#7 |
|
Leaky Injector
Join Date: Oct 2008
Location: Orange County
Age: 35
Posts: 113
Trader Rating: (4)
Feedback Score: 4 reviews
|
Update:
The engine is in now, but before getting to that I'll bring this thread up to speed on what was done leading up to its current state. I've been cleaning/painting a bunch of things that need to go back in the car like the throttle body, intake manifold, engine accessories and brackets, transmission. This all takes a TON of time, which, I've underestimated. Not trying to build a show car here by any means, but some of the stuff just needed some TLC before going back in. 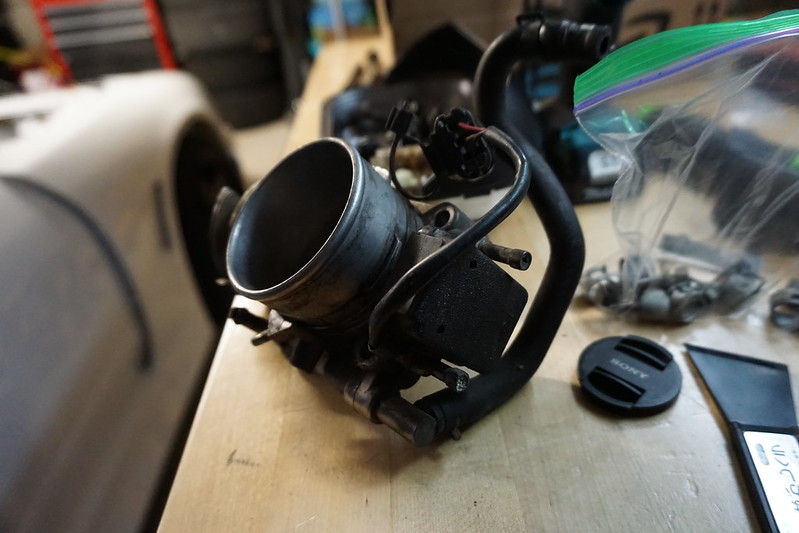 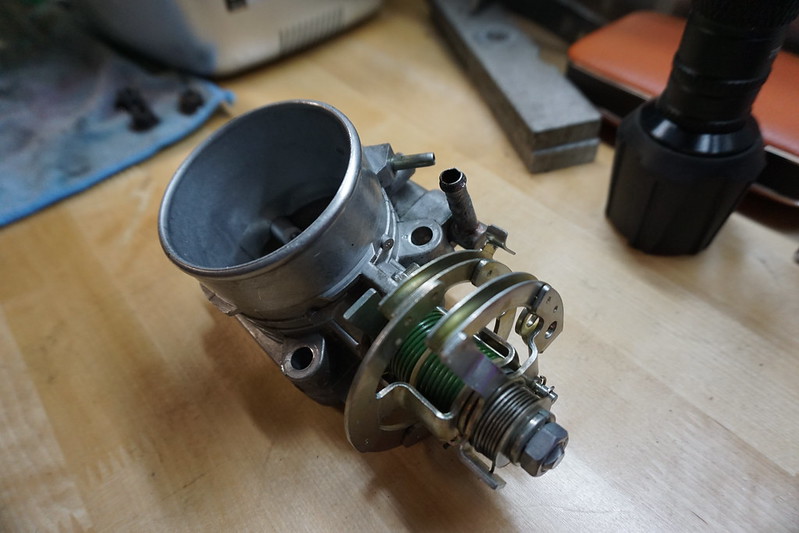 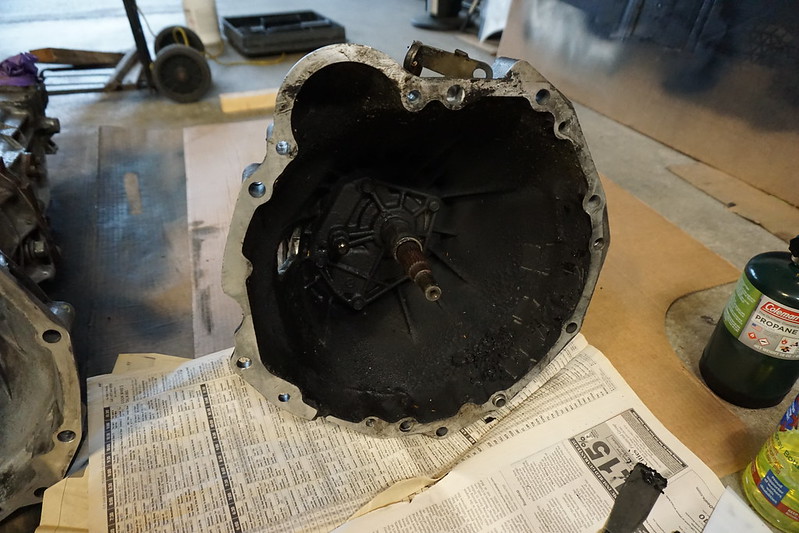 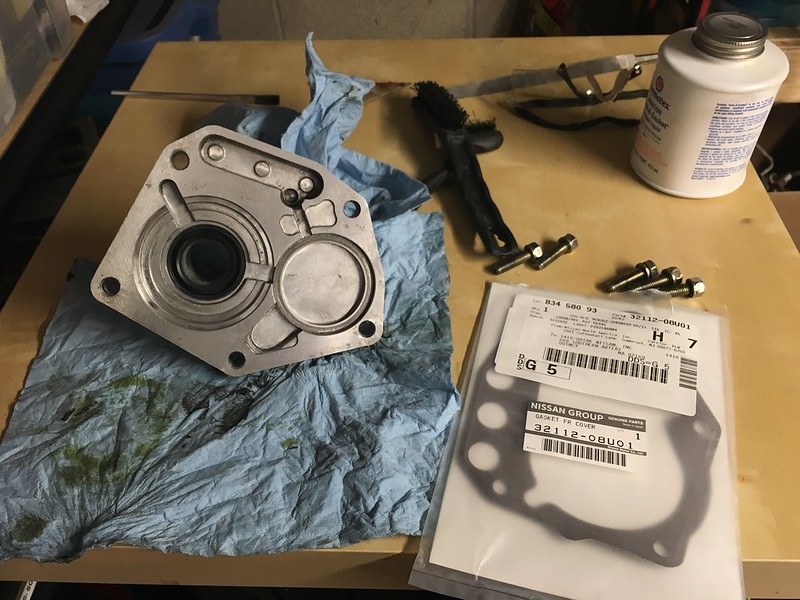 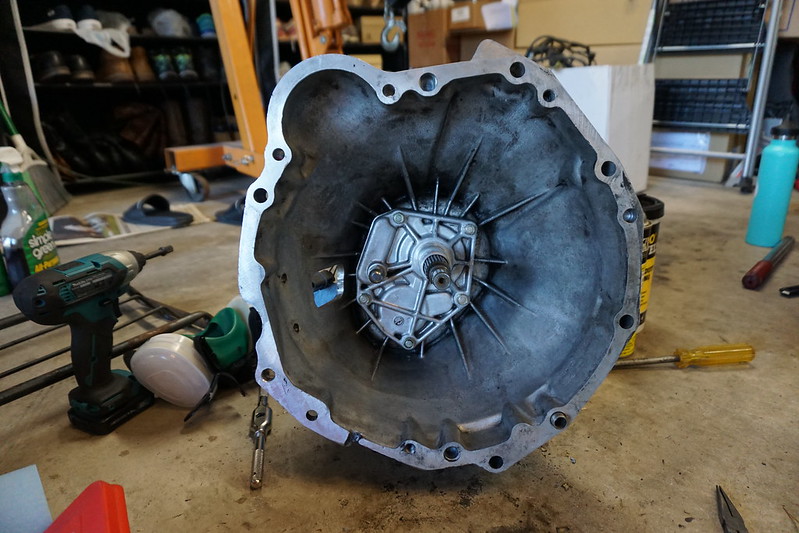 Installed new seals on the transmission and cleaned it up as well. It was pretty filthy in there.  Replaced the old steering rack bushings with these solid MAX steering rack eccentric bushings since I'm running their long tie rods, ITR offsetters and super angle knuckles. 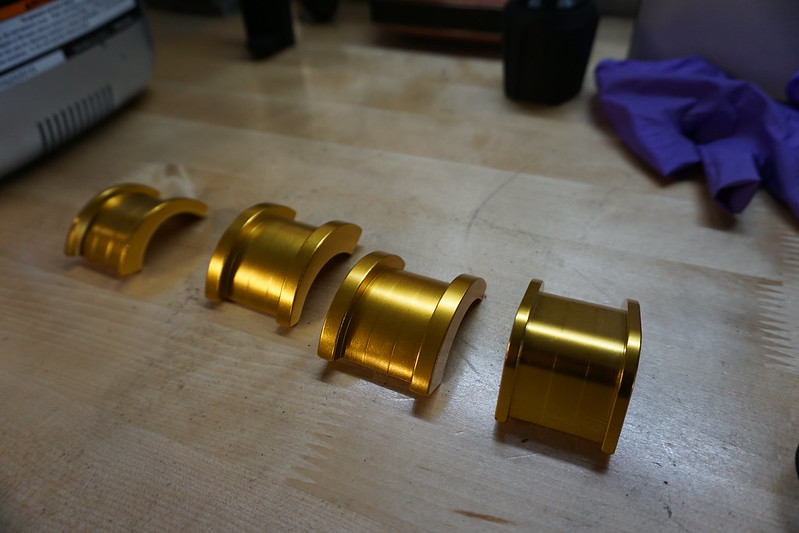  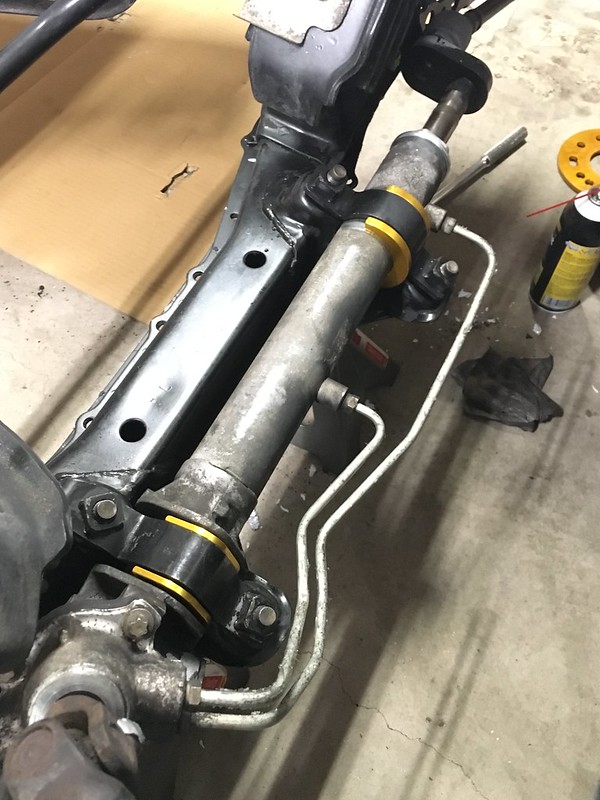 While I was in there I also replaced the steering column bushing with a solid DIF piece.  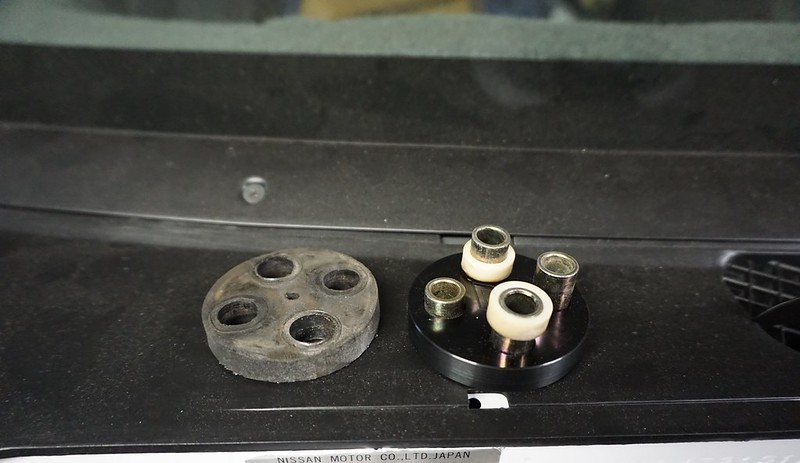  Also, touched up the transmission tunnel with undercoating.  Made a mistake cutting the hardline going to the rear brakes in a rush to get the chassis out to paint, so here I repaired the line with a new union to the Chasebays stainless braided PVC coated brake line.  Chasebays BBE, power steering reservoir and lines installed. 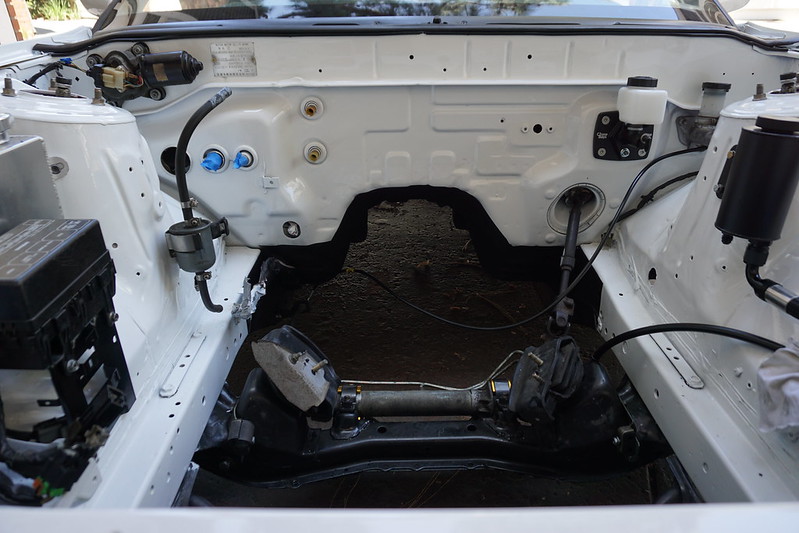 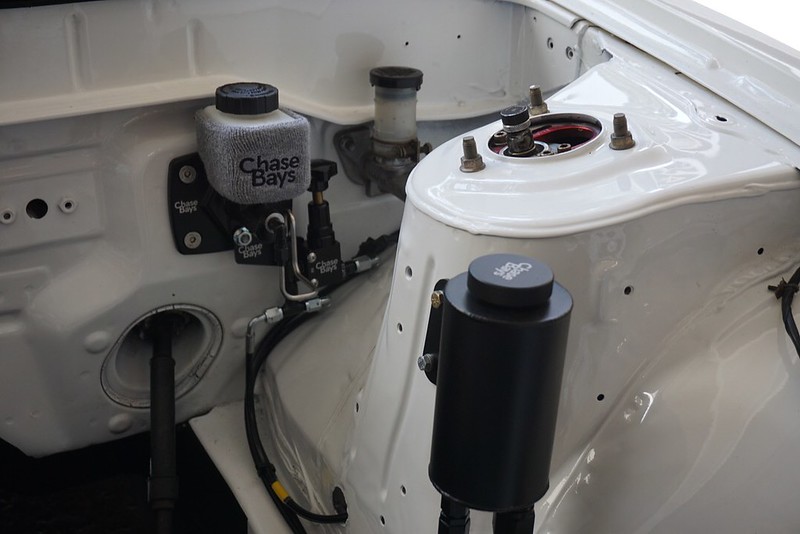 Purchased some used Nismo extended studs for the front so I could comfortably run slip on spacers and slapped on the MAX Z32 brakes. Yes, I know the cotter pin isn't fastened on there completely yet, I just had to snap a quick photo.  Here's the engine with the a/c compressor mocked up, because I've decided I want to run a/c on here if I can get it to work out. It looks like it's going to fit with the Tomei M7960 turbo there. Remember, my chassis is a zenki model so I had to acquire 91-94 s13 a/c parts as they're not the same as 89-90 and so far I have everything except the evaporator so if anyone has one for sale, let me know. One of the lines coming out the firewall is larger on the 91-94 s13's. 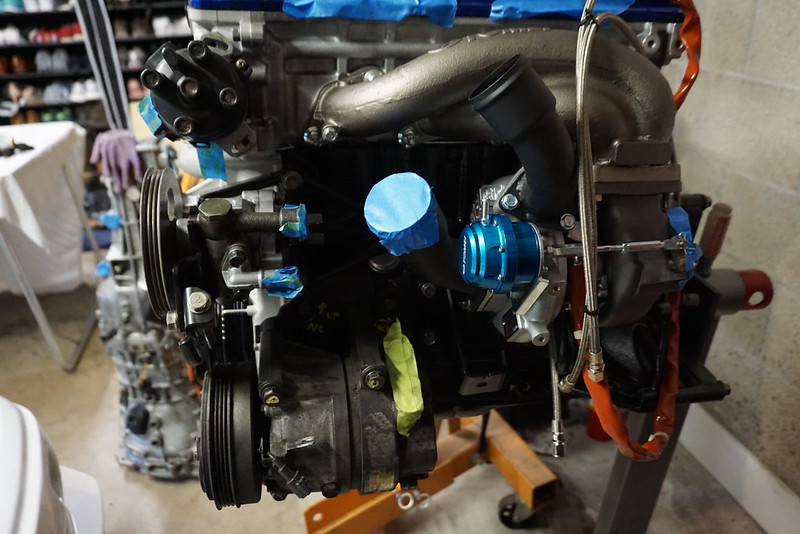 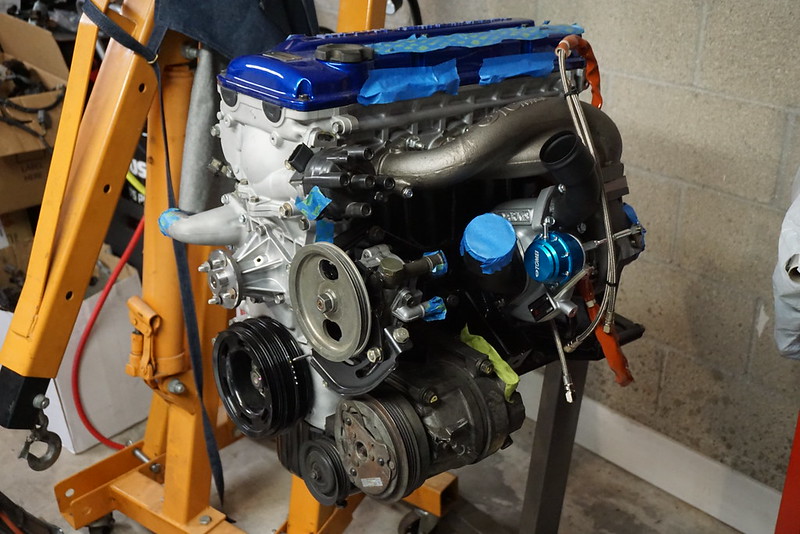 On the intake manifold I got rid of the EGR and used a DIF block off plate to cover the hole. I removed a bunch of the vacuum and water lines that aren't really necessary for the engine to run. Also, I swapped out the upper manifold with one from an s14 because they don't have the airflow-impeding butterfly valves that s13's do. 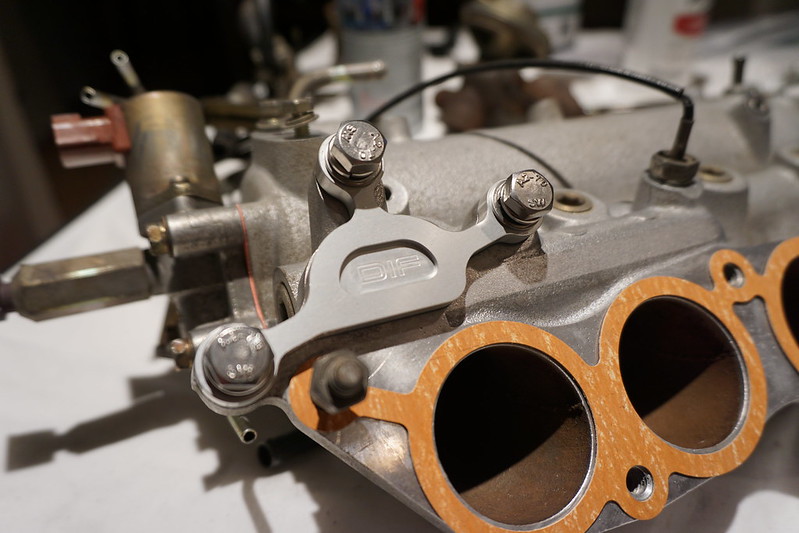 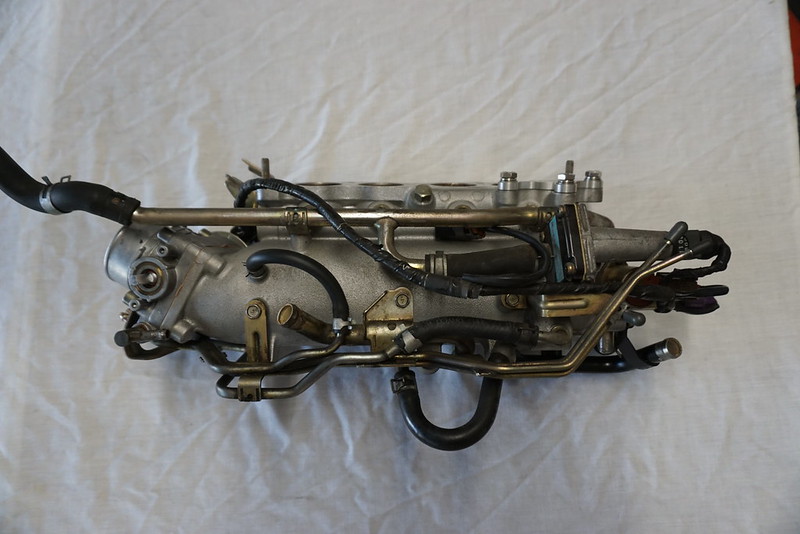 Removed all this stuff 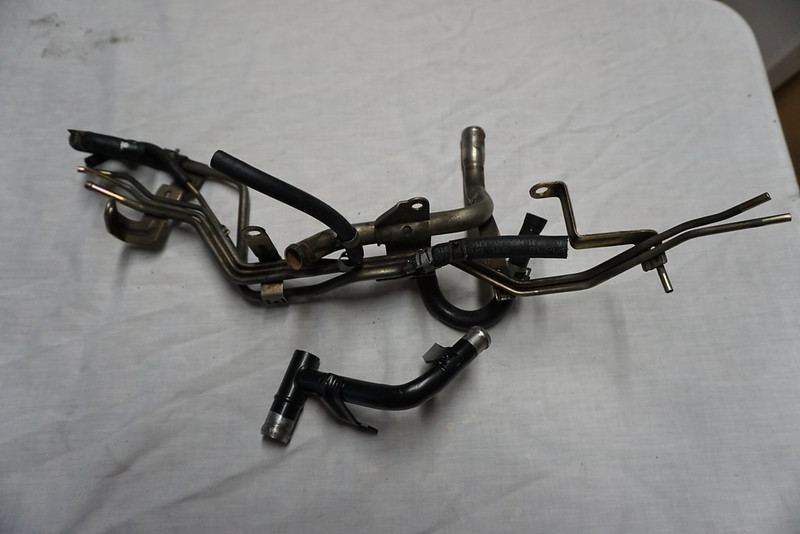 For the fuel setup, I went with injector dynamics 1050x injectors and Radium Engineering fuel rail. Really good quality looking stuff. 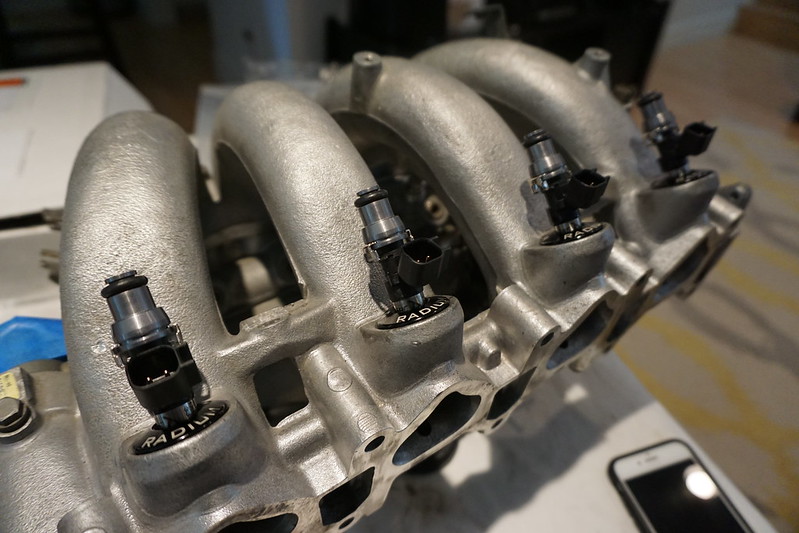 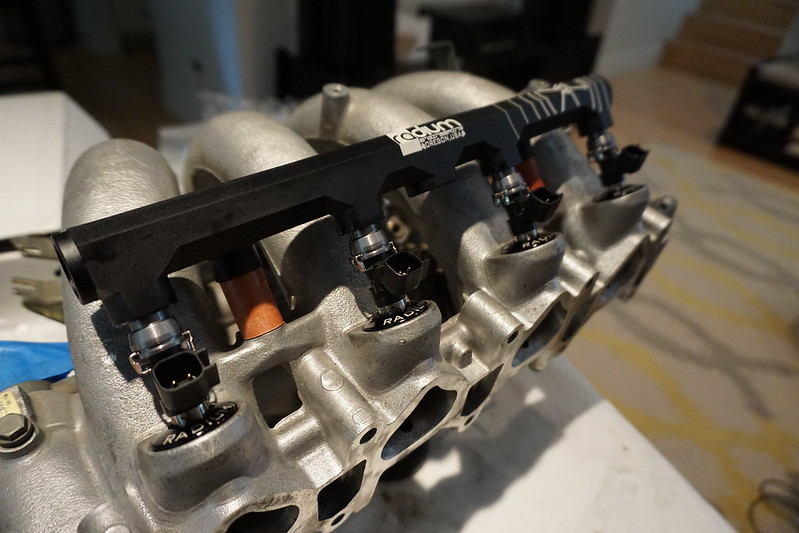 For the clutch I went with the OSGiken Super Single after test driving a buddy's s14 that had this clutch & flywheel setup. It revs up so fast and so smooth on engagement. Really can't wait to drive this thing. 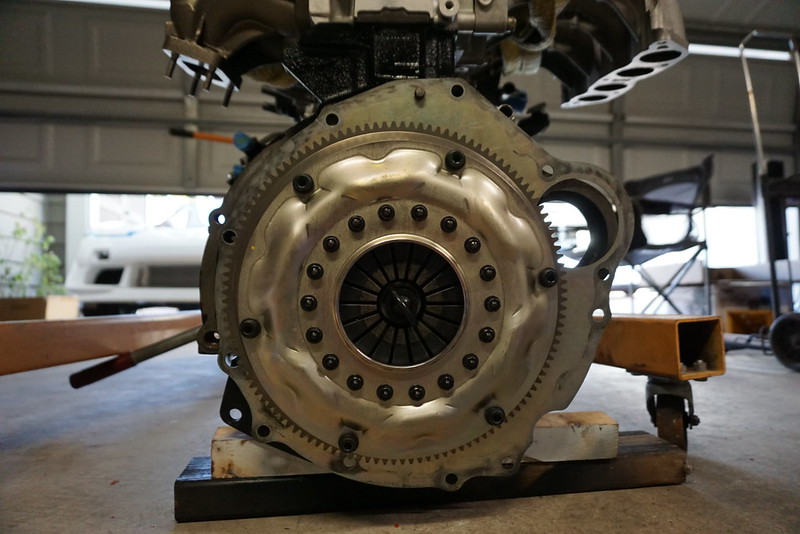 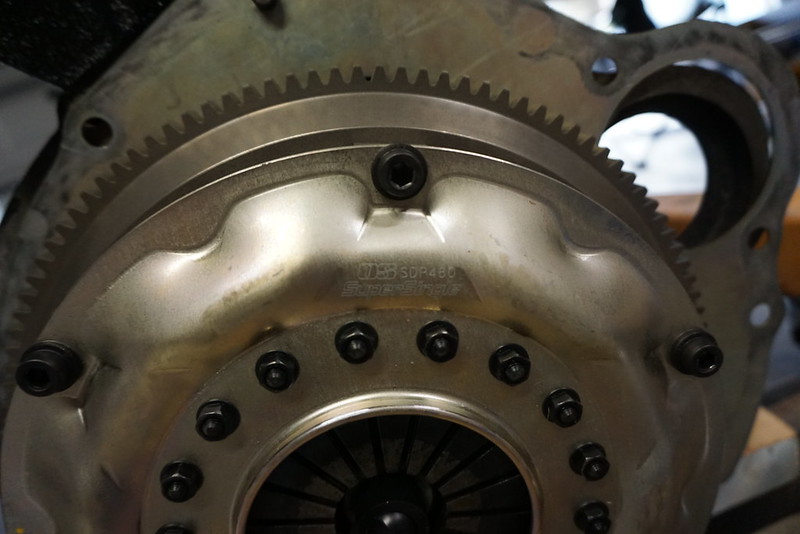 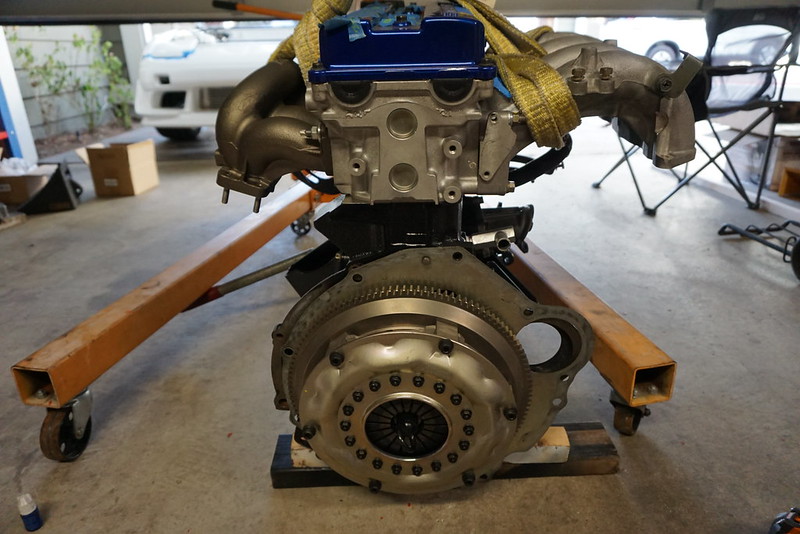 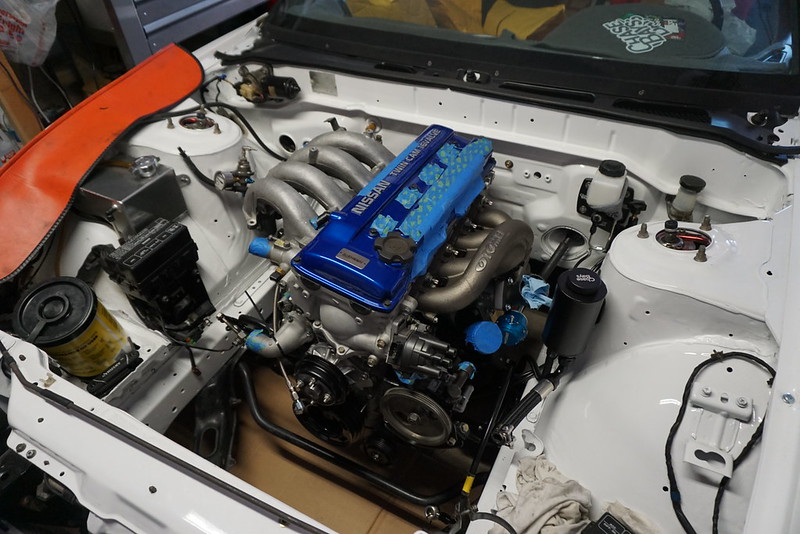 |
|
|
|
|
08-31-2018, 01:59 PM
|
#12 |
|
Zilvia FREAK!
 
Join Date: Jan 2010
Location: SHOW ME WHAT YOU GOT
Posts: 1,115
Trader Rating: (1)
 Feedback Score: 1 reviews
|
looking killer. cleaning stuff sucks, but youre always glad you did it once its done. I like that you are going the AC route. I also like how the blue VC contrasts against the white bay.
|
|
|
|
|
09-08-2018, 12:04 AM
|
#15 |
|
Leaky Injector
Join Date: Oct 2008
Location: Orange County
Age: 35
Posts: 113
Trader Rating: (4)
Feedback Score: 4 reviews
|
Thanks for the kind words guys, I really want to get this build done too. It's been a year almost, I think, since the motor was finished. Anyways, for turbo-back exhaust I decided to go with the MAX Cobra. MAX claims it's designed for KA-T and SR. To add in, Tomei also claims their KA exhaust manifold mounts T25/28 style turbos in the same factory location that an SR20DET does so I hoped that the Cobra might fit without modification. I've confirmed that it does indeed fit, no problem (at least, with the Tomei M7960).
Today I wrapped the MAX Cobra downpipe in some heat retaining header wrap to try and keep exhaust heat where we want it (in the exhaust) and radiant heat to a minimum on surrounding surfaces/floor/cabin. The Cobra's design, with maximum clearance and flexibility in mind brings the piping really really close to the floorboard in a region that lacks a heatshield, which is basically the major reason why I decided to wrap the downpipe. You'll see below how close it actually is once mounted up.  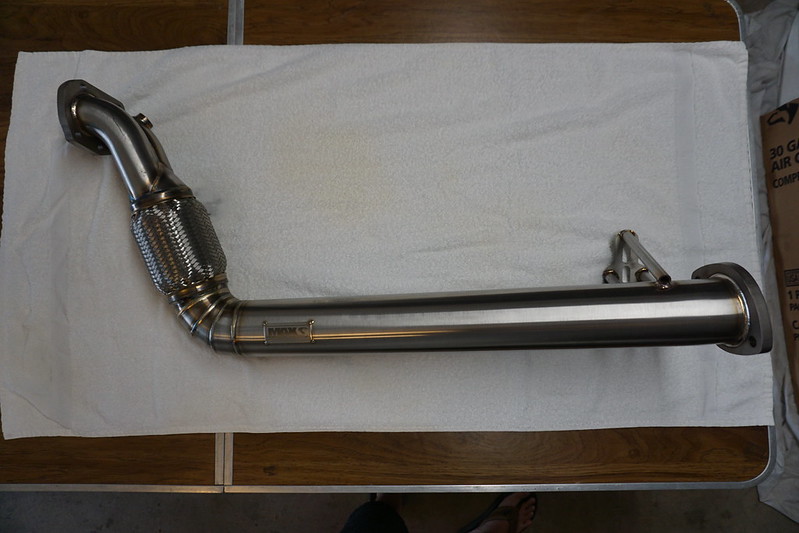 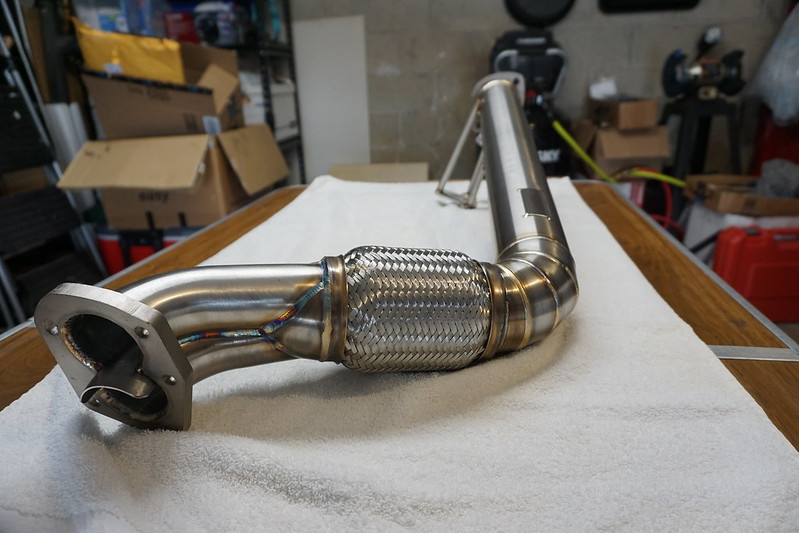 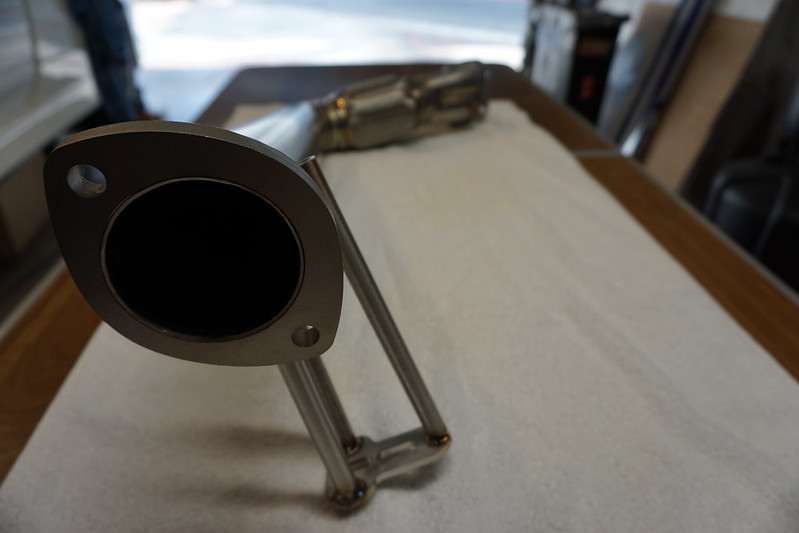 The MAX Cobra downpipe is a beautiful piece of art.. just look at those welds and the craftsmanship. It's sort of a shame I'm covering it up, but I have to go with function over form here. Bottom half done... 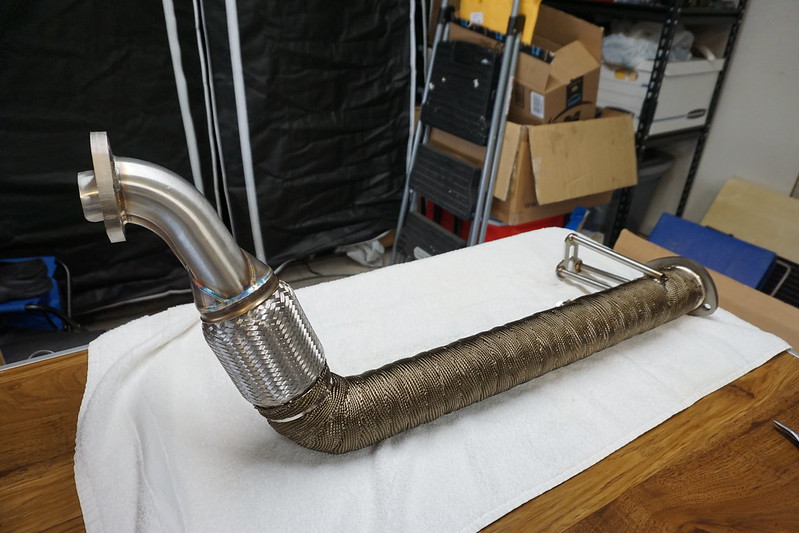 Now all done. 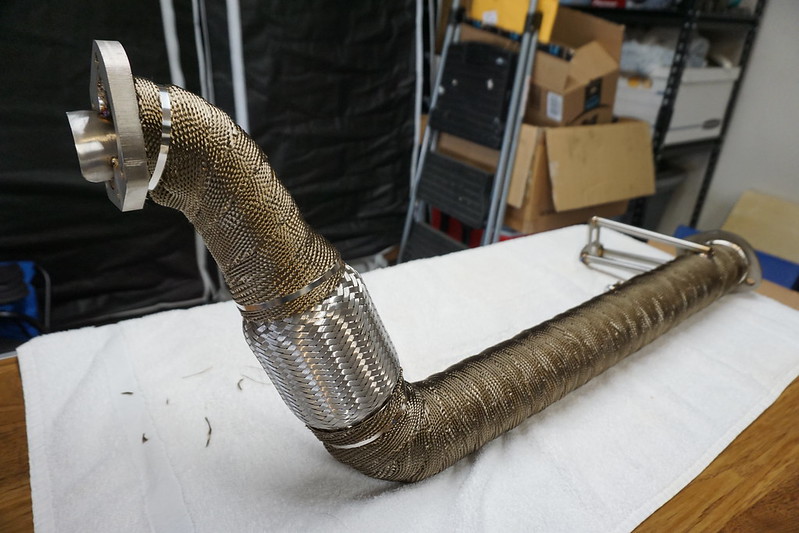 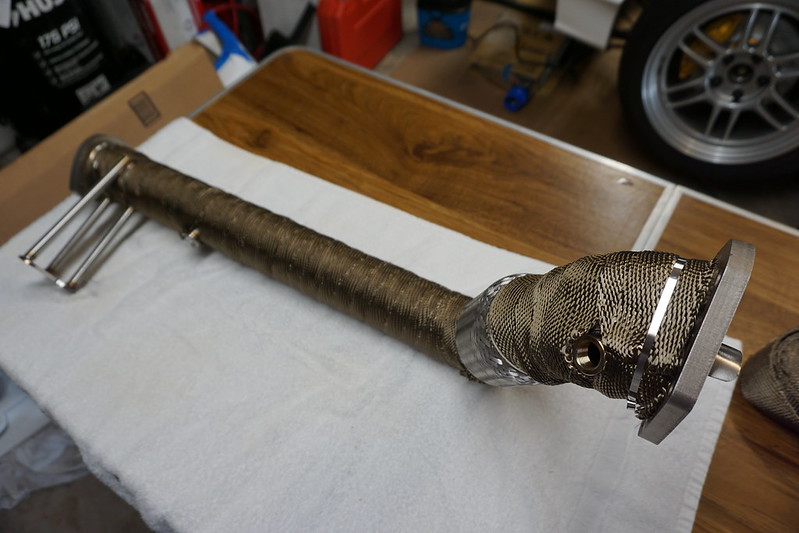 In case anyone was wondering, I went with Ledaut Titanium Exhaust Wrap off of Amazon. The wrap itself seems to be good quality, guess we'll see how it does once the engine is running. Here's some installed pics. 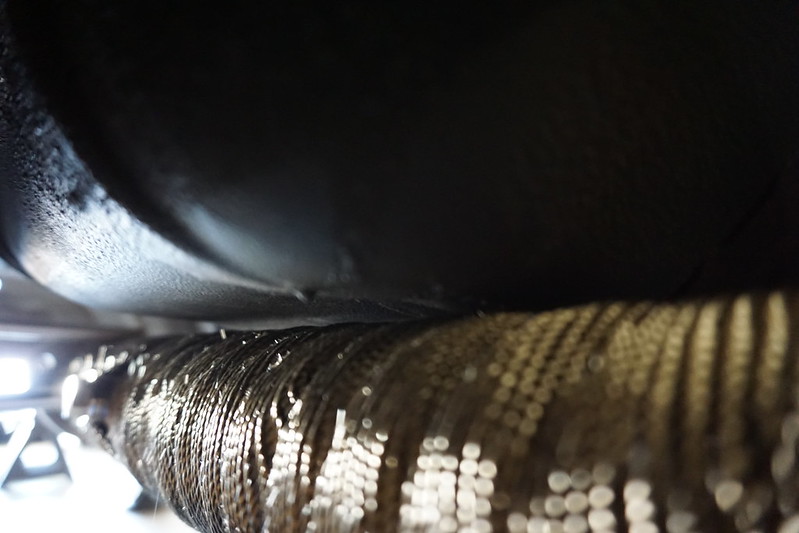 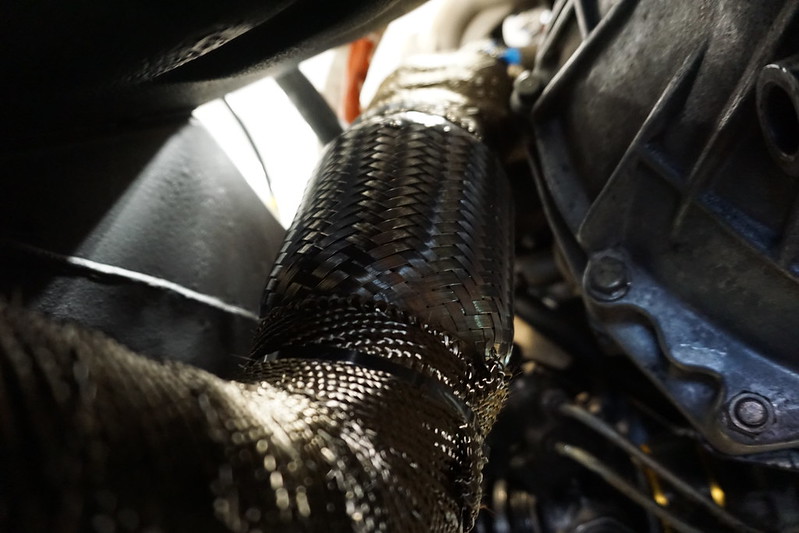  Other things, new throttle cable installed. A/C lines, compressor, condenser etc installed, just waiting on the evaporator to arrive. Also, waiting on an intake that fits the Z32 MAF, has ports for BOV recirculation and breather port for the oil catch can setup that I'm going to run. If anyone has a Greddy or Apexi piece or a custom made one that they're selling and fits the criteria I'm looking for, let me know. |
|
|
|
|
09-11-2018, 08:37 PM
|
#18 |
|
Nissanaholic!
 Join Date: Jan 2010
Location: location X
Posts: 1,815
Trader Rating: (10)
Feedback Score: 10 reviews
|
pure sex!!
__________________
http://www.240sxforums.com/forums/rb...ject-s-rb.html |
|
|
|
|
04-18-2020, 04:15 PM
|
#21 |
|
Leaky Injector
Join Date: Oct 2008
Location: Orange County
Age: 35
Posts: 113
Trader Rating: (4)
Feedback Score: 4 reviews
|
Wow, sorry it has been almost two years.. I'm not sure if anyone still comes on here anymore, but I felt like updating the build thread anyways. I have more time at home now (and I'm sure many of you do too given the current plight of the world) plus I have a ton of content that I have accrued over the past couple years I'd like to share. I'll be updating in parts as there is a bunch to write about. Also, the car is actually roadworthy now.
Ok, so I'll try to move in chronological order from where I left off. To start, eventually I sourced the S13 Apexi intake w/Z32 MAF. This would not clear the space by the driver strut tower using the included Tomei turbo inlet pipe. I came up with the idea to use an original SR T25 inlet pipe with aftermarket clocking adapter instead and wala, intake fits! (Ideally it would be nice to have a custom fabricated piece to clean all these pieces up but for now it works).   Next was installing the turbo hotpipe. The included hotpipe in the Tomei kit does not work for the S13 as S13's don't have the same intercooler pipe routing that S14's do in the engine bay/wheel well area. I had a factory S13 SR20 hotpipe laying around and thought it would just bolt-up. Wrong. As you can see in the image below the turbo outlet pipe is at the wrong angle for this to work. I needed the inlet and outlet pipes to be directed like shown to clear everything. Fortunately, use of a clocking adapter here resolved that issue as well.  I guess the Tomei KA turbo kit was only designed with the S14 in mind, so those with S13 looking to get this kit, just keep that in mind.   More to come.. |
|
|
|
|
04-18-2020, 05:32 PM
|
#22 |
|
Leaky Injector
Join Date: Oct 2008
Location: Orange County
Age: 35
Posts: 113
Trader Rating: (4)
Feedback Score: 4 reviews
|
Earlier in the thread I forgot to mention I deleted the PCV lines that run under the intake manifold using the method of drill, tap, plug with 1/8" NPT plugs. I'm aware there are other ways of accomplishing this, but this is how I did it with what I had. Ideally, if I had my own TIG welder I'd close them up that way, but this works just fine.
  On the PCV box coming off the block, I removed the PCV fitting and replaced it with a straight-thru barb fitting and hose routed to a catch-can. Also, the valve cover vent is routed to the same catch can and vented out.  For engine oil cooling, I went with a Derale oil filter adapter off the factory oil block routed to a Greddy oil filter relocation adapter and down to a Koyo oil cooler.   |
|
|
|
|
04-18-2020, 06:28 PM
|
#23 |
|
Leaky Injector
Join Date: Oct 2008
Location: Orange County
Age: 35
Posts: 113
Trader Rating: (4)
Feedback Score: 4 reviews
|
In staying with my original goal of having A/C, I had to source out an evaporator from a 91-94 chassis because come to find out one of the fittings coming out the firewall is a different size on my 1990 chassis. Also different are the low side piping, compressor and condenser (iirc).
     Cleaned up and slapped some new seals on the evaporator and reinstalled it back under the dash. Since the dash was out I decided to try and make it look a little nicer.  Like many 240's out there, my dash was severely cracked. With mint dashboards going for a premium nowadays and the likelihood of it ending up cracked again eventually I thought to flock the dash instead. I've seen some people with flocked dashboards come out pretty decent and it's really not that expensive to do it so I went for it. First peeled up all the loose edges, then laid some fiberglass bondo down. Sanded it down smooth and cleaned it all up, then laid the flock down.       I think it came out alright. Tricky thing is to make sure you cover the entire surface with flock while the glue is still wet otherwise trying to touch it up with more flock later is nearly impossible to do without compromising the overall finish. It was actually kinda fun, even my wife helped out. Last edited by Tignometry; 04-18-2020 at 07:14 PM.. Reason: added image |
|
|
|
|
04-20-2020, 10:53 PM
|
#27 |
|
Leaky Injector
Join Date: Oct 2008
Location: Orange County
Age: 35
Posts: 113
Trader Rating: (4)
Feedback Score: 4 reviews
|
thanks guys!
I realized there are some things I need to retake pics of that I didn't get to when they were installed, but I'll do my best now. More updates to come. |
|
|
|
|
04-22-2020, 05:45 PM
|
#29 |
|
Leaky Injector
Join Date: Oct 2008
Location: Orange County
Age: 35
Posts: 113
Trader Rating: (4)
Feedback Score: 4 reviews
|
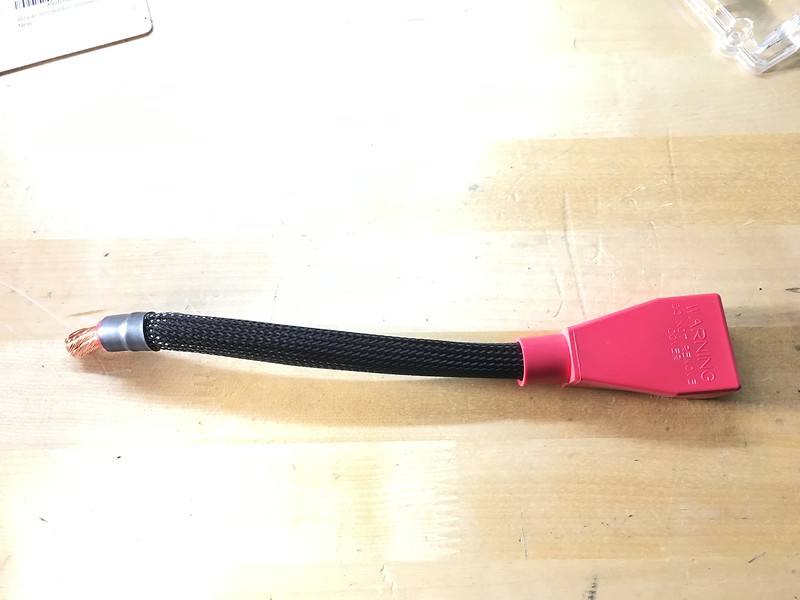
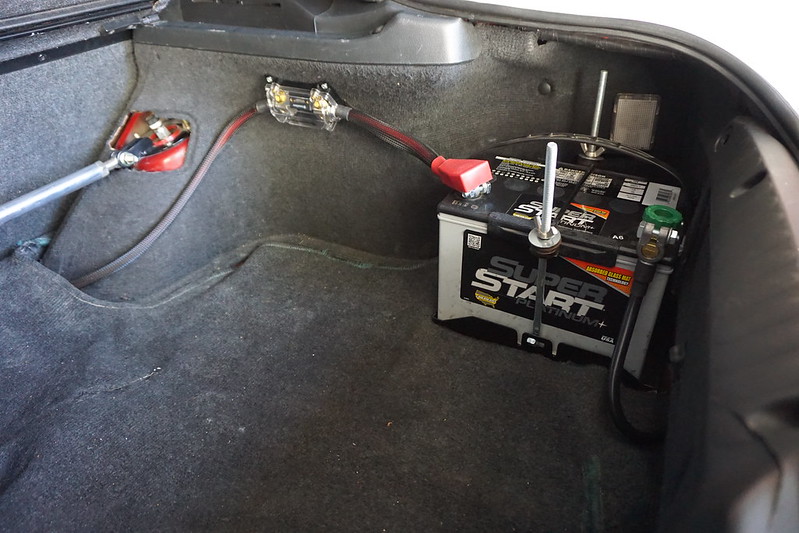
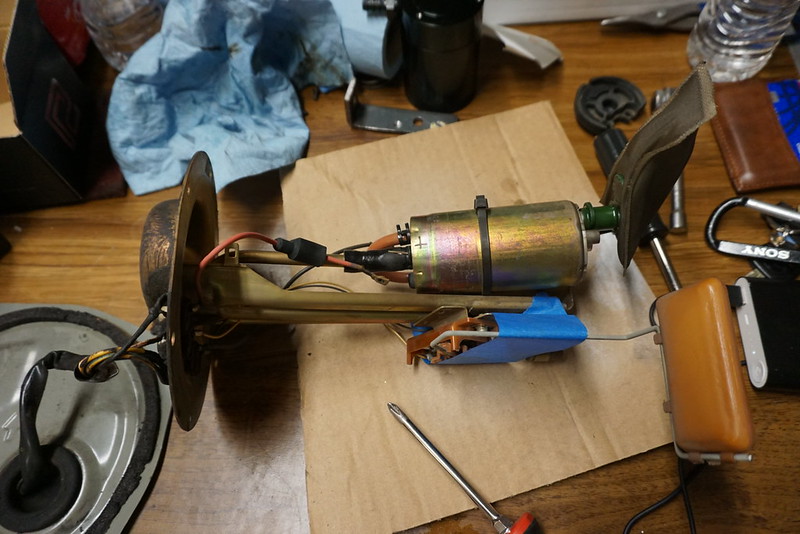
Battery relocation: I moved the battery to the passenger side of the trunk. It's bolted down to the chassis using a battery tray kit I found on Jegs. Grabbed some 1/0 gauge wire, terminals, braided sheath, and ran the wire from the engine bay, through the cabin to a battery disconnect switch in the center console, and out back to a fuse just before the battery. Inspired by proshopnoble's s13, I installed the cutoff switch at the place of the old cigarette lighter. I relocated the cigarette lighter inside the armrest box so that I could still use it for my usb charger.
        |
|
|
|
|
| Bookmarks |
| Thread Tools | |
| Display Modes | |
|
|


 Linear Mode

