|
|||||||
| Chat General Discussion About The Nissan 240SX and Nissan Z Cars |
 |
|
|
Thread Tools | Display Modes |
 03-05-2008, 06:40 PM
|
#1 |
|
Zilvia Junkie
 
|
My S13.4 project build thread. 56k no no
Well Ive been a member on here for quite awhile so just thought I would share my build Ive been working on for the past 8 months.
Seth Just thought Id share my build, that I have over on our forum. The car itself is a 93 S13 Coupe. S13.4 Conversion, Rb20det swap, Stance Coils and all of the good stuff. This is not a show car, this car is going to be a track/street whore, I just like clean cars. This is the second car Ive started on...lol..Allow me to introduce you to the first. The first chassis I bought was super clean on the outside, I figured it would be just as clean underneath and on the rails, boy was I wrong. Hard to believe this car was a rust bucket..... 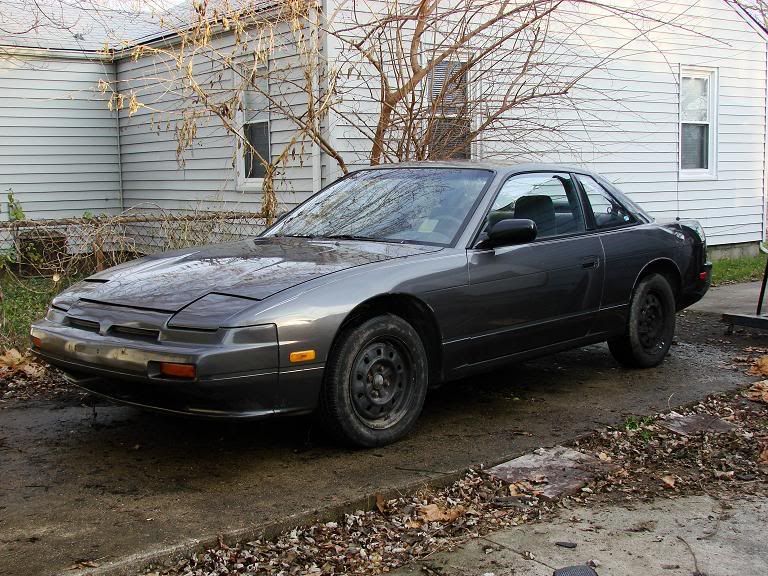 Once the engine and Interior were removed the cancer was found. 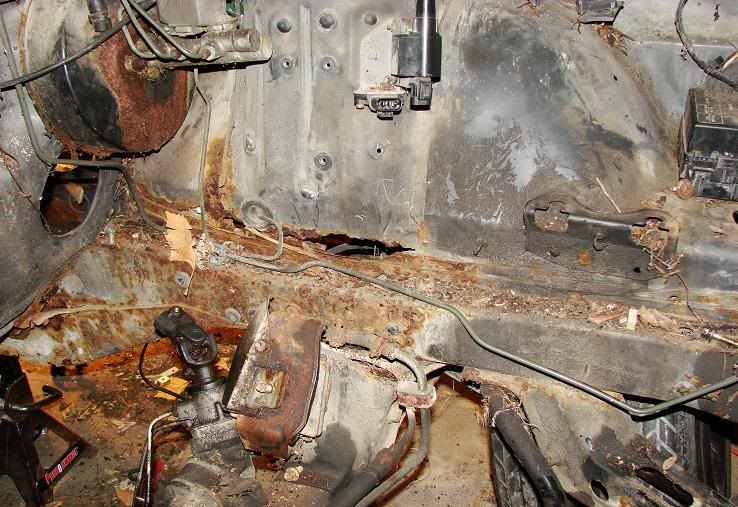 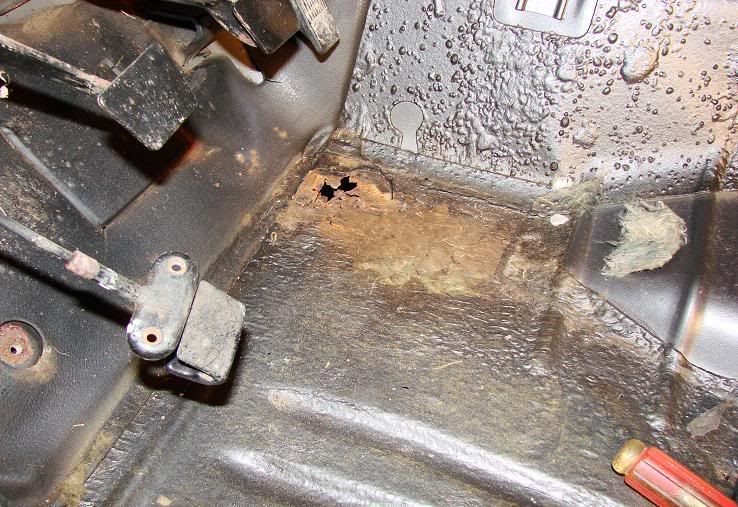 So I decided to clip the car with a RHD shell. Well that was going great until one day while bored I went to put my subframe connectors in, only to found the rear of the chassis was rotted away to almost nothing. So not only was I now out of 2 months of work, I was out of a car in general. The car ready for the RHD, until the rear rust was found. 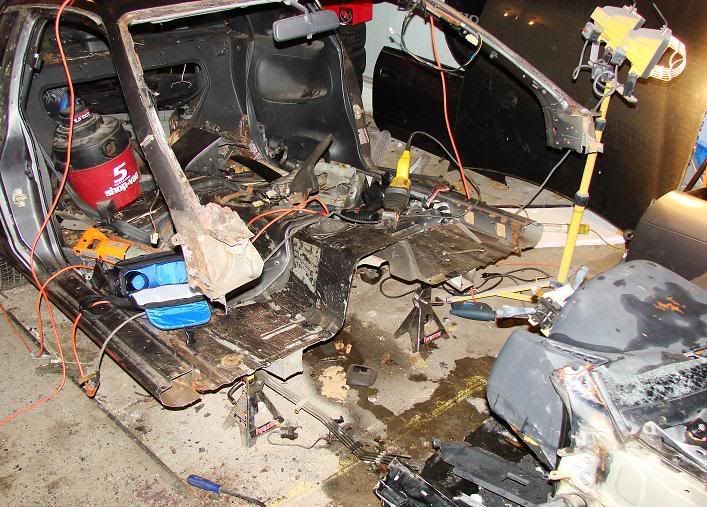 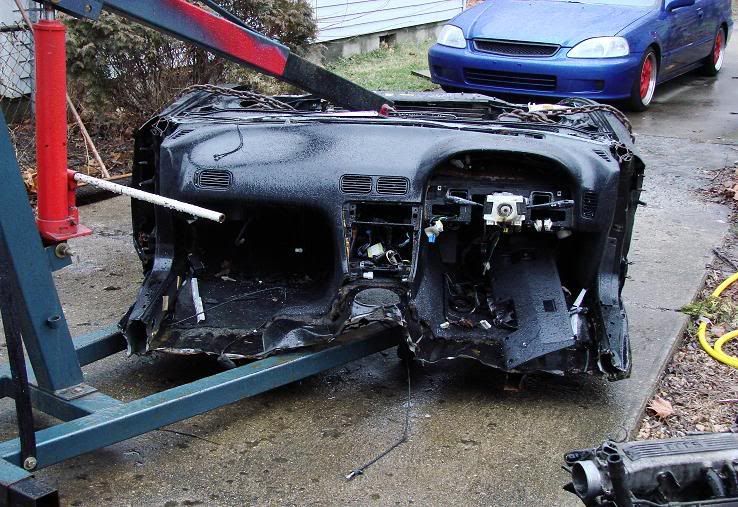 So, after searching for a few weeks for another coupe that was rust free I happen to come across the one I have now. It was so clean, not a spot of rust, the car was a Arizona car and had only been in Indiana for the last year. Only problem was it was hacked by the previous owner who thought he could make his own tube chassis and 1pc doghouse...lol I knew I could clip the car and go RHD, but the car was too clean to chop, and after a few people told me I could never make it a car again, I had it set in my mind that this was the car I was going to build. I will post the original posts from here on out in this thread. Just wanted to give people the 411 who might be interested in this nightmare Ive created for myself....lol Seth March 6th, 2007 Well Ive lost over a month of time in the old 240sx coupe. It was a really nice car on the outside, but the underneath and the front structure have been far from great. I have and I repeat have NEVER thought about giving up on this whole project. Just had to take some time to get things lined up and regroup my thoughts on where to go from here. Most people who know me, would know that patience isnt one of my stronger points and this car along with all the parts would be for sale on some Nissan site. On to the good news. I did score a new coupe and its absolutely beautiful inside and out. Except for the front end. So with that being said, Ive decided to ditch the RHD theory and just put the OEM structure back on this car, using the JDM clip pieces. The car is far to nice and clean to just chop in half. If anything I will keep the JDM clip and components and do a firewall clip on it over next years winter break. Thanks for all of the interest in the project. I know it will turn out to the car I want it to be. I know Im going to need help soon though. Ive done pretty much all of this alone, it was that hard just would be nice to have some extra hands around. I dont know what I need help with yet, but if anyone wants to volunteer I wouldnt turn them down. However please dont feel that your obligated to do so. Onto the pics Rolling my new whip outta the trailor. 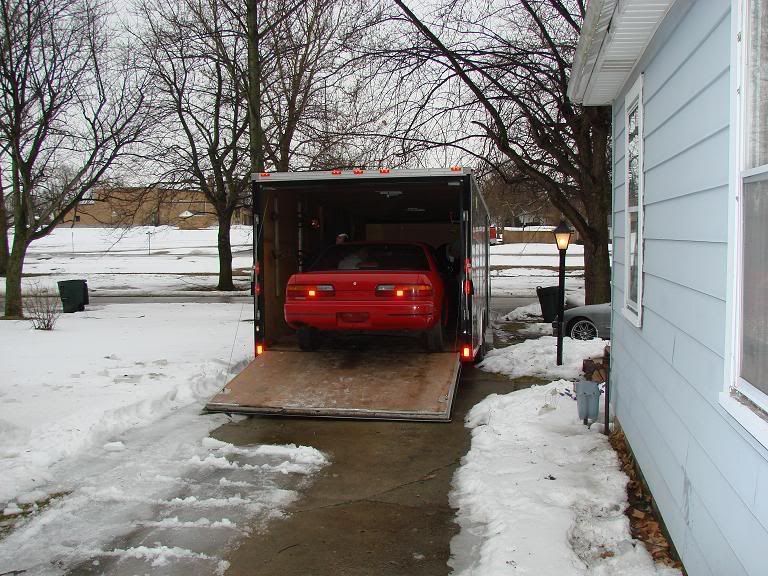 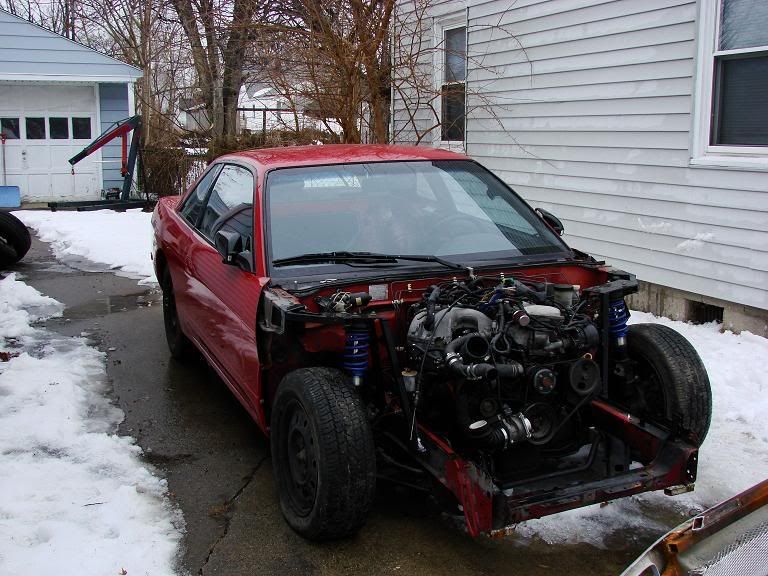 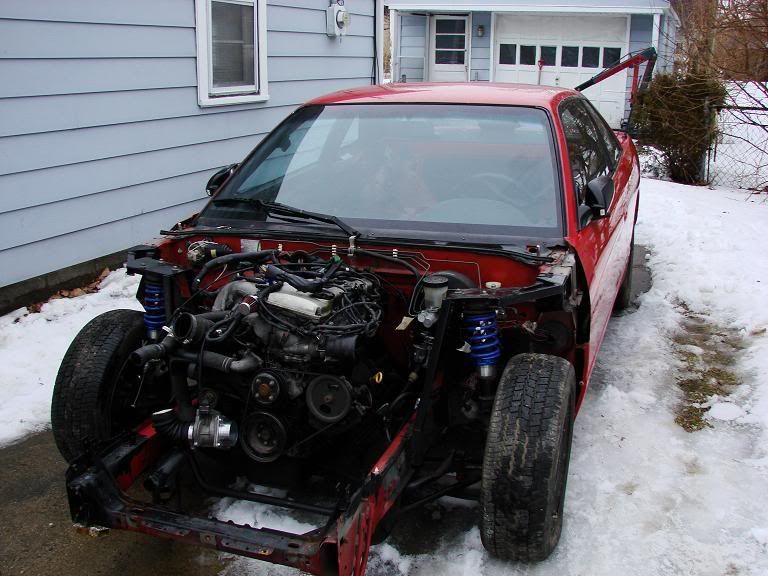 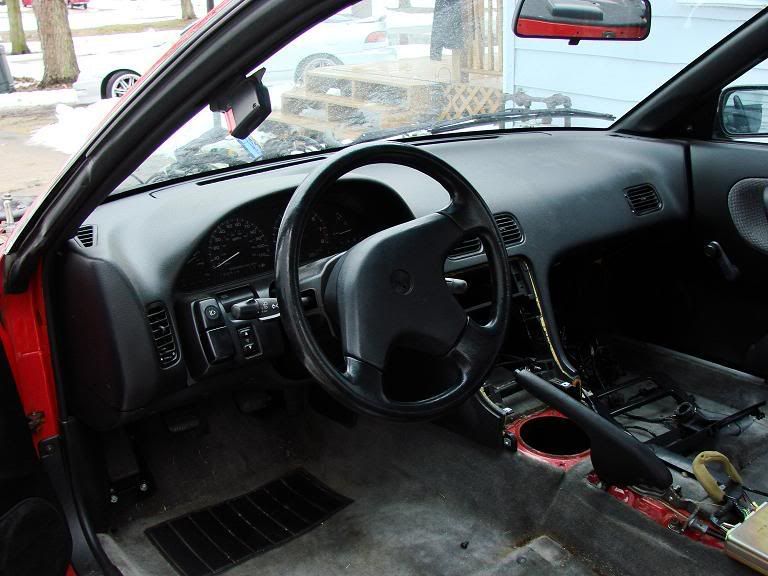 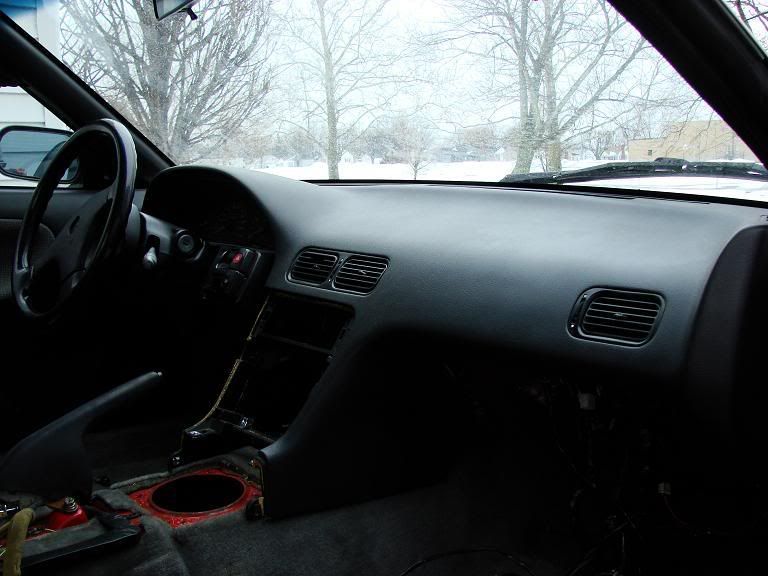 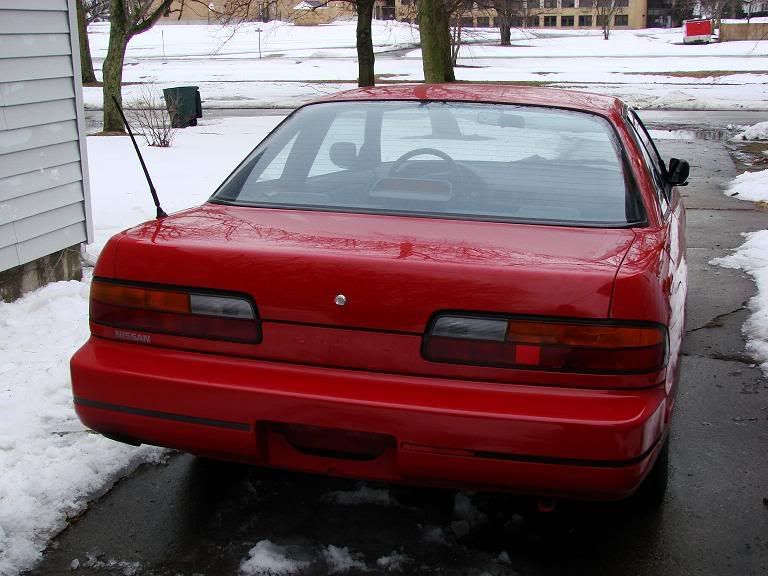 March 13th, 2007 Anyhow, this weekends updates are as followed: Cut the RHD up for the pieces I need to use for the new coupe. Exhibit A 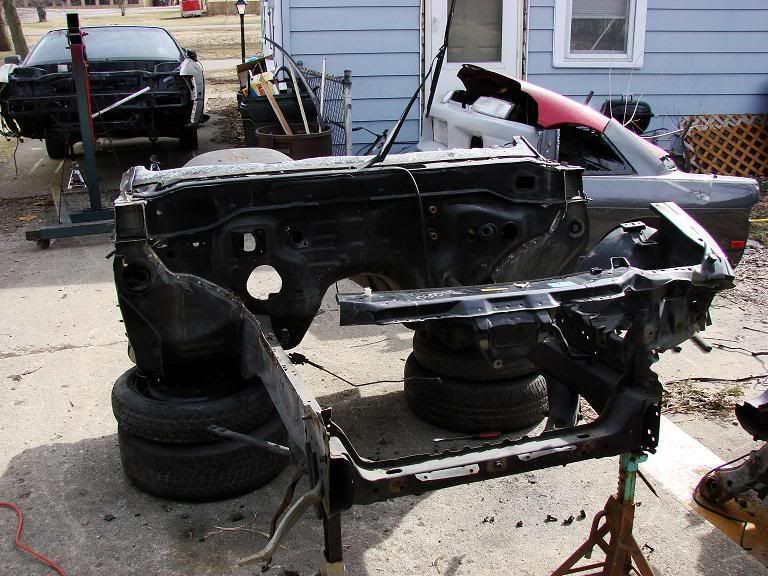 These next two pics are of the complete Right Rail and Partial Left Rail removed from the RHD. 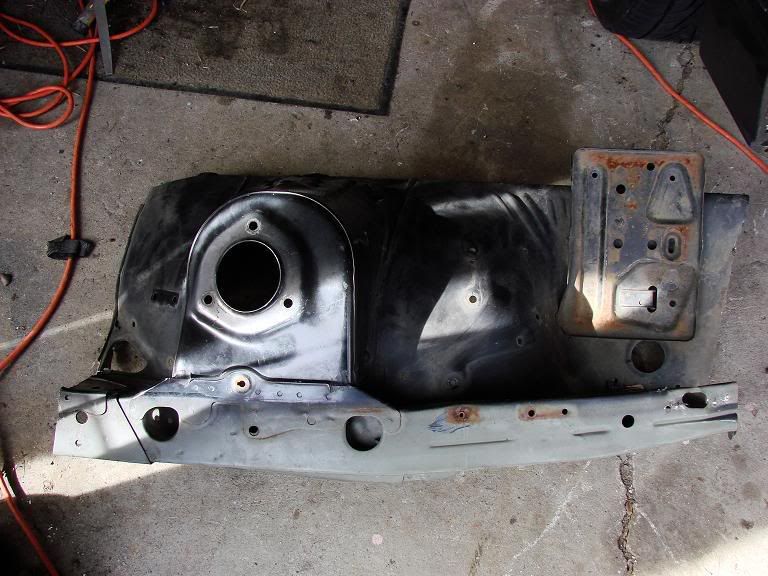 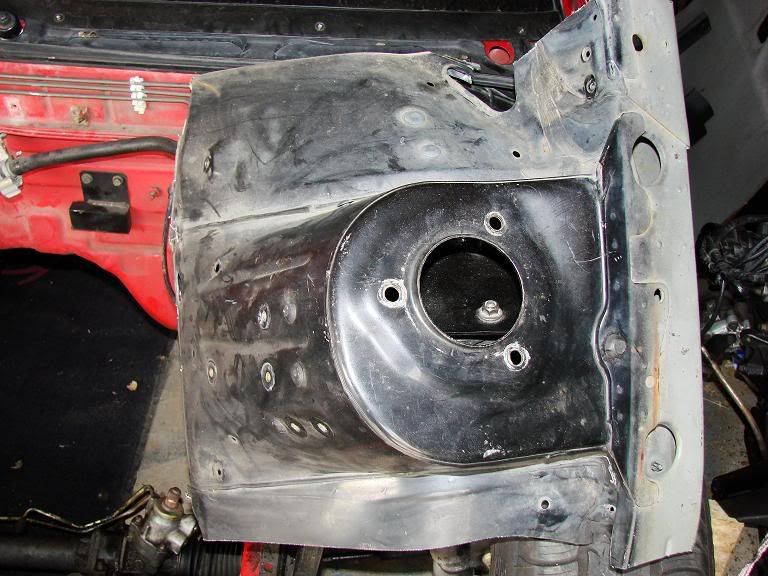 I could only use half of the left rail on the RHD due to the fact that the car was hit in the left front corner wrinkling the rail and inner structure. Currently working on getting the other portion of this off my old silver coupe. This process hasnt been hard, but drilling out factory spot welds can take some time and patience, oh and really good spot cutting bits.......  Updated April 26th, 2007 Well with the help from Jay and my buddy Chris we drilled a shit ton of spot welds out on Sunday. Thanks again Jay for coming down and learning the joys of spot weld removal...lol...After a few more hours last night of straightening out the sections of the new rails and inner structure. They are soon to be welded on and ready to be sanded down for a engine bay paint job overhaul. Ive started to work on the inside at the moment too, trying to maybe get a head start on the RB install. Hopefully Donnie(red 350z) will be over in the next day or so to weld this bitch up for good. My buddy Chris drilling out the old rails to make room for the new rails to sleave into. 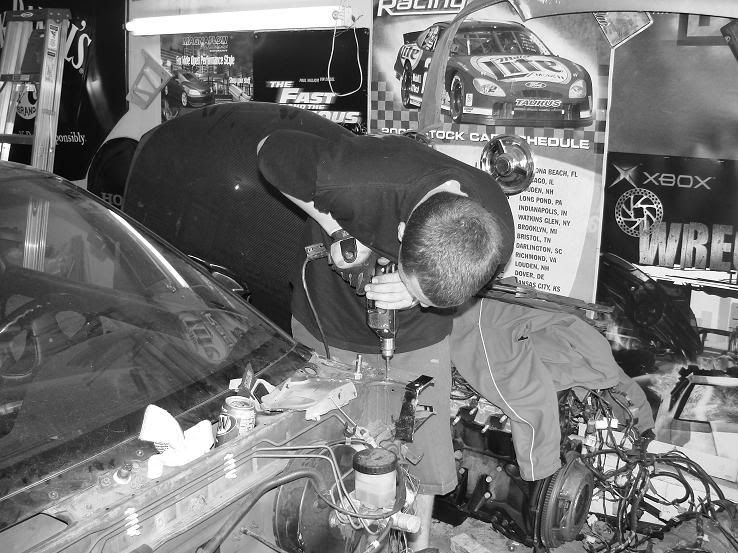 Jay was the new guy in spot weld 101 but he knocked some serious shit out.  I think it was Union Break Time 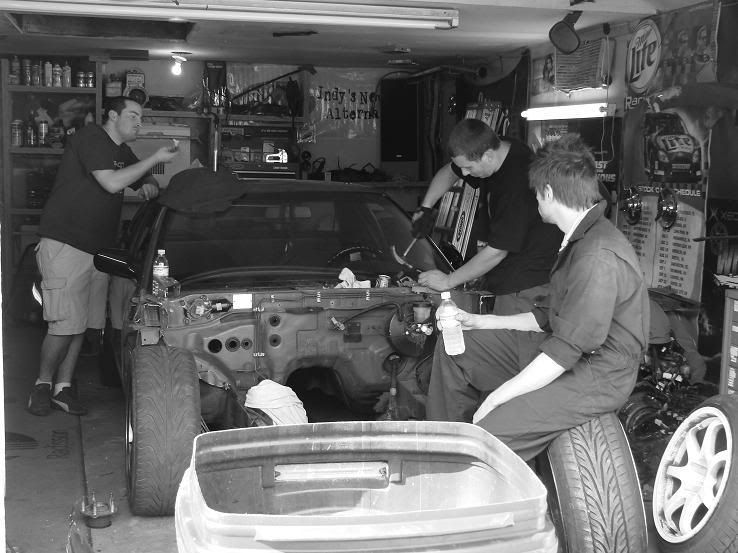 I did get some new parts for the 240 on friday. Version Select IV front bumper (from my old s14) 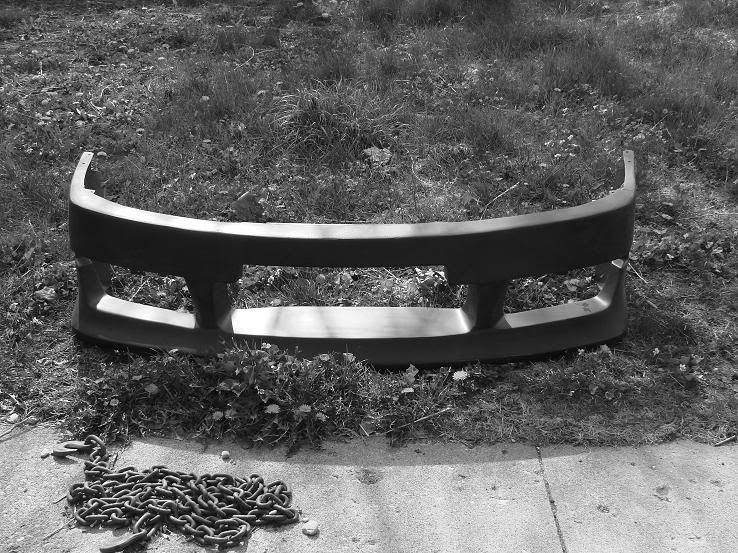
__________________

|

|
| Sponsored Links |
|
03-05-2008, 06:52 PM
|
#3 |
|
Zilvia Junkie
|
More pics as requested. This is farther along then this, but have to wait for people to reply to add more....lol
May 9th, 2007 One step closer to total chaos.  Ok, so the entire sheet metal structure is in place and sheet metal screwed together. Im going to be taking it over to Donnies(Red 350z) place this weekend. Hes going to weld the chassis back together and then its sand/grind the bay and get ready for paint. Then after thats done the motor can finally go in the damn car....lol...It was so nice to see the car outside today for a change, last time it was out it was snowing and it had a horrible fabrication job on the front end from the previous owner as most of you know. 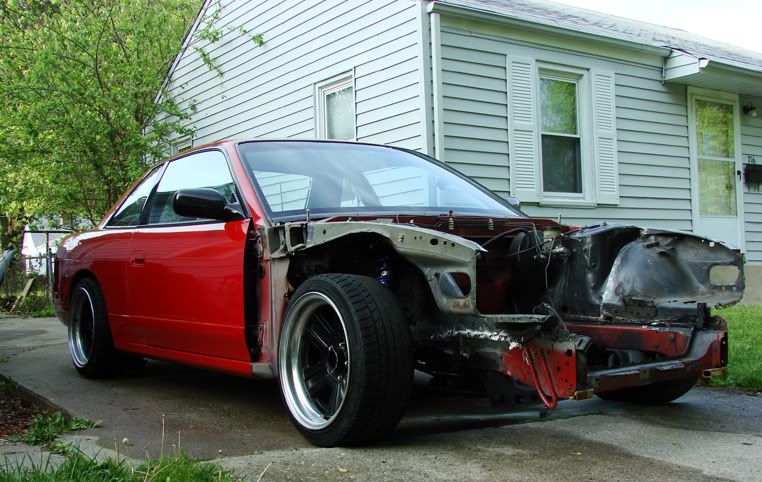 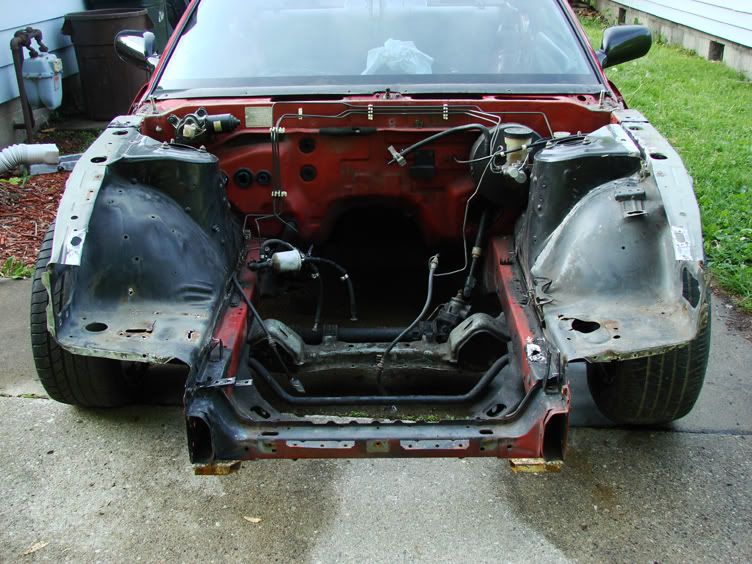 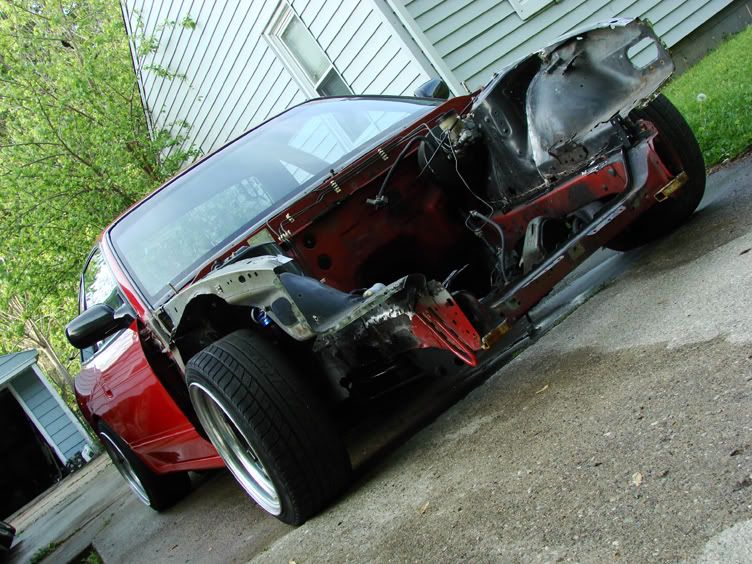 August 11th-August 23rd, 2007 Well due to the extreme heat and plus how backed up donnie is, working on my car isnt really high on the priority list. Paying jobs always come first, then when we have time to work on our own cars we do so. However this week of heat hasnt helped much at all.........until now. I asked my buddy Jay if he would come over and give me a hand with the car last night, donnie had some family plans but it seemed like it was going to be a awesome night to get some work done, and it turned out that way. The car is super duper welded now. Except for the lower radiator support but I have to bolt up a few parts to make sure of the angle before welding. So now I have shit tons of grinding and sanding to do, then its seam sealer time and hopefully painting the engine bay soon. I appreciate Jay coming over and welding last night. It was a tremendous help and took alot of the worry off my mind that I had of the car getting done. For those who know me, I tend to over stress when it comes to my cars. I dont know If Ive said this or not, and if i have Im going to say it again. This really couldnt of all been possible without the help of "The Don" Ive learned alot from him just being around and watching him work. 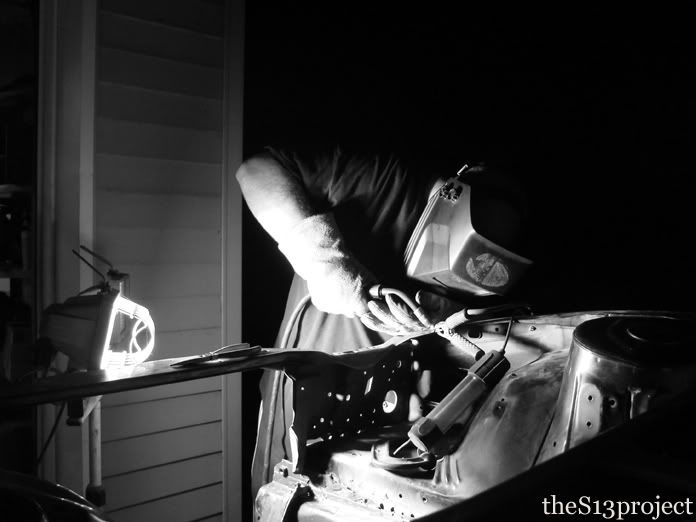 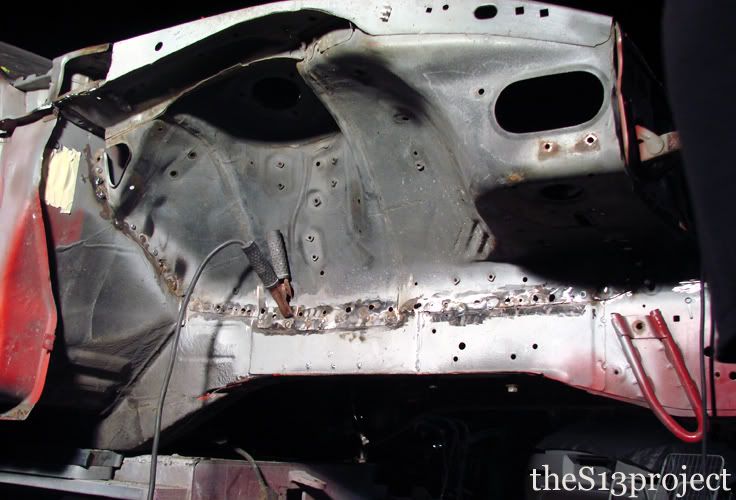 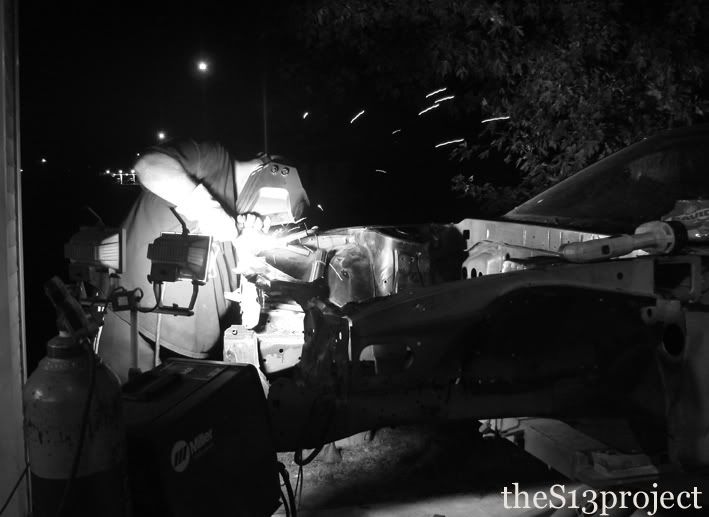 Ok so the front end is done and needs to be grinded so I can seam seal it and then paint the engine bay. Once thats done, the heart of the beast will be transplanted. The front end is off of donnies silvia, I used it for mock up since my kouki hood is at home. 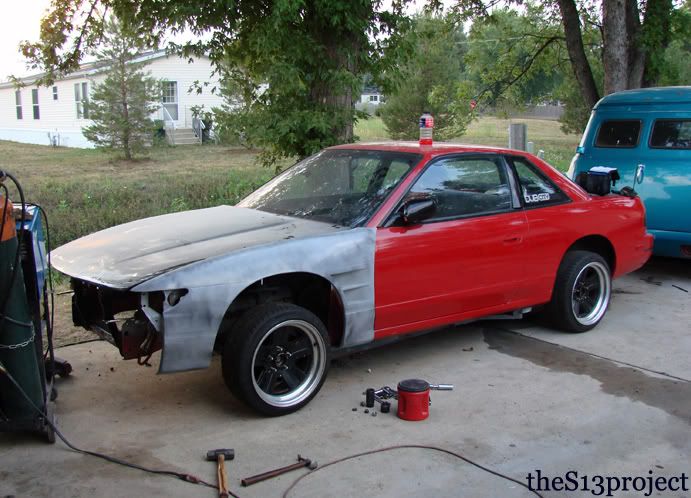 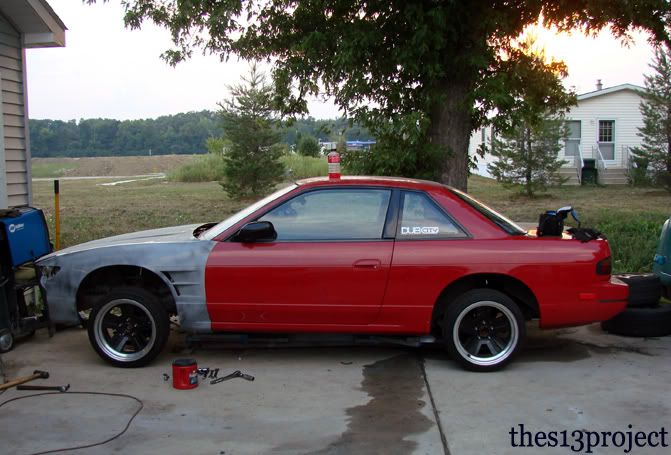 The large gaps in the factory structure have been welded up. I even used a 2in. wide by 1/8in. thick piece of metal to reinforce the frame rail to the structure to give it a bit more stiffness and support to the strut tower braces. For those who havent read this build thread this is the nightmare that I started with when I bought the car. Before  Now 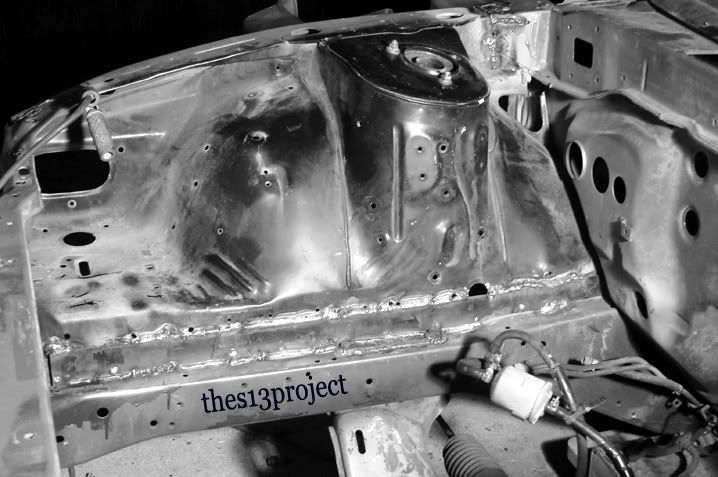 September 16th, 2007 So my buddy Wheatley and Aaron came over last night to help me finish out the minor welding that needed to be touched up. We also stripped the motor down of all the things I wasnt going to use on it and put it in the car as a test fit. Im happy to say that all of the mounts line up perfectly and its not as hammered against the fire wall as I thought it was going to be. However Radiator clearance is pretty tight. Matt and Aaron molesting my motor. 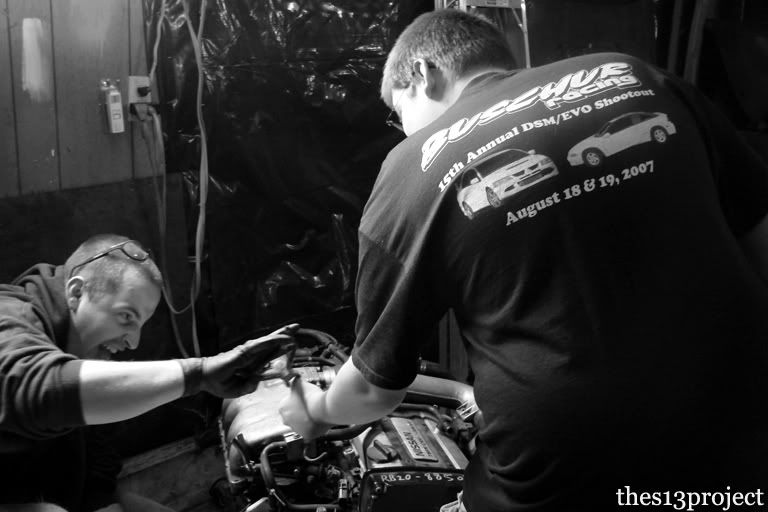 Seat Belts used as Engine straps....FTW! 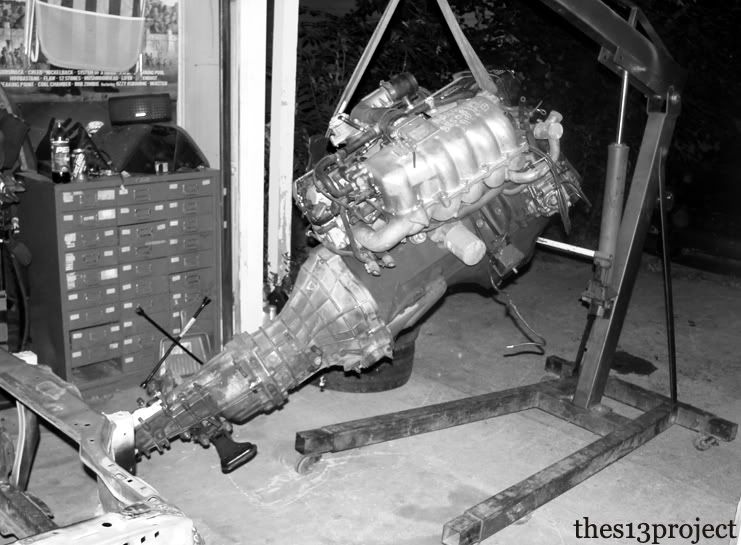 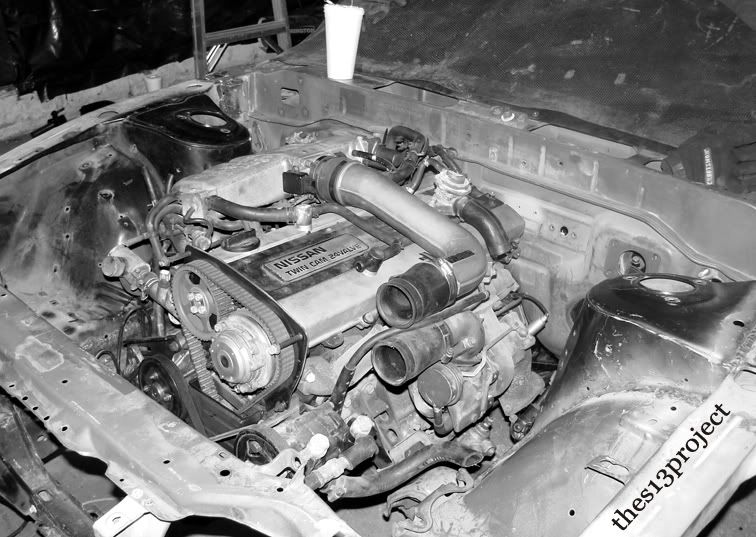 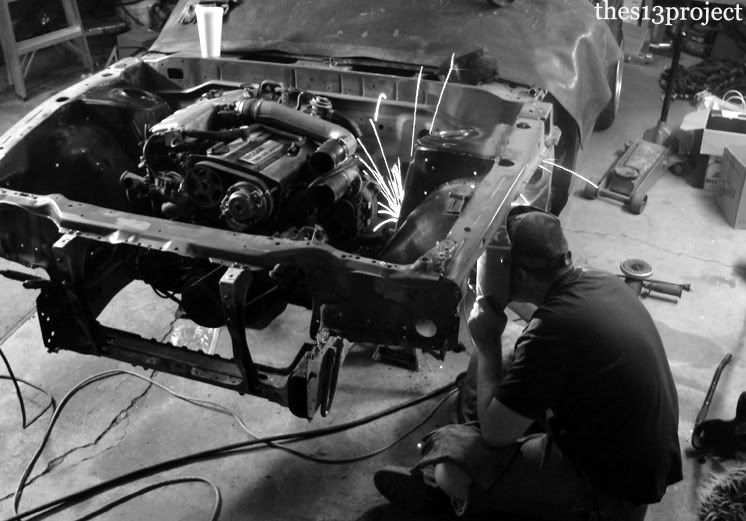 Next is to bolt up the downpipe and catback to make sure everything fits properly, then its time to take the motor back out, paint the bay, and the reinstall the motor and start the wiring procedure. October 22nd, 2007 Now for this weekends updates. I finished the rest of the seam sealing, and man is that shit messy. Ive got to go back over and clean some of the crap up, but it turned out and covered very well. During the spare time I had while waiting on the seam seal to dry, I installed my Circuit Sports spin knob, and a few other odds and ends, then once it was all dry I started to mock-up the front end since I forgot I didnt have any mixing cups to mix my primer in....lol Ok, now for the boring seam seal pics. Yawn! 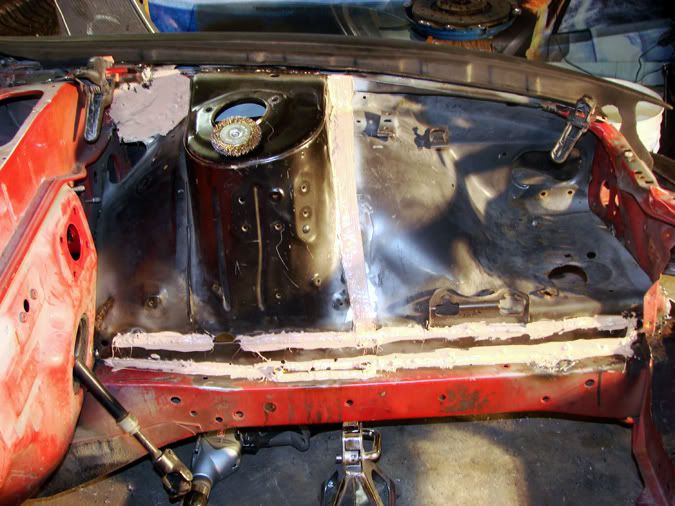 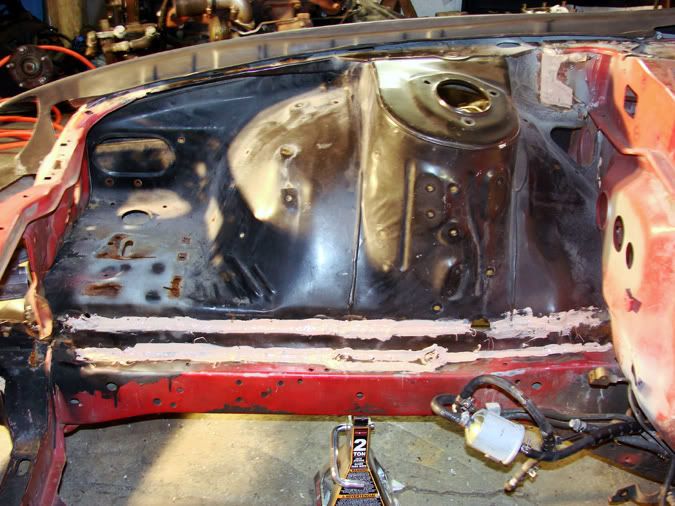 Install of the spin knob. 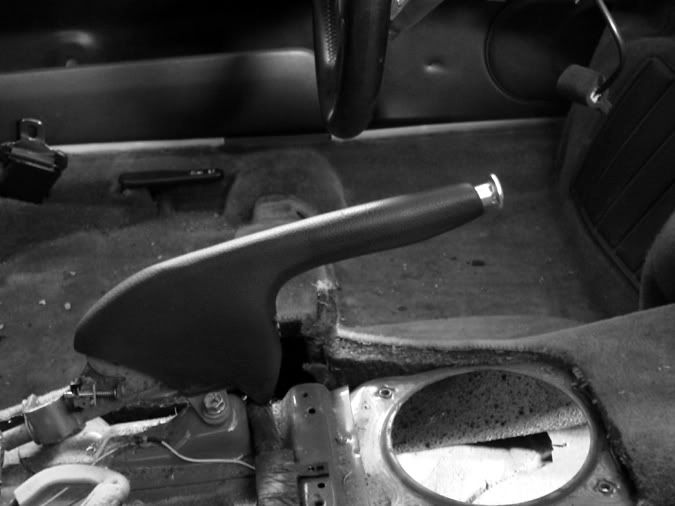 Ive had this on for awhile now, but forgot to add some pics. Circuit Sports Steering Eliminator Bushing 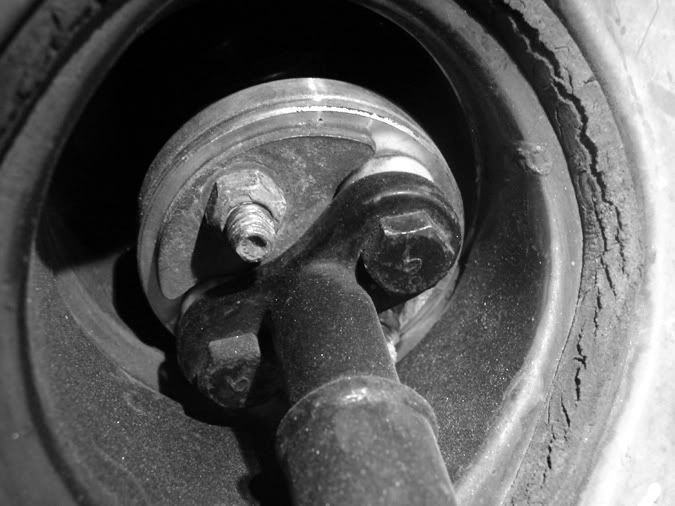 Ok so since all the crap was done. I decided since I didnt have any cups, I still needed to get the front end fabbed up. It fits up better then I thought, but my driver fender needs some work. Im going to call Race-On and see if its something that can be exchanged, if not Ill just work with it. 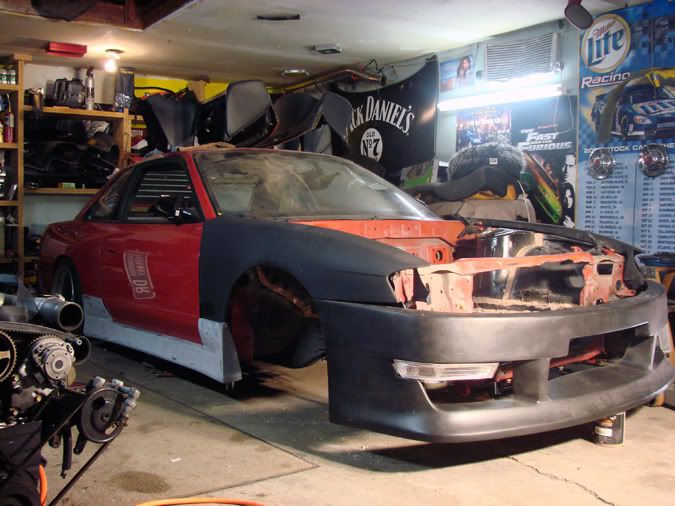 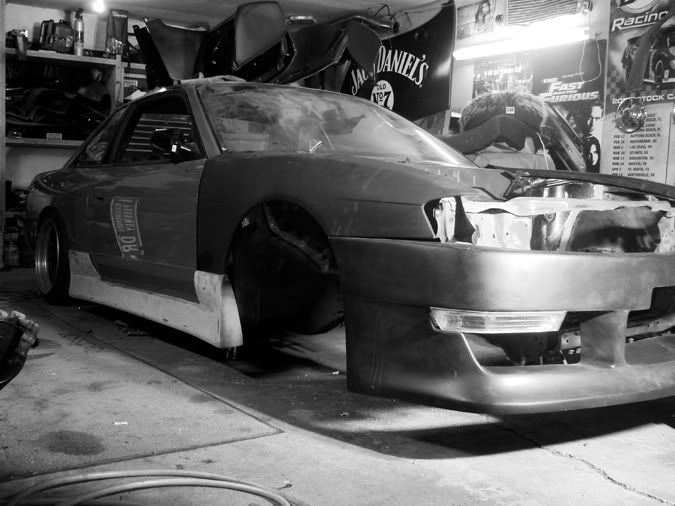 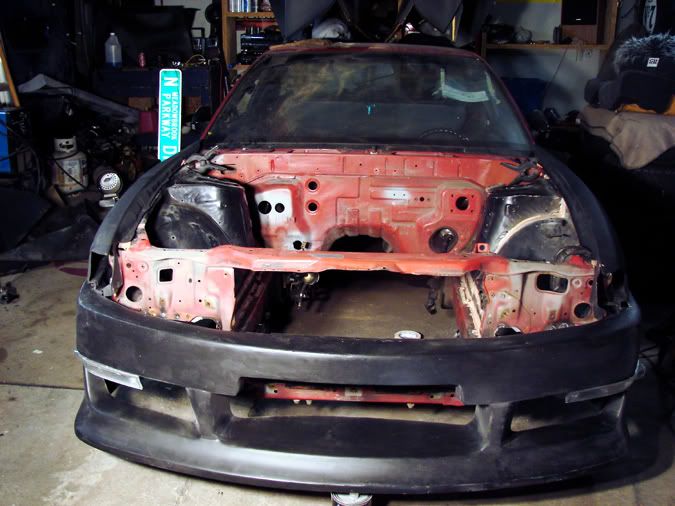 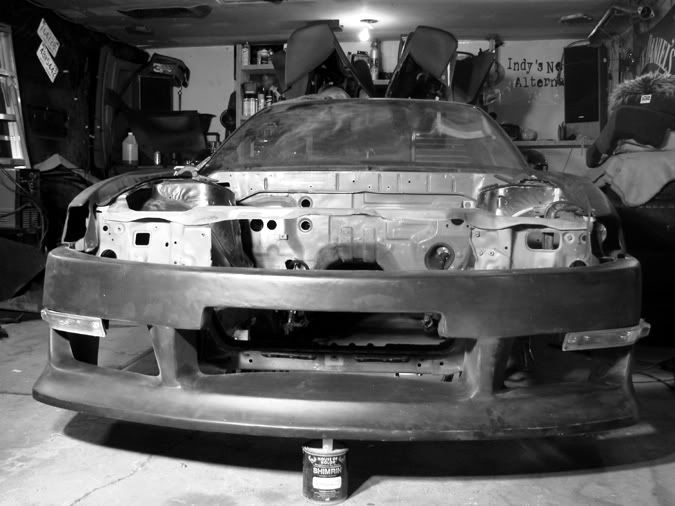 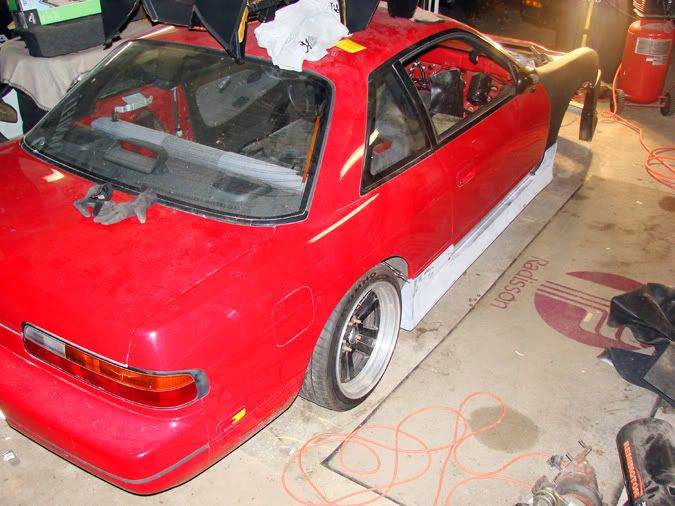 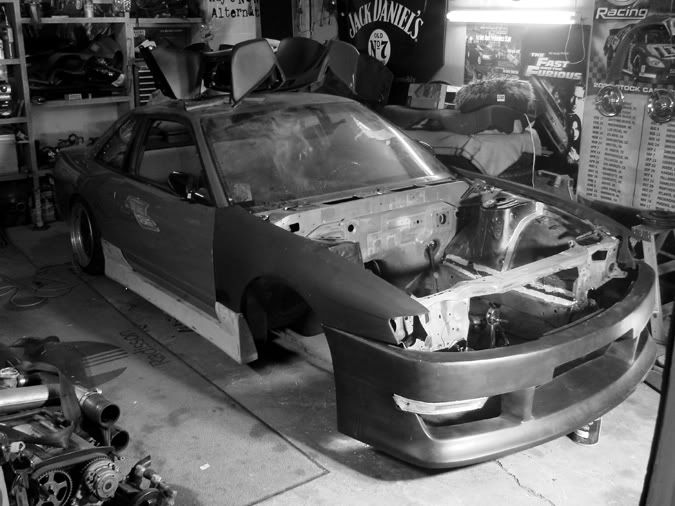 Ok for those who havent seen or are aware of the cars colors. The car will be two toned, black roof, decklid, carbon hood, and the engine bay. That color is House of Kolor - Sparkling Black Pearl. 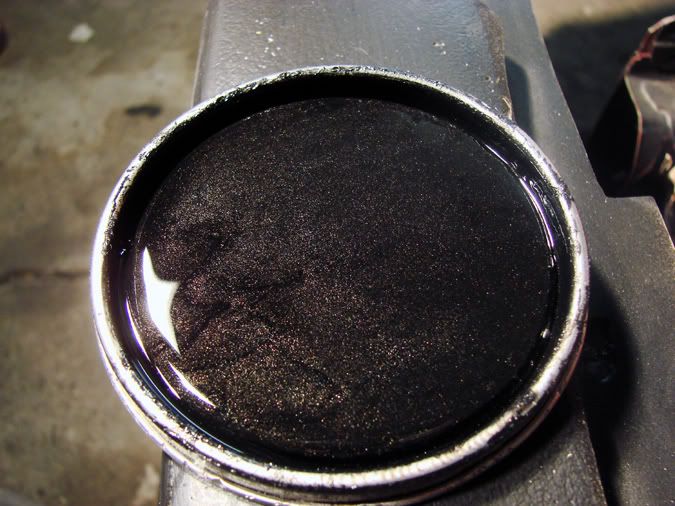 Also thinking of painting my Nardi Wheel to match. 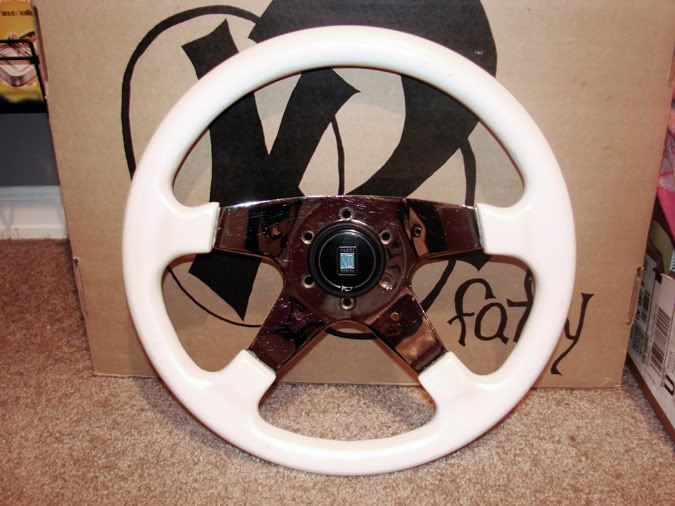 The entire rest of the car will be painted Fire Pepper Pearl Metallic with House of Kolor Radiant Red Flake. The pics do not do the red justice, its a deep blood/maroon red. Goes very well with the House of Kolor flake. 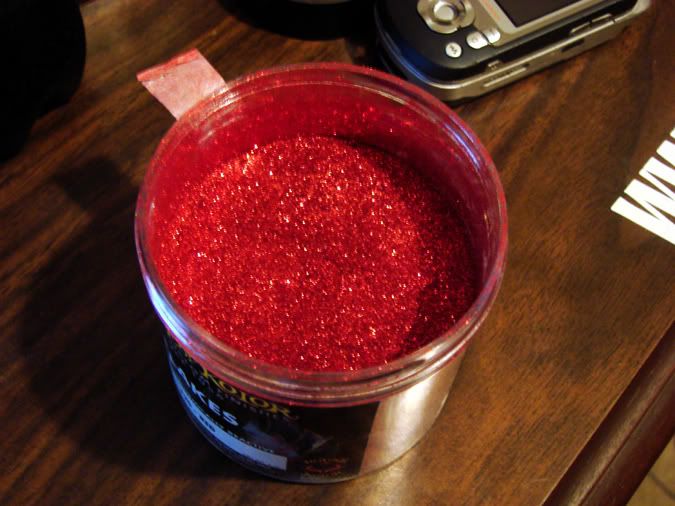 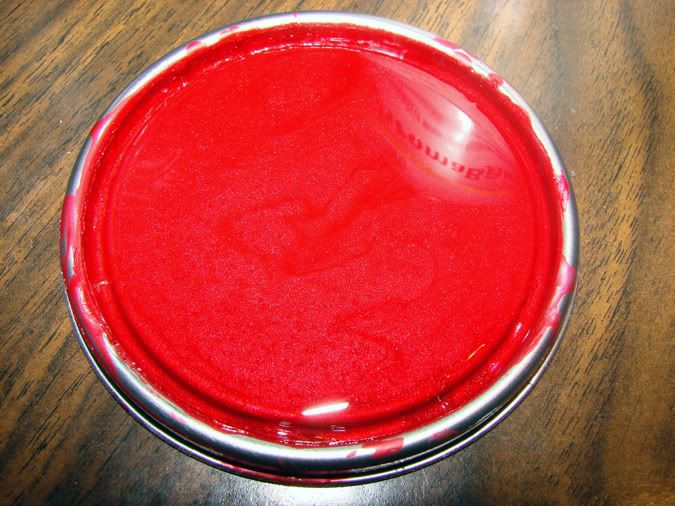 Not to mention I have everything I need in order to get this car painted. You name it, I have it. Now all I have to do is get the thing ready to paint. 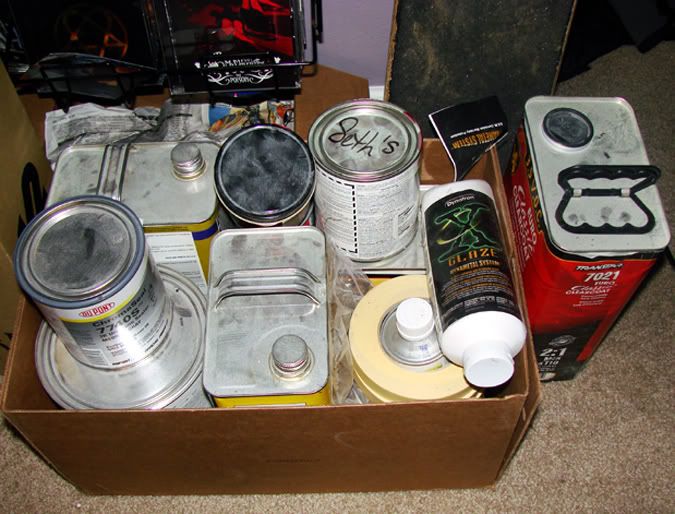
__________________
|
|
|
|
03-05-2008, 07:00 PM
|
#5 |
|
Post Whore!
 
Join Date: Jul 2005
Location: Ottawa, Ontario
Age: 34
Posts: 3,492
Trader Rating: (2)
  Feedback Score: 2 reviews
  |
Wow, nice work! You sure are dedicated. I wouldn't have kept either of those chassis.
BTW, don't paint the roof black, you'll want to kill yourself afterwards. One color looks much nicer. Good luck in the future!
__________________
613DriftWerks.ca |
|
|
|
03-05-2008, 07:16 PM
|
#8 |
|
Zilvia Junkie
|
Thanks guys.....more pics!
November 3rd, 2007 Ok so last week I had some updates and was going to upload them Friday night, but thats when the plague hit me and I was out of commission for the entire weekend. I have gotten more stuff done since then, so heres the status for those who give a flying fook! ;D We shall first start off with the rear trunk interior panels which look like crap from the factory. Very dull grey and are almost like trying to keep white vinyl clean...lol 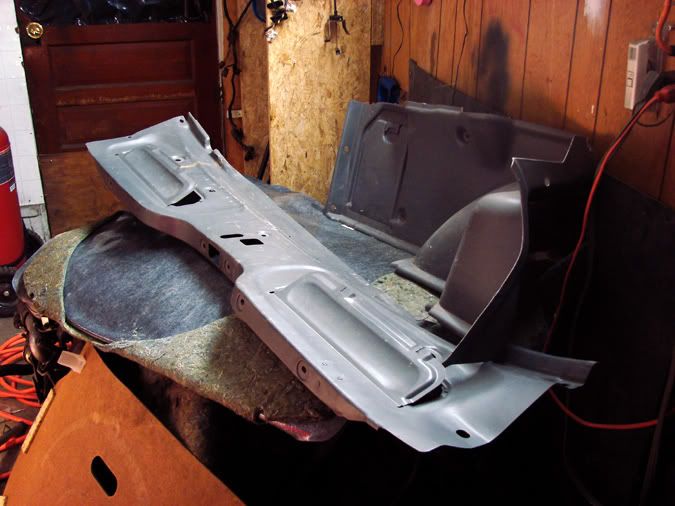 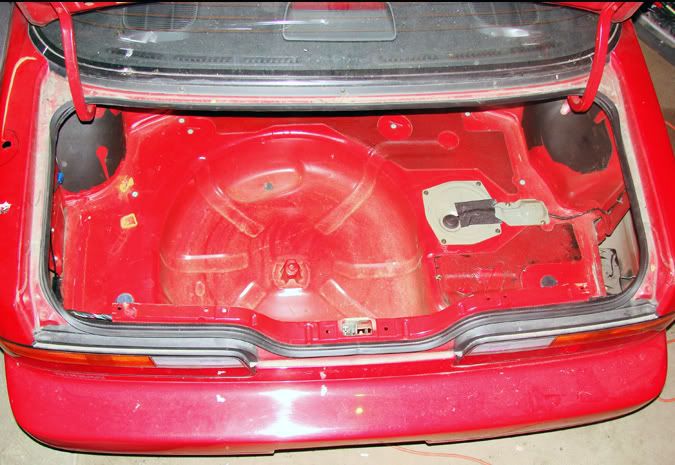 So I sanded, prepped and vinyl dyed it all satin black. Its all put back in now, but please disregard the crappy carpet, its in the process of being fabric dyed now, so it looks like shit in the pic....lol. 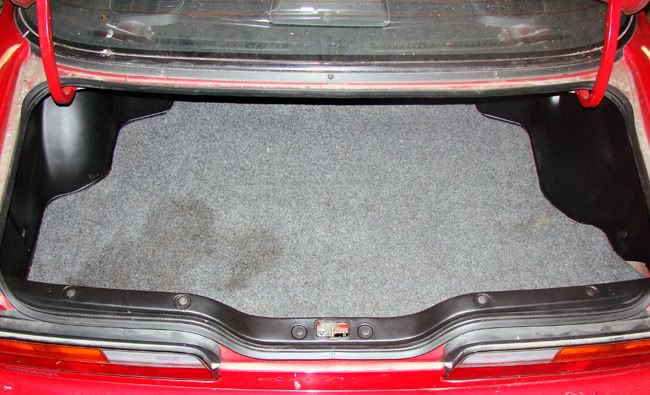 Heres a quick chop of a better finished trunk once the carpet is reinstalled.  Ok so after that crap was done, I then decided to pull out the carpet and fabric dye it as well. FYI, Car Brite Fabric Dye is the best stuff on the market, Ive used this on all carpets Ive fabric dyed. I did Jessicas old Si, from factory grey to dark blue and the color never faded or wore and it was done over 5 years ago. After removal of the carpet I figured Id take a few pics to show the entire dry ice stipped floor. 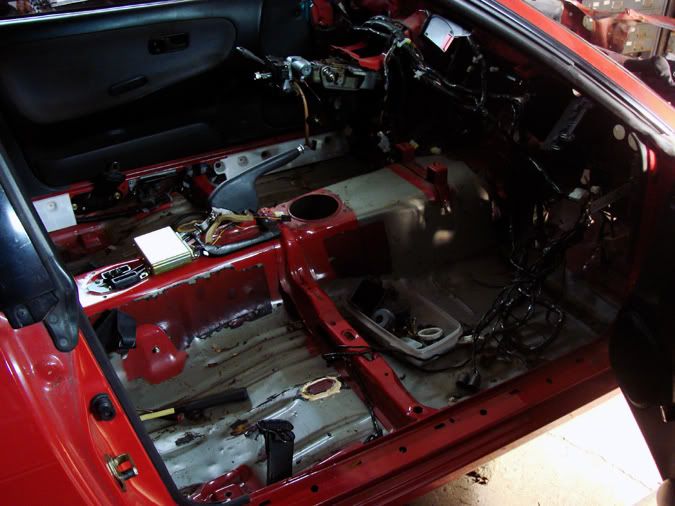 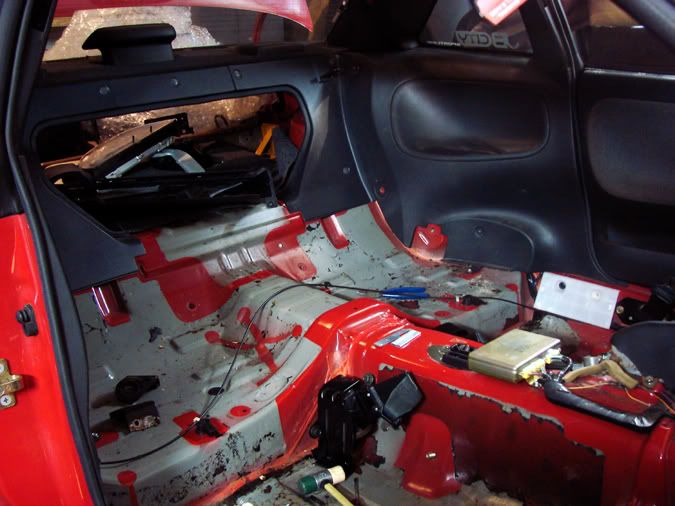 I noticed that there were some plug areas that needed to be fixed so they were stipped and fixed. 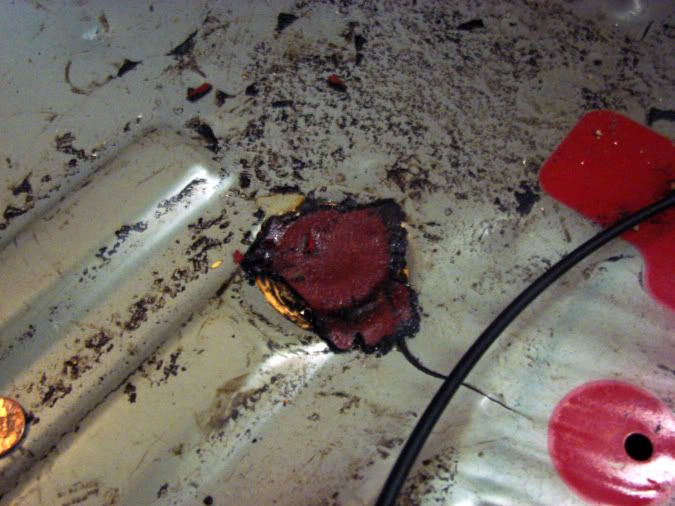 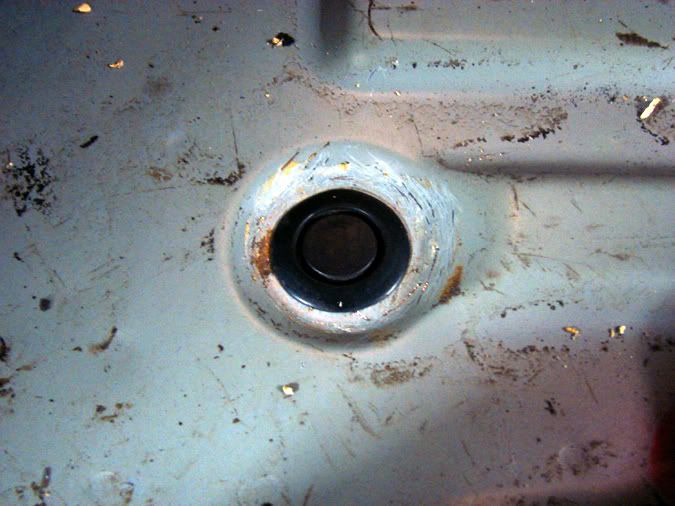 I almost forgot to take pics of the carpet before so heres one, half way through my first coat of black. 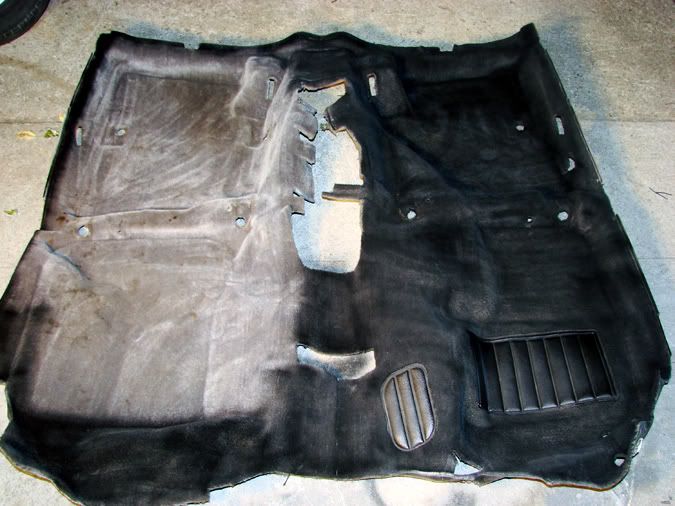 The finished carpet reinstalled in the car.  After the carpet was reinstalled the rear interior was put back in and rear seats bolted in. 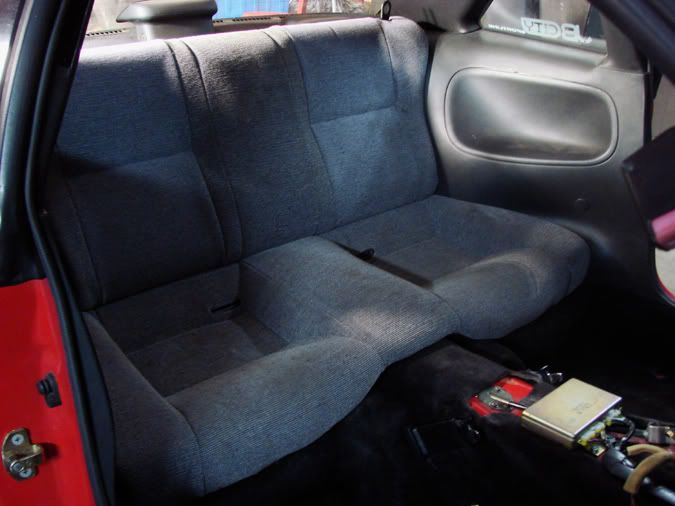 Ok, on to more important things. Both inner fender wells, have been completed. Stripped, seam sealed, then primed, scuffed and then undercoated. 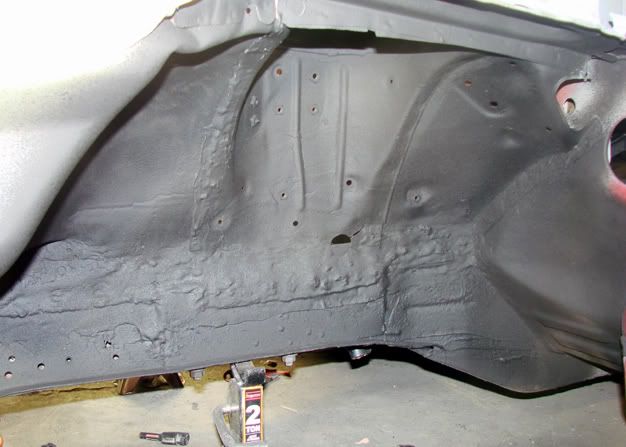 Now onto tonights festivities. Well since I need to go borrow my buddies primer gun tomorrow, I figured I could go ahead and put the subframe connectors and Adj. Traction Rods in. 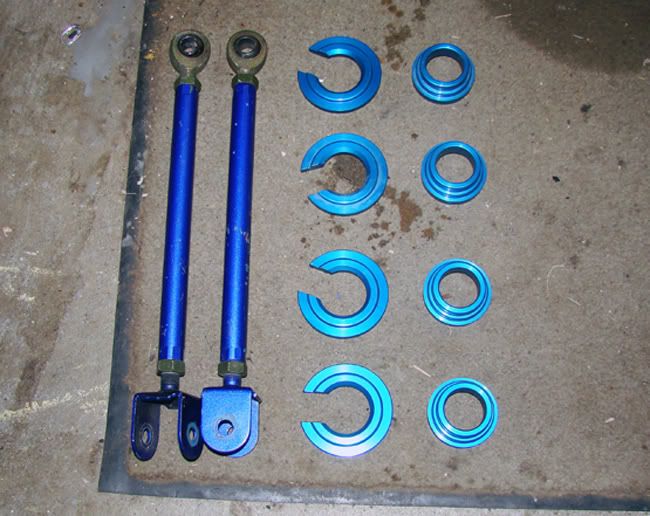 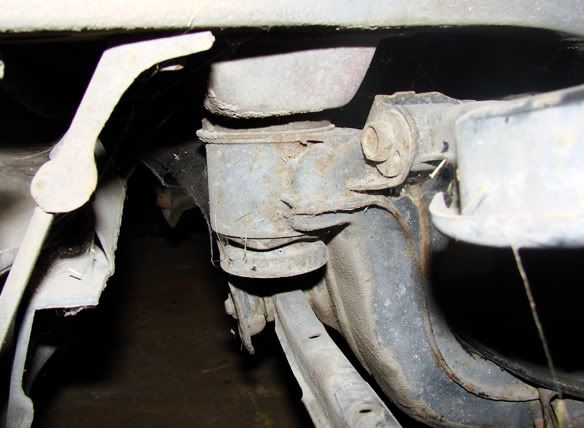 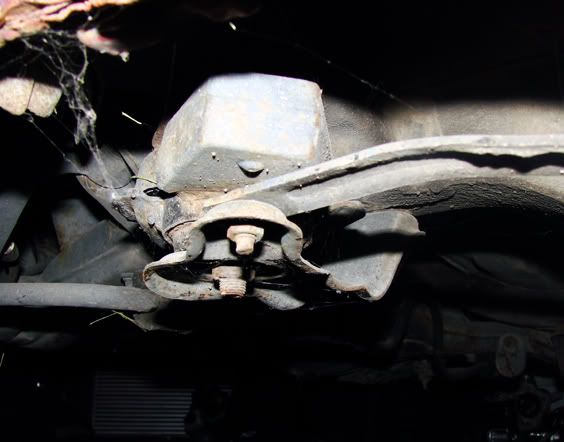 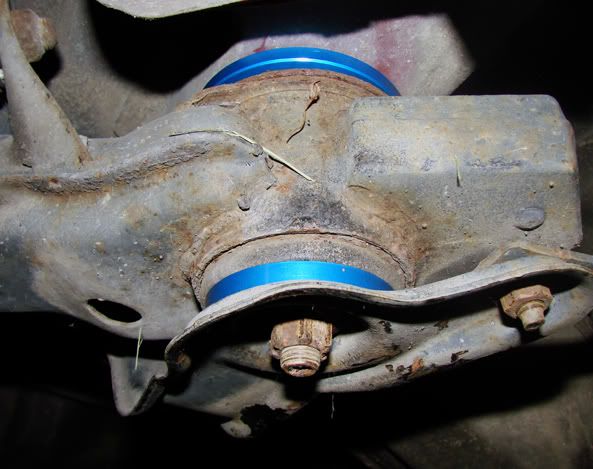 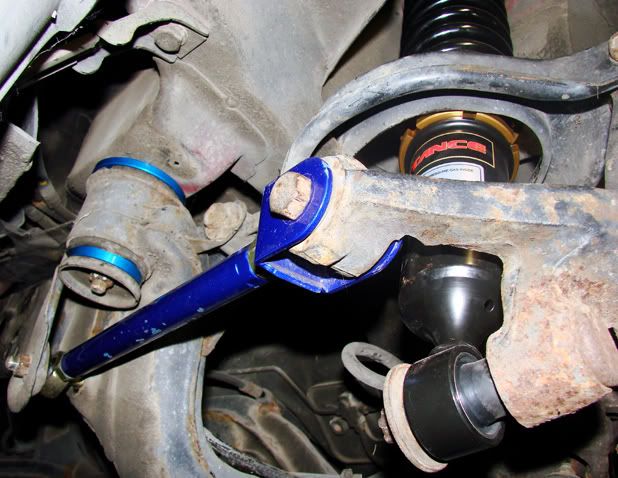 So those are all done now, Ive got a long day of sanding and bitch work tomorrow to get the bay primed. Hopefully I can get it done though. Really want to get the engine bay painted and the motor reinstalled by next weekend. November 12th, 2007 One Step Closer......... So yeah, today was the first time Ive realized that its actually a car again. 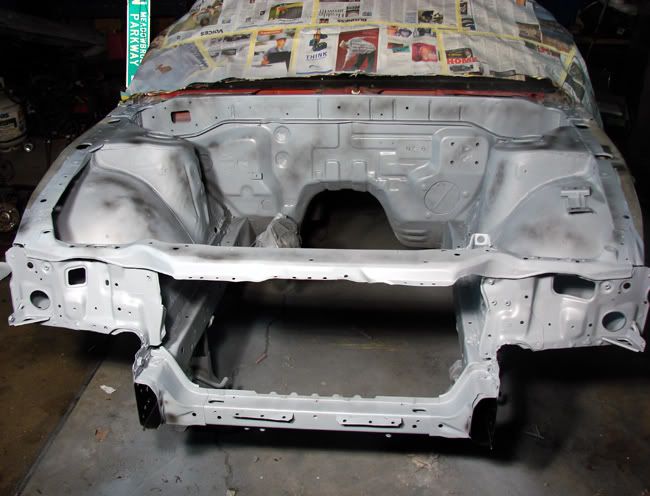 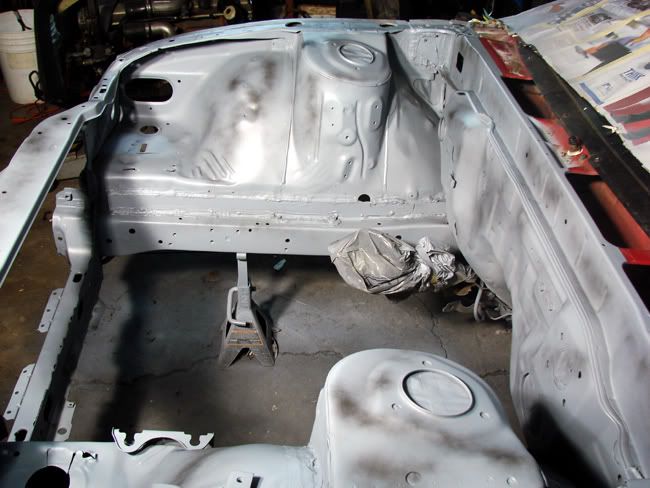 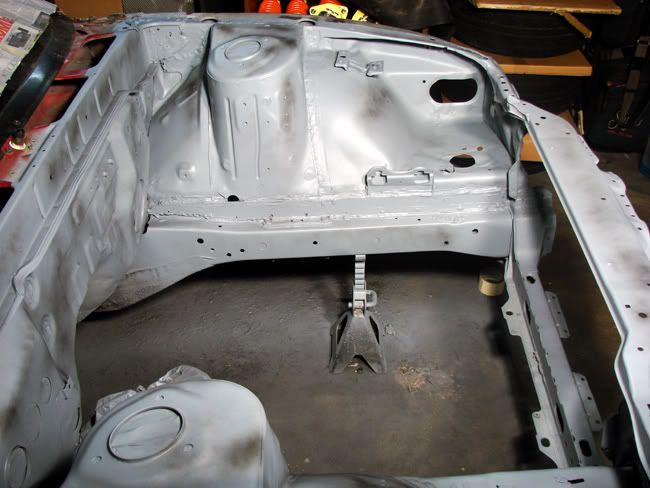 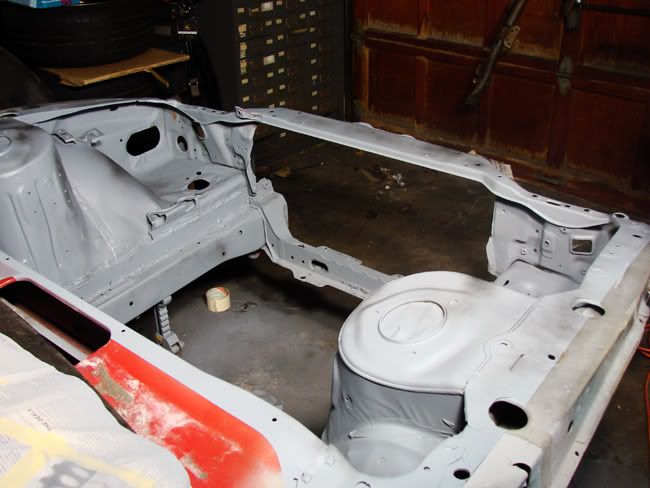 Primed inside, around, upside down and everywhere in between. It will need about 4-5 days to cure due to the cold weather, but I tried to get the garage as hot as I could tonight for a few hours to help speed the process up. Its already been guide coated, so all thats left to do, is a light sanding then its ready for base/clear....WooT! Thanks to M3 Matt for letting me use his kickass SATA primer gun, and to Aaron(aaronsbig16g) for helping me out while I was priming.
__________________
|
|
|
|
03-05-2008, 07:17 PM
|
#9 |
|
www.SonicMotor.com
 Join Date: Aug 2005
Location: 4981 N Irwindale Ave #100, Irwindale, CA
Posts: 9,481
Trader Rating: (113)
Feedback Score: 113 reviews
|
lookin awesome....I too cant wait to see the rest.
__________________
Sonicmotor.com | Zach @ Sonic Motor | 626.363.9036 | [email protected]
Check out our website! ( CLICK ) |
|
|
|
03-05-2008, 07:18 PM
|
#10 |
|
Zilvia Junkie
|
Even more....lol
November 20th, 2007 Ok so after a long weekend of working on s-chassis, (TR's mainly) Sunday morning I was able to get the engine bay sanded and prepped for paint. Today, I finished retaping the car off and installed some new overhead shop lights to make visibility better. The car was final prepped and then ready to go. My friend Matt (M3 Matt) came over around 8 and started painting the engine bay. Matt Wheatley helped along the way, while Aaron and I stood outside to breath fresh air....lol.... The final layer of clear was put on, and it turned out way better then anything I had expected. Matt really did a incredible job for the not so body shop friendly condition my garage is. Here are some pics of the bay, some are kinda cloudy cause the garage looked like Steven Kings "The Myst" after it was done....lol... Youll have to see it for yourself though, because these pics really dont give it the justice it deserves. Thanks again to M3 Matt for helping me out by painting the bay, it looks 100 times better then what I could do, and thanks to Matt. W and Aaron A, for coming out and helping as well. 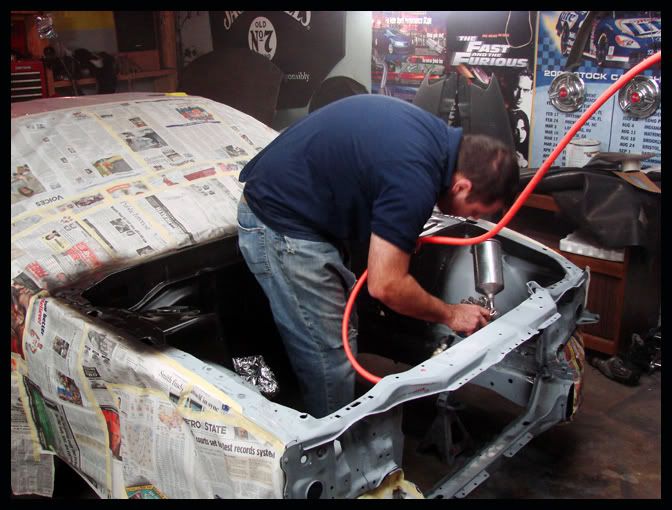  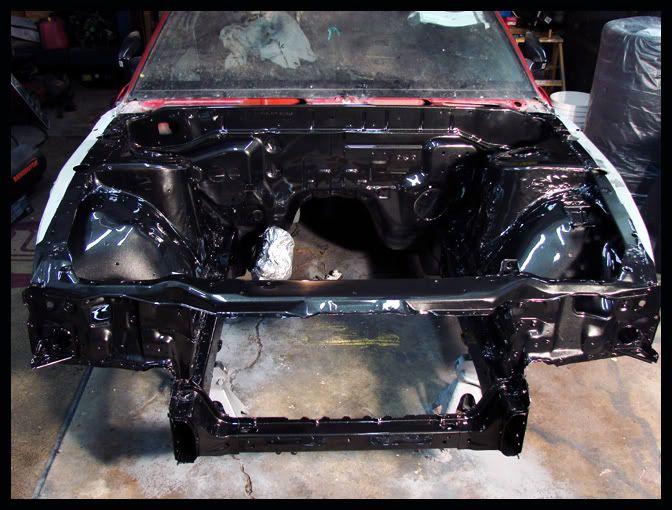 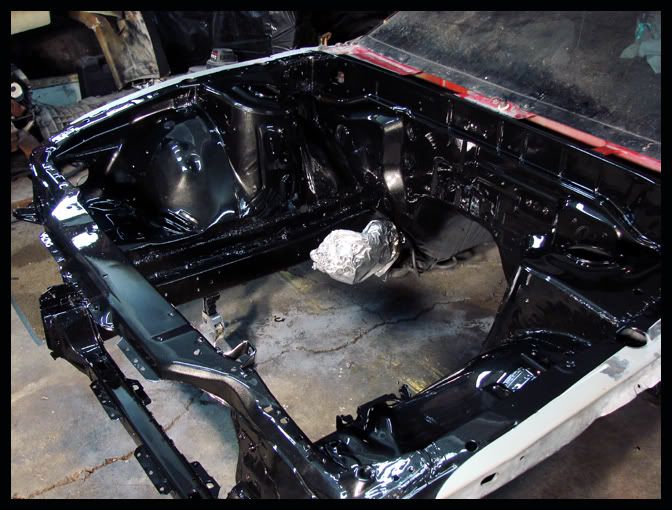     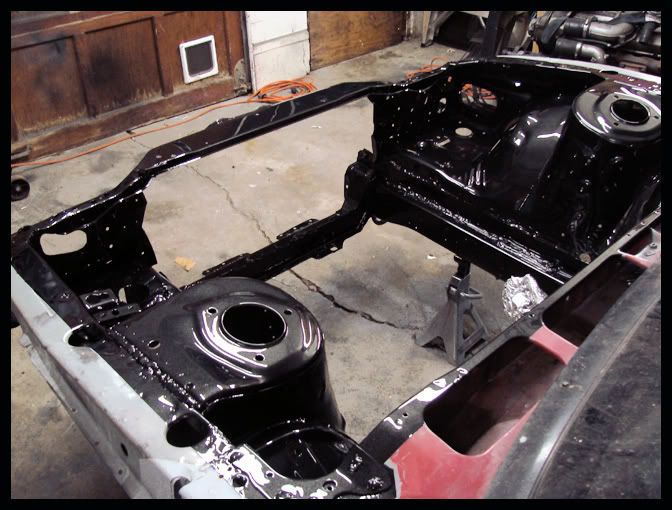 Saturday I went over to Jays house and pulled apart my stock open differential to have my super cool JDM diff welded up. Jdm = Jay Did Mine After it was pulled from the pumpkin. 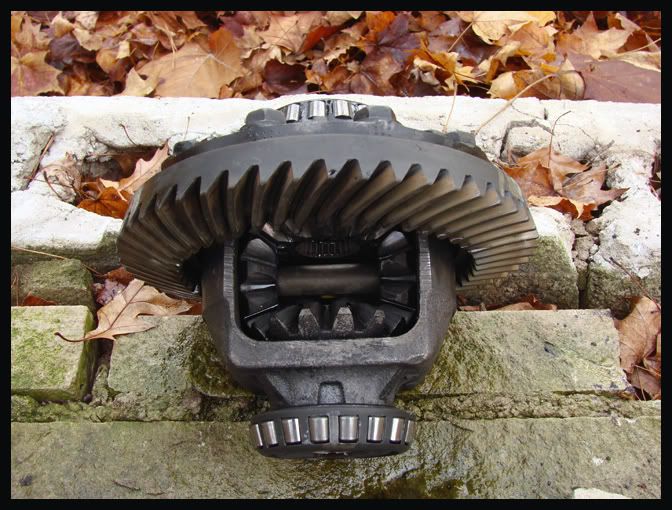 During the welding process. 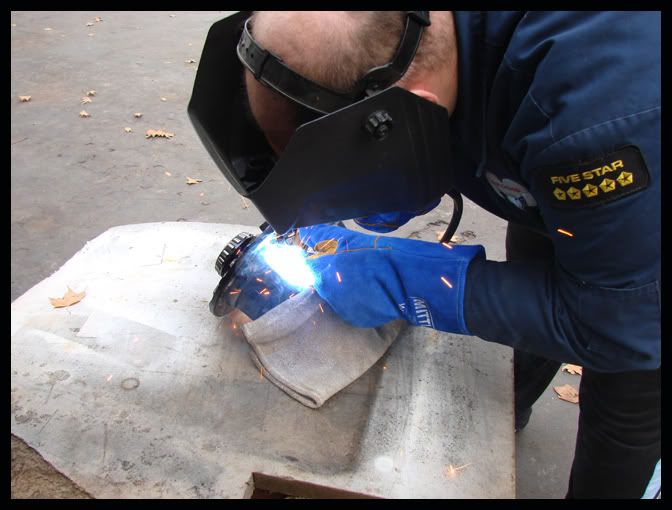 After. (After it cooled down when I got home, I cleaned it up to remove the burrs. 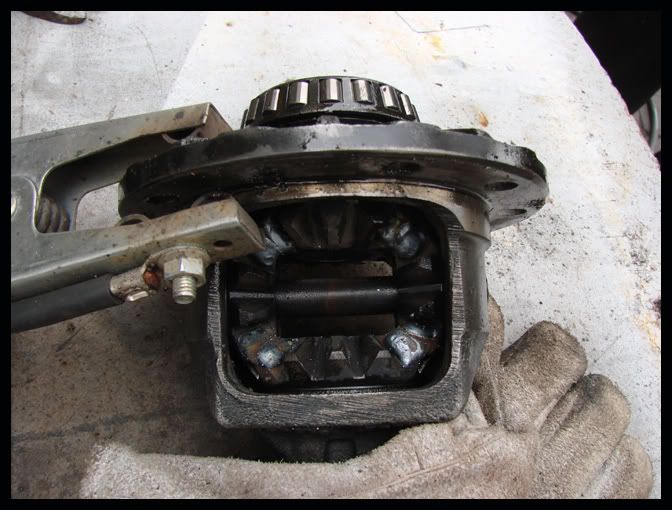 After that was done, I started putting stuff back into the engine bay. Subframe is back in, Suspension is on, Brakes were a quick mock up, still have to buy the SS lines. 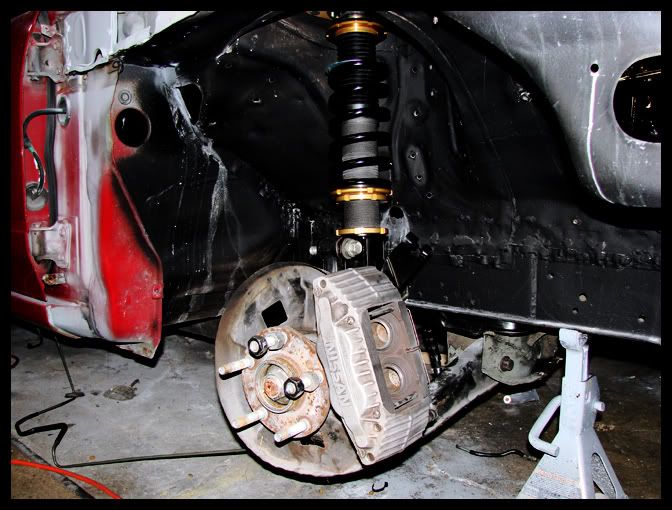 Clutch MC and hardlines were installed. Brake Booster and MC should be here today from UPS, so I can finish up with the hardlines. 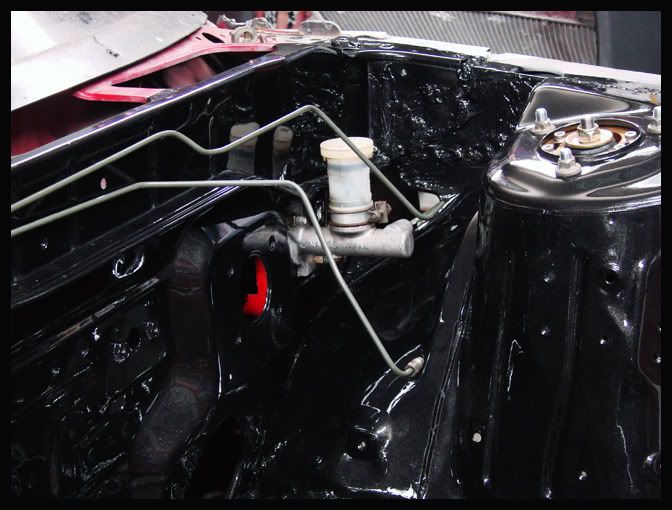 Circuit Sports Radiator Overflow Can Installed. 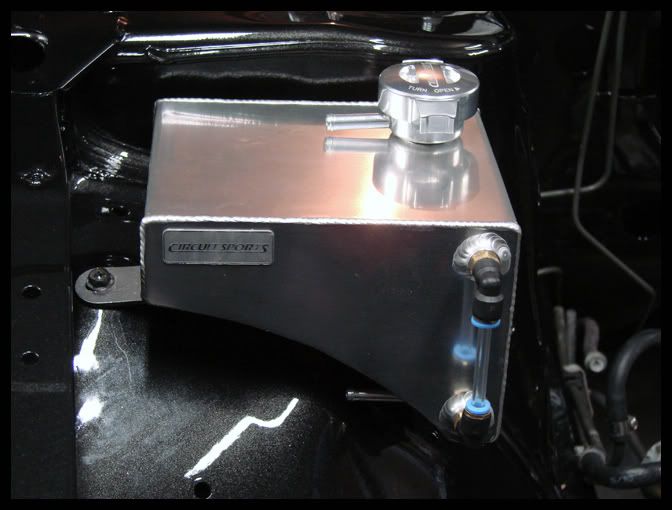 The progress so far. 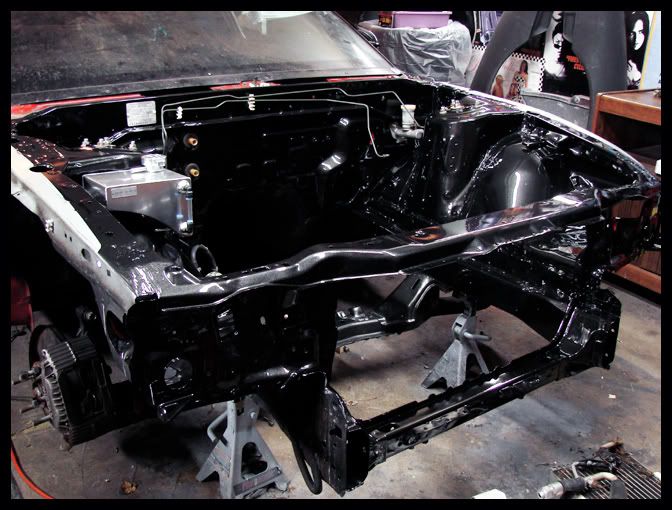 Hopefully Ill get more done tonight once my parts get here from UPS. Not having the Brake Booster and Master Cylinder kinda put me into a bind, but I was lucky enough to find a guy online who had one and we worked out a parts trade deal. More updates in the next day or so I would think. Ive got some more updates. December 11th, 2007 Time for some updates. Little things this weekend and starting of the week have been my p.i.t.a. Sucks when you go to put something together and you cant because you forgot something else you needed. Or something else that has to be done first, but Ive grown somewhat immune to the cars little quirks I often expect them so they no longer come as a suprise. So friday, I went to M3 Matts shop to pick up the Brake Booster I had sand blasted the night before over at his shop. Thanks to Rob for painting it on such short notice looks great!  So saturday morning I went out and put it on, and to my surprise the fed ex man showed at my door bringing me and early xmas gift the wife bought me. A Mishimoto radiator from none other then Alex from Turbogoods.com (thanks again alex for the hook up) 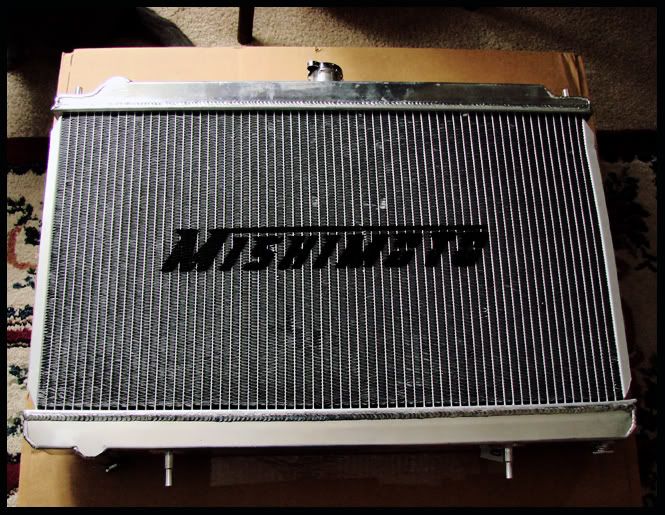 So today I started putting all the pieces together. The master cylinder is bolted down, all the brake lines are ran, the circuit sports MC heat shield was put on, and the radiator was test fit. (have to make some brackets for the radiator top supports.) 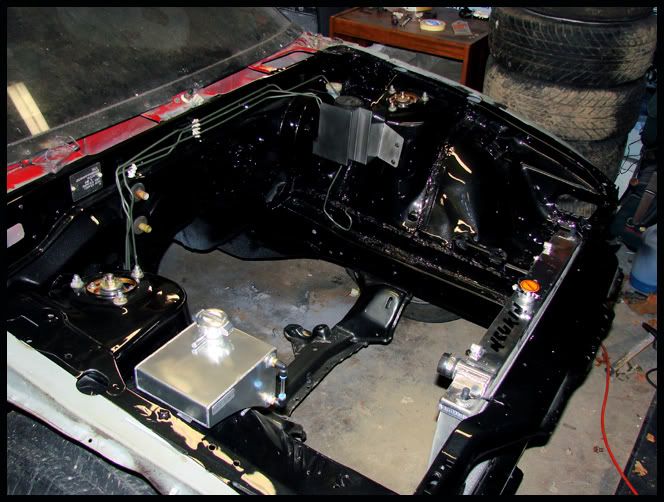 Next thing that Jay and I worked on was this. 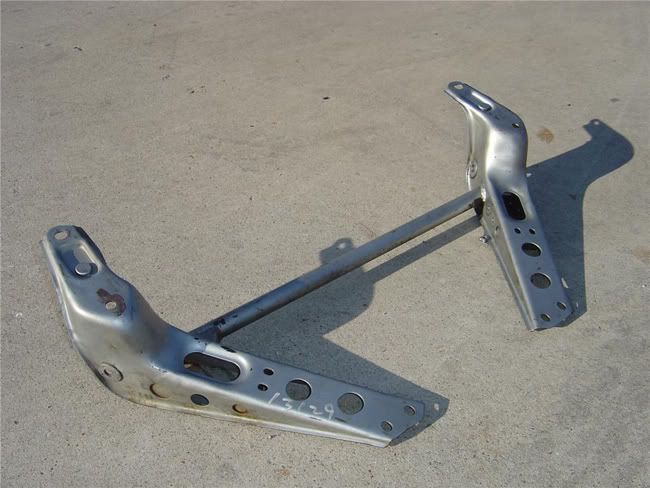 This is a Nismo Powerbrace. $175+ship from mynismo.com Well after looking at my factory parts and this said brace, Jay knew he could make me a carbon copy for alot less. So weve started the process. This is just the tacked piece at the moment, he took it home with him to make the support braces on the bar, and the lower reinforcement plates and I should have it back midweek. 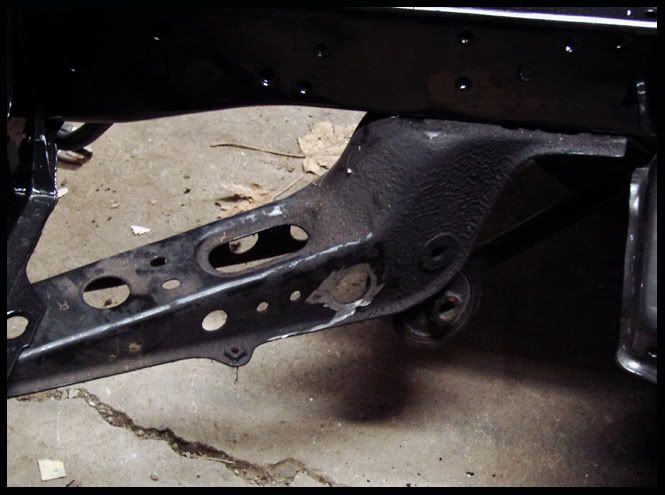  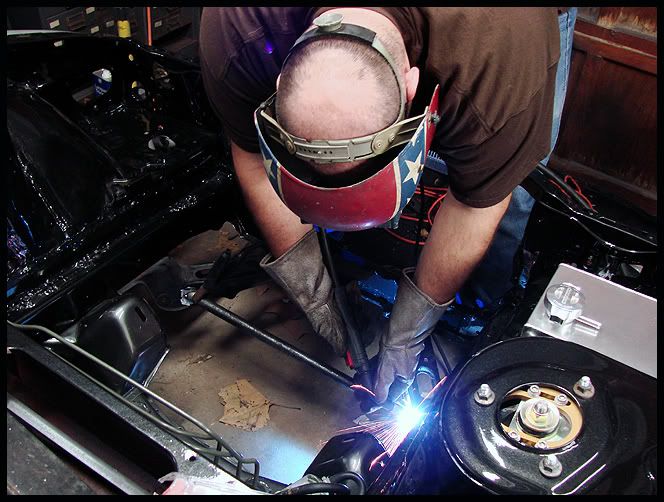 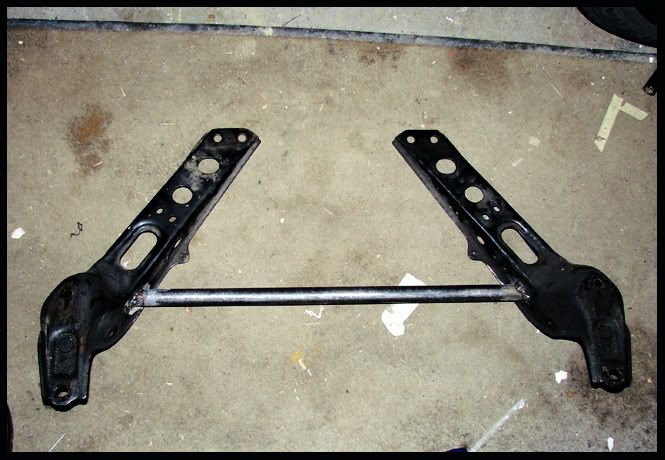 So after Jay left I started putting my welded diff back together, but then realized Id forgotten to buy RTV sealant. So I worked on bolting up the exhaust after installing all new rubber hangers. (thanks TR) 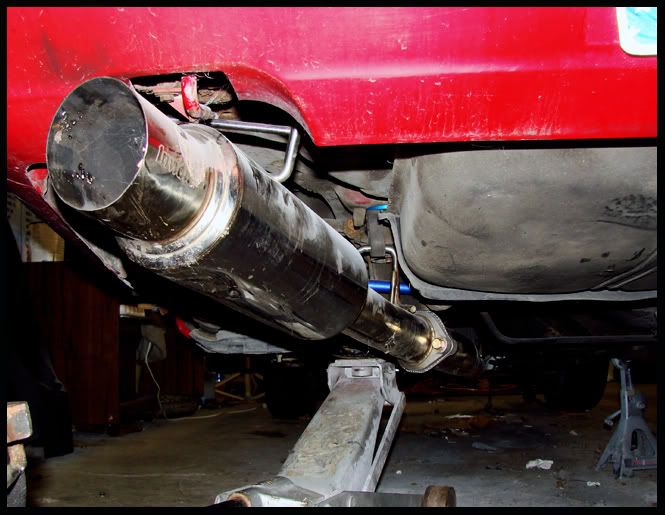  Now all I have to do is get the brace back, put all the front end parts back together and the motor is ready to go in. Still have to do some custom fab work on the downpipe but really wont know to what extreme yet until I get the motor in, but its getting alot closer. I had my parents and the wifey get me nothing but car parts for xmas so stuff should be arriving this week and next to help further this process along. More Updates...... January 2nd, 2008 Sorry for the delay in the updates, the month of December is craziness for the wife and I. Not to mention being down to 1 car at the moment, hasnt helped. Anyways onto whats been going down. Long story short, wife bought me some stuff for the RB for xmas....as I was getting the motor prepped for the waterpump and other things that were on there way. I discovered I had 5 broken exhaust manifold studs. I was beyond pissed, but I did manage to get them all out with reverse drill bits without fucking up the threads so that was the good news out of that ordeal. So this is what I managed to get done while waiting on new exhaust studs and manifold gasket to arrive... Ok so I managed to get all of the remaining studs out of the head. Im going to have to tap and rethread only one of the 12 so I did pretty well in that aspect. Im doing some research tonight to see if these exhaust studs are the same as the VG30, if they are they can be had a lot cheaper then what people ask for them as RB kits. A lot of the drivetrain is interchangeable with the VG30, I just hope this is one of them. My timing belt should be here in a few days, so once its here. Its going on, and the motor is going in. As for the motor, due to my downtime I decided to start stripping various things off the motor to clean up, paint, polish, or simply 86 if I wasnt going to use them. Christmas actually came early for me as of last week, when all of the things that Jes bought me started arriving. First was the Exedy Clutch Kit, then the OEM Water Pump, followed by the HKS Super Flow Intake Kit with MAF adapter. She also bought me a new red filter for the Intake. 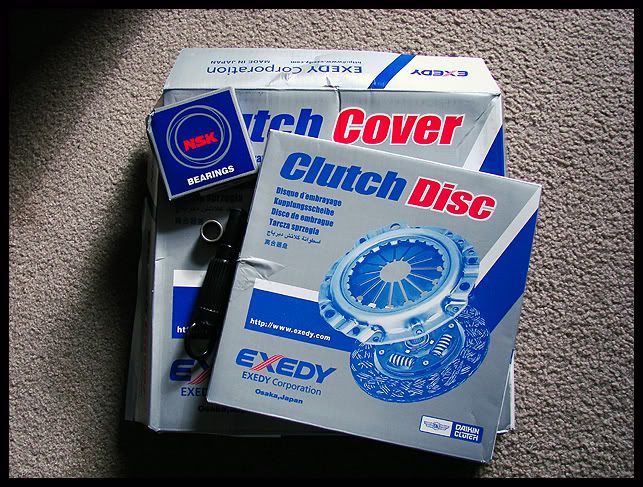 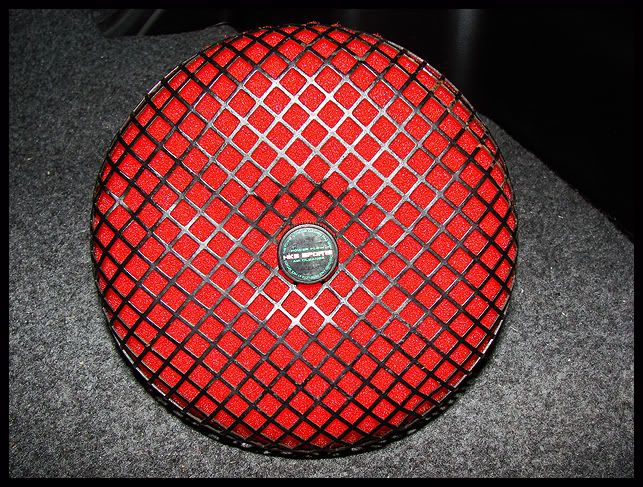 She also bought me new shop lights for the garage. Yes the woman loves me, and Im grateful....lol So as mentioned before, I started tearing things apart........... 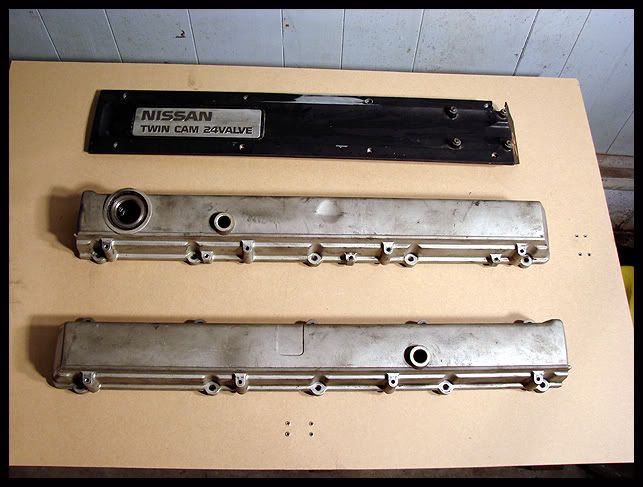 Aircraft stripper only worked on the spark plug cover. The valve covers were not fazed bu multiple attempts with it. So I talked to M3 Matt over at the shop, and he told me I could bring them over and sandblast them. After sandblasting them, I started to polish them, all I can is fuck a whole lot of that....lol....that shit takes way too long. So we came up with another idea, which is in the pictures below. Thanks to M3 Matt for the use of the shop and his painting skills, and to all of the guys there helping me out with everything I needed. Also thanks to Matt W. and Aaron for helping me out last week as well. Let me know what ya think. I think its fucking awesomesauce! 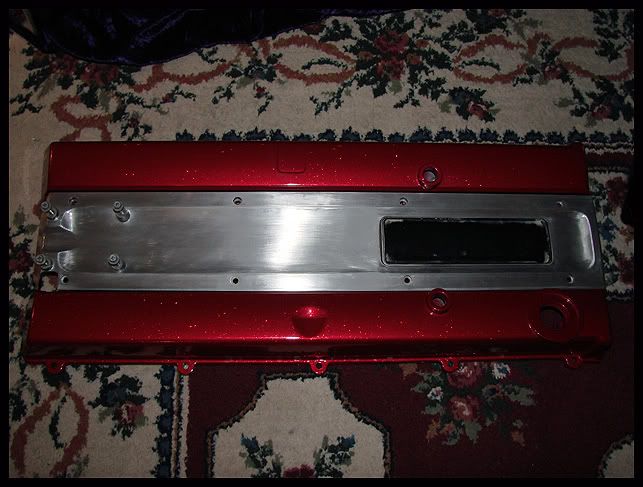 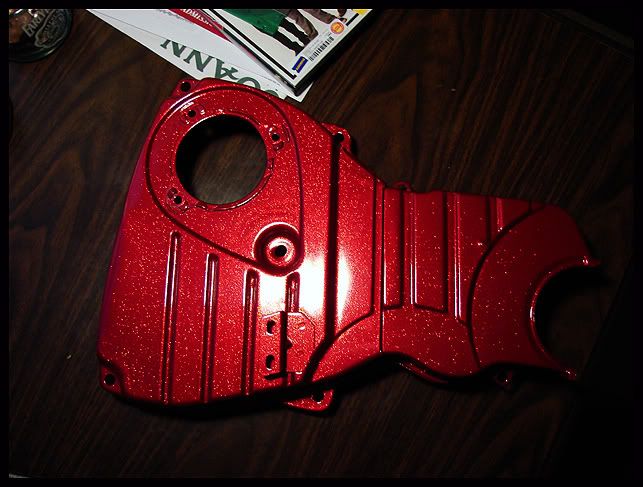 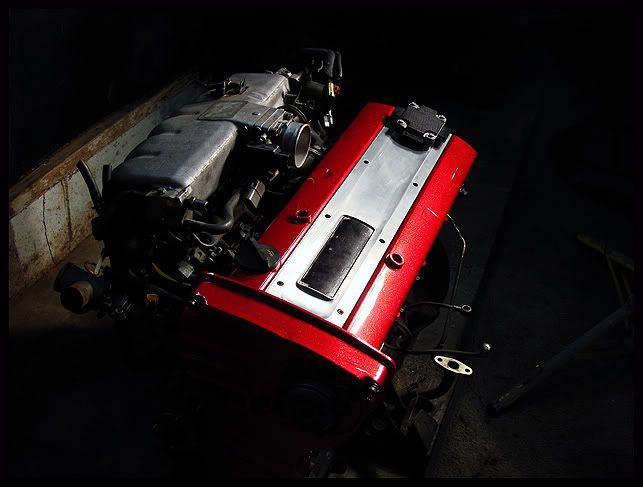 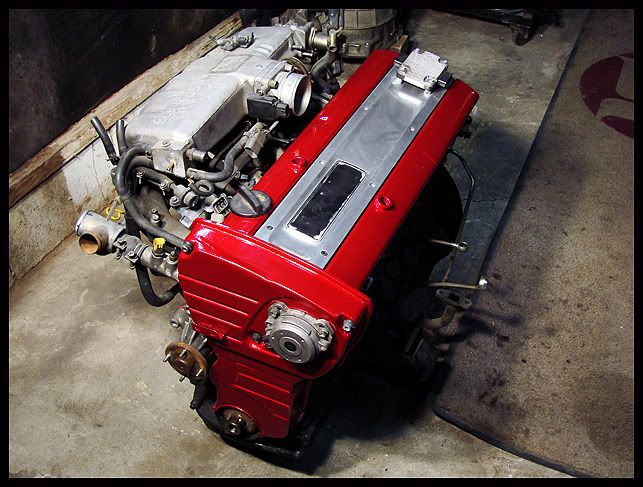 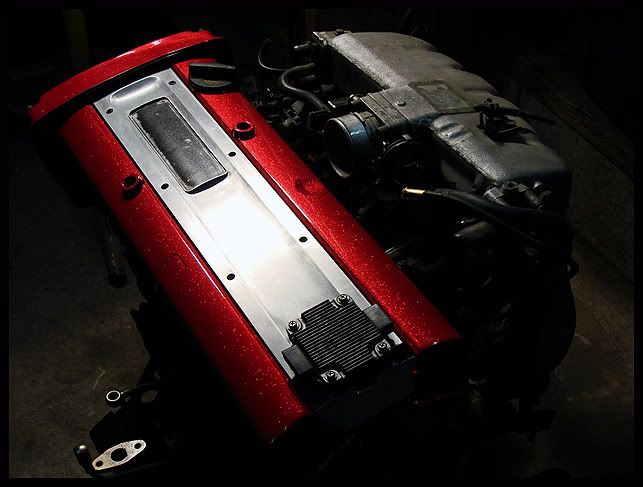 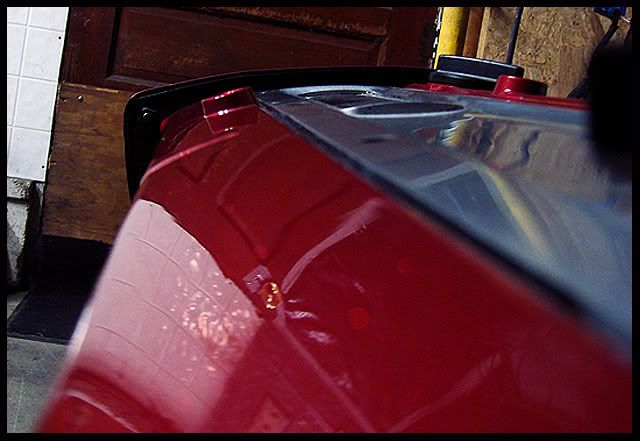 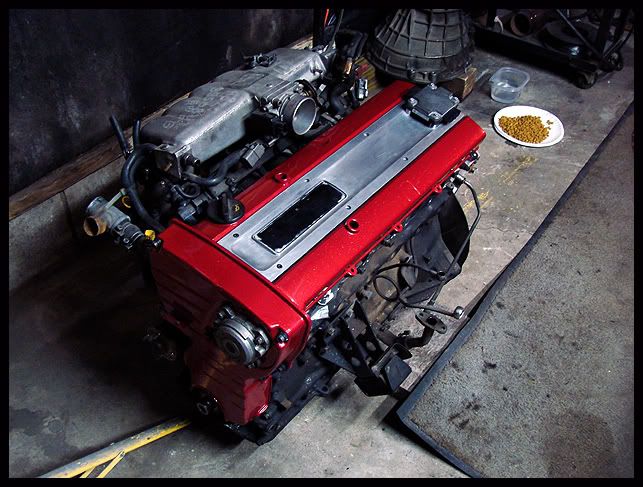
__________________
|
|
|
|
03-05-2008, 07:24 PM
|
#11 |
|
Zilvia Addict
 
Join Date: Feb 2008
Location: The SLC, Utah
Age: 38
Posts: 794
Trader Rating: (3)
  Feedback Score: 3 reviews
|
looks clean man. +1 for the s14 front end decision.
i am gonna start my build here shortly.. i just want to get all my parts sitting on a shelf till i have the time to put them all on at once. its not as fun to just put one part on one week. and another on the next. all at once is fun.. |
|
|
|
03-05-2008, 07:25 PM
|
#12 |
|
Zilvia Junkie
|
So now that the holidays are over, I can get back to working on the car more, so heres last nights update....
Fuck, shit and boobies even. So after trying to over my lazisauce this afternoon, from a long night of drinking at Wheatleys on New Year's, I finally decided it was time to get some shit done. Well as the build thread shows a few updates or so ago, Jay was building me a rare JDM (jay did mine) Nismo powerbrace. Im happy to say, after getting it primed(few days ago) and painted tonight, its on the car, along with all of the other suspension parts. The steering rack is in now, and the steering column is back in and bolted down inside and outside of the car. Before....(after Jay mocked it up) After.... 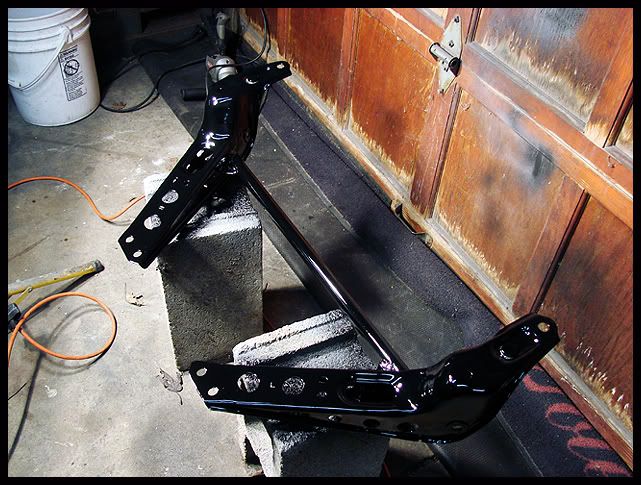 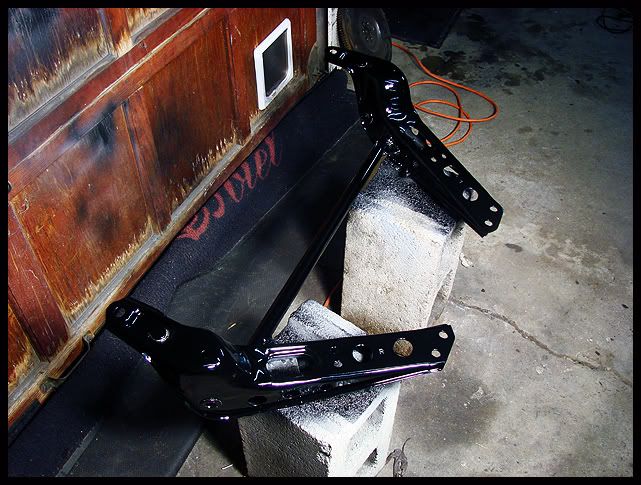 Installed along with the tension rods, sway bar, steering rack, steering column. 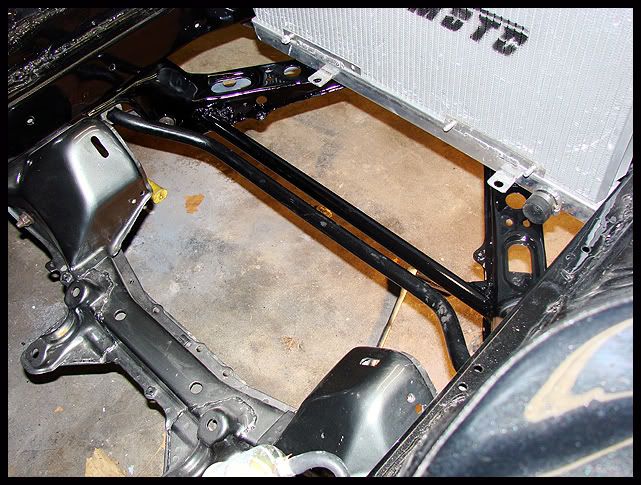 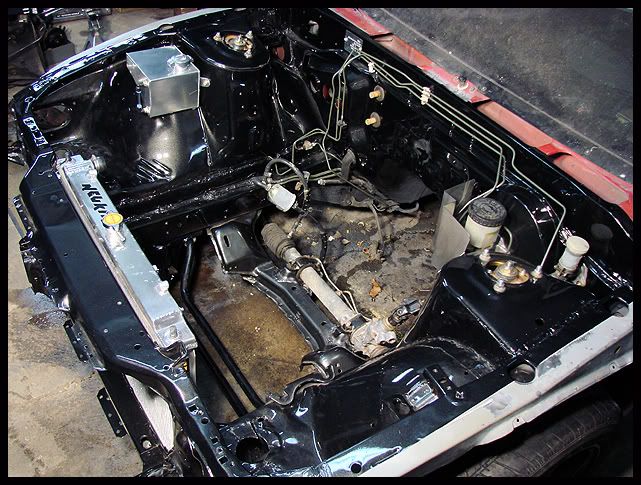 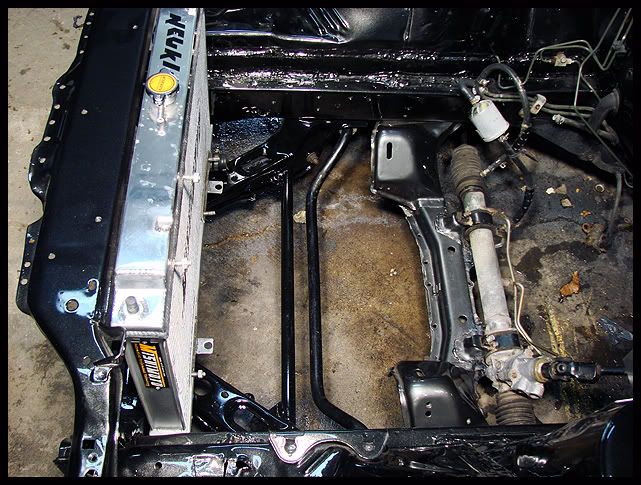 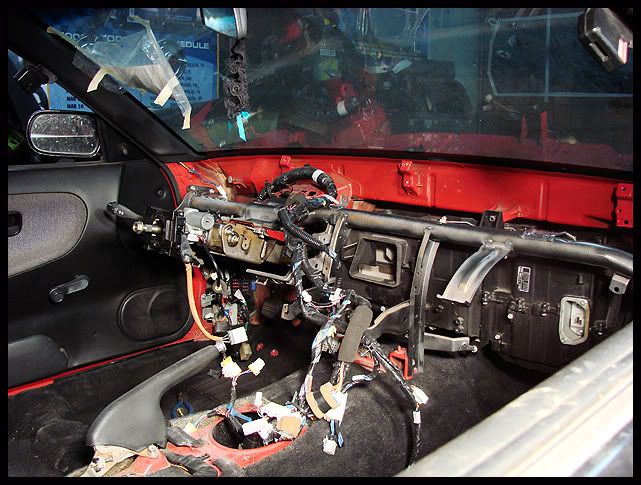
__________________
|
|
|
|
03-05-2008, 07:28 PM
|
#14 |
|
Zilvia Junkie
|
Thanks everyone I really do appreciate the comments, it does mean a lot.
Ok....update time. The block and manifold are now painted. The new Ex. Manifold studs have been put it, except for one, have to borrow a tap to finish the one thats kinda jacked up. 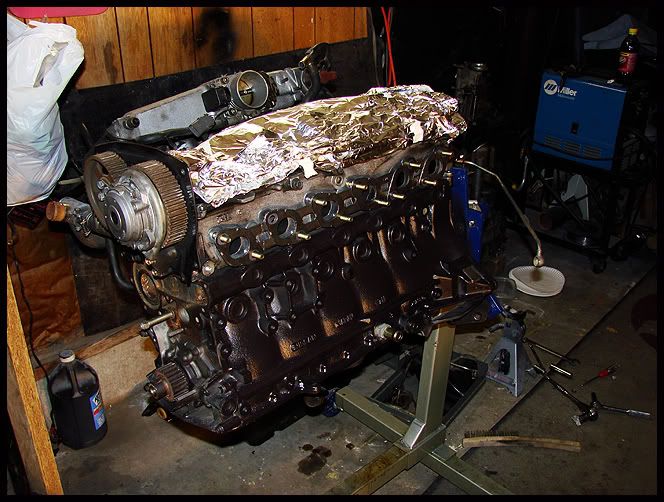 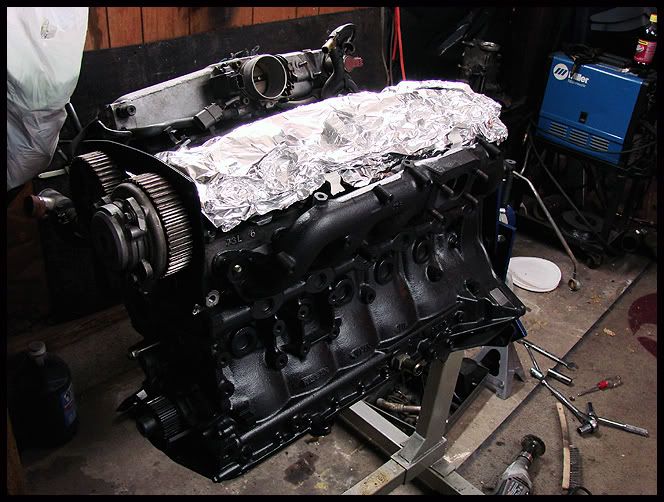 I spent forever and a day removing all of the gray gasket goo from the bottom of the oil pan and motor. Never realize how long the oil pan is until you take the damn thing off....lol...I swear theres 25 10mm bolts holding it on. 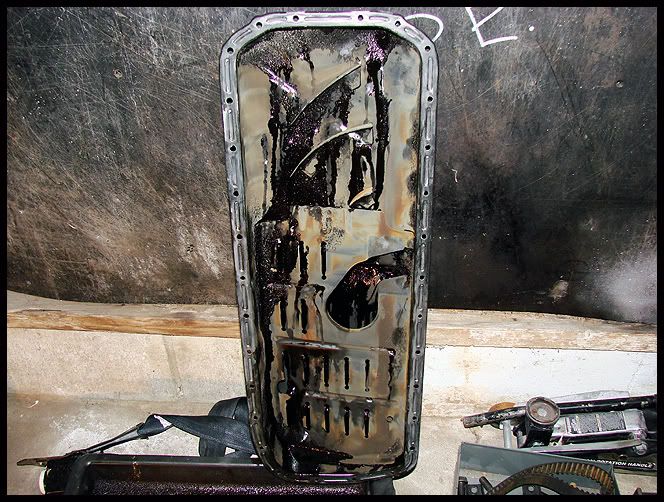 I spent probably 2 hours reinstalling all of the heat and blower motor boxes. I put that stupid bar back in too soon, and it made my life difficult so I took it back out, installed everything and hooked all the connectors to it. no pics, its boring, its heater boxes for christ sake....lol I did get my HKS SSQV this weekend(Thanks Scott). Now I gotta come up with the chedda to buy my charge pipes, and pay for someone to make them...lol. 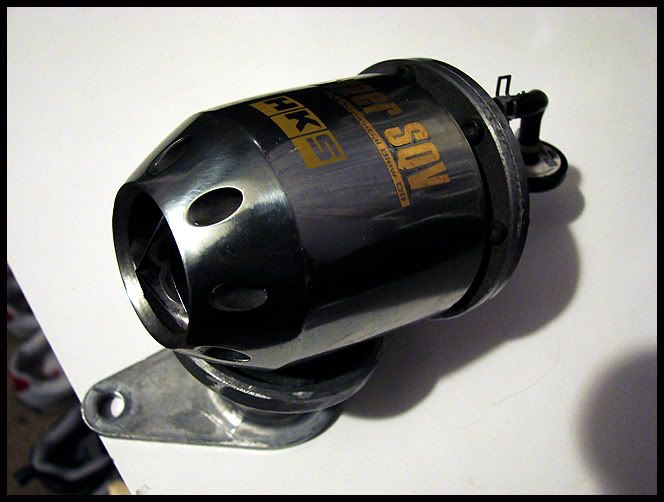 Thats it for now, Im tired and need sleep. More to come this weekend.
__________________
|
|
|
|
03-05-2008, 07:35 PM
|
#18 |
|
Zilvia Junkie
|
Updates and pics with my new camera. (Im still overwhelmed on how to use it, so bare with me...lol)
So as stated before the motor is now finally in.   In this pic you can see that the trans and the firewall are very close together, we actually had to pull the motor back out to put the trans in, because I didnt want to beat on the painted firewall for starter clearance. Speaking of tight fitting things, this car has quite a few of them, the only thing that needs to actually be adjusted is the O2 Housing, its almost rubbing the steering column, so Im going to have one fabbed up to clear it better.  This next one was kinda scary while the motor was going in, talk about tight fit, theres just enough daylight between the sway bar and the oil pan. 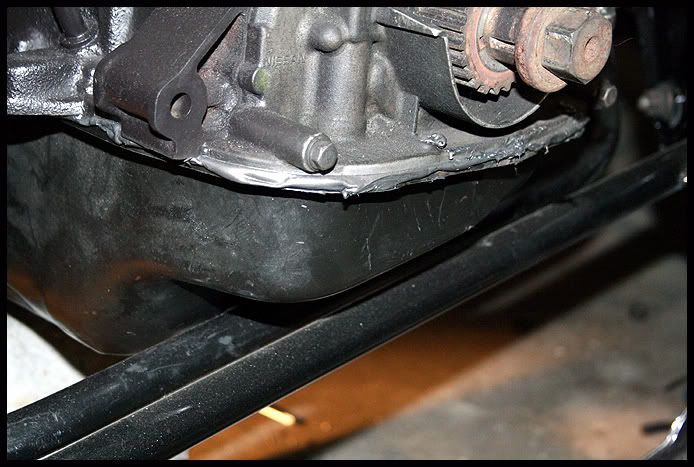 Installed new Aftermarket Torsion Rods and Inner and Outer Adjustable Tie Rods. Big difference in thickness and quality on the aftermarket parts. Cant wait to test them out. 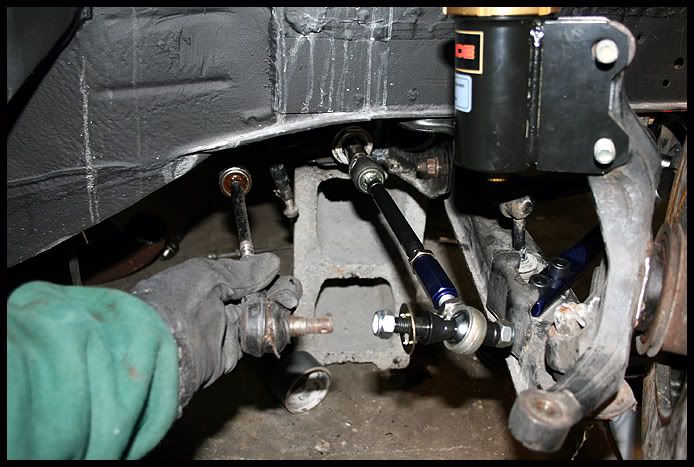 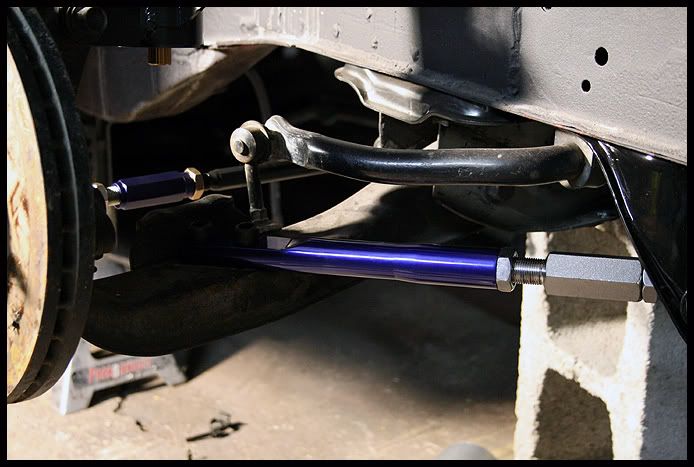
__________________
|
|
|
|
03-05-2008, 07:50 PM
|
#21 |
|
Zilvia Member
 Join Date: Mar 2007
Location: Manchester NH
Age: 45
Posts: 265
Trader Rating: (2)
Feedback Score: 2 reviews
|
WOW! I must say, when I first started scrolling thru the pics I was very nervous! LOL This car is great! It's looks very nicely put together, props to all you guys and the hard work!
|
|
|
|
03-05-2008, 08:05 PM
|
#22 |
|
Zilvia FREAK!
 
Join Date: Nov 2006
Location: South Fulton, TN
Age: 33
Posts: 1,043
Trader Rating: (4)
Feedback Score: 4 reviews
|
i love it. someone finally took a car that most would have trashed and made it into a nice car. I finally have the inspiration to get what little rust i have on the frame repaired. i wanna see more pics.
__________________
92 vert converted 5speed and other little things 
|
|
|
|
03-05-2008, 08:10 PM
|
#24 |
|
Post Whore!

Join Date: Apr 2007
Location: Left Hand Path
Posts: 2,655
Trader Rating: (22)
Feedback Score: 22 reviews
|
The 13 coupe looks like an old school muscle car with no inner fenders, like the way you had it in the first pictures.
I wish they came like that, so easy to work on motors/swap |
|
|
|
03-05-2008, 08:21 PM
|
#26 | |
|
Zilvia Addict

|
Quote:
Can you post a link to where i can buy this ive been waiting to change my mats
__________________
91 Sil80-Sold, LS2 Powered 1997 240sx-Traded, 2005 350z-Sold, Whats next? |
|
|
|
|
03-05-2008, 08:48 PM
|
#30 |
|
Post Whore!

|
looking good. when i first started reading this i was saying oh no, hes gonna cut a perfectly good chassis in half... but it turned out to be the opposite. keep it up!
also, more info on refinishing the interior panels. mine are all shitty and faded from the sun.
__________________
|
|
|
|
| Bookmarks |
|
|


 Linear Mode

