|
|||||||
| Home | Rules & Guidelines | Register | Member Rides | FAQ | Members List | Social Groups | Calendar | Mark Forums Read |
| Chat General Discussion About The Nissan 240SX and Nissan Z Cars |
 |
|
|
Thread Tools | Display Modes |
 04-29-2009, 07:41 PM
|
#1 |
|
Zilvia Addict
 Join Date: Oct 2005
Location: Twin Cities
Age: 44
Posts: 893
Trader Rating: (0)
  Feedback Score: 0 reviews
|
How To: Repair cracked lips, bumpers, etc.
So I had a bit of an incident at USAIR last fall and unfortunately my front lip was the victim. It is a trust gracer front lip and the material is a very brittle, almost PVC like plastic. It doesn't really flex much before it breaks. Well since I had some experience doing plastic repair when I fixed my side skirts, I figured I could fix the lip in a similar manner.
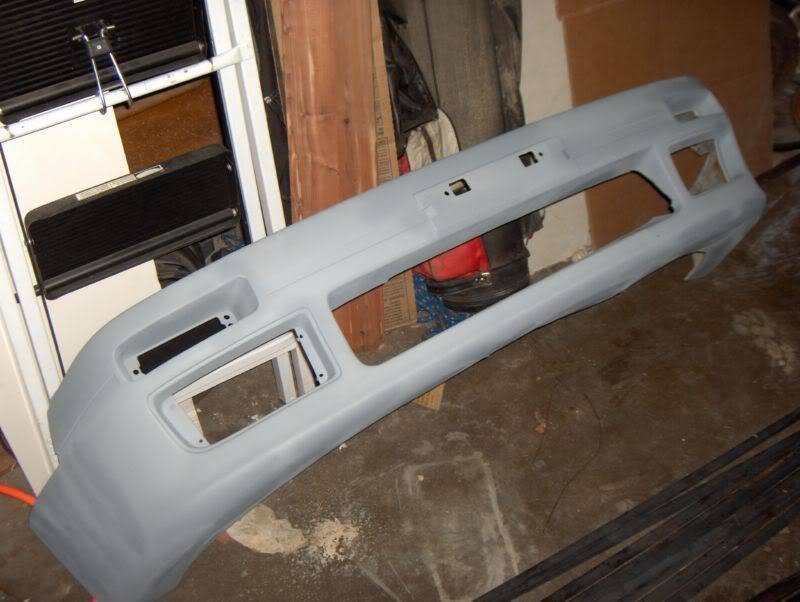
The method below can be used for bumpers, lips, side skirts, etc. I'm no expert on this, but it has worked for me in the past and I was happy with how everything turned out. This is the part I started with, which was originally 6 pieces.  Step 1 Pick up some plastic weld epoxy. This can be found at most auto parts stores. I got mine from NAPA for about $6. It is a 2 part epoxy that once mixed will form a bond with incredible strength. For my application I used about 7 tubes of this.  Step 2 Prep each joint by filing down the edge to about a 45 degree angle. This will help with speading out the epoxy and getting the most surface area for the repair to bond to. I chose to use a 12" flat file, it worked really well and rather quickly. Also sand around each joint about 2" so that you are bonding plastic to plastic. I chose to use 80 grit to start with and I also sand the back of each joint. If you have a crack that you are fixing, I like to drill a small 1/8" hole at the end of the crack to help minimize the chance of the crack spreading after the repair has been made.  Step 3 When joining 2 pieces I chose to use a couple zipties to temporarily hold the part in place while I apply the epoxy. Squeeze out the plastic epoxy onto some cardboard or something similar. Mix the 2 parts together and you will have about 2 minutes to work with until it starts setting up. Once you get the initial epoxy put on, let it setup, then you can remove the zipties and finish filling the joint.  Step 4 Make sure to also epoxy the back of the part. I chose to lay it on pretty heavy where I can. Most of the front lip doesn't actually touch the bumper so I was lucky there.  Step 5 In spots where the repair WILL NOT be noticed I like to drill some holes, run zipties through it, then epoxy right over it. This adds a good amount of strength and it won't really be seen.  Step 6 This is pretty much where it really sucks. Now all the extra epoxy needs to be sanded smooth and blended in. I like to start out with 80 grit to get the majority of the extra epoxy. The first sanding you just want to get it smooth again, and you will be doing several small skim coats to get it perfectly smooth. I used a flexible 6" body filler spatula thing and it worked out great. Once you have it all smooth you can step up to the 120 grit. Sand the entire part smooth, filling in any imperfections with more skim coats of the epoxy. Eventually you will go up to 220 grit, then eventually to 400 grit wet sand. Once that's all done, you will have something like this. Keep in mind that just these 2 joints took me about 5 hours to fix. Throw some primer on it and it's ready to go.  This took me about 15 hours to fix and it will be painted on sunday, thanks to my sponsor Underground Paintwerks.  |

|

|
| Sponsored Links |
|
04-29-2009, 07:49 PM
|
#2 |
|
Zilvia FREAK!
 
Join Date: Aug 2003
Location: Springfield, Mo
Posts: 1,519
Trader Rating: (2)
Feedback Score: 2 reviews
|
you can feather your edges out a lot more. And i dont think leaving the zipties in is a good idea. Its also not a bad idea to identify the plastic and maby get a repair kit for the particular type of plastic. Im glad we have a write up on this, just make sure its right.
__________________
89 240sx hatch #933-the hot rod 91 240sx coupe #131,603-the daily |
|
|
|
|
04-29-2009, 08:02 PM
|
#5 | |
|
Zilvia Addict
Join Date: Oct 2005
Location: Twin Cities
Age: 44
Posts: 893
Trader Rating: (0)
Feedback Score: 0 reviews
|
Quote:
|
|
|
|
|
|
04-29-2009, 08:04 PM
|
#6 | |
|
Zilvia Addict
Join Date: Oct 2005
Location: Twin Cities
Age: 44
Posts: 893
Trader Rating: (0)
Feedback Score: 0 reviews
|
Quote:
|
|
|
|
|
|
04-29-2009, 08:40 PM
|
#7 |
|
Post Whore!
 
Join Date: May 2006
Location: where waldo is
Age: 43
Posts: 3,267
Trader Rating: (16)
Feedback Score: 16 reviews
|
you should start with 180 grit sand paper instead of using 80. 80 is a bit too rough it still leaves scratches. and then move to 220 after that and so on.
plastic welds are the shiit i've used them that alot but there are better plastic epoxy welds and they are better than ones at the auto stores. industrial plastic epoxy welds are better and are stronger than the ones you've used. since youre local you can holla at me on d-town. when youre not busy give a holla i'll give some tips and tricks of what i've learn over the years.
__________________
18g and 20g turbo users click on me http://zilvia.net/f/tech-talk/261219-18g-20g-turbo-users.html 
Last edited by s13silvia123; 04-30-2009 at 10:07 AM.. |
|
|
|
|
04-30-2009, 07:22 AM
|
#10 |
|
Post Whore!
 
Join Date: Mar 2003
Location: New Jersey
Age: 44
Posts: 5,013
Trader Rating: (1)
Feedback Score: 1 reviews
 |
i did this with a zenki gracer lip as well. the epoxy ripped away from the cracked lip after about two weeks of scraping it on stuff. the big old mass of epoxy was still intact, including a ton of smeared epoxy holding it together on the backside, similar to how you have yours.
second time around, i ditched the epoxy and used 3m window weld. i used a whole tube of it and even caked in the area on the backside of the lip. it has held up very well. i believe its ability to flex makes it superior to epoxy for something like a lip. imo, epoxy is better suited for stuff that doesnt get dragged on the ground or need much flex. i used it to repair greddy sideskirts that were cracking down the middle. stop drilled the crack with a small drill bit and filled the hole, the crack and smeared the backside with alot of epoxy for strength. it has held up perfectly. |
|
|
|
|
04-30-2009, 12:29 PM
|
#12 |
|
Guest
Posts: n/a
|
dude, you guys are wasting time with that off the shelf cheap shit...
google "lord fusor" they make some pretty good adhesives THAT ARE SPECIFIC for the types of materials you are bonding to. many body shops use this stuff, or 3m products. off the shelf stuff is WEAK |
|
|
|
04-30-2009, 04:48 PM
|
#15 |
|
Zilvia FREAK!
|
i just fixed my friends abs plastic lip last night using a sodering iron.
made some stitches first then spread the plastic evenly feels solid again needs some prep work before paint lip was broken into 2 pieces and now back into 1 piece 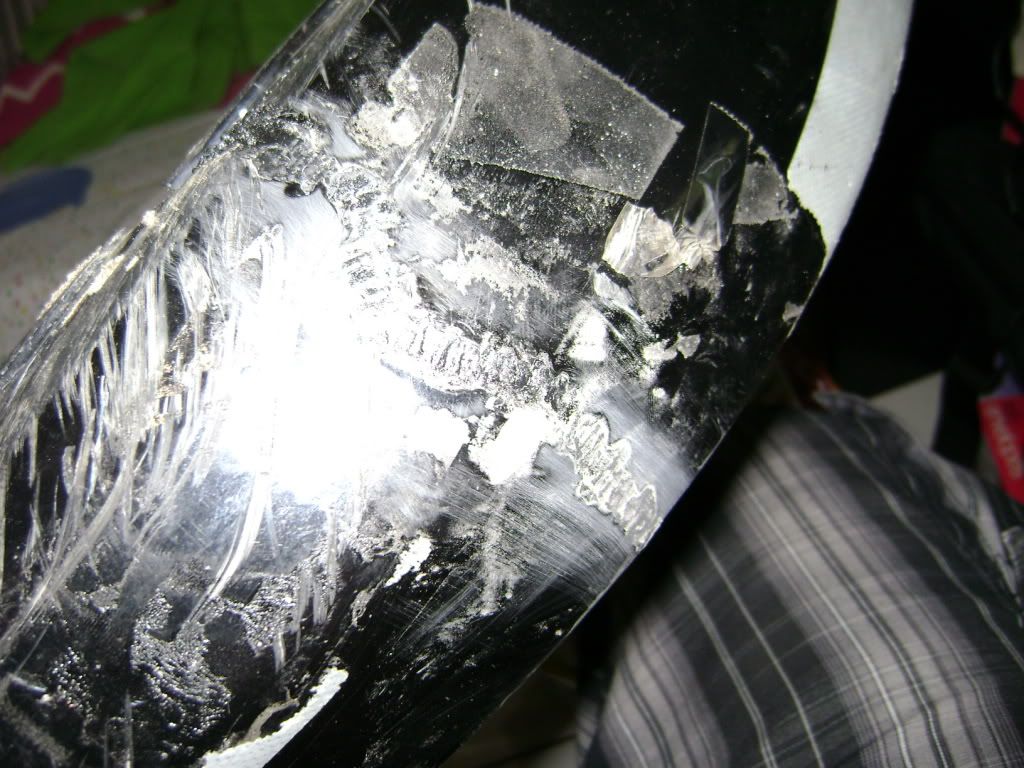 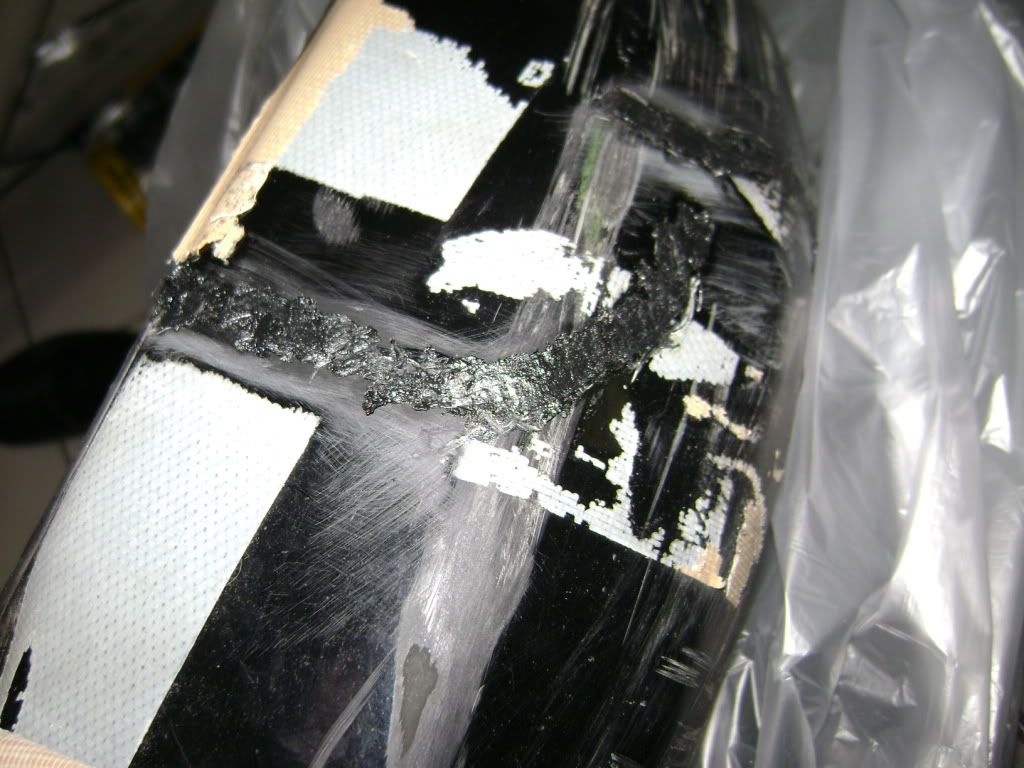 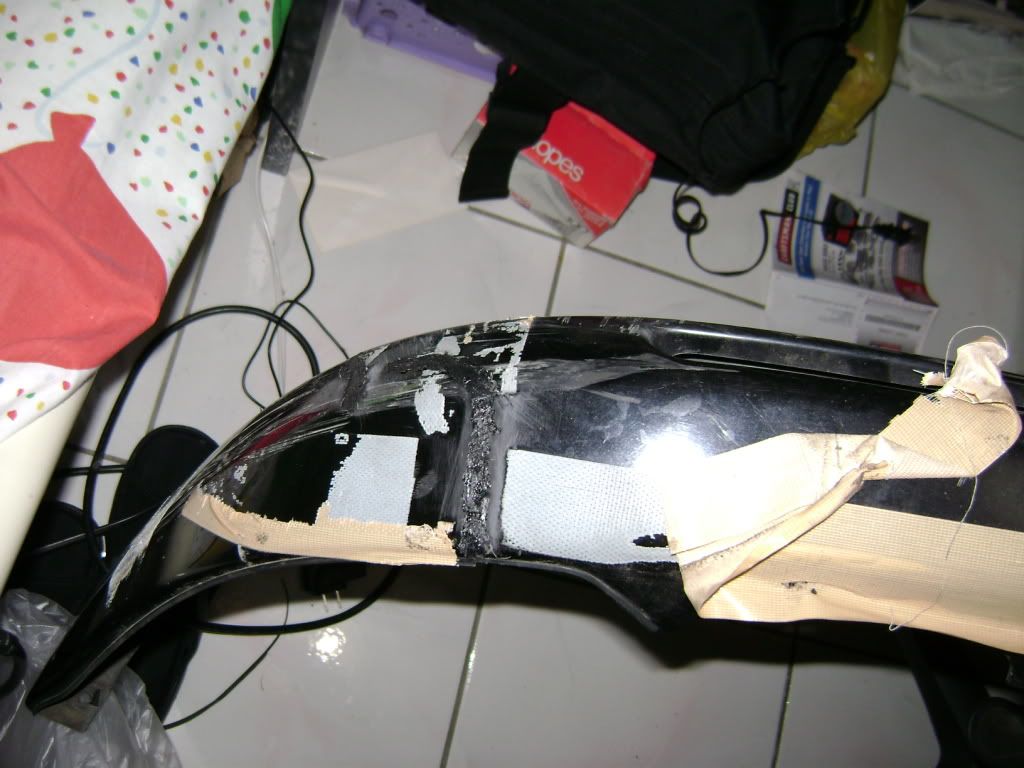 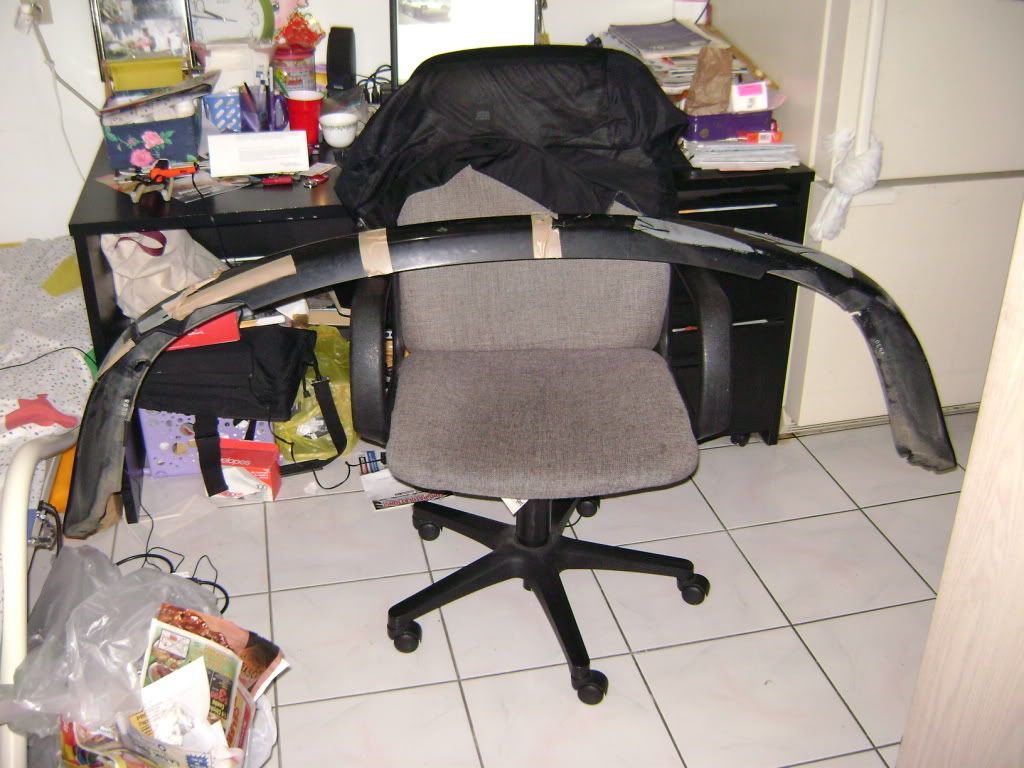 |
|
|
|
|
04-30-2009, 05:06 PM
|
#16 |
|
Zilvia FREAK!
Join Date: Aug 2003
Location: Springfield, Mo
Posts: 1,519
Trader Rating: (2)
Feedback Score: 2 reviews
|
180 grit is the recommended grit. I Feather edge pretty far, so that i can rebuild the area with the plastic fillers(3M EZ-Sand i like the most)... I then use an adhesion promoter, and let dry for about 10 minutes.I also like to apply a mesh or plastic sheet along with the filler on the back side for strength. The I apply filler and sand up to the desired finish. But good to see ppl repairing those old lips instead of tossing em out. my

__________________
89 240sx hatch #933-the hot rod 91 240sx coupe #131,603-the daily |
|
|
|
|
05-01-2009, 01:46 PM
|
#20 |
|
Banned from the Marketplace
|
You can go to HF and get one of those plastic welders.
it's pretty simple to use and it comes with plastic rods that you fuse with what you're welding. it worked good when i cracked my piggy lip before. |
|
|
|
|
05-02-2009, 01:46 PM
|
#22 | |
|
Premium Member

Join Date: Jan 2005
Location: Cali
Age: 56
Posts: 1,371
Trader Rating: (29)
Feedback Score: 29 reviews
|
Quote:
- Harbor Freight Tools - Quality Tools at the Lowest Prices I have thought about trying one of these to see if they work. What is one more type of welding?...lol |
|
|
|
|
|
05-21-2010, 10:29 AM
|
#25 | |
|
BANNED
 Join Date: Nov 2007
Location: Doylestown, PA
Age: 37
Posts: 468
Trader Rating: (3)
Feedback Score: 3 reviews
|
Quote:
|
|
|
|
|
|
05-21-2010, 10:49 AM
|
#26 | ||
|
Post Whore!
Join Date: Aug 2009
Location: Tampa/Bangkok
Posts: 3,431
Trader Rating: (77)
Feedback Score: 77 reviews
|
Quote:
Quote:
|
||
|
|
|
|
05-21-2010, 11:44 AM
|
#27 | |
|
Premium Member
Join Date: Jan 2005
Location: Cali
Age: 56
Posts: 1,371
Trader Rating: (29)
Feedback Score: 29 reviews
|
Quote:
 Good luck |
|
|
|
|
|
05-24-2010, 11:36 AM
|
#29 |
|
Zilvia Addict
|
I've always wanted a reason to buy one of those Harbor freight plastic welders....are they easy to use? Look like they'd be awesome for OEM aero and bike fairings...
__________________
WTB: PAIR 18x10 0 to -25, less than $1500 shipped please. |
|
|
|
|
| Bookmarks |
| Thread Tools | |
| Display Modes | |
|
|


 MORE BACON STRIPS


 Linear Mode

