|
|||||||
| Home | Rules & Guidelines | Register | Member Rides | FAQ | Members List | Social Groups | Calendar | Mark Forums Read |
| Tech Talk Technical Discussion About The Nissan 240SX and Nissan Z Cars |
|
|
Thread Tools | Display Modes |
 05-04-2008, 10:25 AM
|
#1 |
|
Post Whore!
 
Join Date: Jul 2007
Location: Simi Valley, CA
Age: 42
Posts: 9,006
Trader Rating: (106)
  Feedback Score: 106 reviews
|
Irregular idle fix KADE
I have been promising for a while to do a write-up on how to fix your wandering/high idle. For many of us we clean the AAC/IACV valves by spraying carb/intake cleaner down the tube to our heart's content but still have a high/irregular idle. The trick to curing this is a ground, but not a ground for any of the idle control valves as they are grounded through their cases. This is a sensor ground. The coolant temp sensor, TPS, one of the switches/sensors under the intake, and probably others share a common ground wire. Over time for whatever reason this ground is no longer enough for the sensors to send consistent and sccurate signals anymore. The solution to this problem is to splice in an extra ground, which sounds easier than it actually is. I have done this to 2 cars with idle problems now and it fixed both of them.
TOOLS REQUIRED 1: razor blade 2: wire cutters 3: wire stripping/crimping tool 4: 10mm wrench 5: soldering iron (reccomended) SUPPLIES REQUIRED 1: electrical tape 2: blue butt connector 3: blue eyelet connector for a 6mm bolt (10mm head) 4: 3 feet or so of 10 ga wire 5: solder (reccomended) 1: Cut open the harness (as shown in the pics below) and expose the 4-wire ground splice. 2: Cut out the factory crimp connector and strip the wires. Cut it to leave as much length on the wires as possible. 3: Find a length of wire, I would reccomend at least 10 guage, that is a couple feet long and strip it as well. 4: There will be 3 wires on one side and one wire on the other. Twist the 3 wires together (to go on one side of the butt connector). Twist your new ground wire together with the one wire all by itself (to go on the other side of the butt connector). 5: Butt connect the wires using an appropriate crimping tool. This step will be harder than it sounds as you will have to pull the part of the harness that goes to the coolant sensor closer to the rest of the harness to butt connect it. 6: I would HIGHLY reccomend that you solder the wires in the connector for durability and better connection. I really just use the butt connector to hold the wires together so it is easier to solder. 7: There will be some extra length of wire in the harness that goes down to the coolant sensor now as the ground is a bit shorter. Wrap this extra length around the harness and tape the harness back together using the factory insulation. 8: Find an adequate ground point and cut the wire to length. Take it to the chasis (on the strut tower) if your battery is relocated. If your battery is in the stock location then just take it straight to the negative post. 9: Crimp on your eyelet connector and you're ready to go! 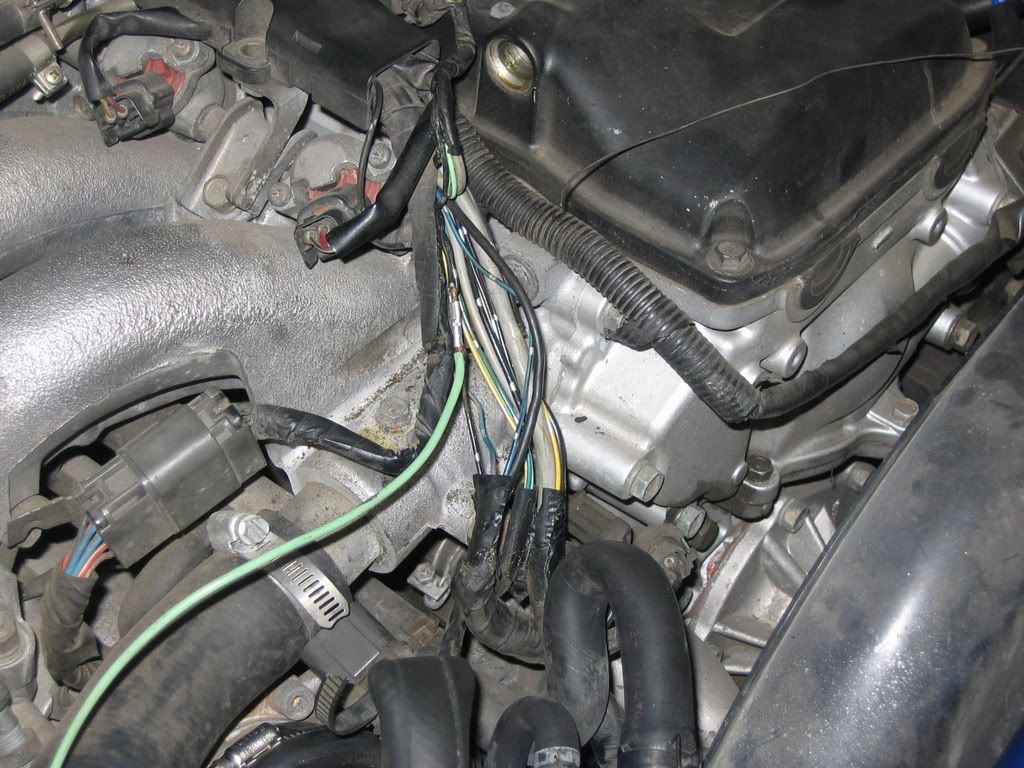  |

|

|
| Sponsored Links |
| Bookmarks |
| Thread Tools | |
| Display Modes | |
|
|


 Threaded Mode