|
|||||||
| Chat General Discussion About The Nissan 240SX and Nissan Z Cars |
 |
|
|
Thread Tools | Display Modes |
 11-20-2007, 12:41 AM
|
#31 |
|
Zilvia.net Advertiser
 Join Date: Apr 2003
Location: Dayton Ohio
Age: 43
Posts: 545
Trader Rating: (4)
  Feedback Score: 4 reviews
 |
another way thats pretty easy to get those collars out is the air hammer with a nice sharp chisel bit in it. it will slice them and knock them out. My press is so haggard and dangerous i use my nice vice to press them back in. After doing bushings once or twice its alot faster moving.
the hyper flex is the master set for the s13. its really not all that expensive. i have a special on them in the advertising section. its worth every penny as it makes the car more stable and tight.
__________________
http://www.forcedfabllc.com/ |

|

|
| Sponsored Links |
|
11-20-2007, 08:02 AM
|
#32 |
|
Post Whore!
 Join Date: Sep 2002
Location: Arden, NC
Age: 40
Posts: 4,460
Trader Rating: (1)
Feedback Score: 1 reviews
|
I bought the rear suspension kit from Autozone. It only has all the rear bushings!
__________________
My 240 vBgarage |
|
|
|
|
11-20-2007, 08:08 AM
|
#33 | |
|
Zilvia FREAK!
 
Join Date: Oct 2003
Location: Long Island, NY
Age: 40
Posts: 1,358
Trader Rating: (0)
Feedback Score: 0 reviews
 |
Quote:
|
|
|
|
|
|
11-20-2007, 08:19 AM
|
#34 |
|
Zilvia Junkie
Join Date: Jul 2007
Location: Long Island, NY
Age: 40
Posts: 568
Trader Rating: (0)
  Feedback Score: 0 reviews
|
this should definitely be stickied, everyone needs to know this, especially since a large percentage of the s13's are on the brink of antique status. everyone should read this writeup!
__________________
1993 KA24DE for sale with 180k..running when pulled.... need to get rid of ASAP...i'm moving |
|
|
|
|
11-20-2007, 08:34 AM
|
#35 | |
|
Zilvia FREAK!
Join Date: Oct 2003
Location: Long Island, NY
Age: 40
Posts: 1,358
Trader Rating: (0)
Feedback Score: 0 reviews
|
Quote:
|
|
|
|
|
|
11-20-2007, 08:38 AM
|
#36 | |
|
Guild of Skullduggerous Intent
 
|
Quote:
|
|
|
|
|
|
11-20-2007, 08:56 AM
|
#38 | |
|
Post Whore!
Join Date: Sep 2002
Location: Arden, NC
Age: 40
Posts: 4,460
Trader Rating: (1)
Feedback Score: 1 reviews
|
Quote:

__________________
My 240 vBgarage |
|
|
|
|
|
11-20-2007, 09:43 AM
|
#39 |
|
Guild of Skullduggerous Intent
|
 WAIT!! Stop the press! WAIT!! Stop the press!This thread prompted me to do some digging. I found out that Courtesy Nissan sells two ES bushing kits for the S14: Energy Suspension Master Bushing Set - 1995 to 1998 240SX for $115 which is what I bought and doesn't come with the rear arm bushings [Part # 7-18103G] and Energy Suspension HYPER-FLEX System Complete Master Bushing Set for $99 that comes with the rear arm bushing set(!!). Part # 7-18107G Just got off the phone with Customer Service and will be returning the Master Set in exchange for the Hyper Flex Set. It's a good thing I only opened the box and didn't tear any of the packaging.  |
|
|
|
|
11-27-2007, 04:00 PM
|
#41 |
|
LAID OUT
 
Join Date: Mar 2004
Location: LAS VEGAS
Age: 43
Posts: 2,015
Trader Rating: (1)
Feedback Score: 1 reviews
|
Any other brands of solid subframe bushings I should look into? SPL, Bings are about the only two I'm aware of right now.
Also what about the diff bushings, are these part of the ES kit? Are they available as solid press ins? |
|
|
|
|
11-27-2007, 04:39 PM
|
#42 | |
|
Zilvia FREAK!
Join Date: Oct 2003
Location: Long Island, NY
Age: 40
Posts: 1,358
Trader Rating: (0)
Feedback Score: 0 reviews
|
Quote:
|
|
|
|
|
|
11-27-2007, 06:36 PM
|
#43 | ||
|
Guild of Skullduggerous Intent
|
Quote:
From ES site: Quote:
http://energysuspension.com/pages/nis1.html |
||
|
|
|
|
11-27-2007, 06:41 PM
|
#44 |
|
Zilvia.net Advertiser

Join Date: Jul 2006
Location: Concord, NC
Posts: 3,127
Trader Rating: (53)
Feedback Score: 53 reviews
|
Cool thread here is my contribution;
http://www.240sxtechdvds.org/subfram...stall_dvd.html http://www.NIPerformance.org Nissan-Infinti Performance Parts Last edited by JDS Performance; 12-12-2007 at 11:48 AM.. |
|
|
|
|
12-11-2007, 06:10 PM
|
#45 |
|
Guild of Skullduggerous Intent
|
Bringing it back since I'm finally getting to putting everything back together. Got the ES bushings pressed in a couple of weeks ago.
Did the rear this weekend.  Anyone else had a bitch of a time getting the swaybars back on? Quick question on the endlink bushings. The instructions included weren't very helpful so this is how I set up the bushings - the 'nippled' ones on the bottom facing each other and the other two on top round sides facing each other:  I'm curious to see how others set them up. Pics or diagrams and reasoning would be helpful. Only managed to get the front swaybar - again, a royal PITA - installed but the rest of the fronts should be cake. How did you guys set up the front swaybar endlinks? |
|
|
|
|
12-11-2007, 07:45 PM
|
#46 |
|
LAID OUT
Join Date: Mar 2004
Location: LAS VEGAS
Age: 43
Posts: 2,015
Trader Rating: (1)
Feedback Score: 1 reviews
|
My whitelines were weird and they didn't give me good instructions either..
BTW got my subframe bushings done over the weekend too. All you guys screwing around with torchs and sawsalls, you are wasting major time! I think we were all done in an hour or so at the shop using a press. Press out the old bushings, then just hammer in the new (frozen) bushings with a little grease.  Can't wait to get the z32 stuff & arms bolted up... This weekend hope to get it in. BTW this is a great thread thanks for making/contributing guys.. |
|
|
|
|
12-11-2007, 08:04 PM
|
#47 | |
|
Zilvia.net Advertiser
Join Date: Jul 2006
Location: Concord, NC
Posts: 3,127
Trader Rating: (53)
Feedback Score: 53 reviews
|
Quote:
 |
|
|
|
|
|
12-11-2007, 08:08 PM
|
#48 | |
|
Zilvia FREAK!
Join Date: Oct 2003
Location: Long Island, NY
Age: 40
Posts: 1,358
Trader Rating: (0)
Feedback Score: 0 reviews
|
Quote:
Glad to see more people replacing these old bushings  |
|
|
|
|
|
12-11-2007, 08:15 PM
|
#49 |
|
Zilvia Junkie
|
Easiest way to install the bushings is to use a large bolt, 2 washers, and a nut. Use an impact or wrench and you got a mini press
 I wish I would've bought a press instead of burning and cutting. What a waste of time and pain in the ass. |
|
|
|
|
12-12-2007, 11:47 AM
|
#51 | |
|
Zilvia.net Advertiser
Join Date: Jul 2006
Location: Concord, NC
Posts: 3,127
Trader Rating: (53)
Feedback Score: 53 reviews
|
Quote:
http://www.240sxtechdvds.org/subfram...stall_dvd.html [ame]http://www.youtube.com/watch?v=wbUpHjPwLjk[/ame] |
|
|
|
|
|
12-12-2007, 01:53 PM
|
#52 |
|
Guild of Skullduggerous Intent
|
So no one else has the ES swaybar bushings on? These were a pain to install. For future referance: I threaded the bolt in first and then used a jack to push to push up the bushing/sleeve up so that I could thread the nut back on; these method worked the best for me.
|
|
|
|
|
12-18-2007, 04:28 PM
|
#53 |
|
Guild of Skullduggerous Intent
|
Update: got the front done and everything back together. Got an alignment done yesterday at the Sears near my work.
On an aside, the guy at Sears didn't want to do my alignment since the front and back wheels weren't the same (I have stocker SEs on the front and R33s on the back) and didn't want to touch the RUCAs. Stock height too. I'll be staying away from Sears from now on. Impressions: I had/have some rubbing issues with the rotors and shields that I'm still sorting out and the car is pretty rough on bumpy roads. Need to take a closer look at it this weekend. Overall though, the steering feel is nice, 'heavy' and predictable. Still gotta do solid bushings on the subframe and get better shocks but so far I'm happy. Now I just gotta figure out this rubbing business. |
|
|
|
|
12-20-2007, 12:33 AM
|
#54 | |
|
LAID OUT
Join Date: Mar 2004
Location: LAS VEGAS
Age: 43
Posts: 2,015
Trader Rating: (1)
Feedback Score: 1 reviews
|
Quote:
Regarding Energy Suspension bushings for the rear uprights.. You can use a ball joint press (toolkit) from Checkers to press out the old rubber bushings and press in the ES poly bushings... Instead of the burn/hacksaw method. It costs a $200 deposit to borrow it, plus you can install some new Sentra LCA ball joints at the same time. I haven't seen this method written in my searching so I thought I'd share... The ball joint c-clamp style press works great if you don't have access to a shop press... I used an electric impact, guess it would work alright with just a ratchet too.  Tips... When you press out the old bushings, try to find a long impact socket with a diameter just slightly smaller than the upright bushing bore diameter. Press this through the bushing bore, so you can press out the rubber bushing and metal sleeve at once and save yourself tons of time hacksawing (feel bad for you guys who do all bushings like that). Next hurdle, to get the ES bushings in. It's damn near impossible to press the ES bushings in "normally". Take the metal pipes out of your bushings (3 per side) then cut the poly part in half, right through the middle (smallest) diameter. I used a superheated razor blade and vice grips to slice through them. If you're not a pyro then a jigsaw or sawsall or dremel would work nice too.... 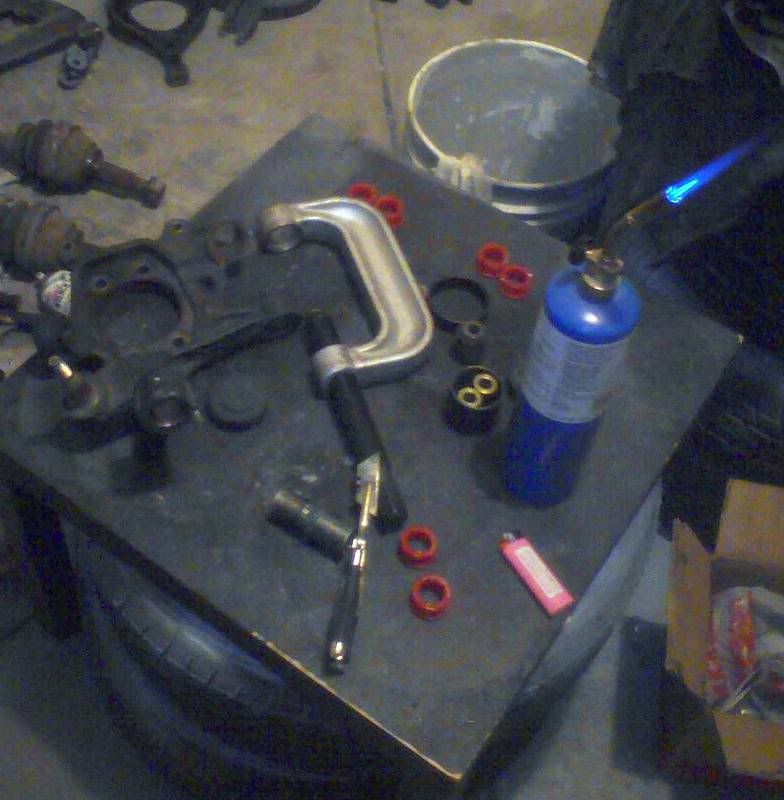 Now slip in one of the poly halves, just press on it with your finger until it gets cockeyed, then use a flatblade to straighten it out. It should drop it right in, so do the other side.... Get the metal pipe started, then use the C-Clamp to press it in fully. Make sure you have something solid on the other side otherwise you'll just press the other bushing half out. 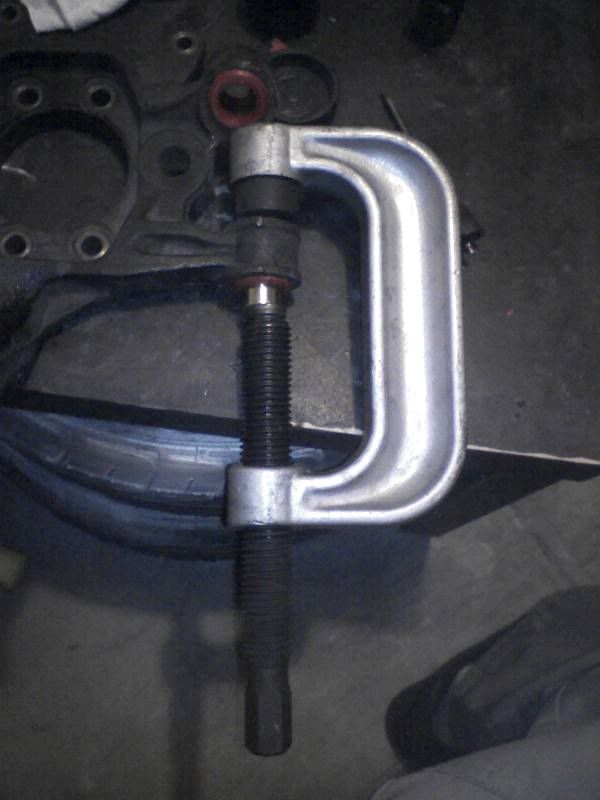 Do the same process on all 6 bushings.... Put all the shit away, take the toolkit back to checkers and get your $200 back! 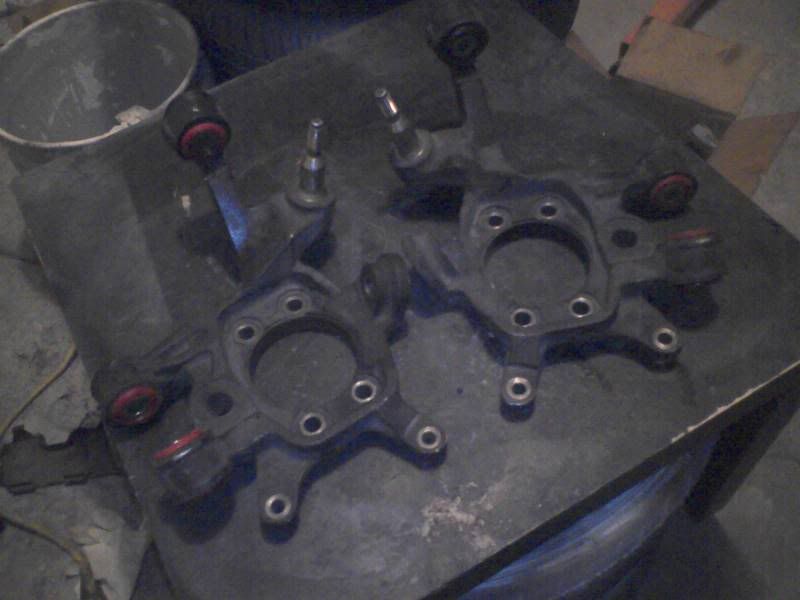 Congratulate yourself on a job well done with a cup of top of the line wine, carlos rossi!! |
|
|
|
|
|
01-04-2008, 08:35 AM
|
#55 |
|
Zilvia FREAK!

|
dam makes me want to do this.
but i just want to change the uprights, and front and rear lower control arm bushings any recommendations? thinking of buying the uprights from powertrix and front lower they have from courtesy? this is for my s13. will the s14 master hyper flex set work?
__________________
fS! vlsd ! slim fans ! hid kits ! lug nuts ! http://www.zilvia.net/f/search.php?d...earchuser=bo2o ^^^click^^^ |
|
|
|
|
01-04-2008, 11:11 AM
|
#56 | |||
|
Guild of Skullduggerous Intent
|
Quote:
Would you mind chiming in with your impressions when you get the car on the road again? Quote:
Quote:
------------------------------------------------------------------- I hadn't bother to post anymore on this thread because it appeared to be dead but I guess I'll give a bit of an update. I'm still having slop in the rear. The old front passanger subframe bushing is just trashed and neither metal collars or a combination of collars and pineapples haven't done the trick. Thus, I got SPL solid bushings for the subframe and diff coming in and should be installing them soon weather permitting. |
|||
|
|
|
|
01-04-2008, 12:03 PM
|
#57 | |
|
Zilvia FREAK!
Join Date: Oct 2003
Location: Long Island, NY
Age: 40
Posts: 1,358
Trader Rating: (0)
Feedback Score: 0 reviews
|
Quote:
|
|
|
|
|
|
01-14-2008, 01:53 PM
|
#58 |
|
Guild of Skullduggerous Intent
|
UPDATE:
SPL bushings for the diff and subframe arrived last week and went into the car this past weekend. Aside from time consuming, the process was fairly linear: I managed to remove and install the subframe bushings on Sat and finished the diff and rest on Sun. Ass up in the air:  After a few hours or work - subframe is out:  The main reason for the work: Driver side front subframe bushing  Passanger side, knew it was bad but didn't know just how bad:  Burning the old bushings out. I tried popping the collars as suggested but that didn't work for me so I used the old sawing technique.  Used a tool to push brake pistons and some washers (Pep Boys or Autozone sells them ~$20 iirc) for the subframe bushings. Bolt was too thick for the diff bushings so I rummaged through my bolt bucket and used what appeared to be a bolt from an alternator or AC unit with a 14mm nut (no pics, too dark by then)  Next day all ready to install. Used a wire brush and some shop towels with Liquid Wrench to do a quick clean up:  I did this all by myself without help which I don't recommend doing but shows that it can be done. Driving Impressions: Went to grab some food/test the car on Sunday and brought the car to work today. The rear of the car feels a whole lot more solid and 'planted'. No more wandering around, better grip. The bad: vibration and noise. Not friendly to bad roads (I drive on the 405). Overall, a huge improvement but not great for a daily. I've daily driven cars with modded suspension in the past so I'm not complaining. I still need to thinker some more with the front and alignment. This is on 17X9 rears and stocker fronts; stock open diff and cruddy oem struts. |
|
|
|
|
01-14-2008, 02:06 PM
|
#59 |
|
Zilvia.net Advertiser
Join Date: Jul 2006
Location: Concord, NC
Posts: 3,127
Trader Rating: (53)
Feedback Score: 53 reviews
|
looking good - if you have a noise/vibration problems you need a set of our Custom Hard Rubber Inserts! www.NIPerformance.org
|
|
|
|
|
01-14-2008, 02:11 PM
|
#60 |
|
LAID OUT
Join Date: Mar 2004
Location: LAS VEGAS
Age: 43
Posts: 2,015
Trader Rating: (1)
Feedback Score: 1 reviews
|
^ awesome post. I did my subframe this past weekend also! Car feels excellent, alignment is way out though tomorrow that will be fixed. Props to you doing it all yourself!! I dropped the old subframe myself but definitely needed help to get the new one in. Getting it all the way up was a major pain, the front studs kept binding. I ended up getting it done by putting the nuts on and tightening the subframe evenly.
Just need to sort out my z32 ebrake cable problem the passenger side is about 3" too long  |
|
|
|
|
| Bookmarks |
|
|


 Linear Mode

